


0 of 0
About this mod
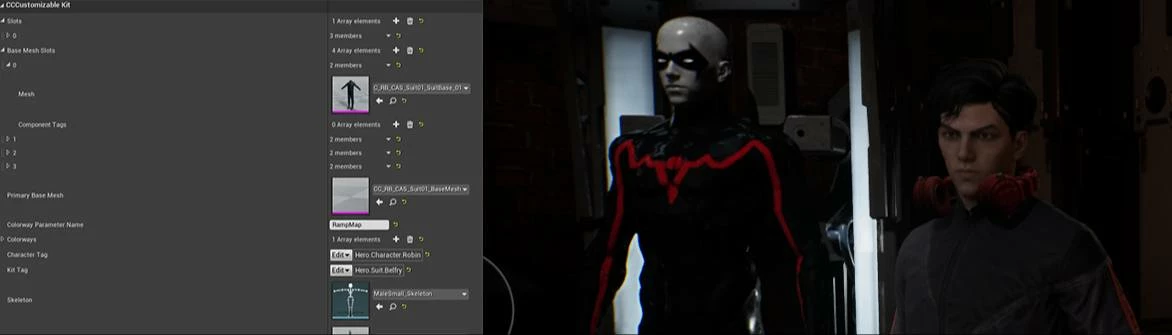
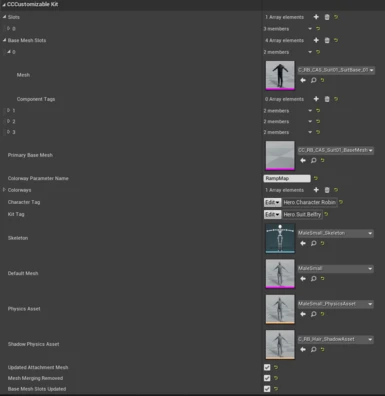
Allows you to make character recipe mods for the updated version of the game. A module for Unreal projects that contains a C++ class made to mimick the script used by the game for the recipe assets (CCCustomizableKit)
- Requirements
- Permissions and credits
This Unreal Editor module allows you to make character recipe mods for the updated version of the game.
Disclaimer: This is a much longer process, compared to how mods were made before the latest update to the game.
You will need a compiled version of UE 4.25 Plus (Can be obtained through Epic/Unreal Engine's GitHub) and an Unreal Project set up for modding the game (You can probably start with the template already uploaded to Nexus here)
Protip: Allow cooked assets to be edited by commenting out the below in AssetEditorSubsystem.cpp before building your Unreal Engine solution.
AssetEditorSubsystem.cpp (Found in Unreal Folder/Engine/Source/Editor/UnrealEd/Private/Subsystems):
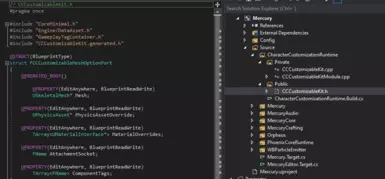
Once you have your UE Project set up, you can add this module (The folder CharacterCustomizationRuntime) to your projects source folder (Project Folder/Source)
Remember to add the module to your projects .uproject file and Build.cs, like so:
(My project name is: Mercury, like the game project.)
Project.uproject (Found in Project Folder):
Project.Build.cs (Found in Project Folder/Source/Project Name):
If you cant find it, your project probably doesn't have code enabled. Create a dummy C++ class from the editor to enable code for your project (File > New C++ class)
Rebuild your project in Visual Studio after adding the module and adjusting the above files. After this your project will support the data assets the game uses for character recipes, meaning you can export the assets and edit them (with UAsset or whatever tool you prefer). Additionally, if you enabled cooked assets to be edited, you can edit the assets directly in the editor after importing them.
To add the edited assets to your project, you need to allow cooked assets in your project (Different from the pro tip above)
In your projects DefaultEngine.ini make sure the following options are set:
DefaultEngine.ini (Found in Project Folder/Config):
Last but not least you need to define Gameplay tags for your project. I don't have a full list of all the tags the game uses, but it's pretty easy to figure out (If you import an asset/recipe with a missing gameplay tag it will tell you. They are also visible in the JSON data from FModel)
Below are my current tags.
DefaultGameplayEngine.ini (Found in Project Folder/Config):
Now you can import assets/recipes to your project by moving the files directly into your projects content directory (Project Folder/Content/Character/Recipes/...)
You will need dummy assets for everything the recipe references, but once you have that you can cook and export without issue.
Disclaimer: This is a much longer process, compared to how mods were made before the latest update to the game.
You will need a compiled version of UE 4.25 Plus (Can be obtained through Epic/Unreal Engine's GitHub) and an Unreal Project set up for modding the game (You can probably start with the template already uploaded to Nexus here)
Protip: Allow cooked assets to be edited by commenting out the below in AssetEditorSubsystem.cpp before building your Unreal Engine solution.
AssetEditorSubsystem.cpp (Found in Unreal Folder/Engine/Source/Editor/UnrealEd/Private/Subsystems):
if (UPackage* Package = Asset->GetOutermost())
{
// Don't open asset editors for cooked packages
/*if (Package->bIsCookedForEditor)
{
return false;
}*/
Once you have your UE Project set up, you can add this module (The folder CharacterCustomizationRuntime) to your projects source folder (Project Folder/Source)
Remember to add the module to your projects .uproject file and Build.cs, like so:
(My project name is: Mercury, like the game project.)
Project.uproject (Found in Project Folder):
{
"FileVersion": 3,
"EngineAssociation": "{0C28821A-4905-8381-A6B5-EDAD654EFDF1}",
"Category": "",
"Description": "",
"Modules": [
{
"Name": "Mercury",
"Type": "Runtime",
"LoadingPhase": "Default"
},
{
"Name": "CharacterCustomizationRuntime",
"Type": "Runtime",
"LoadingPhase": "Default"
}
],
"TargetPlatforms": [
"WindowsNoEditor"
]
}
Project.Build.cs (Found in Project Folder/Source/Project Name):
If you cant find it, your project probably doesn't have code enabled. Create a dummy C++ class from the editor to enable code for your project (File > New C++ class)
using UnrealBuildTool;
public class Mercury : ModuleRules
{
public Mercury(ReadOnlyTargetRules Target) : base(Target)
{
PCHUsage = PCHUsageMode.UseExplicitOrSharedPCHs;

PublicDependencyModuleNames.AddRange(new string[] { "Core", "CoreUObject", "Engine", "InputCore", "CharacterCustomizationRuntime"});
PrivateDependencyModuleNames.AddRange(new string[] {  });
// Uncomment if you are using Slate UI
// PrivateDependencyModuleNames.AddRange(new string[] { "Slate", "SlateCore" });

// Uncomment if you are using online features
// PrivateDependencyModuleNames.Add("OnlineSubsystem");
// To include OnlineSubsystemSteam, add it to the plugins section in your uproject file with the Enabled attribute set to true
}
}
Rebuild your project in Visual Studio after adding the module and adjusting the above files. After this your project will support the data assets the game uses for character recipes, meaning you can export the assets and edit them (with UAsset or whatever tool you prefer). Additionally, if you enabled cooked assets to be edited, you can edit the assets directly in the editor after importing them.
To add the edited assets to your project, you need to allow cooked assets in your project (Different from the pro tip above)
In your projects DefaultEngine.ini make sure the following options are set:
DefaultEngine.ini (Found in Project Folder/Config):
.....
[/Script/UnrealEd.CookerSettings]
cook.AllowCookedDataInEditorBuilds=True
s.AllowUnversionedContentInEditor=1
Last but not least you need to define Gameplay tags for your project. I don't have a full list of all the tags the game uses, but it's pretty easy to figure out (If you import an asset/recipe with a missing gameplay tag it will tell you. They are also visible in the JSON data from FModel)
Below are my current tags.
DefaultGameplayEngine.ini (Found in Project Folder/Config):
[/Script/GameplayTags.GameplayTagsSettings]
ImportTagsFromConfig=True
WarnOnInvalidTags=True
FastReplication=False
InvalidTagCharacters="\"\',"
NumBitsForContainerSize=6
NetIndexFirstBitSegment=16
+GameplayTagList=(Tag="CharacterKit.Archetype.MaleHeroic",DevComment="")
+GameplayTagList=(Tag="Hero.Suit.Belfry",DevComment="")
+GameplayTagList=(Tag="Hero.Character.Nightwing",DevComment="")
+GameplayTagList=(Tag="Hero.Character.Redhood",DevComment="")
+GameplayTagList=(Tag="Hero.Character.Robin",DevComment="")
+GameplayTagList=(Tag="Hero.Character.Batgirl",DevComment="")
+GameplayTagList=(Tag="Hero.Suit.Gotham01",DevComment="")
+GameplayTagList=(Tag="Hero.Suit.Gotham02",DevComment="")
+GameplayTagList=(Tag="Hero.Suit.Gotham03",DevComment="")
+GameplayTagList=(Tag="Hero.Suit.Gotham04",DevComment="")
+GameplayTagList=(Tag="Hero.Suit.Gotham05",DevComment="")
+GameplayTagList=(Tag="Hero.Suit.Gotham06",DevComment="")
+GameplayTagList=(Tag="Hero.Suit.Gotham07",DevComment="")
+GameplayTagList=(Tag="Hero.Suit.Gotham08",DevComment="")
+GameplayTagList=(Tag="Hero.Suit.Gotham09",DevComment="")
+GameplayTagList=(Tag="Hero.Suit.Gotham10",DevComment="")
+GameplayTagList=(Tag="Hero.Suit.Gotham11",DevComment="")
+GameplayTagList=(Tag="Hero.Suit.Gotham12",DevComment="")
+GameplayTagList=(Tag="Hero.Suit.Gotham13",DevComment="")
+GameplayTagList=(Tag="Hero.Suit.Gotham14",DevComment="")
+GameplayTagList=(Tag="Hero.Suit.Gotham15",DevComment="")
+GameplayTagList=(Tag="Hero.Suit.Gotham16",DevComment="")
+GameplayTagList=(Tag="Hero.Suit.Gotham17",DevComment="")
+GameplayTagList=(Tag="Hero.Suit.Gotham18",DevComment="")
+GameplayTagList=(Tag="Hero.Suit.Gotham19",DevComment="")
+GameplayTagList=(Tag="Hero.Suit.Gotham20",DevComment="")
Now you can import assets/recipes to your project by moving the files directly into your projects content directory (Project Folder/Content/Character/Recipes/...)
You will need dummy assets for everything the recipe references, but once you have that you can cook and export without issue.