


0 of 0


About this mod
Adds 100s of Workshop Construction items related to Settlement Structures. Includes special items like modular handrails with animation, modular skylights and metal trim, turret mounts, columns/posts/floor braces, sidewalks/steps, dirt/grass floors, ramps, "gap fillers"; in addition to standard things like walls and floors. 11 different materials.
- Requirements
- Permissions and credits
- Changelogs
- Donations
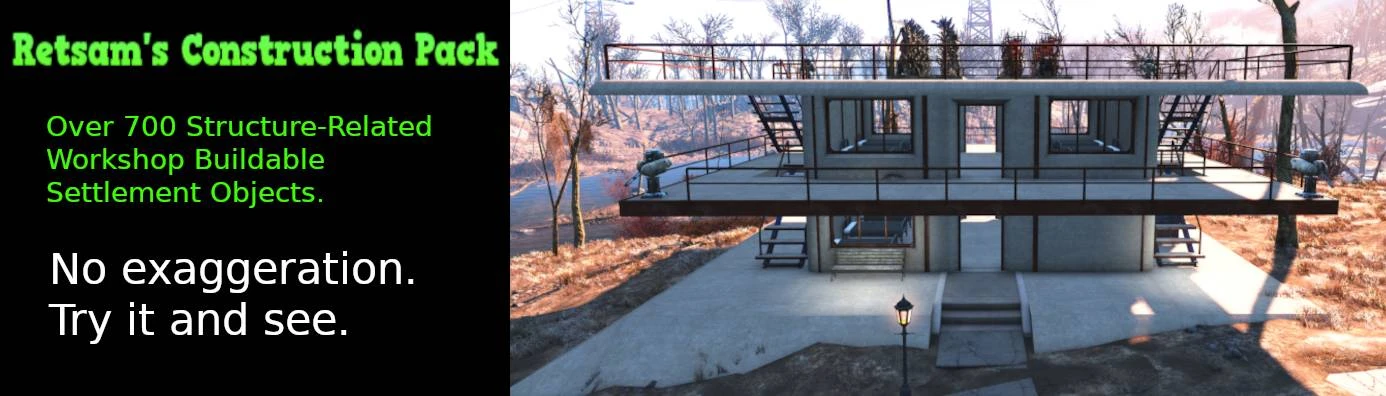
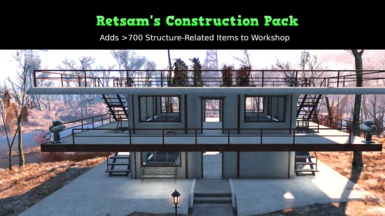
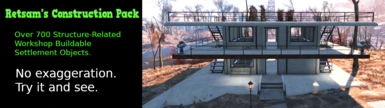
Retsam's Construction Pack
Adds 100s of Workshop Construction items related to Settlement Structures.
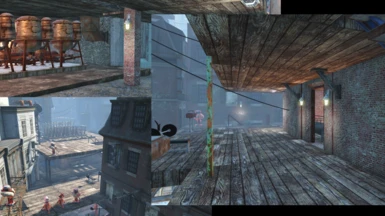
Most items are unique never-seen-before pieces that enable some very creative settlement buildings.
Categories include: Foundations; Floors; Gap Fillers; Wedges; Walls; Wall Top-caps, Wall End-caps; Columns; Posts; Steel Frames (skylights); Steel Trim (for floors), Floor Braces; Turret mounts; Steps; Stairs; Sidewalks; and Modular Handrails with idle animations.
Materials include: Steel, Wood, Clean Concrete (beige), Driveway Concrete (dirty), Castle Concrete (grey), Cinder-block (Covenant style), Red Brick (matches Hangman's Alley), Clean (Church) Stone, Old Stone, Dirt, Brown Grass, and Green Grass. Everything is in a variety of unique sizes and Navmeshed when required, and has proper material-type attributes.
This mod is something I have been working on for 5 months now and there is no exaggeration in the numbers. Last time I checked I had over 400 unique Nif models, and many of these use material swaps to create even more menu objects. TBH, I don't know exactly how many items I have. Last time I exported the list it was around 700.
More than enough for you to have new fun in an old game.
... This work has been more like a full-blown expansion pack than a mod. It is mods-in-a-mod.
They are all organized under the Workshop menu -> Structures -> Restsam's Construction. Should be last item in the list.
Requirements:
DLC1 (For textures)
Note About Textures and Mod Size:
I originally was including stand-alone copies of the textures in my mod bundle. But as the mod grew, this made it rather large, over 30 megs. So I changed my material files to point to the game's textures. This does make the mod significantly smaller (<2 megs), but also has the disadvantage of the possibility of another mod changing a texture or a texture missing due to a missing DLC that I overlooked as a requirement. In any case, if you have missing textures do post about it so I can address it.
Technical Note:
Files are named using the prefix: sag_ConcreteConstruction
First and Foremost:
I have no doubt that some where I goofed some thing. Sometimes I was working on this mod at 3 or 4 AM and considering there are literally hundreds of pieces, well, I'm sure I have a goof somewhere that I have missed. I have done my best to triple-check my work and most items I have used or at least tested in my own game. But other than some minor issues with connection-points and vanilla pieces that I will detail below, I have not had any real issues. No missing textures, weird glitches, crashes etc. If you do find a real bug, post it. I will try to fix it. But be sure to read the details first. Some things are going to be what it is.
Most pieces have obvious uses, but I will outline some particular things about them at the end of this intro. It would be a good idea to read it. It might save you some confusion later. Fair warning though, it will be a long read. ;)
Credits:
Well Bethesda of course. I use their tools and textures, and a few of my pieces are just vanilla pieces with material swaps or a menu item added.
That being said, most of my pieces are my own original Nif creations.
But to be very clear, ALL my textures come from Bethesda. All credit (and complaints lol) goes to them.
I also want to give acknowledgment to two folks:
First is cartman1975, who made the Concrete Walls with Window Glass mod. https://www.nexusmods.com/fallout4/mods/18360
In the very beginning of this venture (months ago at this point) I had asked that person for permission to use one of their pieces and they very nicely said Yes. Although in the end that piece was replaced and none of their work is actually in this mod, I think I should mention this as a Thanks for the willingness to share.
Next is another person who gave me assistance in the beginning of this venture: pepperman35 who gave me some help via the forum. This person even went so far as to provide me with a couple of models they modified for me. Over time I learned enough in Blender to make my own models and that shared work was replaced, but I wanted to acknowledge that niceness of helping a beginner.
Installation and Removal:
Use Vortex. It eliminates a lot of issues. If you do a manual install, then I assume you know what you are doing and you are on your own.
Removal:
Well, this mod adds stuff to the game. A lot of stuff. But it does not touch scripts etc, just makes Workshop objects.
The standard rules apply:
First you should remove every instance of any objects created from this mod, including any stored in a workshop, and then you can remove the mod. Easy-peasy.
Issues:
No known major issues yet, but I'm sure someone will find something.
Something Important:
Good Modeling and Textures require a skill-set I don't have. I consider mine OK, but even I can see some things that are less than ideal. Some curves have visible flat areas, some textures have obvious seams, etc. Do Not open a bug ticket on that stuff cause it is what it is. As I get more experience I'll rework stuff, but I do not consider it a breaking issue.
Of course if there is a obvious issue, like a missing texture or such Do let me know.
Troubleshooting:
This mod inserts itself into the Workshop menu "Structures".
Technically Formlist "WorkshopMenu01Build"; ID 00106DA3
Any other mod that uses that is most likely going to be a mod conflict. If this mod, or another mod you were previously using, does not show up in your menu then most likely that is the case. You can confirm if it is mod conflicts by simply disabling a potential conflicting mod and load up your game and see the results. If you find a conflicting mod you can try rearranging load order, but I doubt that will solve the issue. Most likely you will have pick a mod to use and forget about the other or learn how to make your own patch. I hate saying it that way, but it is an unfortunate truth about the way Bethesda made the menus work. It happens often.
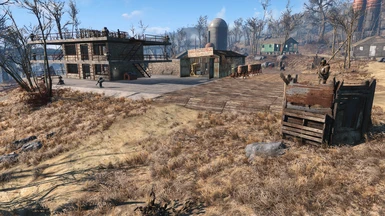
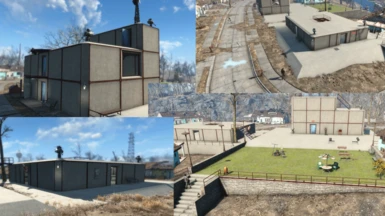
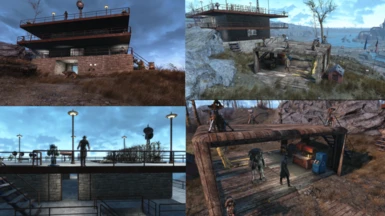
My Other Mods (You can see them in some of my Screenshots):
Guard Post Markers (plus Guards Display Weapons Fix)
https://www.nexusmods.com/fallout4/mods/71785
Retsam's Better Planters
https://www.nexusmods.com/fallout4/mods/74258
Retsam's Vendor Sales-Counter Spacer Blocks
https://www.nexusmods.com/fallout4/mods/74013
Coming Soon:
I have several items that I have modified with connection points that you can see in my screenshots. Things like beds, water pumps, and sales counters are modified so I can precisely place them. Those items don't really fit the genre of this mod, so once I get this mod released, I'll probably make another little mod release that contains those modified items separately.
And of course I still have a long list of things I want to do with this mod like roofs, arches, and metal walls, but I'm drawing the line so I can at least get it published this year...
Plus I want to play the game. I keep spending my time working on this mod.
--The "Wall of Text"--
Backstory:
Building Requirements (Recipes):
Compatibility with Default Game Pieces:
Sizes:
General Category Descriptions:
Roofs and Ceilings:
Dirt and Grass series:
Gap Fillers (and Corner floor pieces):
Wall End Caps and Top Caps:
Wedges (Ramps):
Concrete Steps and Stairs:
Columns and Supports:
Braces and (Turret) Platforms:
Handrails (with Animation):
Frames and (Steel) Trim:
Miscellaneous:
Well, I can't believe you actually read the whole thing. ;)
After all that, honestly the best thing to do is to make a safe game save, load up this mod, console in a ton of cheat materials, and try out as many pieces as you can. Once you decide you like the mod, load up your saved game and go grinding for supplies so you can build your own unique settlements in ways that was never before possible.
And Please Endorse if you use this mod.
Those endorsements are the only reward I get for pouring months of work into this thing.
And the peak days of this game are long gone, I'll not see thousands of downloads and endorsements.
Every single vote is important to me. Do it. It makes me happy.
Have Fun,
Retsam
Adds 100s of Workshop Construction items related to Settlement Structures.
Most items are unique never-seen-before pieces that enable some very creative settlement buildings.
Categories include: Foundations; Floors; Gap Fillers; Wedges; Walls; Wall Top-caps, Wall End-caps; Columns; Posts; Steel Frames (skylights); Steel Trim (for floors), Floor Braces; Turret mounts; Steps; Stairs; Sidewalks; and Modular Handrails with idle animations.
Materials include: Steel, Wood, Clean Concrete (beige), Driveway Concrete (dirty), Castle Concrete (grey), Cinder-block (Covenant style), Red Brick (matches Hangman's Alley), Clean (Church) Stone, Old Stone, Dirt, Brown Grass, and Green Grass. Everything is in a variety of unique sizes and Navmeshed when required, and has proper material-type attributes.
This mod is something I have been working on for 5 months now and there is no exaggeration in the numbers. Last time I checked I had over 400 unique Nif models, and many of these use material swaps to create even more menu objects. TBH, I don't know exactly how many items I have. Last time I exported the list it was around 700.
More than enough for you to have new fun in an old game.
... This work has been more like a full-blown expansion pack than a mod. It is mods-in-a-mod.
They are all organized under the Workshop menu -> Structures -> Restsam's Construction. Should be last item in the list.
Requirements:
DLC1 (For textures)
Note About Textures and Mod Size:
I originally was including stand-alone copies of the textures in my mod bundle. But as the mod grew, this made it rather large, over 30 megs. So I changed my material files to point to the game's textures. This does make the mod significantly smaller (<2 megs), but also has the disadvantage of the possibility of another mod changing a texture or a texture missing due to a missing DLC that I overlooked as a requirement. In any case, if you have missing textures do post about it so I can address it.
Technical Note:
Files are named using the prefix: sag_ConcreteConstruction
First and Foremost:
I have no doubt that some where I goofed some thing. Sometimes I was working on this mod at 3 or 4 AM and considering there are literally hundreds of pieces, well, I'm sure I have a goof somewhere that I have missed. I have done my best to triple-check my work and most items I have used or at least tested in my own game. But other than some minor issues with connection-points and vanilla pieces that I will detail below, I have not had any real issues. No missing textures, weird glitches, crashes etc. If you do find a real bug, post it. I will try to fix it. But be sure to read the details first. Some things are going to be what it is.
Most pieces have obvious uses, but I will outline some particular things about them at the end of this intro. It would be a good idea to read it. It might save you some confusion later. Fair warning though, it will be a long read. ;)
Credits:
Well Bethesda of course. I use their tools and textures, and a few of my pieces are just vanilla pieces with material swaps or a menu item added.
That being said, most of my pieces are my own original Nif creations.
But to be very clear, ALL my textures come from Bethesda. All credit (and complaints lol) goes to them.
I also want to give acknowledgment to two folks:
First is cartman1975, who made the Concrete Walls with Window Glass mod. https://www.nexusmods.com/fallout4/mods/18360
In the very beginning of this venture (months ago at this point) I had asked that person for permission to use one of their pieces and they very nicely said Yes. Although in the end that piece was replaced and none of their work is actually in this mod, I think I should mention this as a Thanks for the willingness to share.
Next is another person who gave me assistance in the beginning of this venture: pepperman35 who gave me some help via the forum. This person even went so far as to provide me with a couple of models they modified for me. Over time I learned enough in Blender to make my own models and that shared work was replaced, but I wanted to acknowledge that niceness of helping a beginner.
Installation and Removal:
Use Vortex. It eliminates a lot of issues. If you do a manual install, then I assume you know what you are doing and you are on your own.
Removal:
Well, this mod adds stuff to the game. A lot of stuff. But it does not touch scripts etc, just makes Workshop objects.
The standard rules apply:
First you should remove every instance of any objects created from this mod, including any stored in a workshop, and then you can remove the mod. Easy-peasy.
Issues:
No known major issues yet, but I'm sure someone will find something.
Something Important:
Good Modeling and Textures require a skill-set I don't have. I consider mine OK, but even I can see some things that are less than ideal. Some curves have visible flat areas, some textures have obvious seams, etc. Do Not open a bug ticket on that stuff cause it is what it is. As I get more experience I'll rework stuff, but I do not consider it a breaking issue.
Of course if there is a obvious issue, like a missing texture or such Do let me know.
Troubleshooting:
This mod inserts itself into the Workshop menu "Structures".
Technically Formlist "WorkshopMenu01Build"; ID 00106DA3
Any other mod that uses that is most likely going to be a mod conflict. If this mod, or another mod you were previously using, does not show up in your menu then most likely that is the case. You can confirm if it is mod conflicts by simply disabling a potential conflicting mod and load up your game and see the results. If you find a conflicting mod you can try rearranging load order, but I doubt that will solve the issue. Most likely you will have pick a mod to use and forget about the other or learn how to make your own patch. I hate saying it that way, but it is an unfortunate truth about the way Bethesda made the menus work. It happens often.
My Other Mods (You can see them in some of my Screenshots):
Guard Post Markers (plus Guards Display Weapons Fix)
https://www.nexusmods.com/fallout4/mods/71785
Retsam's Better Planters
https://www.nexusmods.com/fallout4/mods/74258
Retsam's Vendor Sales-Counter Spacer Blocks
https://www.nexusmods.com/fallout4/mods/74013
Coming Soon:
I have several items that I have modified with connection points that you can see in my screenshots. Things like beds, water pumps, and sales counters are modified so I can precisely place them. Those items don't really fit the genre of this mod, so once I get this mod released, I'll probably make another little mod release that contains those modified items separately.
And of course I still have a long list of things I want to do with this mod like roofs, arches, and metal walls, but I'm drawing the line so I can at least get it published this year...
Plus I want to play the game. I keep spending my time working on this mod.
--The "Wall of Text"--
Backstory:
Spoiler:
First of all, I'm a late arrival. I just started playing FO4 mid 2023 and, due to the time I keep putting into making my mods, I don't think I'm even half-way through my first play-through. It's kinda a shame. I would have loved to have been making mods when this was a hot game. Anyway, ...
This mod contains my very first Nif model, and was the reason I started making this mod. I have released 3 other mods while continuing to work on this one. I just kept adding stuff... for five months now.
The piece that started it all is the 'gap-filler'. Understanding this piece helps understand a lot of the other pieces and the intended use.
I started my game by building using the default Concrete walls. If you are familiar with these, you know that when you place the walls on the exterior of the Foundation, and then add more foundation or floor pieces outside of that wall, you end up with a spacing issue that is equal to the thickness of the wall. The gap filler solves that. It is sized to fill in the wall-width gap in the floor.
Show
First of all, I'm a late arrival. I just started playing FO4 mid 2023 and, due to the time I keep putting into making my mods, I don't think I'm even half-way through my first play-through. It's kinda a shame. I would have loved to have been making mods when this was a hot game. Anyway, ...
This mod contains my very first Nif model, and was the reason I started making this mod. I have released 3 other mods while continuing to work on this one. I just kept adding stuff... for five months now.
The piece that started it all is the 'gap-filler'. Understanding this piece helps understand a lot of the other pieces and the intended use.
I started my game by building using the default Concrete walls. If you are familiar with these, you know that when you place the walls on the exterior of the Foundation, and then add more foundation or floor pieces outside of that wall, you end up with a spacing issue that is equal to the thickness of the wall. The gap filler solves that. It is sized to fill in the wall-width gap in the floor.
Building Requirements (Recipes):
Spoiler:
Let's go ahead and get this one out of the way.
I based my recipes on the vanilla concrete objects. I looked at those values and invented something that seemed appropriate. But in the end, there is nothing that costs more than a few pieces of wood, concrete, steel, or fertilizer. Unless you find a blatant mistake on my part, they are what they are. I have >700 menu items. I'm not inclined to make a science out of it. Just go have fun.
Show
Let's go ahead and get this one out of the way.
I based my recipes on the vanilla concrete objects. I looked at those values and invented something that seemed appropriate. But in the end, there is nothing that costs more than a few pieces of wood, concrete, steel, or fertilizer. Unless you find a blatant mistake on my part, they are what they are. I have >700 menu items. I'm not inclined to make a science out of it. Just go have fun.
Compatibility with Default Game Pieces:
Spoiler:
Generally speaking my pieces work with the default vanilla ones. I use the same connection points. But in my game I only use my pieces and few vanilla concrete ones, so I can't honestly say they would work with everything like shack or warehouse. Just try and see.
There is however one big caveat that you need to be aware of. IMHO the default (concrete) pieces are sloppy. One reason I say that is the connection points aren't 'clean'. Some pieces have numbers like -127.999939 instead of -128. Also some of the connection points on the wall are off by around 1-2 units. I think that part is due to how the steel trim and little square plates (on the concrete walls) are bundled in the collision object. I get the feeling the collision and connection points were generated by automation.
To understand part of the issue, go stick something like a light fixture on a default concrete wall and then look closely behind the fixture. You will see it floating in the air by approx 2 units (The thickness of the metal trim and square corner plates). Also, shoot the wall. Hit concrete and you get concrete impact. Hit the steel trim and, well you get the same thing, a concrete impact. They just wrapped the whole object into one collision object that has a big bubble around it.
In contrast my pieces have skin-tight collision wrap, and separate physics. All my pieces are like that. Stick something on the wall and it does not float. Shoot concrete, hit concrete. Shoot metal, even just the trim, and you hit metal.
* Well, TBH my walls with doorways are an exception. I had some difficulty with the collision object due to the Navmesh cutout. They work fine, but if you shoot the metal trim around the doorways you'll get the same impact was the wall; concrete, stone, or wood. Learning how to fix that is on my To-Do list.
So what does all this mean to you?
Well, as I said my pieces will snap to vanilla concrete and I even have a couple of settlements built that way as examples. The catch is those minor discrepancies in the connection points will sometimes cause a piece to 'jump' even after placing. It is a very tiny amount. Typically it is the 1-2 unit difference on the floor-to-wall points and the visual result is you might return to a settlement and find a tiny raised lip on a floor or similar. It is not enough to break the navmesh. Toons will walk right over it, but it is visually annoying. So far when I have had that happen in my game, once I re-seat the object it does not happen again but I can't promise. To be clear, this doesn't happen with my own pieces connected to each other. At least not yet. It has only happened with my floors connected to the vanilla concrete walls.
Show
Generally speaking my pieces work with the default vanilla ones. I use the same connection points. But in my game I only use my pieces and few vanilla concrete ones, so I can't honestly say they would work with everything like shack or warehouse. Just try and see.
There is however one big caveat that you need to be aware of. IMHO the default (concrete) pieces are sloppy. One reason I say that is the connection points aren't 'clean'. Some pieces have numbers like -127.999939 instead of -128. Also some of the connection points on the wall are off by around 1-2 units. I think that part is due to how the steel trim and little square plates (on the concrete walls) are bundled in the collision object. I get the feeling the collision and connection points were generated by automation.
To understand part of the issue, go stick something like a light fixture on a default concrete wall and then look closely behind the fixture. You will see it floating in the air by approx 2 units (The thickness of the metal trim and square corner plates). Also, shoot the wall. Hit concrete and you get concrete impact. Hit the steel trim and, well you get the same thing, a concrete impact. They just wrapped the whole object into one collision object that has a big bubble around it.
In contrast my pieces have skin-tight collision wrap, and separate physics. All my pieces are like that. Stick something on the wall and it does not float. Shoot concrete, hit concrete. Shoot metal, even just the trim, and you hit metal.
* Well, TBH my walls with doorways are an exception. I had some difficulty with the collision object due to the Navmesh cutout. They work fine, but if you shoot the metal trim around the doorways you'll get the same impact was the wall; concrete, stone, or wood. Learning how to fix that is on my To-Do list.
So what does all this mean to you?
Well, as I said my pieces will snap to vanilla concrete and I even have a couple of settlements built that way as examples. The catch is those minor discrepancies in the connection points will sometimes cause a piece to 'jump' even after placing. It is a very tiny amount. Typically it is the 1-2 unit difference on the floor-to-wall points and the visual result is you might return to a settlement and find a tiny raised lip on a floor or similar. It is not enough to break the navmesh. Toons will walk right over it, but it is visually annoying. So far when I have had that happen in my game, once I re-seat the object it does not happen again but I can't promise. To be clear, this doesn't happen with my own pieces connected to each other. At least not yet. It has only happened with my floors connected to the vanilla concrete walls.
Sizes:
Spoiler:
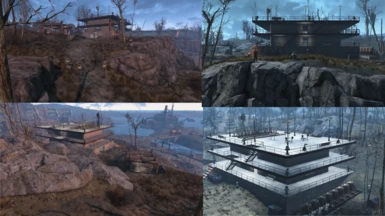
You will see that one thing this mod provides is a large range of sizes. Some Floors are made in sizes ranging from 64x64 up to 512x512 and walls are in different widths and heights. I'll note that the large 512x512 foundation/floor pieces don't always work perfectly. There are so many connection points on these you pretty much need to place them absolute first and then add pieces to it. That way the 512 piece controls where things snap. If you do it the other way, adding the 512 after other pieces, you might have a bit of a struggle getting things to snap. The advantage of using them though is fewer object counts against your settlement and less geometry for performance. It is there as an option. Up to you.
Show
You will see that one thing this mod provides is a large range of sizes. Some Floors are made in sizes ranging from 64x64 up to 512x512 and walls are in different widths and heights. I'll note that the large 512x512 foundation/floor pieces don't always work perfectly. There are so many connection points on these you pretty much need to place them absolute first and then add pieces to it. That way the 512 piece controls where things snap. If you do it the other way, adding the 512 after other pieces, you might have a bit of a struggle getting things to snap. The advantage of using them though is fewer object counts against your settlement and less geometry for performance. It is there as an option. Up to you.
General Category Descriptions:
Spoiler:
Foundations, floors, and walls are self-explanatory. They only things of note are as I already mentioned; A large range of sizes and materials. Also I guess some people might want to know that the walls are all modeled after the vanilla concrete walls. Specifically they are 32 units thick, and a full width is 256, a full height is 223. I do not have any other wall thicknesses.
Conversely, the floors also match the vanilla pieces which is based on a 256x256 square and either 14 (mid-floor) or 28 (upper-floor) units thick.
A couple of Highlights:
1. The 256x256 and 128x256 Foundation blocks have Stacking snap points on top and bottom. In the center and along the edge. You can make an insanely large wall if you wanted to.
2. There are some pieces called "Underpinning" in the wall categories. The function is in the name. They are walls in all aspects, but they have connection points on the Top Only. This makes it a little easier to get them to snap up under walls and foundations at/in the ground. Note they only snap in one direction to the underside of full-size floors and foundations. Be sure to rotate it if it is red. Even so, sometimes they just refuse to co-operate. Even I struggle with them sometimes, and I made them. You are on your own. If you don't like them, don't use them.
Show
Foundations, floors, and walls are self-explanatory. They only things of note are as I already mentioned; A large range of sizes and materials. Also I guess some people might want to know that the walls are all modeled after the vanilla concrete walls. Specifically they are 32 units thick, and a full width is 256, a full height is 223. I do not have any other wall thicknesses.
Conversely, the floors also match the vanilla pieces which is based on a 256x256 square and either 14 (mid-floor) or 28 (upper-floor) units thick.
A couple of Highlights:
1. The 256x256 and 128x256 Foundation blocks have Stacking snap points on top and bottom. In the center and along the edge. You can make an insanely large wall if you wanted to.
2. There are some pieces called "Underpinning" in the wall categories. The function is in the name. They are walls in all aspects, but they have connection points on the Top Only. This makes it a little easier to get them to snap up under walls and foundations at/in the ground. Note they only snap in one direction to the underside of full-size floors and foundations. Be sure to rotate it if it is red. Even so, sometimes they just refuse to co-operate. Even I struggle with them sometimes, and I made them. You are on your own. If you don't like them, don't use them.
Roofs and Ceilings:
Spoiler:
I do not have any roof or ceiling pieces at all. I plan on eventually making a few, I want to experiment with making some arches, but just haven't got around to it. I never use roofs in my game. I always use the upper-floor pieces because they combine the ceiling and next-level floor in one piece. I never have to worry about some location not satisfying the floor/roof requirements for beds and my roofs are always used for planters or recreation areas so I need them AI pathable.
Show
I do not have any roof or ceiling pieces at all. I plan on eventually making a few, I want to experiment with making some arches, but just haven't got around to it. I never use roofs in my game. I always use the upper-floor pieces because they combine the ceiling and next-level floor in one piece. I never have to worry about some location not satisfying the floor/roof requirements for beds and my roofs are always used for planters or recreation areas so I need them AI pathable.
Dirt and Grass series:
Spoiler:
There are numerous pieces made as dirt or brown grass or green grass. They will snap and function as floors, but have dirt attributes. Yes, you can make a dirt floor and put plants or water pumps on them (*See note). One thing to be aware though is things like pumps go 'down' deep enough to pass through floors. If there is something with collision beneath the floor it might interfere. A simple example is if you place a floor on the ground but there is a piece of sidewalk or a grass-mound on the ground it might block placement of the pump. If you have trouble placing something look for things like that. I have also noted that vanilla decorative Grass, of all dumb things, has collision and that singular item has given me more difficulty placing things than anything else in the game. Seriously, a clump of grass that you can't delete, even with that famous mod, can prevent you from placing anything.
I can say 100% my pieces satisfies dirt and floor requirements. If something is blocking it, it is specific to that location.
* I recently discovered that the Mechanist Lair does a good job of preventing us from making food there. I was able to use my dirt floors and place water pumps, but not plants- even when using my Planters mod.
Show
There are numerous pieces made as dirt or brown grass or green grass. They will snap and function as floors, but have dirt attributes. Yes, you can make a dirt floor and put plants or water pumps on them (*See note). One thing to be aware though is things like pumps go 'down' deep enough to pass through floors. If there is something with collision beneath the floor it might interfere. A simple example is if you place a floor on the ground but there is a piece of sidewalk or a grass-mound on the ground it might block placement of the pump. If you have trouble placing something look for things like that. I have also noted that vanilla decorative Grass, of all dumb things, has collision and that singular item has given me more difficulty placing things than anything else in the game. Seriously, a clump of grass that you can't delete, even with that famous mod, can prevent you from placing anything.
I can say 100% my pieces satisfies dirt and floor requirements. If something is blocking it, it is specific to that location.
* I recently discovered that the Mechanist Lair does a good job of preventing us from making food there. I was able to use my dirt floors and place water pumps, but not plants- even when using my Planters mod.
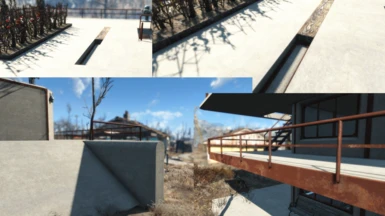
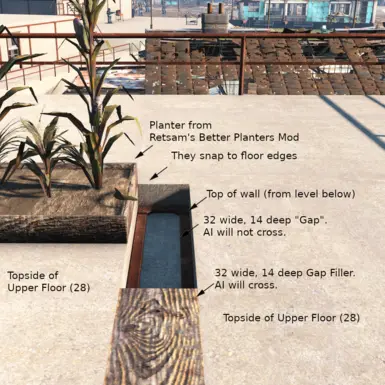
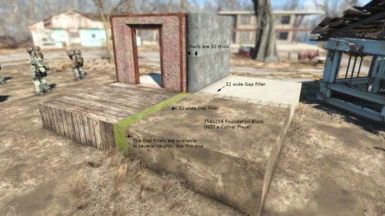
Gap Fillers (and Corner floor pieces):
Spoiler:
I already explained that the gap fillers are 32 units wide and are intended to fill in the space that results from creating interior walls; walls snapped to the perimeter of a foundation or floor. They are not limited to that use though. They are navmeshed, of course, and I have used them in many places to create custom-fit floors.
The corner piece is a floor or foundation piece that is specifically intended to be used on the corners outside of the walls. They have that 32 unit gap-filler pre-built in making them 288x288. It's kinda hard to explain verbally, so I'll included a screenshot of this. Also note that the corner pieces are directional. They should be installed in a specific way. To assist with this there is a directional arrow that will show up when in Build Mode and the floor piece is selected. Point the arrow towards the building's corner.
Another place I always use the gap fillers is on my roofs. All my buildings are built with roof-top gardens (I use my Planter mod). When you attach an upper floor to walls, and then go topside, there are gaps 32 wide and 14 units deep along the tops of the walls. This area is not navmeshed and will block AI pathing. After placing my Planters (they need to snap to the floor edges) I drop in my 14 thick gap fillers, and 32x32 square plates at the corners, and toons walk around with no issue. This is another thing that a picture can explain better. Be sure to check my screenshots.
Show
I already explained that the gap fillers are 32 units wide and are intended to fill in the space that results from creating interior walls; walls snapped to the perimeter of a foundation or floor. They are not limited to that use though. They are navmeshed, of course, and I have used them in many places to create custom-fit floors.
The corner piece is a floor or foundation piece that is specifically intended to be used on the corners outside of the walls. They have that 32 unit gap-filler pre-built in making them 288x288. It's kinda hard to explain verbally, so I'll included a screenshot of this. Also note that the corner pieces are directional. They should be installed in a specific way. To assist with this there is a directional arrow that will show up when in Build Mode and the floor piece is selected. Point the arrow towards the building's corner.
Another place I always use the gap fillers is on my roofs. All my buildings are built with roof-top gardens (I use my Planter mod). When you attach an upper floor to walls, and then go topside, there are gaps 32 wide and 14 units deep along the tops of the walls. This area is not navmeshed and will block AI pathing. After placing my Planters (they need to snap to the floor edges) I drop in my 14 thick gap fillers, and 32x32 square plates at the corners, and toons walk around with no issue. This is another thing that a picture can explain better. Be sure to check my screenshots.
Wall End Caps and Top Caps:
Spoiler:
The wall end caps are essentially columns that you can place anywhere, but they are intended to be used on building corners where two right-angled walls meet. They are 32x32. There is the original vanilla 32x32 square column that everyone knows as the piece you can use to 'glitch' things down into the ground. My end caps are variations of that piece. I have square, 1/4 round, half-round and angled. The angled piece is great for putting lights on a building corner.
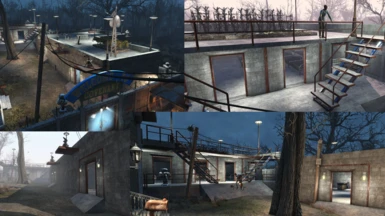
The top caps, well that name is a bit misleading but once you experiment you will understand. With the exception of one piece, the half-round one, they actually snap to floors not walls. Again, using my standard method of having an upper-floor as a roof, you can use gap fillers on the spaces over the interior area, but if you have walls around the perimeter that you want to dress up you can use these pieces. You'll have to look at some pictures for a better explanation but the wall top caps are how I made the rounded or sloped edges around some of my upper floors/roofs.
Something important to note. Gap fillers are navmeshed, wall caps are not, but they will both snap in a lot of the same places. I can use wall caps around the perimeter of floor area and it prevents toons from walking off the roof. But if use my handrails, with animations, I most likely will use gap fillers so they can walk all the way up to the handrail for the animation. And of course the handrail prevents them from falling. Just experiment and see what you prefer. Just be careful to not put a gap filler somewhere toons can't actually get to, like up on top of a wall that is not part of an actual walk area. Doing that will create a navmesh island which is not good for AI pathing.
Show
The wall end caps are essentially columns that you can place anywhere, but they are intended to be used on building corners where two right-angled walls meet. They are 32x32. There is the original vanilla 32x32 square column that everyone knows as the piece you can use to 'glitch' things down into the ground. My end caps are variations of that piece. I have square, 1/4 round, half-round and angled. The angled piece is great for putting lights on a building corner.
The top caps, well that name is a bit misleading but once you experiment you will understand. With the exception of one piece, the half-round one, they actually snap to floors not walls. Again, using my standard method of having an upper-floor as a roof, you can use gap fillers on the spaces over the interior area, but if you have walls around the perimeter that you want to dress up you can use these pieces. You'll have to look at some pictures for a better explanation but the wall top caps are how I made the rounded or sloped edges around some of my upper floors/roofs.
Something important to note. Gap fillers are navmeshed, wall caps are not, but they will both snap in a lot of the same places. I can use wall caps around the perimeter of floor area and it prevents toons from walking off the roof. But if use my handrails, with animations, I most likely will use gap fillers so they can walk all the way up to the handrail for the animation. And of course the handrail prevents them from falling. Just experiment and see what you prefer. Just be careful to not put a gap filler somewhere toons can't actually get to, like up on top of a wall that is not part of an actual walk area. Doing that will create a navmesh island which is not good for AI pathing.
Wedges (Ramps):
Spoiler:
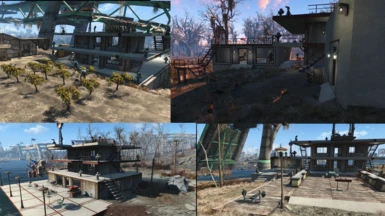
These are my answer to AI-pathing bottlenecks that happen with stairs. My standard building design uses foundation blocks, walls, and then a sort-of patio area around the perimeter. I use the wedges, you can also call them ramps, and the toons can walk up anywhere they want. I use these things everywhere. They work marvelously. They are in a variety of sizes, including gap-filler 32s, and I even have a few corner pieces.
One thing to note is you'll find that often the wedges can be annoying to place. This is particularly true for the smaller ones. The reason for this is there are numerous snap-points that are close together. It will most likely keep snapping to the "wrong" edge for whatever you are trying to do. Like all the pieces my advice is to try "standing" in a different location. That has a big influence on how things snap. I get the best results by, when possible, standing "below" what I am trying to place. Think of it like "pulling" the piece down into place. Again, this is something else you'll probably just have to experiment with to fully understand. But they do work 100%. You'll see them in most of my screen shots.
A Distinction:
Although you can think of Wedges as Ramps since that is the function they serve, there is a difference. Wedges are wedge shaped. A triangle. Ramps are an inclined plane. I did make a ramp thinking I would make a series of them, but my first one looked kinda lame and the wedges serve the same purpose so I put it on hold for now. I do plan on circling back to that idea, but this is the sort of thing that keeps delaying the release of this mod. If I wait until I have everything I want done, I will never get this mod released.
Show
These are my answer to AI-pathing bottlenecks that happen with stairs. My standard building design uses foundation blocks, walls, and then a sort-of patio area around the perimeter. I use the wedges, you can also call them ramps, and the toons can walk up anywhere they want. I use these things everywhere. They work marvelously. They are in a variety of sizes, including gap-filler 32s, and I even have a few corner pieces.
One thing to note is you'll find that often the wedges can be annoying to place. This is particularly true for the smaller ones. The reason for this is there are numerous snap-points that are close together. It will most likely keep snapping to the "wrong" edge for whatever you are trying to do. Like all the pieces my advice is to try "standing" in a different location. That has a big influence on how things snap. I get the best results by, when possible, standing "below" what I am trying to place. Think of it like "pulling" the piece down into place. Again, this is something else you'll probably just have to experiment with to fully understand. But they do work 100%. You'll see them in most of my screen shots.
A Distinction:
Although you can think of Wedges as Ramps since that is the function they serve, there is a difference. Wedges are wedge shaped. A triangle. Ramps are an inclined plane. I did make a ramp thinking I would make a series of them, but my first one looked kinda lame and the wedges serve the same purpose so I put it on hold for now. I do plan on circling back to that idea, but this is the sort of thing that keeps delaying the release of this mod. If I wait until I have everything I want done, I will never get this mod released.
Concrete Steps and Stairs:
Spoiler:
This is one place I just used vanilla assets without much modification. The stairs are the original vanilla ones with a couple of material swaps. The concrete steps are unmodified vanilla ones that I made buildable. Well, I added snap points but that is all. I have a clean set of Sanctuary steps that snaps to floor edges.
I also have a couple of sidewalk pieces, but they are a bit of a failure. Without using some rotation mod, you can't place these to follow the ground contours. I left them in case anyone wanted to mess with them, but they are what they are.
Show
This is one place I just used vanilla assets without much modification. The stairs are the original vanilla ones with a couple of material swaps. The concrete steps are unmodified vanilla ones that I made buildable. Well, I added snap points but that is all. I have a clean set of Sanctuary steps that snaps to floor edges.
I also have a couple of sidewalk pieces, but they are a bit of a failure. Without using some rotation mod, you can't place these to follow the ground contours. I left them in case anyone wanted to mess with them, but they are what they are.
Columns and Supports:
Spoiler:
I have a couple of stone/block columns I happened to find in the vanilla files. I added a couple of connection-points so you can sink them in the dirt, but that is all. In one settlement I used a couple flanking some steps and put turrets on them. It's tricky, but you can put some things on top of them.
There are also some 64x128 round columns. These are stackable and have a floor snap point. That floor snap point I added so I can use a gap filler snapped across the top and level two columns to same height. Works great for that. Note: Turrets Can be placed on top of these, that's what I made them for, but placing turrets is tricky anywhere. All I can say is keep moving things around and you'll eventually get it.
The Pole Supports are things I custom-made for a variety of uses. Available in several styles and sizes. They snap to floors and can sink in the dirt. They add some realism to address "floating" floors. They work nicely.
Show
I have a couple of stone/block columns I happened to find in the vanilla files. I added a couple of connection-points so you can sink them in the dirt, but that is all. In one settlement I used a couple flanking some steps and put turrets on them. It's tricky, but you can put some things on top of them.
There are also some 64x128 round columns. These are stackable and have a floor snap point. That floor snap point I added so I can use a gap filler snapped across the top and level two columns to same height. Works great for that. Note: Turrets Can be placed on top of these, that's what I made them for, but placing turrets is tricky anywhere. All I can say is keep moving things around and you'll eventually get it.
The Pole Supports are things I custom-made for a variety of uses. Available in several styles and sizes. They snap to floors and can sink in the dirt. They add some realism to address "floating" floors. They work nicely.
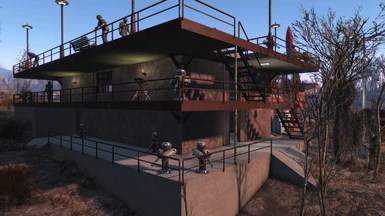
Braces and (Turret) Platforms:
Spoiler:
These are also for visual realism. The braces are 45 degree supports, wood or steel, that have the Place-Anywhere connection point. That is the same connection-point as the one used on lights and posters. That connection-point is a bit quirky. It is difficult to get things precisely placed. To help with that issue, I have some custom snap points on these in addition to the Place-Anywhere. My snap points are at the top of the brace and snap to custom connection-points I added to the underside of the floors and gap fillers, but Only along the edges. If you look at my pictures you will see I typically put these on building corners, and that is where those snap points are. Just try and you'll understand.
The Platforms are actually turret mounts. Here you will find the classic Covenant turret mount/shelf.
(There is also a column in the Column section I put turrets on).
Show
These are also for visual realism. The braces are 45 degree supports, wood or steel, that have the Place-Anywhere connection point. That is the same connection-point as the one used on lights and posters. That connection-point is a bit quirky. It is difficult to get things precisely placed. To help with that issue, I have some custom snap points on these in addition to the Place-Anywhere. My snap points are at the top of the brace and snap to custom connection-points I added to the underside of the floors and gap fillers, but Only along the edges. If you look at my pictures you will see I typically put these on building corners, and that is where those snap points are. Just try and you'll understand.
The Platforms are actually turret mounts. Here you will find the classic Covenant turret mount/shelf.
(There is also a column in the Column section I put turrets on).
Handrails (with Animation):
Spoiler:
I'm pleased with these. They worked out exactly as I wanted. They are modular handrail pieces. There is a left, right, center, and gap-filler size and they snap to floor edges. In addition, there a 4 variations of the center piece with idle animations. I use these in my roof-top recreation areas and toons will definitely use them. They prop up on the handrails in 4 different poses.
Show
I'm pleased with these. They worked out exactly as I wanted. They are modular handrail pieces. There is a left, right, center, and gap-filler size and they snap to floor edges. In addition, there a 4 variations of the center piece with idle animations. I use these in my roof-top recreation areas and toons will definitely use them. They prop up on the handrails in 4 different poses.
Frames and (Steel) Trim:
Spoiler:
The original idea for the frames was to create build-your-own skylights, windows, and floor chases. I still have not got around to making the glass to snap into these. But the frames do work as-is. You can see a skylight in one of my Sanctuary screenshots. It is important to note these are not navmeshed. I did try because I wanted to use these as decoration around the areas my stairs go through floors, as a steel floor-chase, but it did not work out. The surface area is too small and toons would not cross over it. I might circle back to this, but my Trim actually (sort-of) solves the issue from a different approach.
The Steel Trim snaps to floors. It is intended to be a visual thing, a steel border around a floor. Refer to my screenshots. I'm pleased with the results of this one.
Important Note: I have no doubt someone will want to comment on the texture overlap, the "z-fighting", that happens in the trim on the floor corners. I know and I'm not changing. It is what it is. It is hidden if you use TWO, one on each floor-edge of the corner. But if you only put one on one edge, you will see it.
Also a Tip: You will see in my screenshots I often use this trim around the perimeter of second floor balconies or roof-decks WITH handrails. You have to place the handrails FIRST, then snap the trim on. The trims snap to each other, but you'll need an anchor point. If you have trouble you might need to use a full length trim piece first.
And: You will not be able to use handrails and wall caps and trim in the same place. The connection points don't work out. BUT, use gap fillers instead of wall caps and it will work. So: upper-floor, gap filler (on the perimeter), handrail, then trim. But, you don't need the gap-filler. On most of my structures it is just floor, handrail, trim.
Show
The original idea for the frames was to create build-your-own skylights, windows, and floor chases. I still have not got around to making the glass to snap into these. But the frames do work as-is. You can see a skylight in one of my Sanctuary screenshots. It is important to note these are not navmeshed. I did try because I wanted to use these as decoration around the areas my stairs go through floors, as a steel floor-chase, but it did not work out. The surface area is too small and toons would not cross over it. I might circle back to this, but my Trim actually (sort-of) solves the issue from a different approach.
The Steel Trim snaps to floors. It is intended to be a visual thing, a steel border around a floor. Refer to my screenshots. I'm pleased with the results of this one.
Important Note: I have no doubt someone will want to comment on the texture overlap, the "z-fighting", that happens in the trim on the floor corners. I know and I'm not changing. It is what it is. It is hidden if you use TWO, one on each floor-edge of the corner. But if you only put one on one edge, you will see it.
Also a Tip: You will see in my screenshots I often use this trim around the perimeter of second floor balconies or roof-decks WITH handrails. You have to place the handrails FIRST, then snap the trim on. The trims snap to each other, but you'll need an anchor point. If you have trouble you might need to use a full length trim piece first.
And: You will not be able to use handrails and wall caps and trim in the same place. The connection points don't work out. BUT, use gap fillers instead of wall caps and it will work. So: upper-floor, gap filler (on the perimeter), handrail, then trim. But, you don't need the gap-filler. On most of my structures it is just floor, handrail, trim.
Miscellaneous:
Spoiler:
This section is for stuff I didn't know where else to put it. At the moment, it only has one object type.
Doghouse Base:
I made this when I was getting annoyed trying to place a Doghouse on uneven ground. It is essentially a dirt/grass mound with a flat top slightly larger than the standard doghouse. It can sink into the ground a decent amount and has a more organic look than using one of my dirt floors. It has Floor snap points that will snap to the center of a full-size floor. It's not really useful to snap them to floors though, but using those points gave a little more options and they can snap to each other. They snap on the sides and front/back. I think I got the spacing decent enough where you can line them up nicely and still have navigation space. A real bonus to these is custom snap point that matches up with my Doghouse. My Doghouse will snap to the center of these. That's what the directional arrow is for.
Unfortunately, I have not published the mod that will have that doghouse, but it is coming soon. I'll probably call it "Retsam's Snappables". It'll have a few of the things I have modified and use all the time that don't fit the genre of this mod.
Show
This section is for stuff I didn't know where else to put it. At the moment, it only has one object type.
Doghouse Base:
I made this when I was getting annoyed trying to place a Doghouse on uneven ground. It is essentially a dirt/grass mound with a flat top slightly larger than the standard doghouse. It can sink into the ground a decent amount and has a more organic look than using one of my dirt floors. It has Floor snap points that will snap to the center of a full-size floor. It's not really useful to snap them to floors though, but using those points gave a little more options and they can snap to each other. They snap on the sides and front/back. I think I got the spacing decent enough where you can line them up nicely and still have navigation space. A real bonus to these is custom snap point that matches up with my Doghouse. My Doghouse will snap to the center of these. That's what the directional arrow is for.
Unfortunately, I have not published the mod that will have that doghouse, but it is coming soon. I'll probably call it "Retsam's Snappables". It'll have a few of the things I have modified and use all the time that don't fit the genre of this mod.
Well, I can't believe you actually read the whole thing. ;)
After all that, honestly the best thing to do is to make a safe game save, load up this mod, console in a ton of cheat materials, and try out as many pieces as you can. Once you decide you like the mod, load up your saved game and go grinding for supplies so you can build your own unique settlements in ways that was never before possible.
And Please Endorse if you use this mod.
Those endorsements are the only reward I get for pouring months of work into this thing.
And the peak days of this game are long gone, I'll not see thousands of downloads and endorsements.
Every single vote is important to me. Do it. It makes me happy.
Have Fun,
Retsam