


0 of 0


")


About this mod
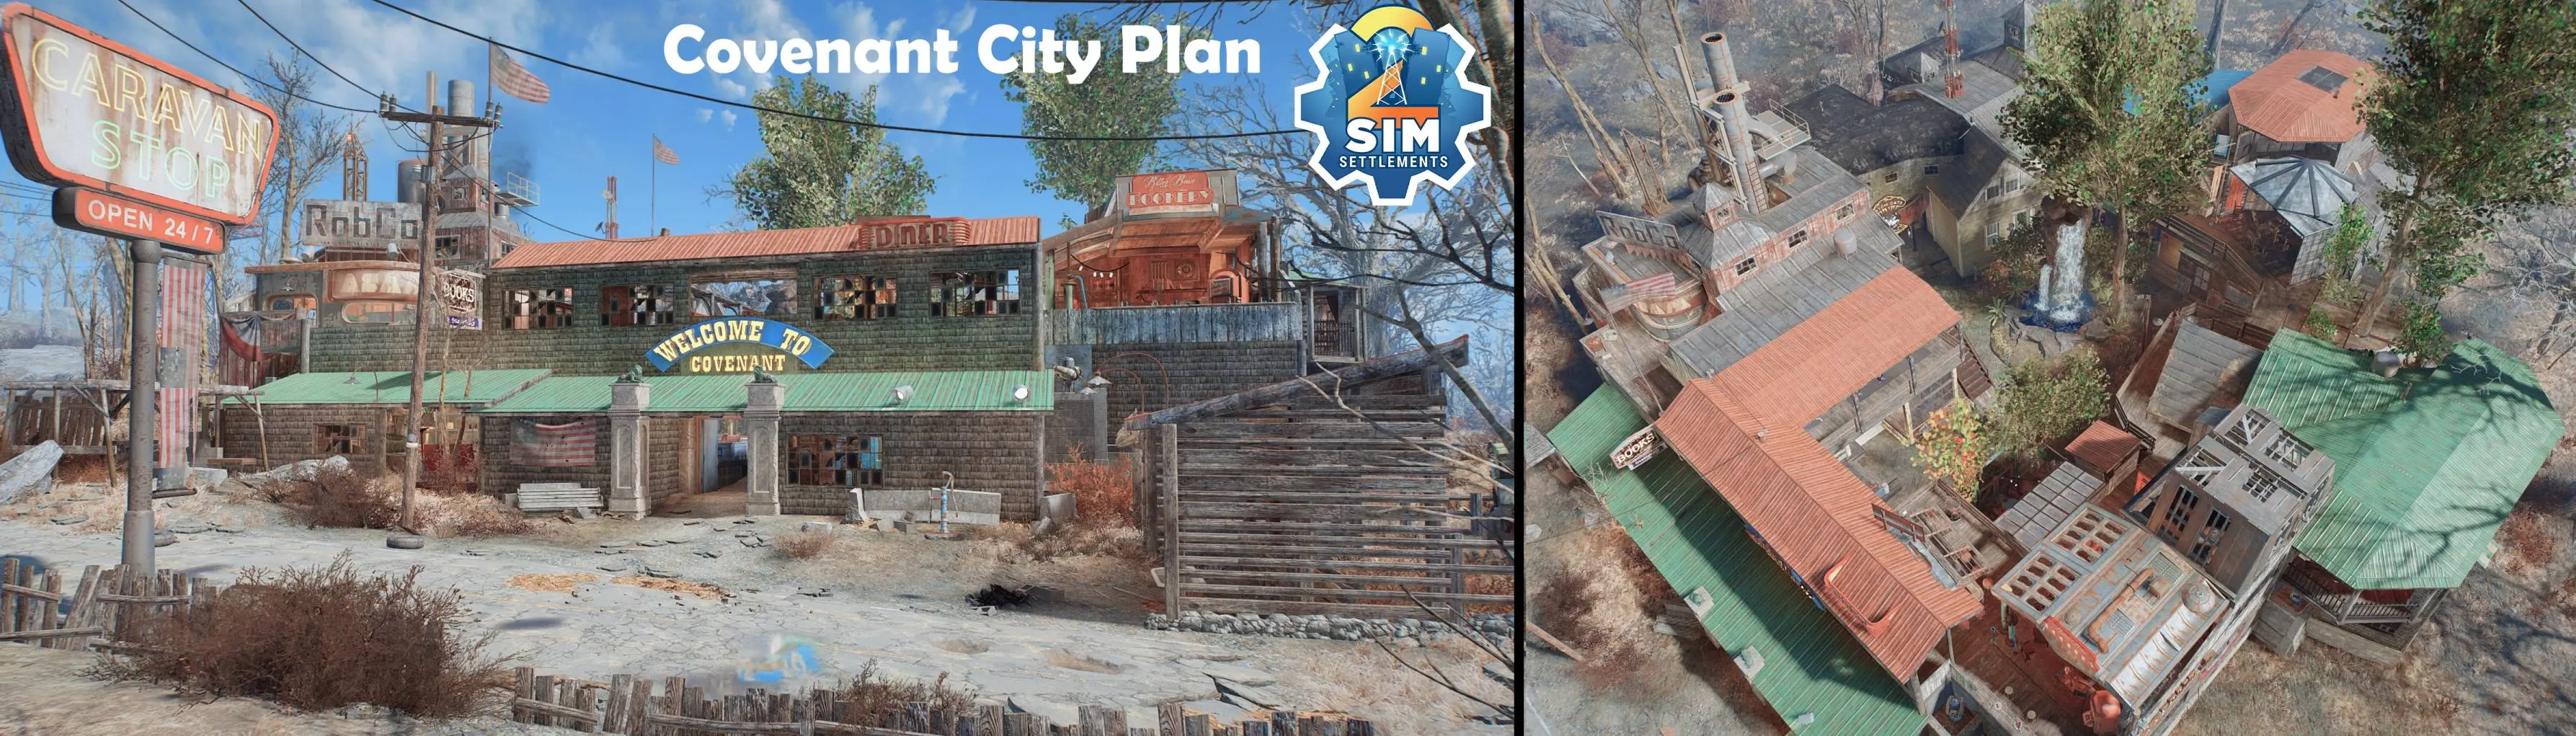
Cozy Covenant, a City Plan for Sim Settlements 2.
Created for the September 2021 Sim Settlements 2 City Plan Contest
- Requirements
- Permissions and credits
- Changelogs
Please be sure to have a read through the Issues section below
The settlement is designed with specific plots chosen for their access points and themes.
Please ensure you have selected Designers Choice ON in the options and have the Add-On packs I have used. You'll find a list of them at the bottom of this description, they are incredible so don't forget to send them your appreciation too!
Some plots are set to begin at higher plot level in the Foundation city plan - to get these you will need to select Starting Plot Levels ON
Update Version 1.1
You will notice that the ASAM for the laser plot is now floating through the glass roof along the side of the house. Just enter build mode and pick up and shift it to the floor, its fine to do (but will reset its position if you refresh the plot)
Player Home Only Layout (Optional file without the rest of the settlement and plots)
As I created the player home separately before putting it into the main settlement there is an optional file with only the player home in the layout.
This allows you add the player home (which is outside the build area on the South Western point) to your own settlement, or even another city plan.
Settlement Overview
Covenant, a small tidy settlement that still packs it in. Some might call it Cozy, but it's still open and ready to welcome visitors.
Foundation Level - 9 settlers
1 Agricultural, 3 Industrial, 2 Municipal, 1 Commercial, 1 Martial
6 Recreational and training (END, AGI, STR)
9 Residential (7 single, 2 double occupant)
Level 1 - 13 Settlers
1 Agricultural, 5 Industrial, 4 Municipal, 2 Commercial, 1 Martial
7 Recreational and training (END, AGI, STR, CHR)
11 Residential (9 single, 2 double occupant)
Level 2 - 18 Settlers
2 Agricultural, 6 Industrial (1 dual), 4 Municipal (1 dual), 3 Commercial, 2 Martial
8 Recreational and training (END, AGI, STR, CHR)
15 Residential (13 single, 2 double occupant)
Level 3 - 21 Settlers
2 Agricultural, 8 Industrial, 4 Municipal, 4 Commercial, 2 Martial
10 Recreational and training (END, AGI, STR, CHR)
18 Residential (16 single, 2 double occupant)
ISSUES - Please Read!
The existing turrets
The turrets may cause issues. Using the City Plan Assistant to create the city plan levels the settlement is claimed without completing the quests.
The existing settlers
If you choose to side with Jacob and the existing settlers, they will remain at the settlement, however all but Ted Huntley will not be assignable. You can use console commands to make them useful, although I haven't fully tested this out, and some may retain their original dialogs. (store, doctor)
Deezer seems to be assignable but end up returning to hawking his lemonade mode.
Console commands used when the settler has been selected and their ID is active (you need to do them all on each settler to active assignment):
For the compact size it packs a lot in
It is reasonably big for its size with quite a few objects.
If you think that your machine is on the lean side when it comes to computing power, then you may just want to use one of the earlier level layouts, or perhaps download the optional save file and see if it will run for you. (including approaching the settlement to see if it doesn't crash)
For others though you will want to turn "Respect Build Limit" to OFF (if you haven't already done so - it defaults to ON - found under Performance)
Objects that YOU will need to scrap
I have used a custom scrap profile and managed to get rid of a number of objects that are not included in the standard profile.
This has left a couple of objects effects as they can't be removed via scrapping.
To get rid of them, go to the console, and type in "PRID {ID number - see below}" and press enter, then type "disable" and press enter
Power wires:
Left over from the desk outside the gate -
If you scrap the desk prior to city plan activation you won't need to do these:
If you scrap the desk prior to city plan activation you won't need to do this one
If scrapped with Place everywhere additional object selection prior to city plan activation you won't need to do this one:
If you scrap the desk prior to city plan activation you won't need to do this one
If you scrap the desk prior to city plan activation you won't need to do this one
If you scrap the desk with Place everywhere additional object selection prior to city plan activation you won't need to do this one:
Power
In my testing I have had a few objects and plots not picking up on the radial power available when the are place in city plan upgrades.
(this seems to occur mainly in city plans with lots of objects. In layouts this doesn't happen - even though they use the same export file)
Simple fix is just to enter workshop mode, pick up a nearby power conduit or power pole, then [TAB] to release it back to its original position.
Some may be in difficult to reach/capture positions from the ground - use Workshop Plus by Kinggath to enable "flight" in workshop mode to make it easier!
The Minor things that are good to know about
Objects outside the build Zone
I have put "dressing" objects outside the build zone. If you don't have Place Everywhere you will not be able to customize further.
(if you do want to add anything, you will still need to place objects inside the build zone first then shift that object where you want it).
Defense and Junk Storage
Junk Storage has a defense requirement - however any city plans not set to Full Involvement setting will still upgrade. Large city plans with a lot of objects require a heap of junk storage.
This plan does not cover the junk storage defense requirements (I didn't want to spam lots of martial plots).
You can turn OFF the "Junk Storage Requires Defense" setting in SS2 when you build and upgrade the city plan then turn it back ON
This setting only effects junk storage placed at that time, turning it back will not change those junk storage containers placed when it was OFF.
Higher level plots need higher ability settlers
There are several plots of various types that require settlers with high Abilities.
Something I found was that when I had the settings Assignment Requirements Off, and Auto Assignment On, settlers would assign to these plots, then change to a new building plan, (if they change these to basic type, or reset to level 1 they will mess up settlement requirements).
Did you know you can use clothing items to help raise their abilities, and legendary items will stack.
Fake Doors
I have included fake doors on walls as 'dressing' into inaccessible areas that would be logically in the real world. Please don't curse me after spending too much time trying to find the sweet spot that gives the 'DOOR E) Open' prompt.
Janitor plot (appears in city plan level 3)
The Janitor residential plot from Apocalyptic Additions (an internal that's 1x1 in size) doesn't add to the settlement bed count, so I have placed a sleeping bag on the bed position until the issue is fixed.
Optional Files
If you can't wait through the city growth process I have included an optional file with level 1, 2 and 3 as separate layouts you can build through the workbench layout menu. Included in this is the modest player home only layout that sits atop the rear house.
I have included a save game file of level 3 of the city plan (with a limited mod list) that will allow you to have a run about the highest level of the city plan. A sort of try before you buy, so you can check out if you want to throw your valuable scrap towards the city plan and wait and watch its gradual upgrades in you game. Drop into the save into your saves folder and look for it when you go to load a game - "GavMan_Czy_Covenant_L3"
ADD-ON's Used (and Highly Recommended!)
I have designed the settlement with the specific plots chosen, you can let it randomize, but might end up with access issues.
You may need to refresh the Martial pillbox as the turret on top fails to spawn some times.
Wasteland Venturers Sim Settlements 2 Addon Pack by Tinuvia and Myrmarachne
Sim Settlements 2 Scrappers by Ohnno
Sim Settlements 2 - Junk Town 2 Addon Pack by Uituit
Sim Settlements 2 - Apocalyptic Additions Addon Pack by SirLach
Sim Settlements 2 - Pra's Random Addon 2 by Pra
Vault-Tec Tools - Sim Settlements 2 Addon Pack by Samutz and Wulfharth
SimHomestead 2 - A SimSettlements 2 addon by Eldarth
Sim Settlements 2 - Tiny Living by Freddrick
If using version 1
Sim Settlements 2 Chapter 2 update
In the old files there is a layout which adds a level 3 Sanitation plot from Tiny Living Add-on and a bed (sleeping bag) for an additional settler.
This will allow you to inject the new plot into an existing version 1.0 plan. Can be used at any current level, will be quick to run, but give the plot a bit of time to run scripts to update itself to level 3. Since everything is packed in I couldn't fit another residential plot in so just added a sleeping bag to the static bed by the store house.
How: Go to the workbench, choose: Manage > Settlement Layout > Build/Manage Layouts > {select desired layout with Next & Previous} Use This Layout > Build It, But Skip Any Scrapping (it will then start)
Please ensure you choose the SKIP ANY SCRAPPING option!
You will need to scrap the original city plans doghouse that will be in the same location as the new plot.
It should be fine to remove the layout file from your load order once you have used them to add the plots.
The settlement is designed with specific plots chosen for their access points and themes.
Please ensure you have selected Designers Choice ON in the options and have the Add-On packs I have used. You'll find a list of them at the bottom of this description, they are incredible so don't forget to send them your appreciation too!
Some plots are set to begin at higher plot level in the Foundation city plan - to get these you will need to select Starting Plot Levels ON
Update Version 1.1
- I swapped over the Municipal plot Water plan that was introduced at level 1 of the city plan to a Sanitation plan.
- To meet the settlement water needs I added several water tanks (no need for a plot)
- In level 2 and 3 of the city plan I rotated the Laser cannon Martial plot 180 degrees
You will notice that the ASAM for the laser plot is now floating through the glass roof along the side of the house. Just enter build mode and pick up and shift it to the floor, its fine to do (but will reset its position if you refresh the plot)
Player Home Only Layout (Optional file without the rest of the settlement and plots)
As I created the player home separately before putting it into the main settlement there is an optional file with only the player home in the layout.
This allows you add the player home (which is outside the build area on the South Western point) to your own settlement, or even another city plan.
- Go to the workbench, select manage (default key is Space),
- choose "Settlement Layout",
- then "Build/Manage Layouts".
- Look for the 'GavMan Covenant Player Home Only' layout using the Next / Previous options.
- Then choose "Use This Layout".
- If you want to keep what you have already built, or a current city plan, choose "Build It, But Skip Any Scrapping"
- it will then build the player home (there is no cinematic flyby when building layouts), when done a pop-up message will tell you it is complete.
Settlement Overview
Covenant, a small tidy settlement that still packs it in. Some might call it Cozy, but it's still open and ready to welcome visitors.
Foundation Level - 9 settlers
1 Agricultural, 3 Industrial, 2 Municipal, 1 Commercial, 1 Martial
6 Recreational and training (END, AGI, STR)
9 Residential (7 single, 2 double occupant)
Level 1 - 13 Settlers
1 Agricultural, 5 Industrial, 4 Municipal, 2 Commercial, 1 Martial
7 Recreational and training (END, AGI, STR, CHR)
11 Residential (9 single, 2 double occupant)
Level 2 - 18 Settlers
2 Agricultural, 6 Industrial (1 dual), 4 Municipal (1 dual), 3 Commercial, 2 Martial
8 Recreational and training (END, AGI, STR, CHR)
15 Residential (13 single, 2 double occupant)
Level 3 - 21 Settlers
2 Agricultural, 8 Industrial, 4 Municipal, 4 Commercial, 2 Martial
10 Recreational and training (END, AGI, STR, CHR)
18 Residential (16 single, 2 double occupant)
ISSUES - Please Read!
The existing turrets
The turrets may cause issues. Using the City Plan Assistant to create the city plan levels the settlement is claimed without completing the quests.
- I found that plots with their own turrets (or robots etc) would become hostile to the existing turrets.
- I don't think they contribute any SS2 numerical value to the defense of the settlement
The existing settlers
If you choose to side with Jacob and the existing settlers, they will remain at the settlement, however all but Ted Huntley will not be assignable. You can use console commands to make them useful, although I haven't fully tested this out, and some may retain their original dialogs. (store, doctor)
Deezer seems to be assignable but end up returning to hawking his lemonade mode.
Console commands used when the settler has been selected and their ID is active (you need to do them all on each settler to active assignment):
- setpv bAllowMove true
- setpv bAllowCaravan true
- setpv bCommandable true
- setpv bWorkshopStatusOn true
- addkeyword WorkshopAllowCommand
- addkeyword WorkshopAllowMove
- addkeyword WorkshopAllowCaravan
For the compact size it packs a lot in
It is reasonably big for its size with quite a few objects.
If you think that your machine is on the lean side when it comes to computing power, then you may just want to use one of the earlier level layouts, or perhaps download the optional save file and see if it will run for you. (including approaching the settlement to see if it doesn't crash)
For others though you will want to turn "Respect Build Limit" to OFF (if you haven't already done so - it defaults to ON - found under Performance)
Objects that YOU will need to scrap
I have used a custom scrap profile and managed to get rid of a number of objects that are not included in the standard profile.
This has left a couple of objects effects as they can't be removed via scrapping.
To get rid of them, go to the console, and type in "PRID {ID number - see below}" and press enter, then type "disable" and press enter
Power wires:
- Power wire lower into settlement ID: 001e1781
- Power wire to left house ID: 001e1782
- Power wire to right house ID: 001e1787
- Power wire to rear house ID: 001e178a
- Power wire to yellow house ID: 001e178b
Left over from the desk outside the gate -
If you scrap the desk prior to city plan activation you won't need to do these:
- desk stain ID: 001be86a
- desk paper rubbish ID: 001be875
- desk paper ID: 000714e3
- desk top ID: 00245a22
If you scrap the desk prior to city plan activation you won't need to do this one
- desk stain ID: 001bfcef
If scrapped with Place everywhere additional object selection prior to city plan activation you won't need to do this one:
- Papers ID: 00075d23.
If you scrap the desk prior to city plan activation you won't need to do this one
- Papers ID: 00072b3c
If you scrap the desk prior to city plan activation you won't need to do this one
- Papers ID: 00072b3d
If you scrap the desk with Place everywhere additional object selection prior to city plan activation you won't need to do this one:
- desk stain ID: 001bfcef
Power
In my testing I have had a few objects and plots not picking up on the radial power available when the are place in city plan upgrades.
(this seems to occur mainly in city plans with lots of objects. In layouts this doesn't happen - even though they use the same export file)
Simple fix is just to enter workshop mode, pick up a nearby power conduit or power pole, then [TAB] to release it back to its original position.
Some may be in difficult to reach/capture positions from the ground - use Workshop Plus by Kinggath to enable "flight" in workshop mode to make it easier!
The Minor things that are good to know about
Objects outside the build Zone
I have put "dressing" objects outside the build zone. If you don't have Place Everywhere you will not be able to customize further.
(if you do want to add anything, you will still need to place objects inside the build zone first then shift that object where you want it).
Defense and Junk Storage
Junk Storage has a defense requirement - however any city plans not set to Full Involvement setting will still upgrade. Large city plans with a lot of objects require a heap of junk storage.
This plan does not cover the junk storage defense requirements (I didn't want to spam lots of martial plots).
You can turn OFF the "Junk Storage Requires Defense" setting in SS2 when you build and upgrade the city plan then turn it back ON
This setting only effects junk storage placed at that time, turning it back will not change those junk storage containers placed when it was OFF.
Higher level plots need higher ability settlers
There are several plots of various types that require settlers with high Abilities.
Something I found was that when I had the settings Assignment Requirements Off, and Auto Assignment On, settlers would assign to these plots, then change to a new building plan, (if they change these to basic type, or reset to level 1 they will mess up settlement requirements).
Did you know you can use clothing items to help raise their abilities, and legendary items will stack.
Fake Doors
I have included fake doors on walls as 'dressing' into inaccessible areas that would be logically in the real world. Please don't curse me after spending too much time trying to find the sweet spot that gives the 'DOOR E) Open' prompt.
Janitor plot (appears in city plan level 3)
The Janitor residential plot from Apocalyptic Additions (an internal that's 1x1 in size) doesn't add to the settlement bed count, so I have placed a sleeping bag on the bed position until the issue is fixed.
Optional Files
If you can't wait through the city growth process I have included an optional file with level 1, 2 and 3 as separate layouts you can build through the workbench layout menu. Included in this is the modest player home only layout that sits atop the rear house.
I have included a save game file of level 3 of the city plan (with a limited mod list) that will allow you to have a run about the highest level of the city plan. A sort of try before you buy, so you can check out if you want to throw your valuable scrap towards the city plan and wait and watch its gradual upgrades in you game. Drop into the save into your saves folder and look for it when you go to load a game - "GavMan_Czy_Covenant_L3"
ADD-ON's Used (and Highly Recommended!)
I have designed the settlement with the specific plots chosen, you can let it randomize, but might end up with access issues.
You may need to refresh the Martial pillbox as the turret on top fails to spawn some times.
Wasteland Venturers Sim Settlements 2 Addon Pack by Tinuvia and Myrmarachne
Sim Settlements 2 Scrappers by Ohnno
Sim Settlements 2 - Junk Town 2 Addon Pack by Uituit
Sim Settlements 2 - Apocalyptic Additions Addon Pack by SirLach
Sim Settlements 2 - Pra's Random Addon 2 by Pra
Vault-Tec Tools - Sim Settlements 2 Addon Pack by Samutz and Wulfharth
SimHomestead 2 - A SimSettlements 2 addon by Eldarth
Sim Settlements 2 - Tiny Living by Freddrick
If using version 1
Sim Settlements 2 Chapter 2 update
In the old files there is a layout which adds a level 3 Sanitation plot from Tiny Living Add-on and a bed (sleeping bag) for an additional settler.
This will allow you to inject the new plot into an existing version 1.0 plan. Can be used at any current level, will be quick to run, but give the plot a bit of time to run scripts to update itself to level 3. Since everything is packed in I couldn't fit another residential plot in so just added a sleeping bag to the static bed by the store house.
How: Go to the workbench, choose: Manage > Settlement Layout > Build/Manage Layouts > {select desired layout with Next & Previous} Use This Layout > Build It, But Skip Any Scrapping (it will then start)
Please ensure you choose the SKIP ANY SCRAPPING option!
You will need to scrap the original city plans doghouse that will be in the same location as the new plot.
It should be fine to remove the layout file from your load order once you have used them to add the plots.