


0 of 0

About this mod
A quick tutorial on how to get around alignments issues in Outfit Studio without having to Copy Selected Weights or paints weights to adjust vertices.
- Permissions and credits
After getting my feet wet with the BodySlide and Outfit Studio, I inevitably ran into an issue where the alignment of meshes in-game, in the Creation Kit and in NifSkope did not reflect what I was seeing in Outfit Studio. And yes, I was in the latest version of Outfit Studio, NifSkope, Fallout 4 and the Creation Kit. After researching an answer or a solution to the issue, I could not find a sure fire fix or rather one that did not end with having to repaint weights and target bones.
With that said, I was able to come up with a pretty simple solution using logic compiled from other suggested resolutions.
How the Issue Presents
Just so we are on the same page, the issue presents as seen below. You'll notice the first set of gear is lined up; however, once the second set of "tactical gear" is imported, it is significant lower than the rest. The important thing to understand here, is that both sets individually are aligned to the player body correctly when worn in-game. However, working with the meshes unaligned in Outfit Studio can be tedious and erroneous.

You may be tempted to simply select all of one set and move them using the translation tool as this is a suggested fix to the issue. Unfortunately, when exporting to a .NIF, the end result will not be what is intended.

If you take this route, you'll find that you'll then have to copy selected weights and adjust as necessary which will then require you to paint weights for any meshes/vertices not adjusted correctly.
While not insanely difficult, it can be a tedious process and seemingly daunting for beginners. Thus, I propose a much simpler method.
The 'Jury-Rigged' Fix
Instead of using the translation gizmo to move the gear by "eyeballing" it, we're going to use the Move function in Outfit Studio. This will allow us to make precise movements and keep track of them so that once the mesh is morphed as needed, we can set everything back to its correct location.

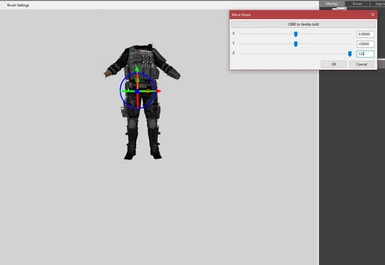
I recommend writing down the value you enter; when you go to move them back, you'll notice Outfit Studio will set the values to 0 even though the item has been moved as seen below.

As per Step 6 & 6.1, do the reverse to move the piece back to its original position.

Once you're done, export the to NIF as normal.

That's all there is to it. To put it simply, move the item into position, edit and morph, move the item back. Lastly, export as usual.
How the Fix Works
This information isn't necessary for using the method above. It's more of a commentary on why the above method works from my understanding of the situation. Outfit Studio zeros out any translation from the imported mesh and while its being edited as described in Step 4.1. This behavior does NOT move the mesh thus when importing two meshes that do not share true origin points, the default translations are not compensated for.
For example, say Mesh A is at true 0,0,0 while Mesh B is at 0,0,-20. Once they are imported into Outfit Studio, both are set to 0,0,0 on the invisible grid but, the meshes are not moved because the original translations are respected. Due to this, any movements done to the meshes will look okay relative to their Outfit Studio translation and coordinates but, will not once exported.
Example: Moving Mesh B +20 on the Z axis moves it to 0,0,20 in Outfit Studio but, its true coordinates are now 0,0,0 since (-20 + 20 = 0).
Why the coordinates and origin points differ in communication between Outfit Studio and NifSkope, I cannot say. Even the information above is simply a theory based on my limited time in Outfit Studio and what I learned in Game Art & Design back in college. Whether I'm right or wrong, the method should work as it did for me if you come across this headache and do not wish to take the long route of painting weights.
If the method does not work for you or you know why this issue happens and how to avoid it, please let me know in the comments. I'm more than happy to amend the tutorial to help those who need it.
Credits
Outfit Studio by Ousnius and Caliente
Militarized Minutemen by Corvalho
The Mercenary Pack by L0rd0fWar
And be sure to check out my latest mod Dr. Quench Soda Company and Radio!
With that said, I was able to come up with a pretty simple solution using logic compiled from other suggested resolutions.
--- This is NOT an Outfit Studio tutorial; this will simply help you resolve an issue ---
How the Issue Presents
Just so we are on the same page, the issue presents as seen below. You'll notice the first set of gear is lined up; however, once the second set of "tactical gear" is imported, it is significant lower than the rest. The important thing to understand here, is that both sets individually are aligned to the player body correctly when worn in-game. However, working with the meshes unaligned in Outfit Studio can be tedious and erroneous.
You may be tempted to simply select all of one set and move them using the translation tool as this is a suggested fix to the issue. Unfortunately, when exporting to a .NIF, the end result will not be what is intended.
If you take this route, you'll find that you'll then have to copy selected weights and adjust as necessary which will then require you to paint weights for any meshes/vertices not adjusted correctly.
While not insanely difficult, it can be a tedious process and seemingly daunting for beginners. Thus, I propose a much simpler method.
The 'Jury-Rigged' Fix
Instead of using the translation gizmo to move the gear by "eyeballing" it, we're going to use the Move function in Outfit Studio. This will allow us to make precise movements and keep track of them so that once the mesh is morphed as needed, we can set everything back to its correct location.
- Load your meshes (outfits) as needed
- Make sure you check the "Keep other Shapes" box
- Make sure you check the "Keep other Shapes" box
- Select the piece that needs to be aligned
- Go to Shape>Move
- Use the sliders to move your selected piece
- I recommend typing whole number values to move items into place; if you type a number and fall short, set it back to zero and try again
- This is crucial as you will need to keep track of each value you change (X, Y, Z) so that you can move it back after you're done morphing it.
- Edit and morph the piece as needed
- After editing, select the newly morphed piece and zero it out by moving it in the opposite direction per your manually entered value
- For example: If you moved z +120, move it -120
- You'll still want to go to Shape>Move to do this
I recommend writing down the value you enter; when you go to move them back, you'll notice Outfit Studio will set the values to 0 even though the item has been moved as seen below.
As per Step 6 & 6.1, do the reverse to move the piece back to its original position.
Once you're done, export the to NIF as normal.
That's all there is to it. To put it simply, move the item into position, edit and morph, move the item back. Lastly, export as usual.
How the Fix Works
This information isn't necessary for using the method above. It's more of a commentary on why the above method works from my understanding of the situation. Outfit Studio zeros out any translation from the imported mesh and while its being edited as described in Step 4.1. This behavior does NOT move the mesh thus when importing two meshes that do not share true origin points, the default translations are not compensated for.
For example, say Mesh A is at true 0,0,0 while Mesh B is at 0,0,-20. Once they are imported into Outfit Studio, both are set to 0,0,0 on the invisible grid but, the meshes are not moved because the original translations are respected. Due to this, any movements done to the meshes will look okay relative to their Outfit Studio translation and coordinates but, will not once exported.
Example: Moving Mesh B +20 on the Z axis moves it to 0,0,20 in Outfit Studio but, its true coordinates are now 0,0,0 since (-20 + 20 = 0).
Why the coordinates and origin points differ in communication between Outfit Studio and NifSkope, I cannot say. Even the information above is simply a theory based on my limited time in Outfit Studio and what I learned in Game Art & Design back in college. Whether I'm right or wrong, the method should work as it did for me if you come across this headache and do not wish to take the long route of painting weights.
If the method does not work for you or you know why this issue happens and how to avoid it, please let me know in the comments. I'm more than happy to amend the tutorial to help those who need it.
Credits
Outfit Studio by Ousnius and Caliente
Militarized Minutemen by Corvalho
The Mercenary Pack by L0rd0fWar
And be sure to check out my latest mod Dr. Quench Soda Company and Radio!