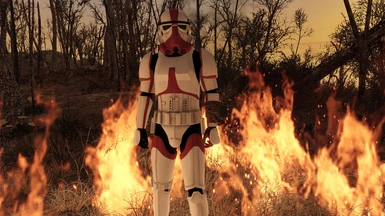
The armor is installed together with the Institute Stormtroopers and E-11 blasters, but their models doesn't change and when spawning or crafting a Stormtrooper armor it appears as a combat armor piece. What's the issue?
I think you'd have to start a new game or wait a few in game days to see changes to existing NPCs. Or it could be another mod changing the file paths of my armors.
I should make it clear, my mod does NOT edit or add NPCs, nor does it add blasters. It works fine on its own.
I uninstalled all other mods, started a new file with only this mod, same issue. Combat Armor placeholders as an object or at the chem station, put on, invisible body. It's like something's missing but I don't know what. I tried with the older mod but there half of the stuff wasn't even available at the chem station and the Tab button was bugged. This is so unfortunate.
In MO2, check if the CW Stormtrooper meshes folder, and its sub folders, actually contain .nif files. Also make sure the mod is enabled in MO2.
I don't really know what else to suggest other than to reinstall your game or follow a modding guide. I suggest "the midnight ride", it's really good and what I used for my modding base.
Yep the mesh files are there and the .nif files, at least when I downloaded the mod manually. I don't know how to check through MO2 if they're there. I checked out Midnight Ride but I didn't find any help there, only what mods to avoid which I don't even have. Maybe the mod would work if I installed it manually?
Well generally you follow the guide from start to finish. It won't have any information for your specific problem.
Yes, you can try installing the mod manually through MO2 if you were using download with mod manager before. Download the mod and in the upper left corner of MO2 there will be a box with a disc icon. Click that and install the mod from there. Also, you can right click a mod entry in MO2 and select open in explorer. This will open that specific mods installation folder in MO2. You can do what I told you earlier from there.
I installed it manually, even reinstalled the game and activated the mod, started a new file, opened commands and typed "help stormtrooper" and the list came up, I spawned a helmet and bam, there lies a combat helmet that says stormtrooper helmet. This is really getting on my nerves. I remember your mod working as it should years ago, but not this time around.
It's supposed to be combat armor, there aren't any ground objects for the stormtrooper armor yet so combat armor is a placeholder. I'm working on making ground objects now so people don't confuse it with a bug. Are the armors appearing invisible still?
Hi, so my game got corrupted earlier and I had to reinstall everything including my mods and the option to make the kama Black is no longer there and I was wondering if you knew what the fix for this might be?
I can see you've downloaded the old version 1.95. Mod was remade in version 2, so the kama color might be under a different name in the armor bench, but I can't remember right now. You can just install the old version. Should be safe to uninstall 2.0 mid game too, assuming you don't use other mods dependent on it.
Is there any way to obtain it through commands? Tried "help "CW Stormtroopers/Commonwealth Stormtroopers", no result. Well, in fact, i need only ID of main Armor suit
This mod is great, but I feel like the recent update has more bugs than the old one.
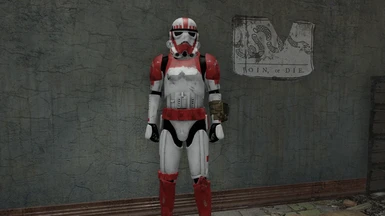
Only the armor's appearance can be modified and there aren't unique states for the appearances, the armor's inventory icon is of the combat armor as opposed to the stormtrooper armor, though these aren't "game breaking", they do make the mod seem more for show as opposed to anything practical, unless I'm missing something.
Those aren't bugs. Unique stats were removed cause they were buggy on the last version. Inv icon is combat armor because it's not easy to create a proper world model. (at least not for me). A lot of the custom paints were cosmetic in the new vegas mod, so thats how I did it. It's also a lot of work to create unique stats for each paint because I have to create multiple unique records in the CK for each paint job.
Of course you can use the old version or add the features you want yourself.
Ah, alrighty. Wasn't too sure. I'm thinking of doing that. (Downloading the old version.)
Also, what's with the invisible extra armor parts? To explain: There are pieces of armor listed in the style of standard armor parts (Chest, left arm, right arm, left leg, right leg.) as well as a body glove, but they're invisible when I put them on, resulting in my character's body turning invisible. Just curious.
Sorry for the late response. Did you use the console to spawn those in? If so, they're most likely left over placeholder records for the modular version I was going to make.
To make a ground mesh just collapse all modifiers in the modeling program you use, move the mesh to the ground and reset its pivot point to be 0, 0, 0. Then export as an .obj file. Now open an existing ground mesh of similar size with NifSkope and select the mesh. Now hit File Import and import the obj file you exported.
Usually this will make a new, erroneous texture child in the mesh, so you will need to scroll down in NifSkope and find the value at the bottom of the stack that says a number and texture. So your NiTriShape may have a new, incorrect texture. Look for BSLightingShaderProperty at the bottom. Will say a number. Select the mesh and scroll down the very bottom list where it says Name Value and look for Shader Property. Double click that and type that original number in and hit Enter. Now you can select the new, incorrect one and right click, hit Block and Remove Branch. Now expand the correctly placed BSLightingShaderProperty and click on BSShaderTextureSet. This will give you a list of the textures. Change the path to fit your textures. Save as, give it a name, assign in the toolkit and... oops, assign in the GECK and save.
I never made any tutorial videos on this due to there being tons out there.... or at least I assume there are tons out there. Should be. I know Nightasy was making tutorials on it on Youtube.
The tutorial I followed was similar to yours. The issue was with collisions of the model being the exactly the same as the reference model. In my case, stormtrooper helmet ground model with combat armor helmet collisions. There is/was clipping in game when the stormtrooper helmet was dropped and collided with the ground.
Unless I did it wrong or there's a way to fix the collisions?


489 comments
I should make it clear, my mod does NOT edit or add NPCs, nor does it add blasters. It works fine on its own.
I don't really know what else to suggest other than to reinstall your game or follow a modding guide. I suggest "the midnight ride", it's really good and what I used for my modding base.
Yes, you can try installing the mod manually through MO2 if you were using download with mod manager before. Download the mod and in the upper left corner of MO2 there will be a box with a disc icon. Click that and install the mod from there. Also, you can right click a mod entry in MO2 and select open in explorer. This will open that specific mods installation folder in MO2. You can do what I told you earlier from there.
Maybe record a video of your process? Or we can get in a call in discord and screenshare. Otherwise, I can't really help you further.
Best regards
Only the armor's appearance can be modified and there aren't unique states for the appearances, the armor's inventory icon is of the combat armor as opposed to the stormtrooper armor, though these aren't "game breaking", they do make the mod seem more for show as opposed to anything practical, unless I'm missing something.
Of course you can use the old version or add the features you want yourself.
Also, what's with the invisible extra armor parts? To explain: There are pieces of armor listed in the style of standard armor parts (Chest, left arm, right arm, left leg, right leg.) as well as a body glove, but they're invisible when I put them on, resulting in my character's body turning invisible. Just curious.
I use ESP Explorer and was confused.
Don't worry about the late response, it's all good. ^^
Now open an existing ground mesh of similar size with NifSkope and select the mesh. Now hit File Import and import the obj file you exported.
Usually this will make a new, erroneous texture child in the mesh, so you will need to scroll down in NifSkope and find the value at the bottom of the stack that says a number and texture.
So your NiTriShape may have a new, incorrect texture.
Look for BSLightingShaderProperty at the bottom. Will say a number.
Select the mesh and scroll down the very bottom list where it says Name Value and look for Shader Property.
Double click that and type that original number in and hit Enter.
Now you can select the new, incorrect one and right click, hit Block and Remove Branch.
Now expand the correctly placed BSLightingShaderProperty and click on BSShaderTextureSet. This will give you a list of the textures.
Change the path to fit your textures.
Save as, give it a name, assign in the toolkit and... oops, assign in the GECK and save.
I never made any tutorial videos on this due to there being tons out there.... or at least I assume there are tons out there. Should be. I know Nightasy was making tutorials on it on Youtube.
Unless I did it wrong or there's a way to fix the collisions?