


This technique is now obsolete. Please see the "standalone textures" section of the main description.
If you want to use one tint map for most characters but different ones for your warden and/or select NPCs, you'll need these resources (as well as a main file as above).
In this kit, the three tint maps have been assigned a letter: A for dark lips, B for medium lips, and C for pale lips. There are two ways of using the kit:
Presets
This is the most user-friendly way of the two approaches, but it is also the most limited: it allows you to assign a different tint map to your warden, but only your warden.
I've provided three presets (MOPs) for each gender/race combo, one for each tint map. The presets are just the "base" presets with a few minor changes:
- They each have one of my three tint maps applied. This cannot be altered in the character creator, which is why it must be set in the mop file.
- The default skintone on them is the darkest vanilla tint, just so that you can see which map you're using at a glance. You can of course change this to anything you like.
- The eyes are further forward (as far forward as possible without the brow mesh going weird) because Bioware's decisions about eye placement are awful and this is a slider you can only change in the toolset.
- The elves in the elf update file also have their ears set up, and their pupils 50% larger (since they look a little pinpricky otherwise).
Note: MOP files are always compatible with Realistic Teeth.
To use the presets, you must put them in your chargenmorphcfg.xml file, which, if you have one, is located in the root of your override folder. You can either use the chargenmorphcfg.xml file I've provided (either on its own if you don't have one yet, or to merge with your existing one using the Chargenmorph Compiler), or delete it and edit yours manually to add them.
Additional chargenmorphcfg lines for manual editing
<heads>
 <human_male>
<resource name="hm_bas_pgmta.mop" />
<resource name="hm_bas_pgmtb.mop" />
<resource name="hm_bas_pgmtc.mop" />
 </human_male>
 <human_female>
<resource name="hf_bas_pgmta.mop" />
<resource name="hf_bas_pgmtb.mop" />
<resource name="hf_bas_pgmtc.mop" />
 </human_female>
 <dwarf_male>
<resource name="dm_bas_pgmta.mop" />
<resource name="dm_bas_pgmtb.mop" />
<resource name="dm_bas_pgmtc.mop" />
 </dwarf_male>
 <dwarf_female>
<resource name="df_bas_pgmta.mop" />
<resource name="df_bas_pgmtb.mop" />
<resource name="df_bas_pgmtc.mop" />
 </dwarf_female>
 <elf_male>
<resource name="em_bas_pgmta.mop" />
<resource name="em_bas_pgmtb.mop" />
<resource name="em_bas_pgmtc.mop" />
 </elf_male>
 <elf_female>
<resource name="ef_bas_pgmta.mop" />
<resource name="ef_bas_pgmtb.mop" />
<resource name="ef_bas_pgmtc.mop" />
 </elf_female>
  </heads>
Manual MOR/MOP Editing
This method is more complex, but it will allow you to assign a different tint map to any character.
The tint map was not previously editable in the toolset: it required assigning one of the base head models I've provided. This also cannot be changed in the toolset, and so once your headmorph is exported to MOR or MOP (or you have a MOR/MOP you are allowed to change), you must edit it manually.
Instructions
I've provided MMH and MAO files to cover all three maps for all different heads (including children and qunari), but because the base head model (ie the MMH) of a headmorph cannot be changed in the toolset, you must change it yourself once your headmorph is exported to MOR or MOP. You can either use the toolset or pyGFF for this.
To edit a line in the toolset, simply double click on it, edit the text, then hit enter. To edit a line in pyGFF, click on it then move down to the "Edit" box in the bottom left to change the text, then click the "Save" button when you're done (this does not save the file, only changes the line).
- Open your MOR or MOP in your chosen tool, and expand the top level if it isn't already expanded (the toolset will probably have expanded it; pyGFF probably will not).
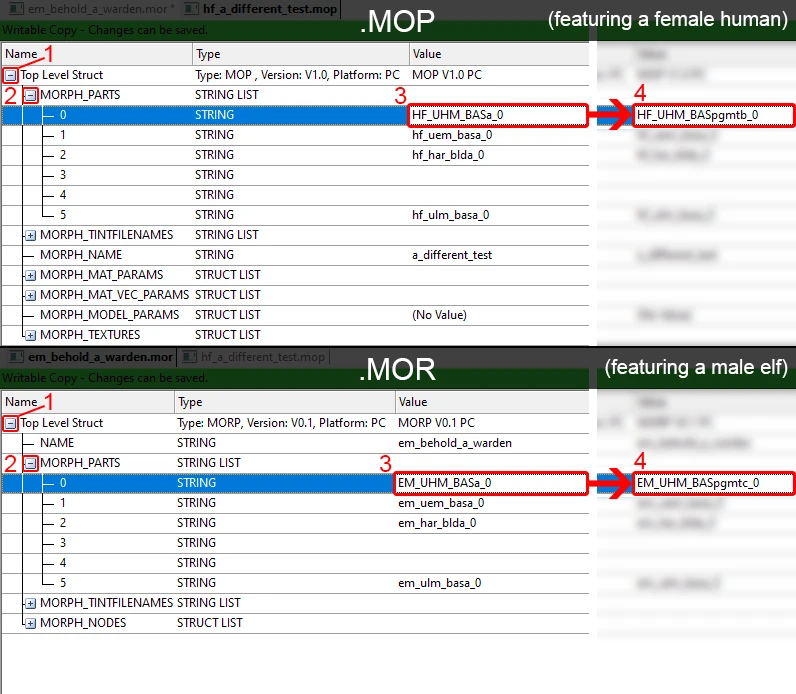
- The group you need will either be the first item (in a MOP) or the second item (in a MOR, just underneath the morph's name) and it will be labelled MORPH PARTS; expand that.
- The first item underneath that (numbered 0) points to the base head model; it will say **_UHM_BASa_0, where ** represents the race/gender character combination. (For example, a female human will have HF_UHM_BASa_0; a male elf will have EM_UHM_BASa_0.) Do not confuse this with **_uem_basa_0 (the eyeballs) or **_ulm_basa_0 (the eyelashes). The thing to look out for is that middle letter in UHM: the base head model is H; eyeballs are E; eyelashes are L.
- Edit this record to reference the base head corresponding to the tint map you wish to use. The format is **_UHM_BASpgmt#_0, where ** is again the race/gender character combination (which must stay the same) and # is the letter corresponding to the tint map you want (which is your choice). Dark lips is a; medium lips is b; pale lips is c. For example, the record for a female dwarf using the light lips map would say DF_UHM_BASpgmtc_0. This must be precisely correct; always ensure that the text ends in _0 for the naming conventions to function properly. Uppercase vs lowercase is not important, however.
- Save your file! In the toolset you can just save normally; pyGFF requires you to "save as" and overwrite the file.
Once you've done that, you're ready to use your MOR/MOP in game as you would normally!
If you want to add more variant heads, I've written a slightly bare-bones tutorial in this article on this mod.
Installation
Extract into your override folder as usual; it's fine to put the kit in the same folder as the main files.
Compatibility
Compatibility files are named "CVK compatibility files" (not "Main compatibility files") and are found in the Miscellaneous Files section. You only need these if you're using the Character Variance Kit.
- If you use tmp7704's elf update you will need the compatibility files I've provided for it; either drop the folder into the Character Variance Kit folder, where the default folder names should give them load order priority over the vanilla-based heads, or drag the MMH and MOP folders out of it so that they merge with the existing MMH and MOP folders and directly overwrite the vanilla-based heads.
- There are also compatibility files available for the same makeup as mentioned in the main file's Compatibility section. These replace (or override with load order priority) the contents of the "Textures" folder.
Uninstallation
Delete the files, remove the MOPs from your chargenmorphcfg.xml file if you added them, and undo any changes you have made to MOR/MOP files you use.
1 comment