About this mod
Correct Path for the EE and some files to edit the portraits yourself in Gimp Or Photoshop.
- Permissions and credits
http://larian.com/forums/ubbthreads.php?ubb=showflat&Number=572817
You can either just download and extract "Divinity EE Custom Portraits" to this path :
"HardDrive":\Steam\steamapps\common\Divinity Original Sin Enhanced Edition\
Or download "Divinity EE Edit Portraits" to edit and change the portraits yourself with Gimp or Photoshop. You will need the DDS plugin for each respectively. Although the quality on the GIMP compression is a bit worse than the one selected for Photoshop.
Gimp DDS plugin :
https://code.google.com/p/gimp-dds/downloads/list
Photoshop DDS plugin
https://developer.nvidia.com/nvidia-texture-tools-adobe-photoshop
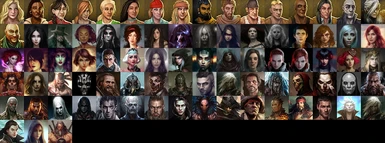
The portraits you will want to use have to be 64x64, and perfectly aligned on the other ones. The first row of portraits seem to be those of some npcs and companions, I didn't change them but you can add whatever you want as with other portraits.
Open the .xcf file with gimp.
In the Layers – Brushed dock to your left by default you will see a series of black squares with an eye next to it, press the eye to to hide a portrait and reveal the main one it replaces.
To delete that layer : select the layer in the “Layers-Brushes” dock, right click and press delete layer.
Now you can leave it as that if you like the default portrait or paste a 64x64 portrait to the exact location (You will have to zoom in and watch that the pixels matches 200% to 400% is enough to see).
Once you are happy with your changes, Select Image>Merge Visible Layers or press CTRL+M. In the window that appears select “Clipped to botom layer” and press Merge.
Press File>Export As>Next to Name change the file extention to .dds>Press Export and Select Compression BC3/DXT5. You can select mipmap if you are on low end pc, but it shouldn't change much.
Copy and paste the .dds file you made to this path, if you don't have it, create the necessary folders:
“HardDrive”:\Steam\steamapps\common\Divinity Original Sin Enhanced Edition\Data\Public\Shared\Assets\Textures\Icons
Open the .psd file with photoshop.
To your right by default under layer you should see a series of squares with an eye next to it, if not either expand panels or press F7. Pressing the eye will hide a portrait and reveal the main one it replaces. Right click on the layer and select “Replace contents”, then select an image that is 64x64.
Once you are happy with your changes, Select Layer>Merge Visible or press Shift+Ctrl+E.
Select File>Save As>Under Format select D3D/DDS>Expand the first menu select 8.8.8.8 ARGB and generate MIP map >Save
Copy and paste the .dds file you made to this path, if you don't have it, create the necessary folders:
“HardDrive”:\Steam\steamapps\common\Divinity Original Sin Enhanced Edition\Data\Public\Shared\Assets\Textures\Icons


