1) Download the Core.zip file, unzip the contents to the root of the game, where the .exe file is located. The contents of the archive are the d3d9.dll file and the scripts folder. 2) Select and download one of the presets you like, or if you cannot choose, select Full shaders optimize.zip, it contains all the presets. 3) Unzip the contents of the downloaded preset(s) archive to any location. Place the contents in the scripts folder located in the root of your game. 4) Visit the Skyrim Priority LE mod author's page to learn more about what the mod does and how to configure it. Open the PriorityMod.toml file located in the scripts folder using Notepad to change the mod settings. The only setting you can make is changing the affinity parameter (optional). To do this, visit the CPU Affinity Mask Calculator page. Then open your system settings and pay attention to the RAM parameter. You need to start from the specified amount. Go back to the calculator page, before doing anything, subtract 1 from the amount of your RAM, now moving from top to bottom, put checkmarks on the calculator. Uncheck CPU 1 and CPU 3. The resulting value is in the CPU Affinity Bitmask (hex) field. It will start with 0x and look like this: 0x000000000000FFF5. You need to remove all the repeating zeros that follow each other (stand next to each other), until you get a value similar to this 0xFFF5. You specify it in the affinity parameter.
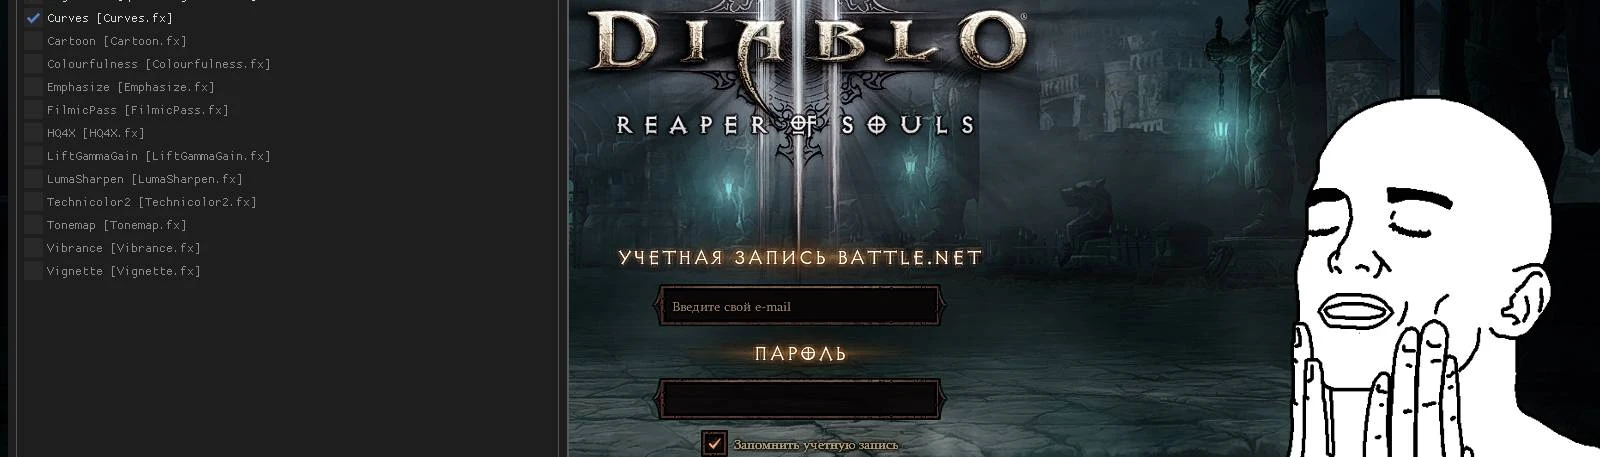
If you have not downloaded dsmfix and have selected one preset, you can already play. If you have selected Full shaders optimize containing all presets, then after starting the game you can press the Home key on your keyboard to open the ReShade menu. Next to the arrows on the left there will be a strip with the name of the default preset (darkD3). Click on this strip to select another preset from the drop-down list. The drop-down list is an explorer window. The ReShade window can be opened at any time during the game, to disable the preset press F11. To take a screenshot press F1, the screenshots taken are placed in the scripts folder.
If you have downloaded dsmfix:
!!! Use this mod only in single player mode!!!
5) Place the contents in the scripts folder. Usually no configuration is required, but if you want to increase the sensitivity of the mouse, you can edit the dsmfix.ini file, the sensitivity parameter. Or you can use dsmfixgui.exe to do this through the utility. To disable this mod, exit the game and rename the file dsmfix.asi to dsmfix.asi.bak. Confirm the warning about changing the extension.


 01")


 02")
3 comments
2) Select and download one of the presets you like, or if you cannot choose, select Full shaders optimize.zip, it contains all the presets.
3) Unzip the contents of the downloaded preset(s) archive to any location. Place the contents in the scripts folder located in the root of your game.
4) Visit the Skyrim Priority LE mod author's page to learn more about what the mod does and how to configure it. Open the PriorityMod.toml file located in the scripts folder using Notepad to change the mod settings. The only setting you can make is changing the affinity parameter (optional). To do this, visit the CPU Affinity Mask Calculator page. Then open your system settings and pay attention to the RAM parameter. You need to start from the specified amount. Go back to the calculator page, before doing anything, subtract 1 from the amount of your RAM, now moving from top to bottom, put checkmarks on the calculator. Uncheck CPU 1 and CPU 3. The resulting value is in the CPU Affinity Bitmask (hex) field. It will start with 0x and look like this: 0x000000000000FFF5. You need to remove all the repeating zeros that follow each other (stand next to each other), until you get a value similar to this 0xFFF5. You specify it in the affinity parameter.
If you have not downloaded dsmfix and have selected one preset, you can already play. If you have selected Full shaders optimize containing all presets, then after starting the game you can press the Home key on your keyboard to open the ReShade menu. Next to the arrows on the left there will be a strip with the name of the default preset (darkD3). Click on this strip to select another preset from the drop-down list. The drop-down list is an explorer window. The ReShade window can be opened at any time during the game, to disable the preset press F11. To take a screenshot press F1, the screenshots taken are placed in the scripts folder.
If you have downloaded dsmfix:
!!! Use this mod only in single player mode!!!
5) Place the contents in the scripts folder. Usually no configuration is required, but if you want to increase the sensitivity of the mouse, you can edit the dsmfix.ini file, the sensitivity parameter. Or you can use dsmfixgui.exe to do this through the utility. To disable this mod, exit the game and rename the file dsmfix.asi to dsmfix.asi.bak. Confirm the warning about changing the extension.