


0 of 0


Modding Demon's Souls is easier than you think. There are several ways you can mod the game. This tutorial will guide you through a couple of them.
Note: Whenever you mod something in the game, be it either by installing a mod or modding the game yourself it may be necessary to clear the PS3 cache on the RPCS3 emulator. NOT TO BE CONFUSED WITH THE SHADER CACHE. You'll find the PS3 cache in the RPCS3 emulator folder inside DEV_HDD1 folder, delete the contents of the caches folder.
Table of contents:
- Modding Parameter Files
- Modding Textures
- Modding Text
- Modding Maps
- Reference IDs
- Translating Parameter Options
- Other Stuff
This is probably the most significant way you can mod the game. There are two types of parameter files, drawparam and gameparam. Drawparam controls graphical parameters, mostly lighting but also stuff like depth of field, contrast, saturation, etc. Gameparam controls gameplay parameters, how much health enemies have, how much scaling a weapon has, how many souls an item cost, etc. To modify parameter files we'll need a couple of tools.
Tools needed:
- Demon's Souls Debug Menu
You can download the Debug Menu patch from Gibbed here: https://github.com/gibbed/DemonsSoulsDebug/releases/tag/1.0.1
Follow this tutorial on how to install: https://www.youtube.com/watch?v=H1JoeVRsRbU
Note: The tutorial is for a CFW PS3 but works just fine on RPCS3, just get your EBOOT.BIN from your game's folder and follow the rest of the instructions.
- BND Build
Get Horkrux's version of BND Rebuilder here: https://github.com/horkrux/DeS-BNDBuild/releases
Wulf2k's version of the rebuilder do not extract bnds inside dcx files directly so you have to extract the dcx file and then the bnd and rebuild both which makes it more time consuming, Horkrux's version extracts and rebuilds everything in one go.
Instructions:
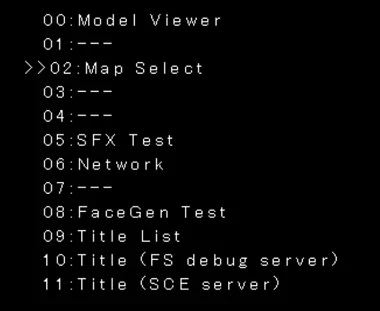
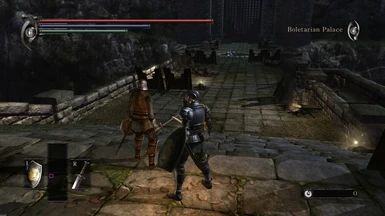
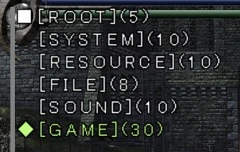
After installing the Debug Menu load up the game. You'll be greeted with this screen:

Model Viewer allows you to view models, press (L3+R3) to exit it if you decide to use it. Map Select will warp you directly to a level using the debug character. The Title options will load you normally into the game. For now just select Map Select.
The maps you can load are:
-m01 The Nexus
-m02 Boletaria Palace
-m03 Shrine of Storms
-m04 Tower of Latria
-m05 Valley of Defilement
-m06 Stonefang Tunnel
-m07 WILL CRASH THE GAME! (This is the cut level)
-m08 Tutorial
-m99 WILL CRASH THE GAME! (These are test rooms)
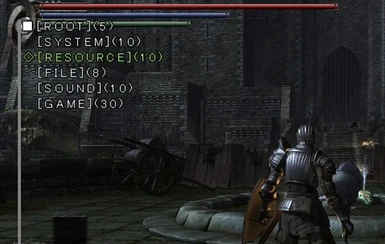
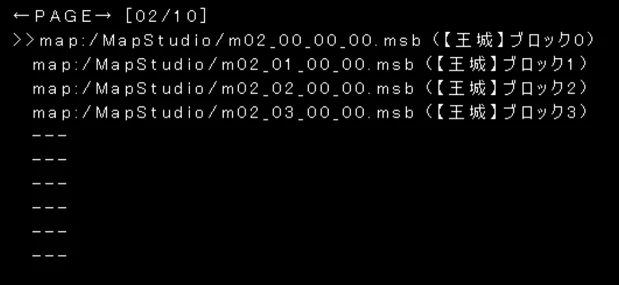
Each map will have a list of levels you can load into, these are the archstones. Choose a level to load into. By quitting the game you will return to the Map Select screen. Once you load into the game press Select to load the Debug Menu:
Navigating the menu: Press select to open or close the menu. Press up and down on the D-Pad to navigate the menu. Press X to enter and 0 to return. Left and Right on the D-Pad to increase or decrease values by 1. Hold L1 and move left or right on the D-Pad to change values in increments of 10, hold Square to change in increments of 100 and both L1 and Square to change in increments of 1000. You can also hold L1 or Square and press up and down on the D-Pad to scroll down the lists faster. Press Triangle to revert values back to default.
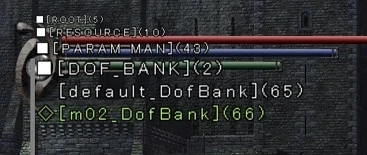
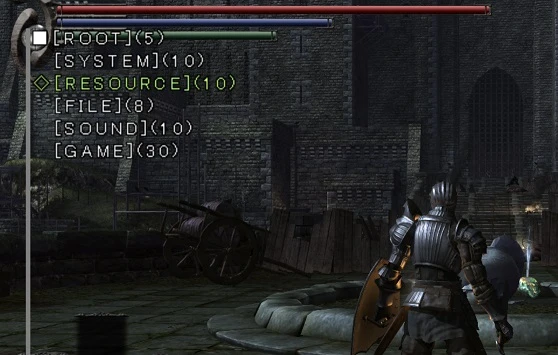
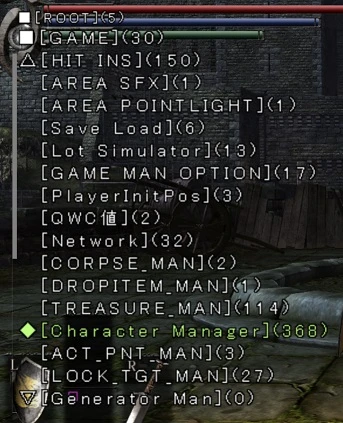
There are many options here. The menu is in japanese but even without knowing japanese it's not that hard to navigate and mess around. To modify the game you want to go to "Resource" and then to "Param Man". There you will find a list of parameters that can be modified.

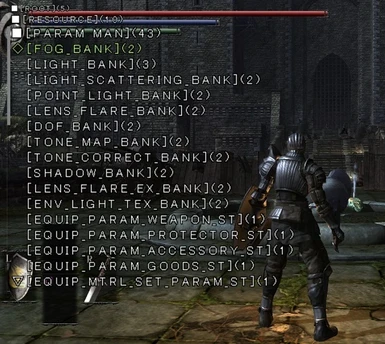
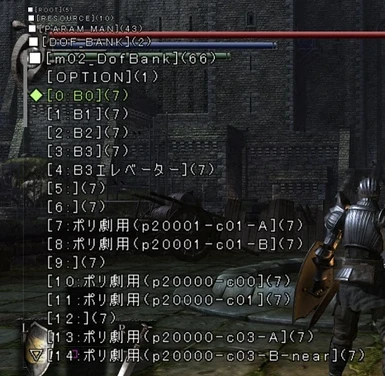
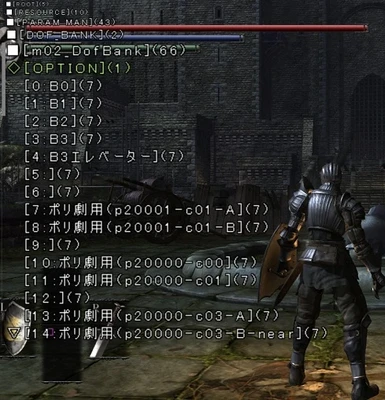
From "FOG_BAN" all the way down to "ENV_LIGHT_TEX_BANK", these are Drawparam files, they control graphical parameters. Below that are Gameparam files that control gameplay parameters. For this tutorial I'm going to remove the Depth of Field effect from the game. So we'll go to DOF_BANK:

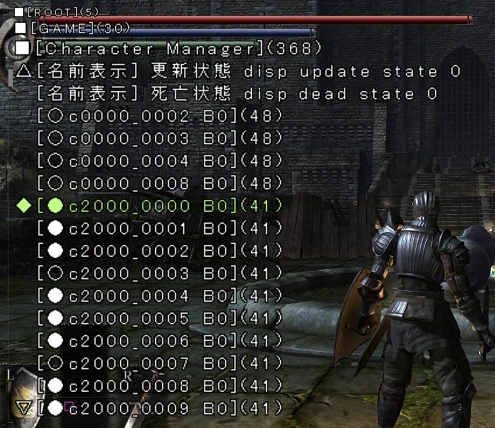
From this menu you select the map you're currently in. In this example it's m02.
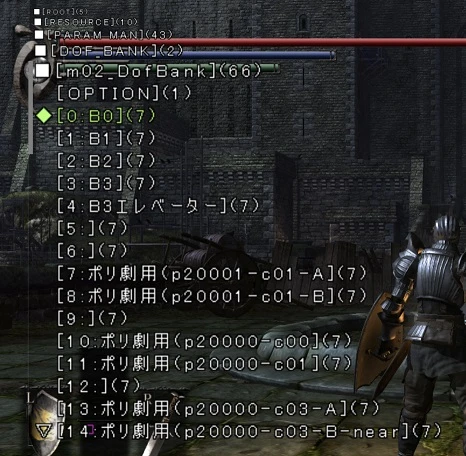
Here we have many options. The B0, B1, B2, B3 represent each area of the level, the other options control cutscenes. Since we're in the first area of the level we select B0.
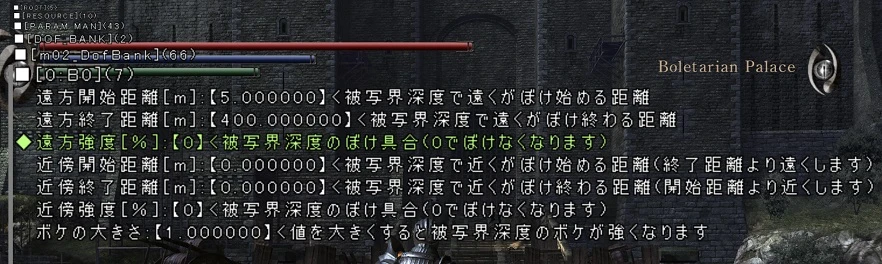
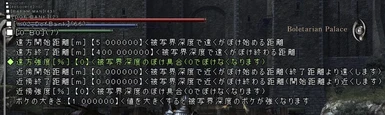
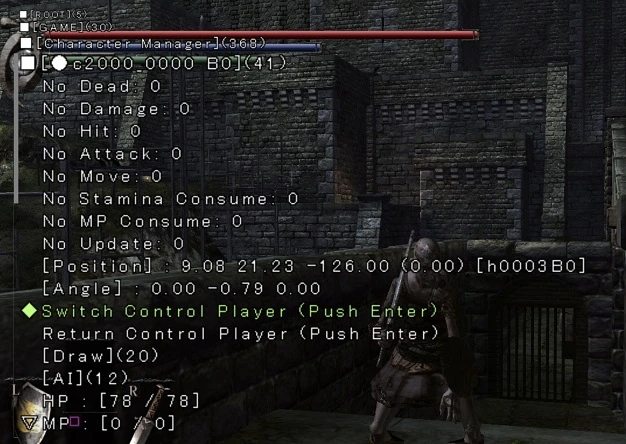
Now we just change the % value to 0 and the Depth of Field effect is gone. With graphical parameters you can see the change in real time so just press select again to close the Debug menu and look around. Press select again to open the menu. Now we need to save our changes. Press circle to return.
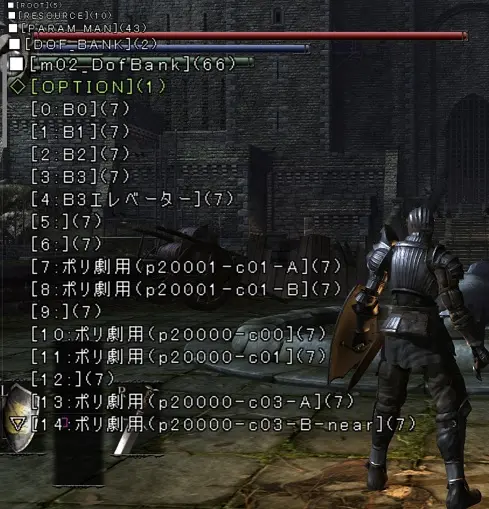
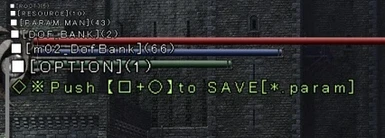
Go to OPTION
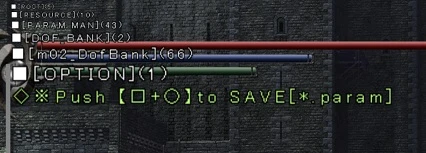
To save the changes hold Square and press X. The Debug menu says [Square + Circle] but that's because X and Circle are inverted in the japanese PS3 so unless your PS3 is japanese you need to hold Square and press X instead. After that go to your Demon's Souls folder and inside the param folder, the path should be something like "Demon's Souls - [BLUS30443] \ PS3_GAME \ USRDIR \ param". There you'll find the saved param file.
 NOTE: I was unable to save the parameter file in some builds of the RPCS3 emulator. If the file doesn't save try an earlier build of the emulator.
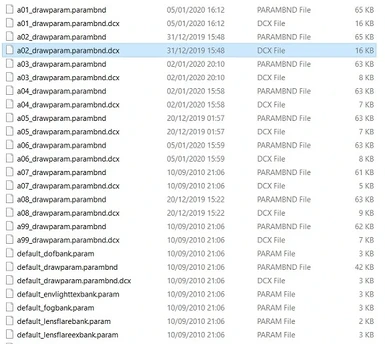
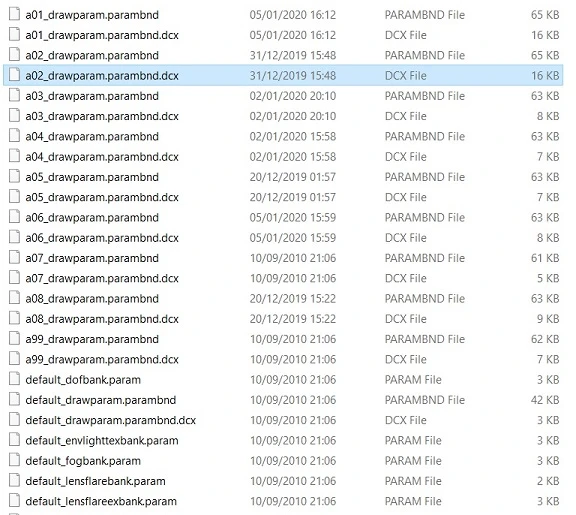
Now you need to rename the file and remove those numbers. In this case we rename "m02_DofBank_200415_000507.param" to "m02_DofBank.param". Since we modified a graphics parameter we need to save it to the drawparam folder. Inside drawparam you'll find a list of files, what we need are the .dcx files. Each map of the game has it's own .dcx file, since we modified map 02 which is Boletaria Palace we need the a02_drawparam.parambnd.dcx file, not to be confused with the .parambnd file. Now make a copy of that file somewhere else so we can work with it and if you want you should also make a backup copy so you can revert back afterwards.
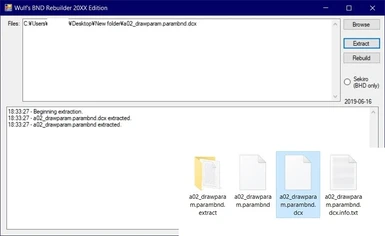
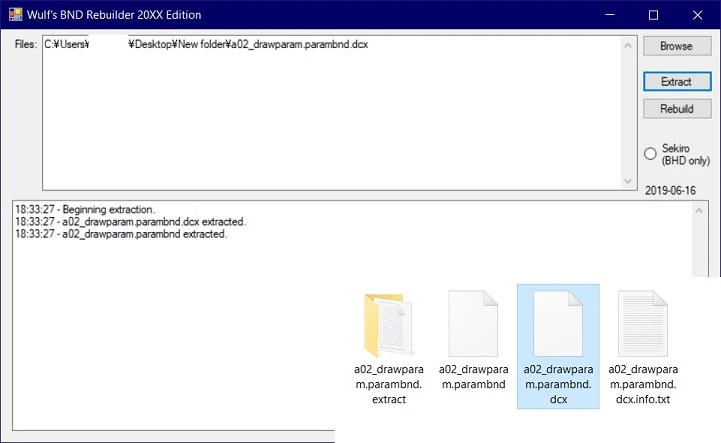
Once you have a copy of "a02_drawparam.parambnd.dcx" inside another folder open DeSBNDBuild.exe and drag and drop the .dcx file inside, press extract. You'll get a folder, inside that folder go to all the way to the param folder and copy your modified "m02_DofBank.param" into it, replace the file and close the folder. Now back to DeSBNDBuild.exe press Rebuild and it will save the changes into the .dcx file. Now your mod is complete, you can just place the modified a02_drawparam.parambnd.dcx into your Demon's Souls drawparam folder, overwrite when asked to. You can delete the other files that were extracted. To see the changes you can either close and reload the game entirely or just exit the current map you're load in and either quit to the main menu or quit back to the Map Select menu if using the debug Map Selector.
This same method can be used to change other graphical parameters. Keep in mind that for each map of the game you'll need it's corresponding dcx file. For gameplay parameters the .dcx file that needs to be modified is either "gameparamna.parambnd.dcx" for the western release or "gameparam.parambnd.dcx" for the japanese version, I recommend modifying both so that your mod works with all versions of the game.
Tools needed:
- BND Build
Get Horkrux's version of BND Rebuilder here: https://github.com/horkrux/DeS-BNDBuild/releases
Wulf2k's version of the rebuilder do not extract bnds inside dcx files directly so you have to extract the dcx file and then the bnd and rebuild both which makes it more time consuming, Horkrux's version extracts and rebuilds everything in one go.
- Paint.net
https://www.getpaint.net/
- Irfanview
Not really needed but recommended https://www.irfanview.com/
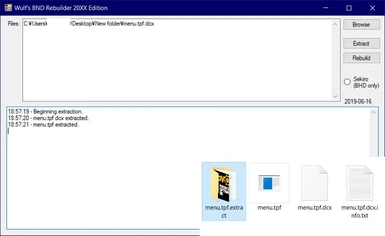
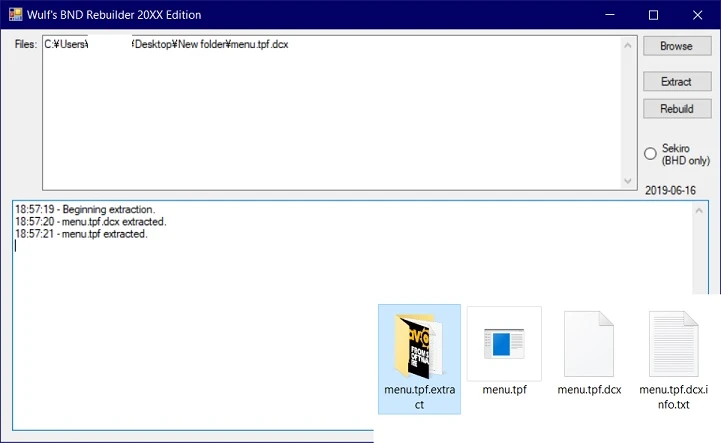
Start by extracting texture files with BND Build. Texture files can be found in a few different places inside the game's folder. The textures are usually stored inside .tpf files however we need to extract the .dcx files that contains the compressed .tpf files instead. For this example let's modify the menu textures. Go to your Demon's Souls folder, the path should be "Demon's Souls - [BLUS30443] \ PS3_GAME \ USRDIR \ menu". Here you can modify "menu.tpf.dcx" which contains many textures for the menus. Copy the "menu.tpf.dcx" into a new folder and extract it using DeSBNDBuild.exe.
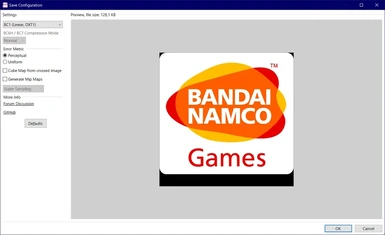
You'll get a folder and inside you'll find many .dds files, these are the textures. You can open and modify them using Paint.NET. Open one of them and modify it as you see fit. After you're done with your changes you can save it. Go to files and select Save As. It's going to open a new screen. Under settings you need to select either DXT1 or DXT5, to know which one to save as you can open the texture file using Irfan View and under "Image" select "Information" and it should show you which one it is. Next you'll need to determine if the texture has mip maps or not. Menu textures don't have them but textures for models and geometry will have them so you'll need to check the "Generate Mip Maps" box for those.

- BND Build
Get Horkrux's version of BND Rebuilder here: https://github.com/horkrux/DeS-BNDBuild/releases
Wulf2k's version of the rebuilder do not extract bnds inside dcx files directly so you have to extract the dcx file and then the bnd and rebuild both which makes it more time consuming, Horkrux's version extracts and rebuilds everything in one go.
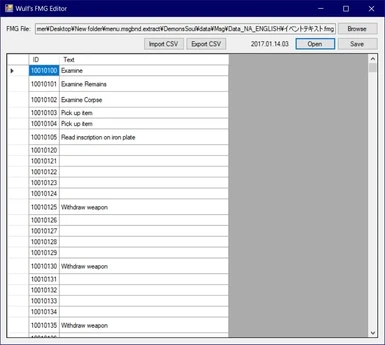
- Wulf's Fmg Editor
I could not find any link to his tool anywhere on the internet. I'm going to upload the tool to this mod files.
All text in the game can be modified using the FMG editor. The text files can be found in "Demon's Souls - [BLUS30443] \ PS3_GAME \ USRDIR \ msg \ na_english". Inside you'll find two .dcx files, menu and item. The menu file includes both menu text and dialog. Make a copy of the file you want to edit and copy it to a new fold. Extract it using BND Build. Inside the folders you'll find several .fmg files. Open the FMG Editor, drag and drop the file you want to modify. Open it with the FMG Editor, modify the text as you see fit, save and close. Now go back to BND Build and click on Rebuild. Now you can copy the modified .dcx file back to your msg\na_english folder and replace the original file. You can delete the other extracted files.
This is probably the most difficult of them. I don't understand it very well but you can change models and placement of objects, map pieces and enemies in each map of the game. The Enemy Spawn Remix mod was made using this.
Tools needed:
- Demon's Souls Debug Menu
You can download the Debug Menu patch from Gibbed here: https://github.com/gibbed/DemonsSoulsDebug/releases/tag/1.0.1
Follow this tutorial on how to install: https://www.youtube.com/watch?v=H1JoeVRsRbU
Note: The tutorial is for a CFW PS3 but works just fine on RPCS3, just get your EBOOT.BIN from your game's folder and follow the rest of the instructions.
- Wulf's MSB Editor
Again I was unable to find a download link for this one so I'm going to upload it to the mod files.
For this tutorial we're going to change one enemy into another and change it's position as well.
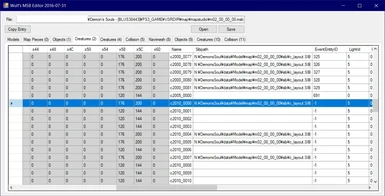
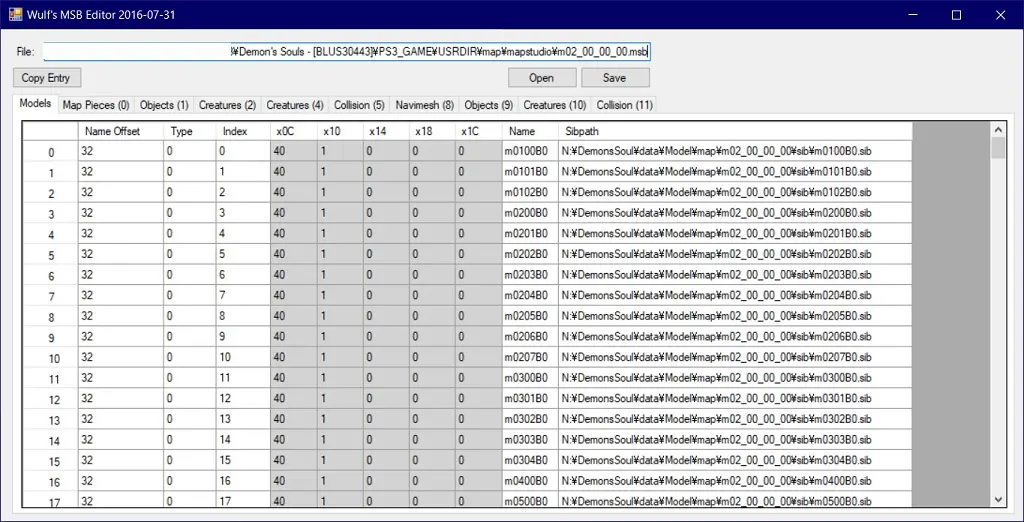
While it's possible to edit maps without using the Debug Menu I do not recommend doing so as you'll need the debug menu to get reference IDs and coordinates. Open up the MSB Editor then go to the mapstudio folder inside you Demon's Souls folder, the path should be something like "Demon's Souls - [BLUS30443] \ PS3_GAME \ USRDIR \ map \ mapstudio". Select the map and area you want to modify. Run the game and using the Debug Menu go to Map Selector and select the map you want to edit, in this case we'll go to Boleataria 1-1 so that's map 02 or m02_00_00_00.msb.
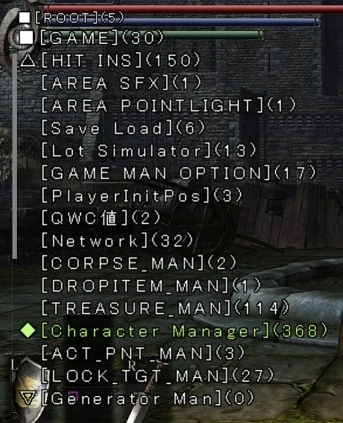
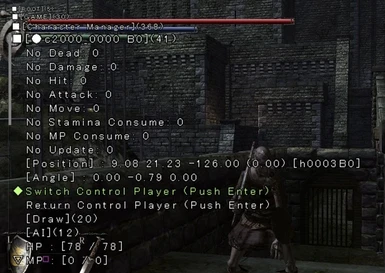
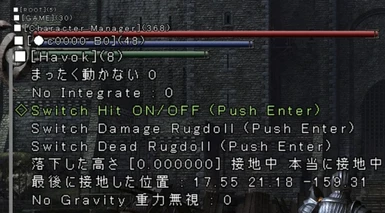
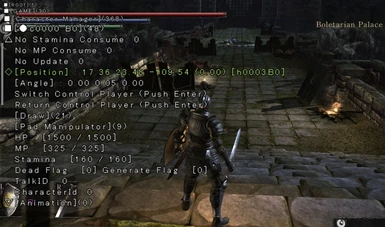
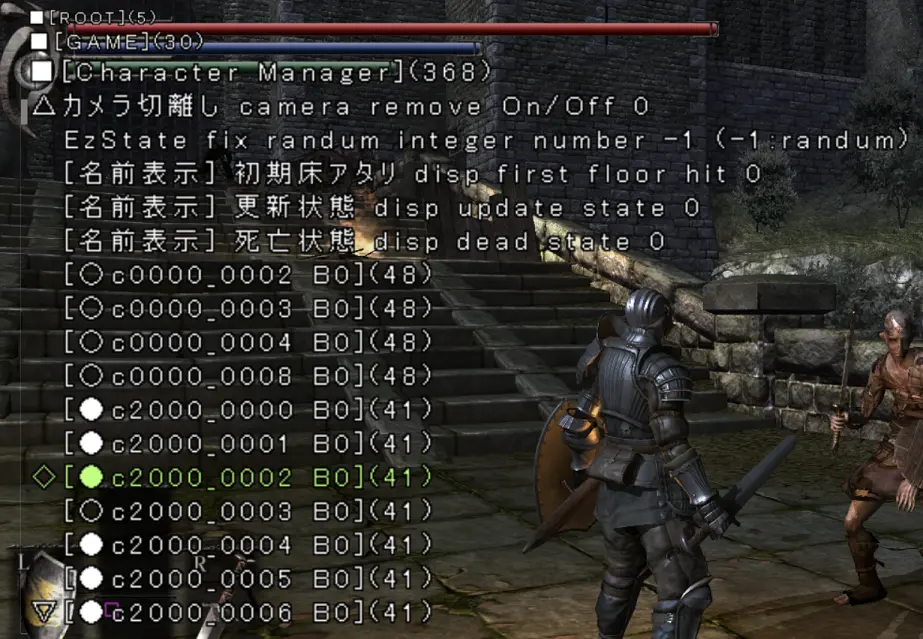
Before we start modifying the map I recommend changing a few settings in the Debug Menu. Press select to open the Debug Menu then go to GAME > Character Manager and scroll all the way to the bottom. Go to the first [c0000 B0] option, here you'll find several options for your character.
Scroll down and go to TEAM_TYPE and change it to 0. This will stop enemies and bosses from being hostile.
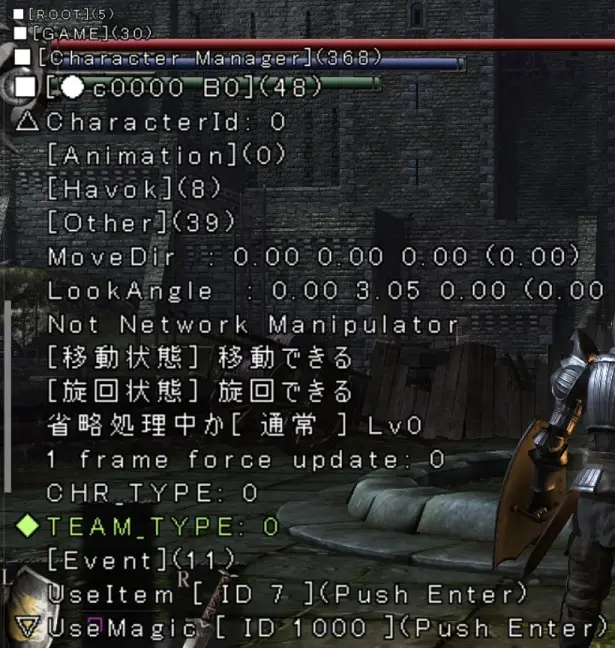
Next go into the Havok option above and enter it. Then go to Switch Hit ON/OFF and press X once to enable it. This will make it so that your character can walk through NPCs, enemies and bosses and you cannot be damaged by enemies or environmental hazards.

With both options enabled you should be able to walk around the map without enemies attacking or moving towards you. This way we can get reference IDs and coordinates for editing without being interrupted by anything. Next we'll go back to the Character Manager and find the enemy we want to edit on the map.
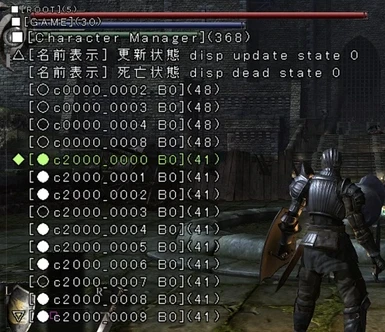
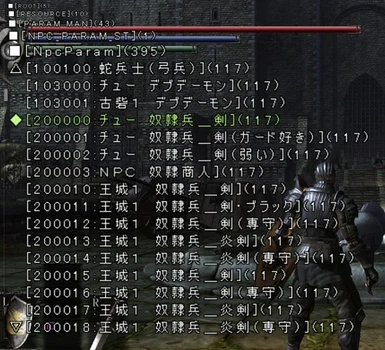
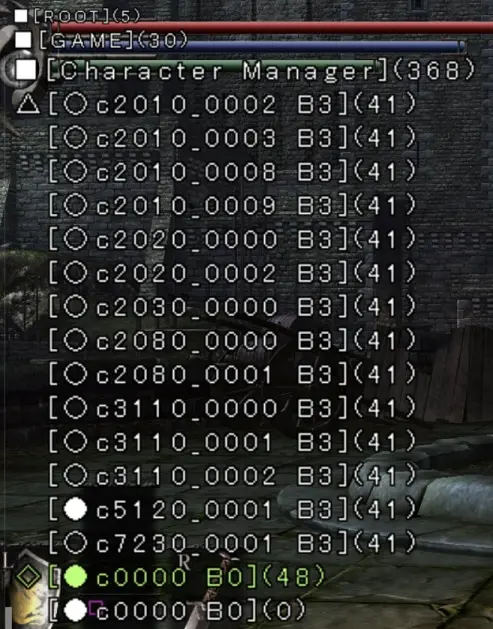
Now let's mod this Dregling. To do so we need to find his reference ID. In the Character Manage you'll find several IDs, the ones that have a white circle belongs to characters that are currently loaded in the area. In the characters ID the first 4 numbers represent its model and the last 4 represent its number. First you need to choose a model, in this case 2000 and check if it belongs to the same character you want to modify then you just need to check one of each number until you find the one you want.
In this case the Dregling we want to modify has a model ID of 2000 and the especific one we want to mod is the number 0002. We can check this by going into that reference ID number in the Debug Menu and scrolling down the options to Switch Control Player. Press X and it will move the camera towards that especific character, that way you know you have the correct ID. In this case the ID is c2000_0002. Press Return Control Player before exiting this screen.

Next we need to find the ID of the other enemy we want to replace this Dregling with. Since we already know Dreglings model ID is 2000 we can go back to Character Manager and skip to the next IDs. In this case the next ID is 2010. If you check a character that has a 2010 ID you'll see that it belongs to the Boletarian Soldier so let's replace the Dregling with a Soldier.
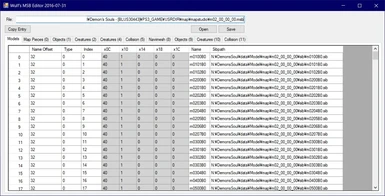
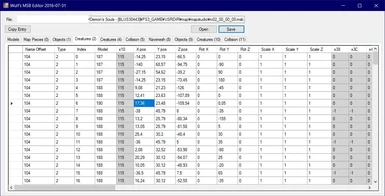
Now let's go back to the MSB Editor. First we'll go to the Soldier's reference ID. For the Soldier it is 2010_0000. So under the name tab you'll find the reference ID for the Soldier. Click on the arrow on the left to highlight the Soldier's line of values.

Next we'll need to copy two values that we'll use to replace the Dregling. First we need the model ID to change the Dregling into a Soldier and then we need the NPC Param to make Dregling stats the same as the regular Soldier. To get the model ID scroll to the left and check the Soldier's model ID, keep in mind that the ID changes with different map files. In this case the ID is 190.
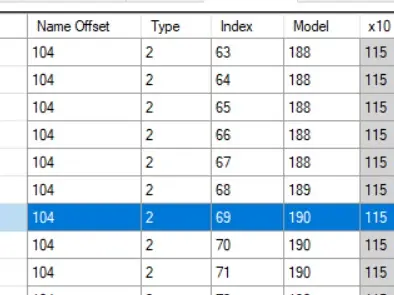
Now we need the NPC Param. Scroll to the right and in the NPC Param tab you'll find the correct NPC Param for the Soldier. In this case it's 201013.
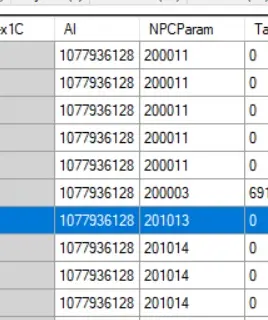
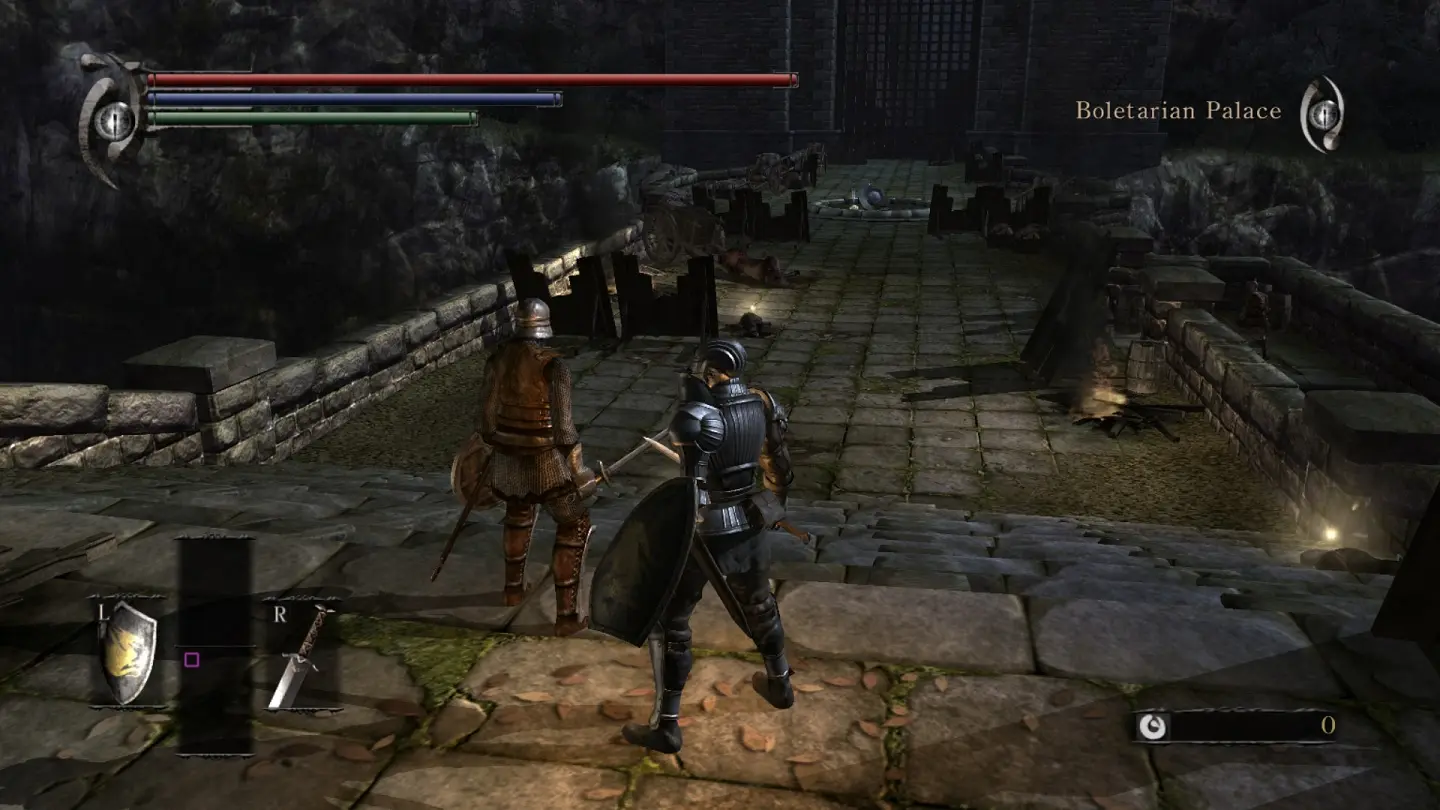
Now all we need to do is go to the Dregling's reference ID and replace both the Model ID and the NPC Param. In this case we'll go to the name tab and highlight c2000_0002 which is the Dregling we want to modify and change his Model ID to 190 and his NPC Param to 201013. Once changed click Save. Now to test it go back to the game and quit to the main menu. This will bring you back to the Map Selector. Next just reload the same map and check the Dregling to see if it changed.

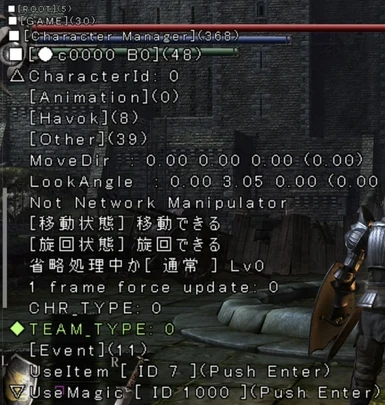
Next we'll change his position in the map. To do so we need to find where we want to move him to and get the correct coordinates. First move to where you want to move the character. In this case I'll move him a little bit further back to the stairs on the bridge. After positioning yourself where you want your Soldier to be we also need to be facing the direction we want him to face, so position yourself exactly as you want the Soldier to be. Next go to Character Manager and scroll down to [c0000 B0] which is your character. In the list there you'll find the coordinates for both the position of your character as well as the rotation angle. Now all you have to do is go back to MSB Editor.
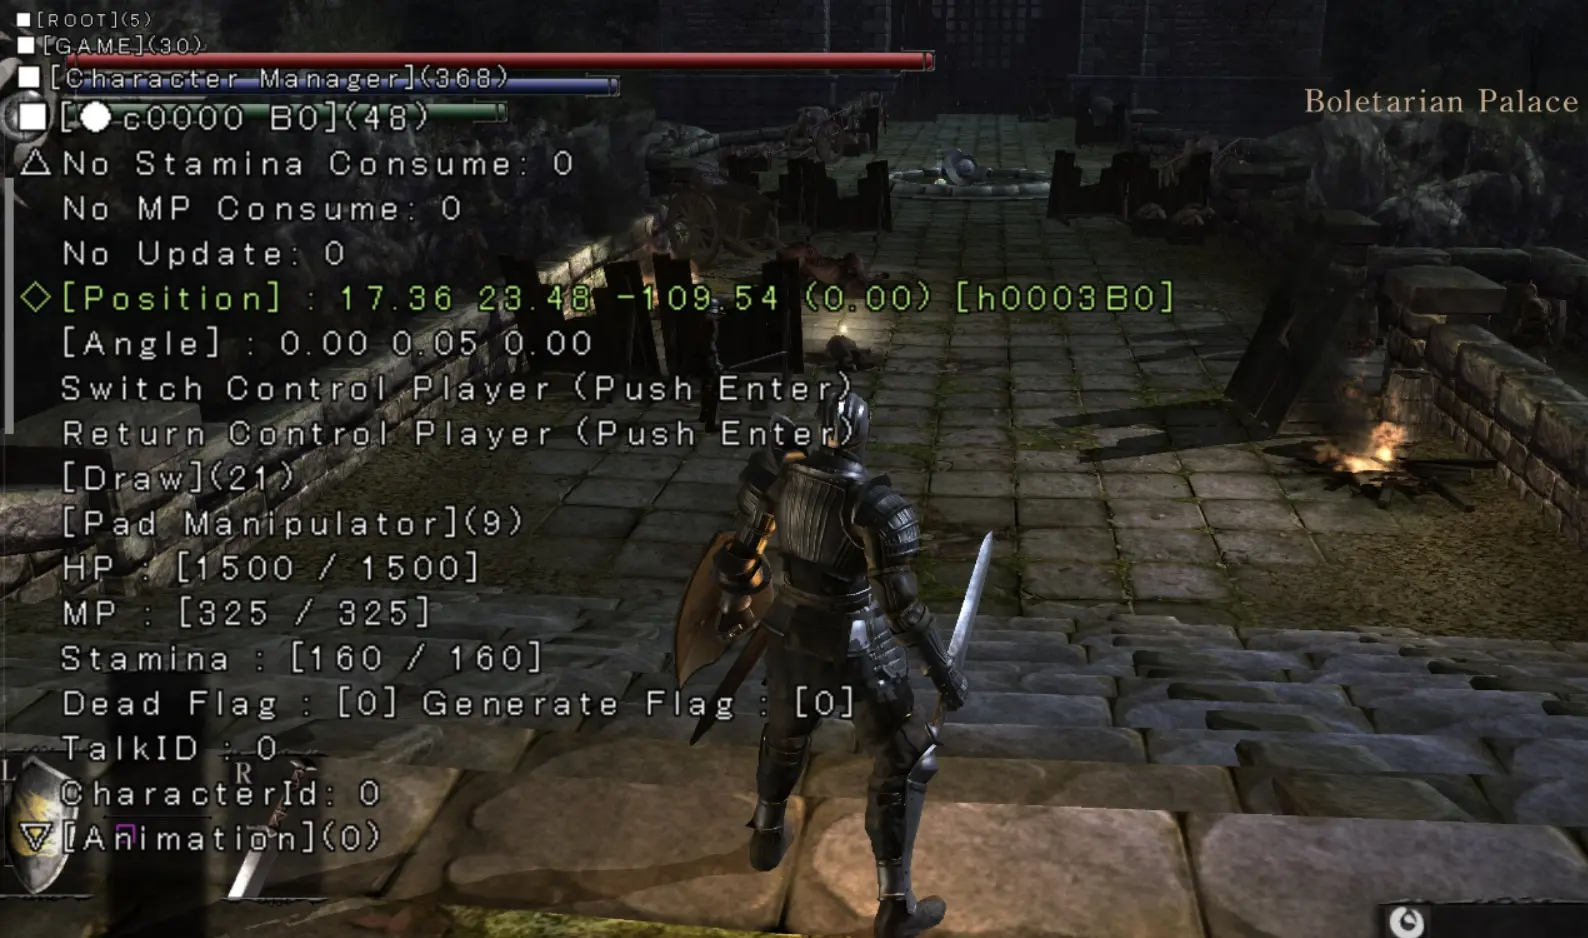
In the MSB Editor go back to the Dregling values, even though now it's a Soldier the name is still the same c2002_0002. The values you see in the Position of your character in the Debug menu represent the X, Y and Z pos values in the MSB Editor. In this case we have Z pos = 17,36 ; Y pos = 23,48 and Z pos = -109,54 ; Write down those values in the MSB Editor. Next we have the rotation values under Angle in the Debug Menu, they represent Rot X, Y and Z in the MSB Editor. Change those values as well in the MSB Editor. Essentially we're using our character's Position and Angle and using those values on the Dregling so that the Dregling will move to exactly where our character is standing without clipping through the ground of floating in the air.

Now save the changes and quit to the main menu to reload the map and check to see if it changed.
This should cover the basics for editing the maps. It's possible to change Objects and even Map Pieces but it's very complicated and getting the reference ID's for those is not easy. Keep in mind also that there are limitations. There's a memory limit in the game so adding more enemies will cause them to either not spawn or the game to infinitelly load. Changing enemies to enemies from another map is possible but the AI will not function correcly, it's very probably possible to fix that but I do not know how so for now only enemies that are in the same map can be replaced with each other.
Reference IDs
When editing files it's important to know the reference IDs of the things you're trying to modify. Here's a list of reference IDs I compiled to help you with that.
Armor ID
assassin's mask 100200
black leather armor 200200
black gloves 300200
black boots 400200
chain helmet 100400
chain mail 200400
chain gloves 300400
hard leather boots 400400
brushwood helmet 100800
brushwood armor 200800
brushwood gauntlets 300800
brushwood leggings 400800
fluted helmet 100700
fluted armor 200700
fluted gauntlets 300700
fluted leggings 400700
gloom helmet 101000
gloom armor 201000
gloom gauntlets 301000
gloom leggings 401000
leather cap 100300
leather armor 200300
leather gloves 300300
leather boots 400300
mirdan helmet 100500
mirdan mail 200500
mirdan gauntlets 300500
mirdan leggings 400500
plate helmet 100600
coat of plate 200600
plate gauntlets 300600
plate leggings 400600
silver coronet 100100
wizards clothes 200100
wizards gloves 300100
wizards shoes 400100
dull gold helmet 101900
dull gold armor 201900
dull gold gauntlets 301900
dull gold leggings 401900
binded hood 102000
binded cross 202000
binded gloves 302000
binded boots 402000
three cornered hat 102100
old ragged robes 202100
old ragged gloves 302100
old ragged boots 402100
gold mask 100000
rogues clothes 201800
rogues gloves 301800
rogues boots 401800
ancient kings mask 101100
ancient kings breastplate 201100
ancient kings gauntlets 301100
ancient kings leggings 401100
venerable sages hood 101400
venerable sages robes 201400
venerable sages gloves 301400
venerable sages boots 401400
saints robe 201200
saints gloves 301200
saints boots 401200
dark silver helmet 100900
dark silver armor 200900
dark silver gauntlets 300900
dark silver leggings 400900
shamans clothes 200000
shamans armbands 300000
shamans tabi 400000
official's cap 101800
silver bracelets 301700
helmet no equipment 101700
armor no equipment 201700
gauntlets no equipment 301500
leggings no equipment 401500
monk's head collar 180000
NPC IDs for Bosses:
103000 = Vanguard Tutorial
605000 = Dragon God Tutorial
605001 = Dragon God Stonefang
500100 = Phallanx
501000 = Tower Knight
502000 = Penetrator
723000 = False King Allant
504000 = Adjudicator
602000 = Old Hero
503000 = Storm King
506000 = False Idol
304000 = Maneater
304010 = Maneater tail
509000 = Filth Thing
508000 = Dirty Colossus
510000 = Armored Spider
405000 = Flamelurker
NPC IDs:
There are way too many NPCs in the game, most of them are enemies and these enemies have for the most part multiple variants. This is why a knight in Boletarian Palace is much weaker in the first level of the area compared to the last level, that's because the game has separate NPC parameters for different variants of enemies. Listing all NPC ids here would take too much space so instead I'm going to show how to easily and quickly get specific NPC IDs using the Debug Menu in game.
First load into the area of the NPC you want to modify and press select to open the Debug Menu. Next scroll down to GAME.
Next go to Character Manager.
In this screen you'll find a lot of options. Scroll down until you get to the reference IDs list. The IDs that have white circles belong to NPCs that are currently loaded in the area, the other circles are NPCs that are not loaded yet. The game only loads NPCs that are in the area around your character so if you're trying to check the ID of a specific NPC you'll have to walk up to them until they get loaded in the memory so you can confirm their ID.
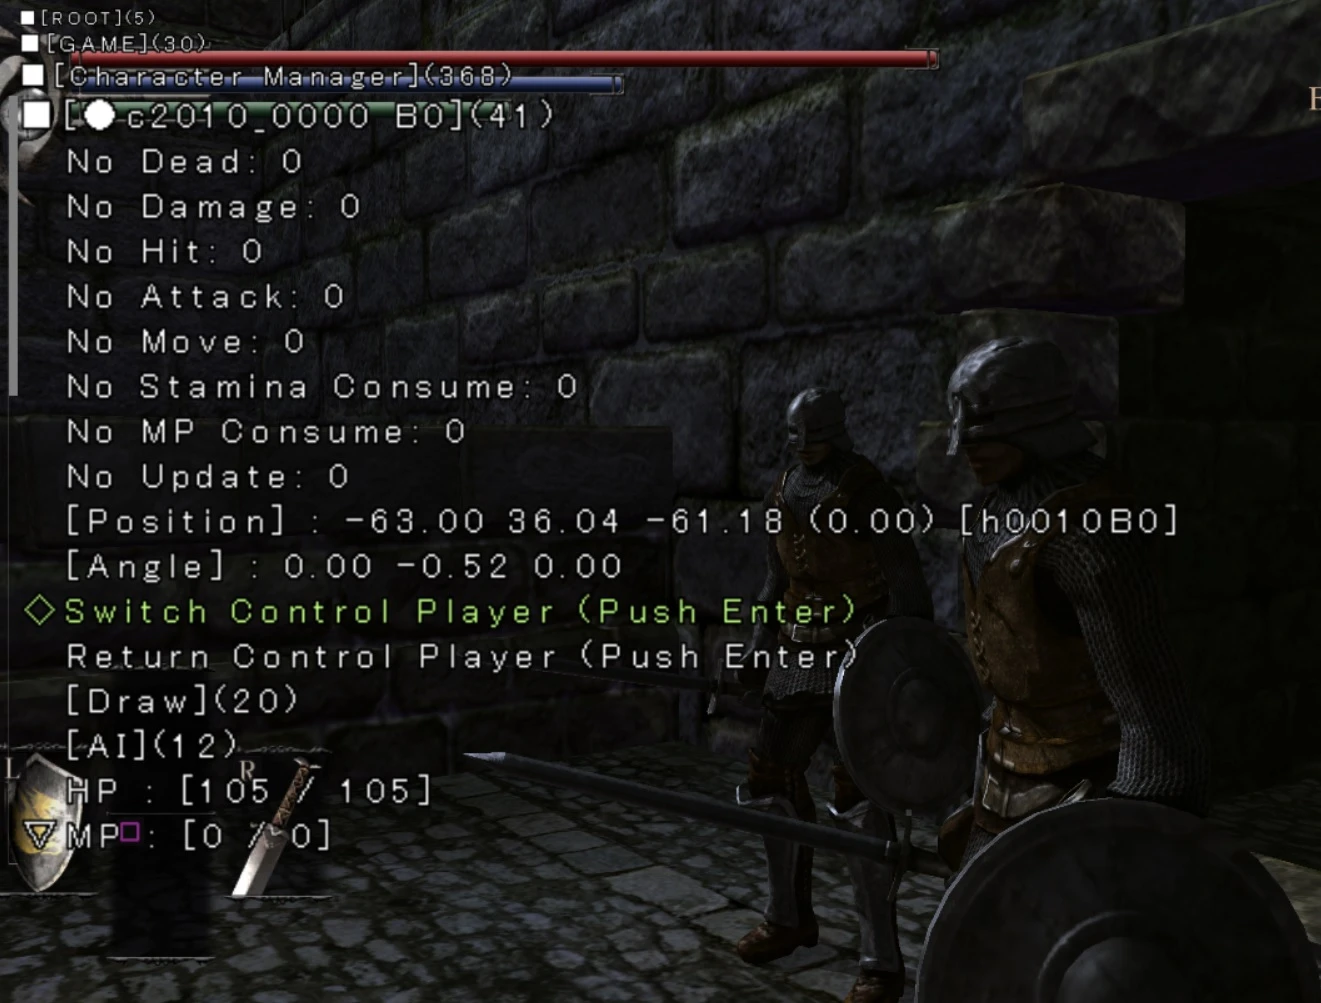
Go to any ID on the list and click on it. Next select Switch Control Player, this will place the camera on the specific NPC. In this case it's this specific Dregling. As you can see the name is c2000_0000, the c means character, the 2000 is the dregling model, and the last two digits, in this case it's 00, is that dregling specific reference ID.
Note: Click Return Control Player to regain control of your character.
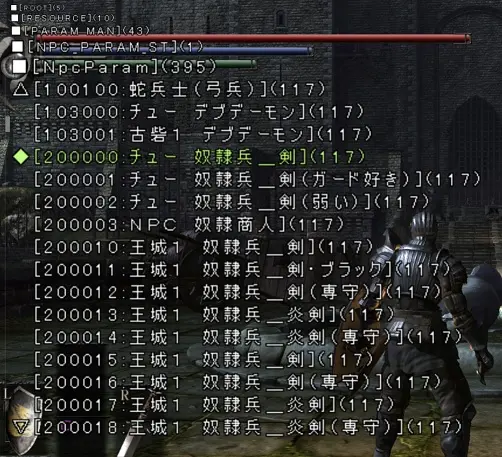
After getting the NPC reference ID you can go to NPC Param for example and change the parameters for that specific NPC. In this case to change the parameters of that specific Dregling you go to 200000, 2000 (dregling model) 00 (variant), and you can change it's values.
Since the menu is all in japanese, if you don't know japanese here's how you can understand what each option does in the parameter manager of the debug menu.
Translating Parameter Options
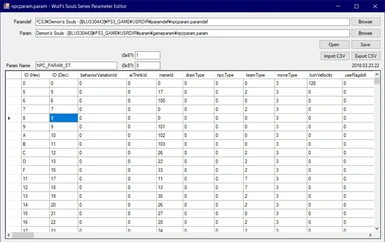
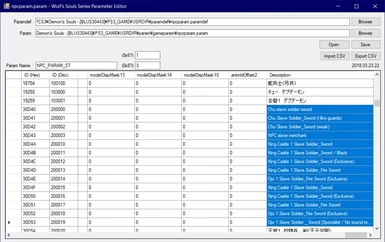
Get Wulf's Param Editor here: https://github.com/Wulf2k/DeS-ParamEdit/releases
Now open the Param Editor. Then go to your Demon's Souls folder and load the parameter files you want to modify. For this example we're modifying NPCParam. So we need to load npcparam.param into the Param tab, you'll find this file in your Demon's Souls param folder, inside gameparam. Just drag and drop the file into the Param tab and then go back to your Demon's Souls folder and go to Paramdef folder. Next we need the paramdef file that is related to the param file we want to modify. In this case we need the npcparam.paramdef file. Load the paramdef file in the paramdef tab and then press Open.
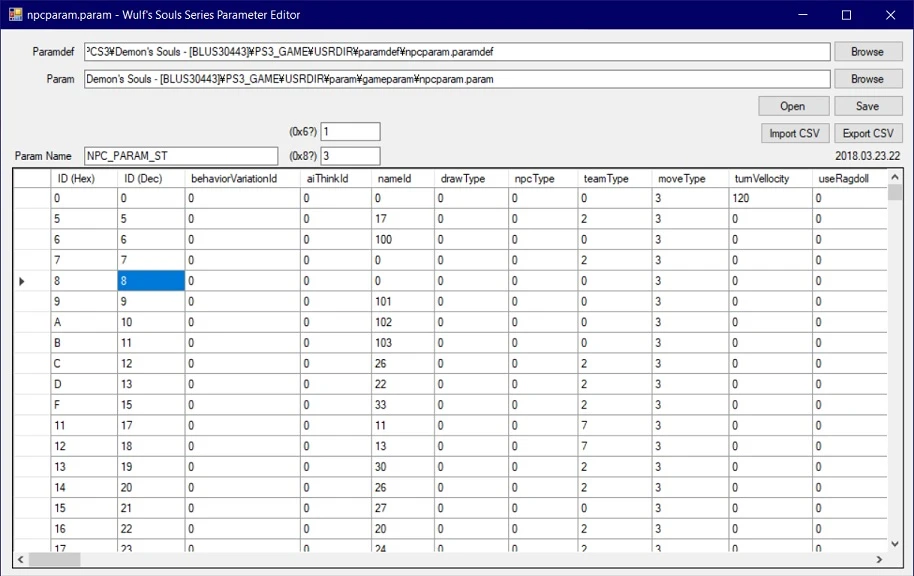
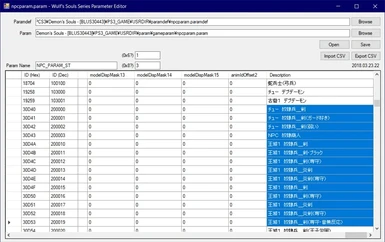
Open it and you'll get a table of contents. To the left we have two columns that represent the Reference ID, both in Hex (you can ignore that one) and regular Decimal. The other tabs on the top represent each option found in the NPCParam section of the Debug Menu, since these are in english there's no need to translate them, you can read the option in the Param Editor and find that option in the Debug Menu, here it goes from left to right, in the menu it goes from top down.


Now all you have to do is go into your Param Editor and copy the description you want to translate and paste it into https://translate.google.com/ translate it from japanese to your language and then copy and paste it back into the editor. This way you can guide yourself better using the Debug Menu.
Other Stuff
The debug menu is mostly in japanese. If you don't speak japanese you can use the Param Editor tool to translate the menus. While you can mod using the Param Editor I do not recommend doing that because the editor will often mess with the values of some of the parameters. What I do recommend is open the parameter file you want to edit using the Param Editor and using Google translate to translate the entries so it's easier to understand what you're editing in the game's debug menu. https://github.com/Wulf2k/DeS-ParamEdit/releases
The rest of Wulk2k tools: https://github.com/Wulf2k?tab=repositories
How to access the cut level Northern Limits tutorial by Wulf2k: https://www.youtube.com/watch?v=Uif8NLk0WiM
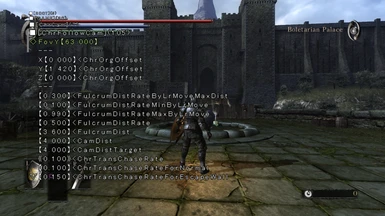
It's possible to change the game's FOV values using the Debug Menu but changes aren't permanent so if you want to play the game with a different FOV you'll have to manually change it everytime you play the game. To change the FOV press select to open the Debug Menu then go to GAME > ChrCam > ChrFollowCam and change the FovY values.
Note: Whenever you mod something in the game, be it either by installing a mod or modding the game yourself it may be necessary to clear the PS3 cache on the RPCS3 emulator. NOT TO BE CONFUSED WITH THE SHADER CACHE. You'll find the PS3 cache in the RPCS3 emulator folder inside DEV_HDD1 folder, delete the contents of the caches folder.
Table of contents:
- Modding Parameter Files
- Modding Textures
- Modding Text
- Modding Maps
- Reference IDs
- Translating Parameter Options
- Other Stuff
Modding Parameter Files
This is probably the most significant way you can mod the game. There are two types of parameter files, drawparam and gameparam. Drawparam controls graphical parameters, mostly lighting but also stuff like depth of field, contrast, saturation, etc. Gameparam controls gameplay parameters, how much health enemies have, how much scaling a weapon has, how many souls an item cost, etc. To modify parameter files we'll need a couple of tools.
Tools needed:
- Demon's Souls Debug Menu
You can download the Debug Menu patch from Gibbed here: https://github.com/gibbed/DemonsSoulsDebug/releases/tag/1.0.1
Follow this tutorial on how to install: https://www.youtube.com/watch?v=H1JoeVRsRbU
Note: The tutorial is for a CFW PS3 but works just fine on RPCS3, just get your EBOOT.BIN from your game's folder and follow the rest of the instructions.
- BND Build
Get Horkrux's version of BND Rebuilder here: https://github.com/horkrux/DeS-BNDBuild/releases
Wulf2k's version of the rebuilder do not extract bnds inside dcx files directly so you have to extract the dcx file and then the bnd and rebuild both which makes it more time consuming, Horkrux's version extracts and rebuilds everything in one go.
Instructions:
After installing the Debug Menu load up the game. You'll be greeted with this screen:
Model Viewer allows you to view models, press (L3+R3) to exit it if you decide to use it. Map Select will warp you directly to a level using the debug character. The Title options will load you normally into the game. For now just select Map Select.
The maps you can load are:
-m01 The Nexus
-m02 Boletaria Palace
-m03 Shrine of Storms
-m04 Tower of Latria
-m05 Valley of Defilement
-m06 Stonefang Tunnel
-m07 WILL CRASH THE GAME! (This is the cut level)
-m08 Tutorial
-m99 WILL CRASH THE GAME! (These are test rooms)
Each map will have a list of levels you can load into, these are the archstones. Choose a level to load into. By quitting the game you will return to the Map Select screen. Once you load into the game press Select to load the Debug Menu:
Navigating the menu: Press select to open or close the menu. Press up and down on the D-Pad to navigate the menu. Press X to enter and 0 to return. Left and Right on the D-Pad to increase or decrease values by 1. Hold L1 and move left or right on the D-Pad to change values in increments of 10, hold Square to change in increments of 100 and both L1 and Square to change in increments of 1000. You can also hold L1 or Square and press up and down on the D-Pad to scroll down the lists faster. Press Triangle to revert values back to default.
There are many options here. The menu is in japanese but even without knowing japanese it's not that hard to navigate and mess around. To modify the game you want to go to "Resource" and then to "Param Man". There you will find a list of parameters that can be modified.
From "FOG_BAN" all the way down to "ENV_LIGHT_TEX_BANK", these are Drawparam files, they control graphical parameters. Below that are Gameparam files that control gameplay parameters. For this tutorial I'm going to remove the Depth of Field effect from the game. So we'll go to DOF_BANK:
From this menu you select the map you're currently in. In this example it's m02.
Here we have many options. The B0, B1, B2, B3 represent each area of the level, the other options control cutscenes. Since we're in the first area of the level we select B0.
Now we just change the % value to 0 and the Depth of Field effect is gone. With graphical parameters you can see the change in real time so just press select again to close the Debug menu and look around. Press select again to open the menu. Now we need to save our changes. Press circle to return.
Go to OPTION
To save the changes hold Square and press X. The Debug menu says [Square + Circle] but that's because X and Circle are inverted in the japanese PS3 so unless your PS3 is japanese you need to hold Square and press X instead. After that go to your Demon's Souls folder and inside the param folder, the path should be something like "Demon's Souls - [BLUS30443] \ PS3_GAME \ USRDIR \ param". There you'll find the saved param file.
Now you need to rename the file and remove those numbers. In this case we rename "m02_DofBank_200415_000507.param" to "m02_DofBank.param". Since we modified a graphics parameter we need to save it to the drawparam folder. Inside drawparam you'll find a list of files, what we need are the .dcx files. Each map of the game has it's own .dcx file, since we modified map 02 which is Boletaria Palace we need the a02_drawparam.parambnd.dcx file, not to be confused with the .parambnd file. Now make a copy of that file somewhere else so we can work with it and if you want you should also make a backup copy so you can revert back afterwards.
Once you have a copy of "a02_drawparam.parambnd.dcx" inside another folder open DeSBNDBuild.exe and drag and drop the .dcx file inside, press extract. You'll get a folder, inside that folder go to all the way to the param folder and copy your modified "m02_DofBank.param" into it, replace the file and close the folder. Now back to DeSBNDBuild.exe press Rebuild and it will save the changes into the .dcx file. Now your mod is complete, you can just place the modified a02_drawparam.parambnd.dcx into your Demon's Souls drawparam folder, overwrite when asked to. You can delete the other files that were extracted. To see the changes you can either close and reload the game entirely or just exit the current map you're load in and either quit to the main menu or quit back to the Map Select menu if using the debug Map Selector.
This same method can be used to change other graphical parameters. Keep in mind that for each map of the game you'll need it's corresponding dcx file. For gameplay parameters the .dcx file that needs to be modified is either "gameparamna.parambnd.dcx" for the western release or "gameparam.parambnd.dcx" for the japanese version, I recommend modifying both so that your mod works with all versions of the game.
Modding Textures
Tools needed:
- BND Build
Get Horkrux's version of BND Rebuilder here: https://github.com/horkrux/DeS-BNDBuild/releases
Wulf2k's version of the rebuilder do not extract bnds inside dcx files directly so you have to extract the dcx file and then the bnd and rebuild both which makes it more time consuming, Horkrux's version extracts and rebuilds everything in one go.
- Paint.net
https://www.getpaint.net/
- Irfanview
Not really needed but recommended https://www.irfanview.com/
Start by extracting texture files with BND Build. Texture files can be found in a few different places inside the game's folder. The textures are usually stored inside .tpf files however we need to extract the .dcx files that contains the compressed .tpf files instead. For this example let's modify the menu textures. Go to your Demon's Souls folder, the path should be "Demon's Souls - [BLUS30443] \ PS3_GAME \ USRDIR \ menu". Here you can modify "menu.tpf.dcx" which contains many textures for the menus. Copy the "menu.tpf.dcx" into a new folder and extract it using DeSBNDBuild.exe.
You'll get a folder and inside you'll find many .dds files, these are the textures. You can open and modify them using Paint.NET. Open one of them and modify it as you see fit. After you're done with your changes you can save it. Go to files and select Save As. It's going to open a new screen. Under settings you need to select either DXT1 or DXT5, to know which one to save as you can open the texture file using Irfan View and under "Image" select "Information" and it should show you which one it is. Next you'll need to determine if the texture has mip maps or not. Menu textures don't have them but textures for models and geometry will have them so you'll need to check the "Generate Mip Maps" box for those.
Once you save your texture go back to BND Build and rebuild the .dcx file. Now you can replace the original .dcx file with the new modified one, you can delete the other files in your new folder.Modding Text
Tools needed:- BND Build
Get Horkrux's version of BND Rebuilder here: https://github.com/horkrux/DeS-BNDBuild/releases
Wulf2k's version of the rebuilder do not extract bnds inside dcx files directly so you have to extract the dcx file and then the bnd and rebuild both which makes it more time consuming, Horkrux's version extracts and rebuilds everything in one go.
- Wulf's Fmg Editor
I could not find any link to his tool anywhere on the internet. I'm going to upload the tool to this mod files.
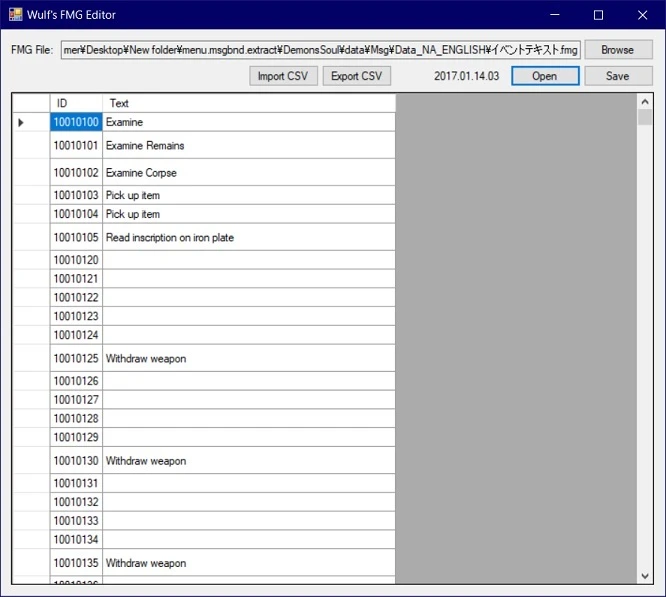
All text in the game can be modified using the FMG editor. The text files can be found in "Demon's Souls - [BLUS30443] \ PS3_GAME \ USRDIR \ msg \ na_english". Inside you'll find two .dcx files, menu and item. The menu file includes both menu text and dialog. Make a copy of the file you want to edit and copy it to a new fold. Extract it using BND Build. Inside the folders you'll find several .fmg files. Open the FMG Editor, drag and drop the file you want to modify. Open it with the FMG Editor, modify the text as you see fit, save and close. Now go back to BND Build and click on Rebuild. Now you can copy the modified .dcx file back to your msg\na_english folder and replace the original file. You can delete the other extracted files.
Modding Maps
This is probably the most difficult of them. I don't understand it very well but you can change models and placement of objects, map pieces and enemies in each map of the game. The Enemy Spawn Remix mod was made using this.
Tools needed:
- Demon's Souls Debug Menu
You can download the Debug Menu patch from Gibbed here: https://github.com/gibbed/DemonsSoulsDebug/releases/tag/1.0.1
Follow this tutorial on how to install: https://www.youtube.com/watch?v=H1JoeVRsRbU
Note: The tutorial is for a CFW PS3 but works just fine on RPCS3, just get your EBOOT.BIN from your game's folder and follow the rest of the instructions.
- Wulf's MSB Editor
Again I was unable to find a download link for this one so I'm going to upload it to the mod files.
For this tutorial we're going to change one enemy into another and change it's position as well.
While it's possible to edit maps without using the Debug Menu I do not recommend doing so as you'll need the debug menu to get reference IDs and coordinates. Open up the MSB Editor then go to the mapstudio folder inside you Demon's Souls folder, the path should be something like "Demon's Souls - [BLUS30443] \ PS3_GAME \ USRDIR \ map \ mapstudio". Select the map and area you want to modify. Run the game and using the Debug Menu go to Map Selector and select the map you want to edit, in this case we'll go to Boleataria 1-1 so that's map 02 or m02_00_00_00.msb.
Before we start modifying the map I recommend changing a few settings in the Debug Menu. Press select to open the Debug Menu then go to GAME > Character Manager and scroll all the way to the bottom. Go to the first [c0000 B0] option, here you'll find several options for your character.
Scroll down and go to TEAM_TYPE and change it to 0. This will stop enemies and bosses from being hostile.
Next go into the Havok option above and enter it. Then go to Switch Hit ON/OFF and press X once to enable it. This will make it so that your character can walk through NPCs, enemies and bosses and you cannot be damaged by enemies or environmental hazards.
With both options enabled you should be able to walk around the map without enemies attacking or moving towards you. This way we can get reference IDs and coordinates for editing without being interrupted by anything. Next we'll go back to the Character Manager and find the enemy we want to edit on the map.
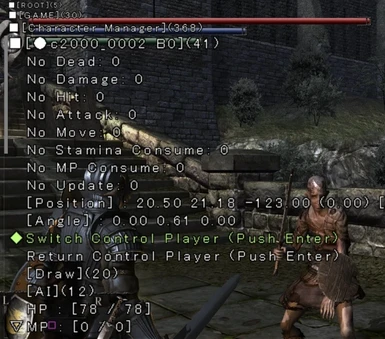
Now let's mod this Dregling. To do so we need to find his reference ID. In the Character Manage you'll find several IDs, the ones that have a white circle belongs to characters that are currently loaded in the area. In the characters ID the first 4 numbers represent its model and the last 4 represent its number. First you need to choose a model, in this case 2000 and check if it belongs to the same character you want to modify then you just need to check one of each number until you find the one you want.
In this case the Dregling we want to modify has a model ID of 2000 and the especific one we want to mod is the number 0002. We can check this by going into that reference ID number in the Debug Menu and scrolling down the options to Switch Control Player. Press X and it will move the camera towards that especific character, that way you know you have the correct ID. In this case the ID is c2000_0002. Press Return Control Player before exiting this screen.
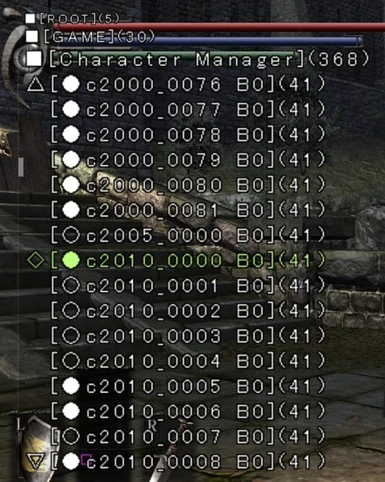
Next we need to find the ID of the other enemy we want to replace this Dregling with. Since we already know Dreglings model ID is 2000 we can go back to Character Manager and skip to the next IDs. In this case the next ID is 2010. If you check a character that has a 2010 ID you'll see that it belongs to the Boletarian Soldier so let's replace the Dregling with a Soldier.
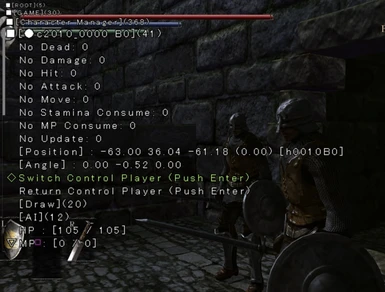
Now let's go back to the MSB Editor. First we'll go to the Soldier's reference ID. For the Soldier it is 2010_0000. So under the name tab you'll find the reference ID for the Soldier. Click on the arrow on the left to highlight the Soldier's line of values.
Next we'll need to copy two values that we'll use to replace the Dregling. First we need the model ID to change the Dregling into a Soldier and then we need the NPC Param to make Dregling stats the same as the regular Soldier. To get the model ID scroll to the left and check the Soldier's model ID, keep in mind that the ID changes with different map files. In this case the ID is 190.
Now we need the NPC Param. Scroll to the right and in the NPC Param tab you'll find the correct NPC Param for the Soldier. In this case it's 201013.
Now all we need to do is go to the Dregling's reference ID and replace both the Model ID and the NPC Param. In this case we'll go to the name tab and highlight c2000_0002 which is the Dregling we want to modify and change his Model ID to 190 and his NPC Param to 201013. Once changed click Save. Now to test it go back to the game and quit to the main menu. This will bring you back to the Map Selector. Next just reload the same map and check the Dregling to see if it changed.
Next we'll change his position in the map. To do so we need to find where we want to move him to and get the correct coordinates. First move to where you want to move the character. In this case I'll move him a little bit further back to the stairs on the bridge. After positioning yourself where you want your Soldier to be we also need to be facing the direction we want him to face, so position yourself exactly as you want the Soldier to be. Next go to Character Manager and scroll down to [c0000 B0] which is your character. In the list there you'll find the coordinates for both the position of your character as well as the rotation angle. Now all you have to do is go back to MSB Editor.
In the MSB Editor go back to the Dregling values, even though now it's a Soldier the name is still the same c2002_0002. The values you see in the Position of your character in the Debug menu represent the X, Y and Z pos values in the MSB Editor. In this case we have Z pos = 17,36 ; Y pos = 23,48 and Z pos = -109,54 ; Write down those values in the MSB Editor. Next we have the rotation values under Angle in the Debug Menu, they represent Rot X, Y and Z in the MSB Editor. Change those values as well in the MSB Editor. Essentially we're using our character's Position and Angle and using those values on the Dregling so that the Dregling will move to exactly where our character is standing without clipping through the ground of floating in the air.
Now save the changes and quit to the main menu to reload the map and check to see if it changed.
This should cover the basics for editing the maps. It's possible to change Objects and even Map Pieces but it's very complicated and getting the reference ID's for those is not easy. Keep in mind also that there are limitations. There's a memory limit in the game so adding more enemies will cause them to either not spawn or the game to infinitelly load. Changing enemies to enemies from another map is possible but the AI will not function correcly, it's very probably possible to fix that but I do not know how so for now only enemies that are in the same map can be replaced with each other.
Reference IDs
When editing files it's important to know the reference IDs of the things you're trying to modify. Here's a list of reference IDs I compiled to help you with that.
Armor ID
assassin's mask 100200
black leather armor 200200
black gloves 300200
black boots 400200
chain helmet 100400
chain mail 200400
chain gloves 300400
hard leather boots 400400
brushwood helmet 100800
brushwood armor 200800
brushwood gauntlets 300800
brushwood leggings 400800
fluted helmet 100700
fluted armor 200700
fluted gauntlets 300700
fluted leggings 400700
gloom helmet 101000
gloom armor 201000
gloom gauntlets 301000
gloom leggings 401000
leather cap 100300
leather armor 200300
leather gloves 300300
leather boots 400300
mirdan helmet 100500
mirdan mail 200500
mirdan gauntlets 300500
mirdan leggings 400500
plate helmet 100600
coat of plate 200600
plate gauntlets 300600
plate leggings 400600
silver coronet 100100
wizards clothes 200100
wizards gloves 300100
wizards shoes 400100
dull gold helmet 101900
dull gold armor 201900
dull gold gauntlets 301900
dull gold leggings 401900
binded hood 102000
binded cross 202000
binded gloves 302000
binded boots 402000
three cornered hat 102100
old ragged robes 202100
old ragged gloves 302100
old ragged boots 402100
gold mask 100000
rogues clothes 201800
rogues gloves 301800
rogues boots 401800
ancient kings mask 101100
ancient kings breastplate 201100
ancient kings gauntlets 301100
ancient kings leggings 401100
venerable sages hood 101400
venerable sages robes 201400
venerable sages gloves 301400
venerable sages boots 401400
saints robe 201200
saints gloves 301200
saints boots 401200
dark silver helmet 100900
dark silver armor 200900
dark silver gauntlets 300900
dark silver leggings 400900
shamans clothes 200000
shamans armbands 300000
shamans tabi 400000
official's cap 101800
silver bracelets 301700
helmet no equipment 101700
armor no equipment 201700
gauntlets no equipment 301500
leggings no equipment 401500
monk's head collar 180000
NPC IDs for Bosses:
103000 = Vanguard Tutorial
605000 = Dragon God Tutorial
605001 = Dragon God Stonefang
500100 = Phallanx
501000 = Tower Knight
502000 = Penetrator
723000 = False King Allant
504000 = Adjudicator
602000 = Old Hero
503000 = Storm King
506000 = False Idol
304000 = Maneater
304010 = Maneater tail
509000 = Filth Thing
508000 = Dirty Colossus
510000 = Armored Spider
405000 = Flamelurker
NPC IDs:
There are way too many NPCs in the game, most of them are enemies and these enemies have for the most part multiple variants. This is why a knight in Boletarian Palace is much weaker in the first level of the area compared to the last level, that's because the game has separate NPC parameters for different variants of enemies. Listing all NPC ids here would take too much space so instead I'm going to show how to easily and quickly get specific NPC IDs using the Debug Menu in game.
First load into the area of the NPC you want to modify and press select to open the Debug Menu. Next scroll down to GAME.
Next go to Character Manager.
In this screen you'll find a lot of options. Scroll down until you get to the reference IDs list. The IDs that have white circles belong to NPCs that are currently loaded in the area, the other circles are NPCs that are not loaded yet. The game only loads NPCs that are in the area around your character so if you're trying to check the ID of a specific NPC you'll have to walk up to them until they get loaded in the memory so you can confirm their ID.
Go to any ID on the list and click on it. Next select Switch Control Player, this will place the camera on the specific NPC. In this case it's this specific Dregling. As you can see the name is c2000_0000, the c means character, the 2000 is the dregling model, and the last two digits, in this case it's 00, is that dregling specific reference ID.
Note: Click Return Control Player to regain control of your character.
After getting the NPC reference ID you can go to NPC Param for example and change the parameters for that specific NPC. In this case to change the parameters of that specific Dregling you go to 200000, 2000 (dregling model) 00 (variant), and you can change it's values.
Since the menu is all in japanese, if you don't know japanese here's how you can understand what each option does in the parameter manager of the debug menu.
Translating Parameter Options
Get Wulf's Param Editor here: https://github.com/Wulf2k/DeS-ParamEdit/releases
Now open the Param Editor. Then go to your Demon's Souls folder and load the parameter files you want to modify. For this example we're modifying NPCParam. So we need to load npcparam.param into the Param tab, you'll find this file in your Demon's Souls param folder, inside gameparam. Just drag and drop the file into the Param tab and then go back to your Demon's Souls folder and go to Paramdef folder. Next we need the paramdef file that is related to the param file we want to modify. In this case we need the npcparam.paramdef file. Load the paramdef file in the paramdef tab and then press Open.
Open it and you'll get a table of contents. To the left we have two columns that represent the Reference ID, both in Hex (you can ignore that one) and regular Decimal. The other tabs on the top represent each option found in the NPCParam section of the Debug Menu, since these are in english there's no need to translate them, you can read the option in the Param Editor and find that option in the Debug Menu, here it goes from left to right, in the menu it goes from top down.
All the way to the right you'll find the description. In the debug menu you'll see the Decimal ID followed by the description and by clicking on that you get the options from the table of contents above so you can modiy each value for each option. In this case we were trying to modify the dregling 200000 (id) so the japanese name to the right should be the description of the dregling. If you don't speak japanese you can translate that using the Param Editor and Google Translate. Now all you have to do is go into your Param Editor and copy the description you want to translate and paste it into https://translate.google.com/ translate it from japanese to your language and then copy and paste it back into the editor. This way you can guide yourself better using the Debug Menu.
Other Stuff
The debug menu is mostly in japanese. If you don't speak japanese you can use the Param Editor tool to translate the menus. While you can mod using the Param Editor I do not recommend doing that because the editor will often mess with the values of some of the parameters. What I do recommend is open the parameter file you want to edit using the Param Editor and using Google translate to translate the entries so it's easier to understand what you're editing in the game's debug menu. https://github.com/Wulf2k/DeS-ParamEdit/releases
The rest of Wulk2k tools: https://github.com/Wulf2k?tab=repositories
How to access the cut level Northern Limits tutorial by Wulf2k: https://www.youtube.com/watch?v=Uif8NLk0WiM
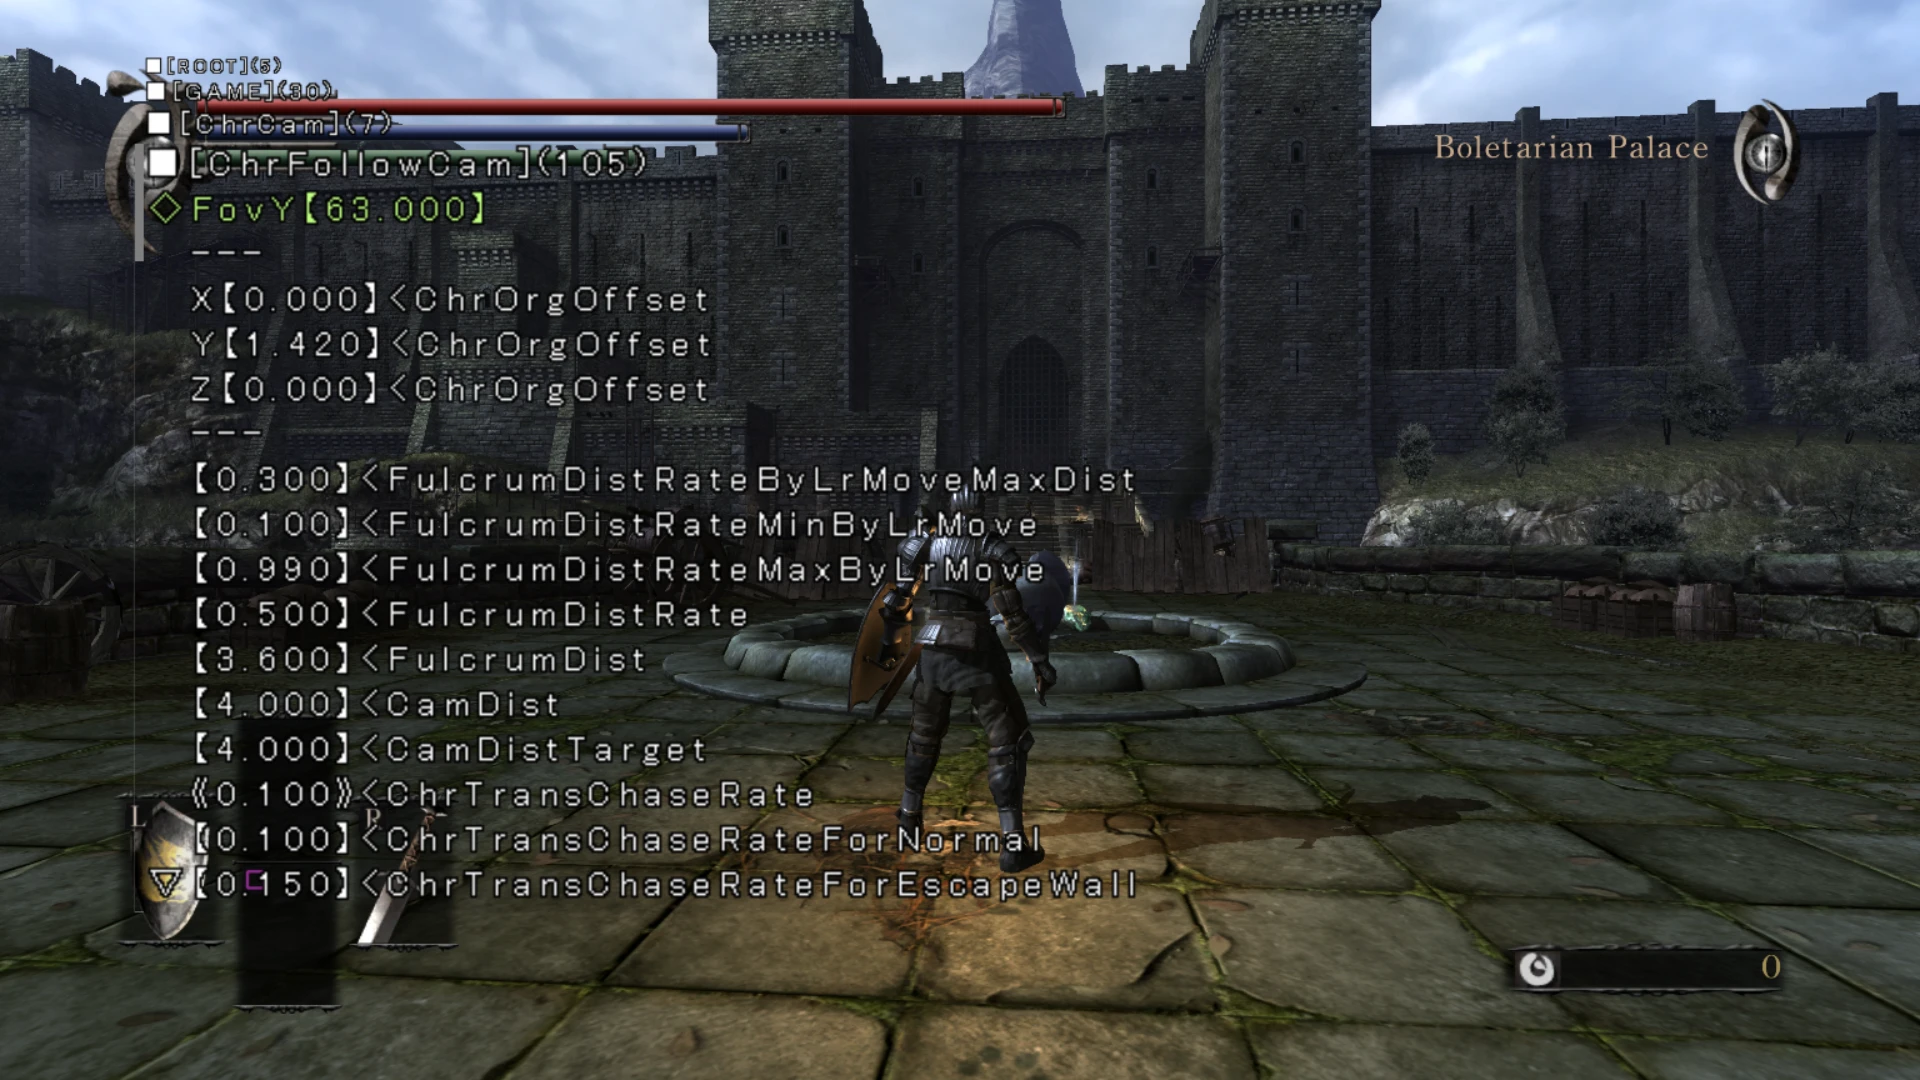
It's possible to change the game's FOV values using the Debug Menu but changes aren't permanent so if you want to play the game with a different FOV you'll have to manually change it everytime you play the game. To change the FOV press select to open the Debug Menu then go to GAME > ChrCam > ChrFollowCam and change the FovY values.