Section 1 First off, this mod is packed in a 7-Zip file, this means that you will need a program that can open the Zip file. If you do not have a program to do such, 7-Zip is free and straight forward. Once you have downloaded my 7-Zip file from Nexus Mods, open the Zip file up with a program that can open it. My 7-Zip file should contain one or more mods. These mod(s) should be named similar or exactly the same as the mod name from Nexus Mods. Select the file(s) by left clicking on them while holding CTRl (Control), then right click and select "Move To...", or, while the files are selected, select "Extract", which should be at the top.
Section 2 Performing either action will bring up a window that says "Copy" and "Copy To:", this is where you can either put in a folder that you made or directly put it in your BL2 or TPS Binaries folder. These directories can be found via Steam in multiple ways. 1st way for BL2: [HardDriveName]:\Steam\steamapps\common\Borderlands 2\Binaries 1st way for the Pre-Sequel: [HardDriveName]:\Steam\steamapps\common\BorderlandsPreSequel\Binaries 2nd way: open up Steam, go to your library, find the Borderlands that the mod belongs to, right click, select the very last option "Properties", go to "Local Files" and "Browse Local Files". Continuing from the 2nd way, just open up the Binaries folder and it should contain "Redist" and "Win32" if you are on Windows. For easy access to the Binaries folder, you can left click "Home" in File Explorer's top left corner and then select "Pin To Quick Access". This will be an easy way to do stuff in there. Once you have the location figured out for the program to copy to, let it copy the file(s) there. This will now serve as an easy to access location for BLCMM to find mods.
Section 3 BLCMM is quite important for the majority of my mods due to their customizability and functionality. It is also a very great tool for creating mods and making your own mod pack with ease. A lot of my mods use "Hotfixes" which do not work well with other mods, unless they are properly merged with other mods that use said method (blue text in BLCMM). BLCMM merges mods with Hotfixes and other commands about as seamlessly as you can get, so I strongly recommend doing it this way. Now, before I start going on a rant about this, let me get to what needs to be done to play your game with mods. I will not go over how to set up BLCMM for the first time in here, so I will now go to the "what to do" part once you get things set up.
Section 4 With BLCMM open, go to the top left and left click on "File", then select "Open". From there, find my mod file that is aptly named so that you may be able to use it as a starting point to add mods to. Well, would you look at all that yellow text! Yeah, I go into detail about the specific mod and I try to organize my options to be beginner friendly in most cases. Anyways, if you left click the little ">" icon next to a folder name, it will drop down another folder, sometimes these are multi-layered and will require some clicking. If you see several options that are in a purple color, these are considered "MUT" categories (Mutually Exclusive) which only allow one option in that folder to be selected at a time. You can choose one option by left clicking the "o" icon and it will fill the dot, not unlike most fill in the dot tests from school. Any folder that is white is something that is not a "MUT" folder and you can toggle everything in that folder via the same method, but this time it will get a "v" icon (checkmark) in it. You can read through my folder names and try to figure out what you would like to have happen in the mod, but beware, some things are mandatory and I did not lock the folder.
Section 5 Now, if you made it through that brief synopsis of beginner level BLCMM information, give yourself a pat on the back. Most people do not tend to read these so I sometimes wonder why I bother. Back to the subject at hand, you have now customized my file (if applicable) to your liking. Now, where do you go from here if you want to use multiple of my mods (if they are compatible)? Well, head back to the "File" option in the top left of BLCMM. From there, select "Import Mod File(s)" and simply peruse (go through) the mod files in your Binaries folder or elsewhere. You can do the same method from the beginning and left click on the mod name while holding CTRL (Control) to select multiple mods to add at once. These mods will now be added to a cyan folder called "mods", or they will be directly imported under the main mod's stuff if you had the main mod's cyan text selected when you imported the additional mods.
Section 6 Follow the same process for Section 4, or not, it's up to how you want to play. However, some of my mods DO NOT come with selected default options and will require you to choose options to make them work. If you see dark and light green text, this means that the light green text replaces the effect of the dark green text. You can right click the light green text to go to where it overwrites a previous statement and or command. Just decide, of the two or more statements and or commands, which one sounds the best for your preference. You do not need to unselect any particular code due to how BLCMM works, but keep in mind that the one that takes place is the furthest one down in your mod file and it has light green text. Once that is all over and you have your multiple mods in one file and customized the way you want, you now go back to "File" in the top left and select "Save As". You can choose to save the file as is, or you can simplify it to anything that you want, such as "1.txt". When you do rename the file or save this file as something else, make sure that it has NO SPACING in the name. This is because you will not be able to execute it later. From here, you now have the optimal form of file. One file saved as something that you remember, includes your mod choices, can be added to or subtracted from, works with all mods that use hotfixes since they are considered one mod now and last but not least this mod pack can be executed.
Section 7 Here comes the fun part. Now you need to start up your mod specific Borderlands game. Now, this upcoming part differs in a lot of ways depending on your OS (Operating System). I use Windows so I will speak for such now. When you start up your game, continue as normal until you get to the "Main Menu" screen where your character is on a cliff and whatnot. From here, DO NOT DO ANYTHING YET! You need to wait around 10 seconds (I believe in you) for your SHiFT account to be connected to whatever service it is. After these 10 seconds you may execute the mod from Section 6 by opening the console (green and transparent black overlay) and typing (without the quotes) "exec ModName.Extension". As an example from Section 6, I would type exec 1.txt If you get an error that says "Transient.SparkServiceConfiguration_6" in the console after executing your mod pack, you did it before you connected to SHiFT. You can either restart or just wait until you are connected. This honestly depends on the mod pack that you executed though. Sometimes it is better to restart but most of the time it is not. You may encounter other errors but it should be fine as long as you don't see "Transient.SparkServiceConfiguration_6". Again, this is not always the case and sometimes the errors can edit weird things.
I hope this has helped you get started! If need be, feel free to ask a question in this posts section or join our Discord server linked at the bottom of all of my mod descriptions.
I really like this mod, especially with how often items tend to clip into terrain. However, the default and even the edit done by MillionLights seemed comically large to me. I also don't really like how the changed aspect ratio seems to mess with the texture.
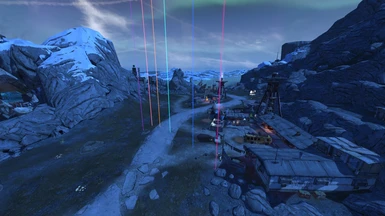
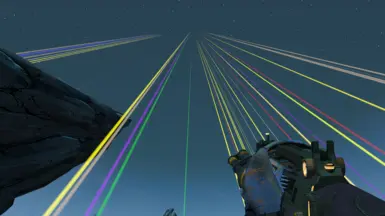
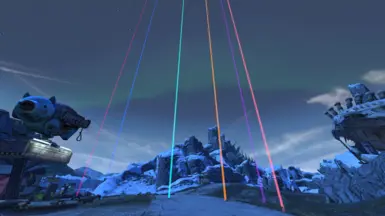
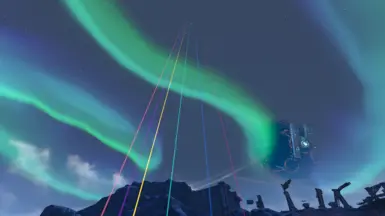
What I did is take the vanilla values for the loot beam sizes (0,120,3,120,0,3,120,0) And just arbitrarily double them - well a little more than double - to (0,280,7,280,0,7,280,0) Which ends up looking really nice in my opinion, either way great mod.
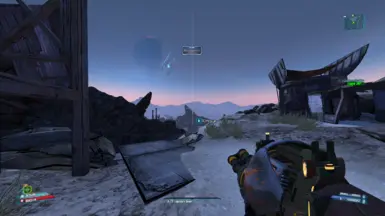
I alternated the Loot-Beam-only line a bit to create a more subtle Preset that works well for normal gameplay and helps to see loot without being super obvious or cheaty
set fx_shared_items.Particles.Part_ItemLocatorStick:ParticleModuleSize_1 StartSize.LookupTable (0,1300,7,1300,0,7,1300,0)
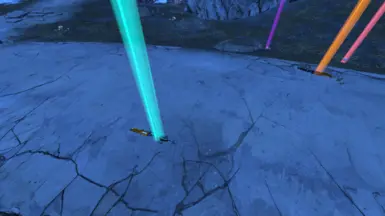
- Beams are slightly higher than the destroyed Uranus - slightly wider to improve visibility - Beam sticks out below the items a bit (in case something lands on a roof above you) - Loot Beam only (no changes to interaction, info, card or icon)
Thought you'd like it. Feel free to use it or improve the preset!
Here's a short 30sec demonstration: https://www.youtube.com/watch?v=DCpj_mdNzZ8
Thanks so much! I loved the idea of the mod but I couldn't get past having everything, including voice logs or quest items, having mile high beams. Really helped me out and I'm sure you helped some others too
Can anyone help me? So i've installed this mod and put it into the Binaries folder but it's very hit and miss for when it wants to work. I don't do anything differently but it just doesn't work sometimes. I use the BL2BetterLoot mod and I try to use the Loot Beams to see the better loot but as of right now it's just not working. Thans
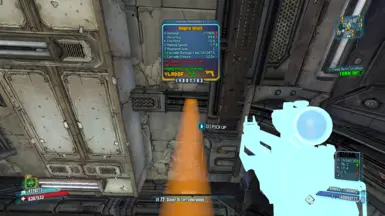
First of all, thanks for this mod. I want to be able to pick up itmes from a large distance. So I enabled the Cheat Mode. But I also want the Info cards to be displayed at the regular position (few meter above the ground). So I disabled "Loot Beam Info - Vertical Distance", "Item Type Icon Size" and "Item Card Size - Customize". This helped me with info cards but the stuff like ammo and cash still have a large ass icons on the ground, which is blocking the complete screen. 'Item Type Icon Size' has these values in the code: (0,4500,4500,4500,0,4500,4500,0). But I don't know which value to tweak to make them smaller. Please help. Also, looking forward to the next update so that white and green items don't cast a beam.
There are various options for the sizes of the item card size (including vanilla). I'd edit some of those options and test to see what works well for you. (0,4500,4500,4500,0,4500,4500,0) each 4500 is either height or width of the item card or whatever (particle), so you basically just need to edit every other one and see what it changes.
Sort of, I actually plan on using the rainbow beam (which I can replace with no beam) to apply to every non-unique item and keep the varying colored beams for vanilla items. This will allow the big beams to only apply to useful items and not white, greens, etc.
However, mods that affect rarity of items will have to be overwritten.
Not sure if perhaps I'm doing something wrong, and I have only tried the loot beams method within the configs, but this makes things impossible to pick up if they sink slightly into the floor as they do, as an example the bunker. Some of the gear falls into the little slots between the flooring, although it doesn't fall through the map. I am unable to loot it.
I manage to bypass this by using code to push all the loot to go above the floor and circle around the player. Shall try some of the other options in a bit and will confirm if it is just that option or not or if perhaps it is just an problem on my end.
If you are using the "Only Loot Beams" part, then this is a vanilla game bug. Changing the size of a particle would not prevent anything of that sort. There is a hover width change in that mode, but the values are vanilla for one and another was increased by 100. If anything, this should make picking up things easier.
Strange, usually I am able to grab the items within the gaps and such, but with this I am unable to do so. Regardless of option, even with just beams, usually standing ontop of it and looking at it below the ground allows me to grab it. But with this enabled the option is entirely gone.
However it isn't a terrible thing, as I can bypass this using code to raise all gear and such around the player. Shall keep messing around. I know the gear below the floor is a vanilla issue, just the mod enabled seems to not allow me to grab it the usual way.


26 comments
First off, this mod is packed in a 7-Zip file, this means that you will need a program that can open the Zip file. If you do not have a program to do such, 7-Zip is free and straight forward.
Once you have downloaded my 7-Zip file from Nexus Mods, open the Zip file up with a program that can open it. My 7-Zip file should contain one or more mods.
These mod(s) should be named similar or exactly the same as the mod name from Nexus Mods.
Select the file(s) by left clicking on them while holding CTRl (Control), then right click and select "Move To...", or, while the files are selected, select "Extract", which should be at the top.
Section 2
Performing either action will bring up a window that says "Copy" and "Copy To:", this is where you can either put in a folder that you made or directly put it in your BL2 or TPS Binaries folder.
These directories can be found via Steam in multiple ways.
1st way for BL2: [HardDriveName]:\Steam\steamapps\common\Borderlands 2\Binaries
1st way for the Pre-Sequel: [HardDriveName]:\Steam\steamapps\common\BorderlandsPreSequel\Binaries
2nd way: open up Steam, go to your library, find the Borderlands that the mod belongs to, right click, select the very last option "Properties", go to "Local Files" and "Browse Local Files".
Continuing from the 2nd way, just open up the Binaries folder and it should contain "Redist" and "Win32" if you are on Windows.
For easy access to the Binaries folder, you can left click "Home" in File Explorer's top left corner and then select "Pin To Quick Access". This will be an easy way to do stuff in there.
Once you have the location figured out for the program to copy to, let it copy the file(s) there. This will now serve as an easy to access location for BLCMM to find mods.
Section 3
BLCMM is quite important for the majority of my mods due to their customizability and functionality. It is also a very great tool for creating mods and making your own mod pack with ease.
A lot of my mods use "Hotfixes" which do not work well with other mods, unless they are properly merged with other mods that use said method (blue text in BLCMM).
BLCMM merges mods with Hotfixes and other commands about as seamlessly as you can get, so I strongly recommend doing it this way.
Now, before I start going on a rant about this, let me get to what needs to be done to play your game with mods.
I will not go over how to set up BLCMM for the first time in here, so I will now go to the "what to do" part once you get things set up.
Section 4
With BLCMM open, go to the top left and left click on "File", then select "Open". From there, find my mod file that is aptly named so that you may be able to use it as a starting point to add mods to.
Well, would you look at all that yellow text! Yeah, I go into detail about the specific mod and I try to organize my options to be beginner friendly in most cases.
Anyways, if you left click the little ">" icon next to a folder name, it will drop down another folder, sometimes these are multi-layered and will require some clicking.
If you see several options that are in a purple color, these are considered "MUT" categories (Mutually Exclusive) which only allow one option in that folder to be selected at a time.
You can choose one option by left clicking the "o" icon and it will fill the dot, not unlike most fill in the dot tests from school.
Any folder that is white is something that is not a "MUT" folder and you can toggle everything in that folder via the same method, but this time it will get a "v" icon (checkmark) in it.
You can read through my folder names and try to figure out what you would like to have happen in the mod, but beware, some things are mandatory and I did not lock the folder.
Section 5
Now, if you made it through that brief synopsis of beginner level BLCMM information, give yourself a pat on the back. Most people do not tend to read these so I sometimes wonder why I bother.
Back to the subject at hand, you have now customized my file (if applicable) to your liking. Now, where do you go from here if you want to use multiple of my mods (if they are compatible)?
Well, head back to the "File" option in the top left of BLCMM. From there, select "Import Mod File(s)" and simply peruse (go through) the mod files in your Binaries folder or elsewhere.
You can do the same method from the beginning and left click on the mod name while holding CTRL (Control) to select multiple mods to add at once.
These mods will now be added to a cyan folder called "mods", or they will be directly imported under the main mod's stuff if you had the main mod's cyan text selected when you imported the additional mods.
Section 6
Follow the same process for Section 4, or not, it's up to how you want to play. However, some of my mods DO NOT come with selected default options and will require you to choose options to make them work.
If you see dark and light green text, this means that the light green text replaces the effect of the dark green text. You can right click the light green text to go to where it overwrites a previous statement and or command.
Just decide, of the two or more statements and or commands, which one sounds the best for your preference. You do not need to unselect any particular code due to how BLCMM works, but keep in mind that the one that takes place is the furthest one down in your mod file and it has light green text.
Once that is all over and you have your multiple mods in one file and customized the way you want, you now go back to "File" in the top left and select "Save As".
You can choose to save the file as is, or you can simplify it to anything that you want, such as "1.txt". When you do rename the file or save this file as something else, make sure that it has NO SPACING in the name. This is because you will not be able to execute it later.
From here, you now have the optimal form of file. One file saved as something that you remember, includes your mod choices, can be added to or subtracted from, works with all mods that use hotfixes since they are considered one mod now and last but not least this mod pack can be executed.
Section 7
Here comes the fun part. Now you need to start up your mod specific Borderlands game. Now, this upcoming part differs in a lot of ways depending on your OS (Operating System).
I use Windows so I will speak for such now. When you start up your game, continue as normal until you get to the "Main Menu" screen where your character is on a cliff and whatnot.
From here, DO NOT DO ANYTHING YET! You need to wait around 10 seconds (I believe in you) for your SHiFT account to be connected to whatever service it is.
After these 10 seconds you may execute the mod from Section 6 by opening the console (green and transparent black overlay) and typing (without the quotes) "exec ModName.Extension". As an example from Section 6, I would type exec 1.txt
If you get an error that says "Transient.SparkServiceConfiguration_6" in the console after executing your mod pack, you did it before you connected to SHiFT.
You can either restart or just wait until you are connected. This honestly depends on the mod pack that you executed though. Sometimes it is better to restart but most of the time it is not.
You may encounter other errors but it should be fine as long as you don't see "Transient.SparkServiceConfiguration_6". Again, this is not always the case and sometimes the errors can edit weird things.
I hope this has helped you get started! If need be, feel free to ask a question in this posts section or join our Discord server linked at the bottom of all of my mod descriptions.
However, the default and even the edit done by MillionLights seemed comically large to me.
I also don't really like how the changed aspect ratio seems to mess with the texture.
What I did is take the vanilla values for the loot beam sizes (0,120,3,120,0,3,120,0)
And just arbitrarily double them - well a little more than double - to (0,280,7,280,0,7,280,0)
Which ends up looking really nice in my opinion, either way great mod.
set fx_shared_items.Particles.Part_ItemLocatorStick:ParticleModuleSize_1 StartSize.LookupTable (0,1300,7,1300,0,7,1300,0)
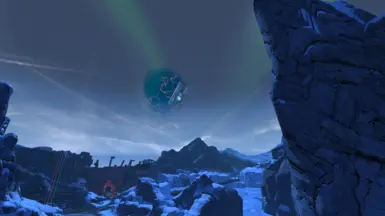
- Beams are slightly higher than the destroyed Uranus
- slightly wider to improve visibility
- Beam sticks out below the items a bit (in case something lands on a roof above you)
- Loot Beam only (no changes to interaction, info, card or icon)
Thought you'd like it. Feel free to use it or improve the preset!
Here's a short 30sec demonstration:
https://www.youtube.com/watch?v=DCpj_mdNzZ8
So i've installed this mod and put it into the Binaries folder but it's very hit and miss for when it wants to work.
I don't do anything differently but it just doesn't work sometimes.
I use the BL2BetterLoot mod and I try to use the Loot Beams to see the better loot but as of right now it's just not working.
Thans
I want to be able to pick up itmes from a large distance. So I enabled the Cheat Mode.
But I also want the Info cards to be displayed at the regular position (few meter above the ground). So I disabled "Loot Beam Info - Vertical Distance", "Item Type Icon Size" and "Item Card Size - Customize". This helped me with info cards but the stuff like ammo and cash still have a large ass icons on the ground, which is blocking the complete screen. 'Item Type Icon Size' has these values in the code: (0,4500,4500,4500,0,4500,4500,0). But I don't know which value to tweak to make them smaller. Please help.
Also, looking forward to the next update so that white and green items don't cast a beam.
(0,4500,4500,4500,0,4500,4500,0) each 4500 is either height or width of the item card or whatever (particle), so you basically just need to edit every other one and see what it changes.
However, mods that affect rarity of items will have to be overwritten.
I manage to bypass this by using code to push all the loot to go above the floor and circle around the player. Shall try some of the other options in a bit and will confirm if it is just that option or not or if perhaps it is just an problem on my end.
There is a hover width change in that mode, but the values are vanilla for one and another was increased by 100. If anything, this should make picking up things easier.
However it isn't a terrible thing, as I can bypass this using code to raise all gear and such around the player. Shall keep messing around. I know the gear below the floor is a vanilla issue, just the mod enabled seems to not allow me to grab it the usual way.
But I was wondering if you could share how you raise the gear around the player like you describe. I have no clue about any of this.