Section 1 First off, this mod is packed in a 7-Zip file, this means that you will need a program that can open the Zip file. If you do not have a program to do such, 7-Zip is free and straight forward. Once you have downloaded my 7-Zip file from Nexus Mods, open the Zip file up with a program that can open it. My 7-Zip file should contain one or more mods. These mod(s) should be named similar or exactly the same as the mod name from Nexus Mods. Select the file(s) by left clicking on them while holding CTRl (Control), then right click and select "Move To...", or, while the files are selected, select "Extract", which should be at the top.
Section 2 Performing either action will bring up a window that says "Copy" and "Copy To:", this is where you can either put in a folder that you made or directly put it in your BL2 or TPS Binaries folder. These directories can be found via Steam in multiple ways. 1st way for BL2: [HardDriveName]:\Steam\steamapps\common\Borderlands 2\Binaries 1st way for the Pre-Sequel: [HardDriveName]:\Steam\steamapps\common\BorderlandsPreSequel\Binaries 2nd way: open up Steam, go to your library, find the Borderlands that the mod belongs to, right click, select the very last option "Properties", go to "Local Files" and "Browse Local Files". Continuing from the 2nd way, just open up the Binaries folder and it should contain "Redist" and "Win32" if you are on Windows. For easy access to the Binaries folder, you can left click "Home" in File Explorer's top left corner and then select "Pin To Quick Access". This will be an easy way to do stuff in there. Once you have the location figured out for the program to copy to, let it copy the file(s) there. This will now serve as an easy to access location for BLCMM to find mods.
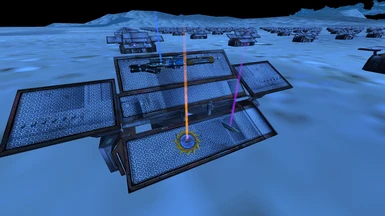
Section 3 BLCMM is quite important for the majority of my mods due to their customizability and functionality. It is also a very great tool for creating mods and making your own mod pack with ease. A lot of my mods use "Hotfixes" which do not work well with other mods, unless they are properly merged with other mods that use said method (blue text in BLCMM). BLCMM merges mods with Hotfixes and other commands about as seamlessly as you can get, so I strongly recommend doing it this way. Now, before I start going on a rant about this, let me get to what needs to be done to play your game with mods. I will not go over how to set up BLCMM for the first time in here, so I will now go to the "what to do" part once you get things set up.
Section 4 With BLCMM open, go to the top left and left click on "File", then select "Open". From there, find my mod file that is aptly named so that you may be able to use it as a starting point to add mods to. Well, would you look at all that yellow text! Yeah, I go into detail about the specific mod and I try to organize my options to be beginner friendly in most cases. Anyways, if you left click the little ">" icon next to a folder name, it will drop down another folder, sometimes these are multi-layered and will require some clicking. If you see several options that are in a purple color, these are considered "MUT" categories (Mutually Exclusive) which only allow one option in that folder to be selected at a time. You can choose one option by left clicking the "o" icon and it will fill the dot, not unlike most fill in the dot tests from school. Any folder that is white is something that is not a "MUT" folder and you can toggle everything in that folder via the same method, but this time it will get a "v" icon (checkmark) in it. You can read through my folder names and try to figure out what you would like to have happen in the mod, but beware, some things are mandatory and I did not lock the folder.
Section 5 Now, if you made it through that brief synopsis of beginner level BLCMM information, give yourself a pat on the back. Most people do not tend to read these so I sometimes wonder why I bother. Back to the subject at hand, you have now customized my file (if applicable) to your liking. Now, where do you go from here if you want to use multiple of my mods (if they are compatible)? Well, head back to the "File" option in the top left of BLCMM. From there, select "Import Mod File(s)" and simply peruse (go through) the mod files in your Binaries folder or elsewhere. You can do the same method from the beginning and left click on the mod name while holding CTRL (Control) to select multiple mods to add at once. These mods will now be added to a cyan folder called "mods", or they will be directly imported under the main mod's stuff if you had the main mod's cyan text selected when you imported the additional mods.
Section 6 Follow the same process for Section 4, or not, it's up to how you want to play. However, some of my mods DO NOT come with selected default options and will require you to choose options to make them work. If you see dark and light green text, this means that the light green text replaces the effect of the dark green text. You can right click the light green text to go to where it overwrites a previous statement and or command. Just decide, of the two or more statements and or commands, which one sounds the best for your preference. You do not need to unselect any particular code due to how BLCMM works, but keep in mind that the one that takes place is the furthest one down in your mod file and it has light green text. Once that is all over and you have your multiple mods in one file and customized the way you want, you now go back to "File" in the top left and select "Save As". You can choose to save the file as is, or you can simplify it to anything that you want, such as "1.txt". When you do rename the file or save this file as something else, make sure that it has NO SPACING in the name. This is because you will not be able to execute it later. From here, you now have the optimal form of file. One file saved as something that you remember, includes your mod choices, can be added to or subtracted from, works with all mods that use hotfixes since they are considered one mod now and last but not least this mod pack can be executed.
Section 7 Here comes the fun part. Now you need to start up your mod specific Borderlands game. Now, this upcoming part differs in a lot of ways depending on your OS (Operating System). I use Windows so I will speak for such now. When you start up your game, continue as normal until you get to the "Main Menu" screen where your character is on a cliff and whatnot. From here, DO NOT DO ANYTHING YET! You need to wait around 10 seconds (I believe in you) for your SHiFT account to be connected to whatever service it is. After these 10 seconds you may execute the mod from Section 6 by opening the console (green and transparent black overlay) and typing (without the quotes) "exec ModName.Extension". As an example from Section 6, I would type exec 1.txt If you get an error that says "Transient.SparkServiceConfiguration_6" in the console after executing your mod pack, you did it before you connected to SHiFT. You can either restart or just wait until you are connected. This honestly depends on the mod pack that you executed though. Sometimes it is better to restart but most of the time it is not. You may encounter other errors but it should be fine as long as you don't see "Transient.SparkServiceConfiguration_6". Again, this is not always the case and sometimes the errors can edit weird things.
I hope this has helped you get started! If need be, feel free to ask a question in this posts section or join our Discord server linked at the bottom of all of my mod descriptions.
after one year of now playing i am back here again to try the game and the mod ( with commander lilth dlc this time ) and for some reason the fast travel for the small and large chest farming doesnt appear on the fast travel and idk what am i doing wrong this time ( i tried to use the create level 30 character instead of beginning from scratch of it so maybe that's an issue but idk if that is an issue or should be an issue )
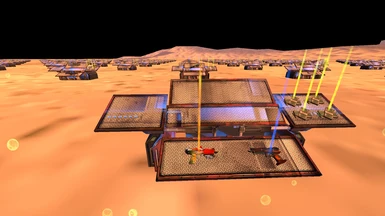
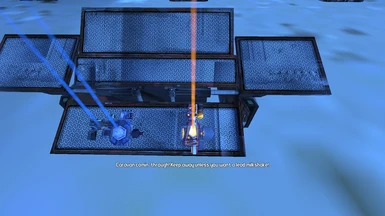
the mod works fine and great but the only downside is that whenever you fast travel to the dust you are taken to the large chest farming area instead of the dust where ellie is. BUT what i did was i actually have to uncheck the large chests farming area in the blcmm to get the dust with ellie back and it works as well.
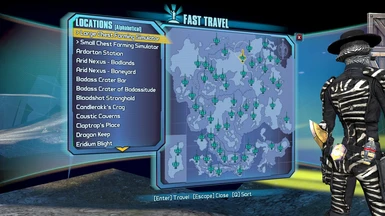
So, I can't get this working rn for some reason. I keep getting the fast travel point >Small Chest Farming Simulator, the large doesn't show up at all, and It just takes me to the friendship gulag. I'm Hexedited and running no other mods, I've had this working before, but I cannot for the life of me get it working right again. Was is broken by the patch? (I haven't played BL2 in over a year) *edit* I'm still troubleshooting, will update if I figure out where I screwed up.
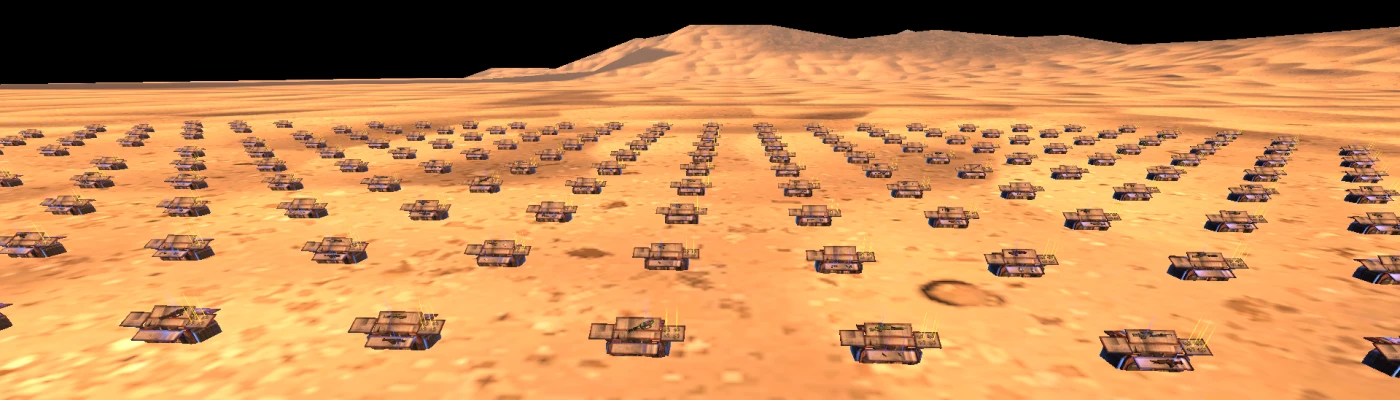
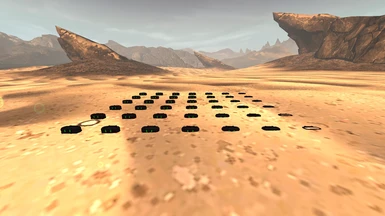
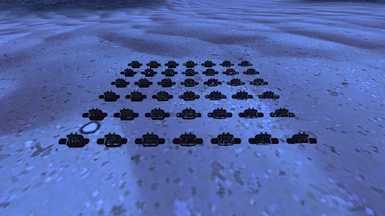
Found a couple issues with this mod. I noticed that the small map has no fast travel point after you get there, so you have to exit and re-enter the game. The large farm causes the fast travel point at Ellie's in dust to be moved, which also causes there to be no dust fast travel point.
Yeah, I can't really add a fast travel station without replacing a whole object class. This mod was not really meant to be used for any purpose but the edited locations. I can edit the Gulag one to teleport you to the right spot right away though.
I cant travel to the dust because every time a message pops up that says Fatal Error! Address= 0x0 (filename not found) not sure if im just stupid or the mod is missing a file, but if you can please help. Edit: I am stupid it was a simple fix
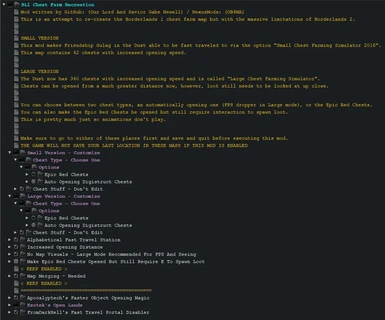
The auto opening chests require the Ultimate Vault Hunter Upgrade Pack 2 DLC. I may have accidentally did something else that causes that (which only occurs due to lack of DLC). I'll look into fixing it and making that more apparent.
Updated the mod to hopefully resolve the issue. I also removed unnecessary code, moved the fast travel station in the Dust to be nearby (none in Friendship Gulag) and updated some text to hopefully have people read that they need a certain DLC for a certain option.
If the problem still persists, just disable the map merging folder. It will prevent the solo options and the Friendship Gulag Fast Travel Station from working though. I guess I'll make another update for that.
EDIT: I added an option to disable DLC map merging, so make sure to use that option and not use the automatic opening chest type. This should definitely fix it.
I cannot find the fast travel in the menu, I am running the patch with these other mods: More Chests, Better Vendors, Better Loot, I have tested several combinations and nothing seems to let it appear. Thanks for the help.
I assume that you have the Dust, Friendship Gulag, and Bloodshot Ramparts (top of the dam) unlocked? These maps have to be available for my mod to work, and the listing for them is always at the very top of the Alphabetical sorting mode for the Fast Travel Station.
I don't think it is possible for any of those listed mods to interfere with my mod at all besides More Chests On Pandora, as I edited two maps and a few other things that they don't particularly mess up.


21 comments
First off, this mod is packed in a 7-Zip file, this means that you will need a program that can open the Zip file. If you do not have a program to do such, 7-Zip is free and straight forward.
Once you have downloaded my 7-Zip file from Nexus Mods, open the Zip file up with a program that can open it. My 7-Zip file should contain one or more mods.
These mod(s) should be named similar or exactly the same as the mod name from Nexus Mods.
Select the file(s) by left clicking on them while holding CTRl (Control), then right click and select "Move To...", or, while the files are selected, select "Extract", which should be at the top.
Section 2
Performing either action will bring up a window that says "Copy" and "Copy To:", this is where you can either put in a folder that you made or directly put it in your BL2 or TPS Binaries folder.
These directories can be found via Steam in multiple ways.
1st way for BL2: [HardDriveName]:\Steam\steamapps\common\Borderlands 2\Binaries
1st way for the Pre-Sequel: [HardDriveName]:\Steam\steamapps\common\BorderlandsPreSequel\Binaries
2nd way: open up Steam, go to your library, find the Borderlands that the mod belongs to, right click, select the very last option "Properties", go to "Local Files" and "Browse Local Files".
Continuing from the 2nd way, just open up the Binaries folder and it should contain "Redist" and "Win32" if you are on Windows.
For easy access to the Binaries folder, you can left click "Home" in File Explorer's top left corner and then select "Pin To Quick Access". This will be an easy way to do stuff in there.
Once you have the location figured out for the program to copy to, let it copy the file(s) there. This will now serve as an easy to access location for BLCMM to find mods.
Section 3
BLCMM is quite important for the majority of my mods due to their customizability and functionality. It is also a very great tool for creating mods and making your own mod pack with ease.
A lot of my mods use "Hotfixes" which do not work well with other mods, unless they are properly merged with other mods that use said method (blue text in BLCMM).
BLCMM merges mods with Hotfixes and other commands about as seamlessly as you can get, so I strongly recommend doing it this way.
Now, before I start going on a rant about this, let me get to what needs to be done to play your game with mods.
I will not go over how to set up BLCMM for the first time in here, so I will now go to the "what to do" part once you get things set up.
Section 4
With BLCMM open, go to the top left and left click on "File", then select "Open". From there, find my mod file that is aptly named so that you may be able to use it as a starting point to add mods to.
Well, would you look at all that yellow text! Yeah, I go into detail about the specific mod and I try to organize my options to be beginner friendly in most cases.
Anyways, if you left click the little ">" icon next to a folder name, it will drop down another folder, sometimes these are multi-layered and will require some clicking.
If you see several options that are in a purple color, these are considered "MUT" categories (Mutually Exclusive) which only allow one option in that folder to be selected at a time.
You can choose one option by left clicking the "o" icon and it will fill the dot, not unlike most fill in the dot tests from school.
Any folder that is white is something that is not a "MUT" folder and you can toggle everything in that folder via the same method, but this time it will get a "v" icon (checkmark) in it.
You can read through my folder names and try to figure out what you would like to have happen in the mod, but beware, some things are mandatory and I did not lock the folder.
Section 5
Now, if you made it through that brief synopsis of beginner level BLCMM information, give yourself a pat on the back. Most people do not tend to read these so I sometimes wonder why I bother.
Back to the subject at hand, you have now customized my file (if applicable) to your liking. Now, where do you go from here if you want to use multiple of my mods (if they are compatible)?
Well, head back to the "File" option in the top left of BLCMM. From there, select "Import Mod File(s)" and simply peruse (go through) the mod files in your Binaries folder or elsewhere.
You can do the same method from the beginning and left click on the mod name while holding CTRL (Control) to select multiple mods to add at once.
These mods will now be added to a cyan folder called "mods", or they will be directly imported under the main mod's stuff if you had the main mod's cyan text selected when you imported the additional mods.
Section 6
Follow the same process for Section 4, or not, it's up to how you want to play. However, some of my mods DO NOT come with selected default options and will require you to choose options to make them work.
If you see dark and light green text, this means that the light green text replaces the effect of the dark green text. You can right click the light green text to go to where it overwrites a previous statement and or command.
Just decide, of the two or more statements and or commands, which one sounds the best for your preference. You do not need to unselect any particular code due to how BLCMM works, but keep in mind that the one that takes place is the furthest one down in your mod file and it has light green text.
Once that is all over and you have your multiple mods in one file and customized the way you want, you now go back to "File" in the top left and select "Save As".
You can choose to save the file as is, or you can simplify it to anything that you want, such as "1.txt". When you do rename the file or save this file as something else, make sure that it has NO SPACING in the name. This is because you will not be able to execute it later.
From here, you now have the optimal form of file. One file saved as something that you remember, includes your mod choices, can be added to or subtracted from, works with all mods that use hotfixes since they are considered one mod now and last but not least this mod pack can be executed.
Section 7
Here comes the fun part. Now you need to start up your mod specific Borderlands game. Now, this upcoming part differs in a lot of ways depending on your OS (Operating System).
I use Windows so I will speak for such now. When you start up your game, continue as normal until you get to the "Main Menu" screen where your character is on a cliff and whatnot.
From here, DO NOT DO ANYTHING YET! You need to wait around 10 seconds (I believe in you) for your SHiFT account to be connected to whatever service it is.
After these 10 seconds you may execute the mod from Section 6 by opening the console (green and transparent black overlay) and typing (without the quotes) "exec ModName.Extension". As an example from Section 6, I would type exec 1.txt
If you get an error that says "Transient.SparkServiceConfiguration_6" in the console after executing your mod pack, you did it before you connected to SHiFT.
You can either restart or just wait until you are connected. This honestly depends on the mod pack that you executed though. Sometimes it is better to restart but most of the time it is not.
You may encounter other errors but it should be fine as long as you don't see "Transient.SparkServiceConfiguration_6". Again, this is not always the case and sometimes the errors can edit weird things.
I hope this has helped you get started! If need be, feel free to ask a question in this posts section or join our Discord server linked at the bottom of all of my mod descriptions.
I think this mod is one of the best (when merged with "Loot Beams" and "Loot Despawner" from U)
I'm Hexedited and running no other mods, I've had this working before, but I cannot for the life of me get it working right again.
Was is broken by the patch? (I haven't played BL2 in over a year)
*edit* I'm still troubleshooting, will update if I figure out where I screwed up.
I may have accidentally did something else that causes that (which only occurs due to lack of DLC).
I'll look into fixing it and making that more apparent.
EDIT: I added an option to disable DLC map merging, so make sure to use that option and not use the automatic opening chest type.
This should definitely fix it.
These maps have to be available for my mod to work, and the listing for them is always at the very top of the Alphabetical sorting mode for the Fast Travel Station.
I don't think it is possible for any of those listed mods to interfere with my mod at all besides More Chests On Pandora, as I edited two maps and a few other things that they don't particularly mess up.