Batman: Arkham Asylum texture modding tools. Used for Asylum Reborn HD Texture Pack.
Permissions and credits
Credits and distribution permission
Other user's assetsAll the assets in this file belong to the author, or are from free-to-use modder's resources
Upload permissionYou are not allowed to upload this file to other sites under any circumstances
Modification permissionYou must get permission from me before you are allowed to modify my files to improve it
Conversion permissionYou are not allowed to convert this file to work on other games under any circumstances
Asset use permissionYou must get permission from me before you are allowed to use any of the assets in this file
Asset use permission in mods/files that are being soldYou are not allowed to use assets from this file in any mods/files that are being sold, for money, on Steam Workshop or other platforms
Asset use permission in mods/files that earn donation pointsYou are not allowed to earn Donation Points for your mods if they use my assets
Author notes
Permission given by Wasteland Ghost to upload the tools. https://github.com/wghost/UPKUtils
Tools developed by Wasteland Ghost, with permission granted to upload them. Originally made for X:COM EU/EW games, and eventually updated to support Arkham Asylum. In-depth instructions to be added. Batch files or Powershell can be used to run commands. Batch files require quotations (") for file directories. Example mod made with the tools: https://www.nexusmods.com/batmanarkhamasylum/mods/1
Exporting Textures Using Batch Files
Batch files are included in the download. Right Click 'Extract Textures.bat' > Edit > Set Game Directory (where stated).
Run 'Extract Textures.bat'. The extracted textures will be placed in a folder called 'ExtractedTextures'. The output directory can be changed by editing the 'o-' value in the batch file.
Injecting/Importing Textures Using Batch Files
Batch files are included in the download. Right Click 'Install Textures.bat' > Edit > Set Game Directory (where stated).
Place all custom textures in 'CustomTextures' folder. Texture format should be .dds, and is typically BC1/DXT1 with auto-generated mipmaps.
Run 'Install Textures.bat'. Injected textures will be in 'Imported' folder. Copy contents inside 'Imported' folder to '(Game-Directory)\Batman Arkham Asylum GOTY\BmGame\CookedPC\' - Overwrite when prompted. Suggested to back up the CookedPC folder before this procedure.
Exporting Textures Using PowerShell
Launch Windows PowerShell (type 'powershell' in search bar)
All texture files from the game are contained in the CookedPC folder: \BatmanArkhamAsylum\BmGame\CookedPC Backup the CookedPC folder before using the tools.
BmGame.u contains the main textures, including Batman's body textures.
The output is "ExtractedTextures", which means all exported textures will be stored in the ExtractedTextures folder.
Injecting/Importing Textures Using PowerShell
Launch Windows PowerShell (type 'powershell' in search bar)
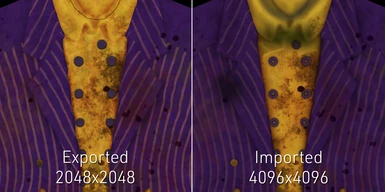
Injecting textures requires inventory.csv file created through the exporting process to be next to the texture file(s) you want to inject. The injected texture must match the pixel format and name of the original texture being replaced. Injected texture can be higher in resolution. The Advanced Launcher adds support for higher resolution character textures.
Texture format should be .dds, and is typically BC1/DXT1 with auto-generated mipmaps.
In this injection example, "Batman_V2.Maps.V2_Batman_Body_D.dds" is one of Batman's body textures. ImportTexturesFromDDS.exe, BmGame.u and the body texture are contained in the same folder. This will result in a new BmGame.u file, and potentially a Textures2D.tfc file depending on the texture. Transfer both to the game's CookedPC folder to install new textures.
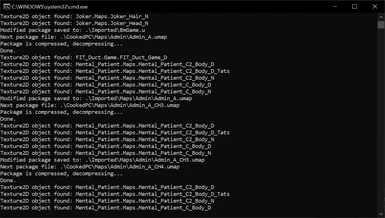
Mass-injecting textures
In this example, custom textures are placed in the CustomTextures folder, and Imported is the output folder.
After textures have finished importing, copy the Imported folder contents over to the game's CookedPC folder.
Custom Commands
-h, --help get usage help (this text) -i, --input= set input dir -o, --output= set output dir -k, --keep keep input dir structure for output dir -w, --overwrite overwrite existing dds files -t, --tfc= set tfc dir (by default input dir is used)