Wow, these all look fantastic! I'm glad people are getting use out of my stamps mod.
Also, for anyone in comments unsure how to edit the MSK file: 1) Download GIMP. 2) Open file 3) Add your own decal. You can do this in a different program and just open it in GIMP to export to DDS if you want. Use the table on this page as reference for the exact colours you should use for the MSKCloth. 4) Export file as .DDS, compression DXT1 + Generate Mipmaps(Kaiser). Remember to save as .DDS not .dds, as capitalisation matters in this game.
You can open the PAK with modder's multitool, drag the pak into its window and it will auto unpack the file. You then drag it back it to repack it. There's more here if it helps.
how do you edit the DDS itself? I have it open in gimp, but are we meant to edit each of the mipmaps? And I'm guessing it's not as simple as copy/pasting a new decal onto the image. Is there a video that shows how to do this?
If it helps, all I'm trying to do is switch the decal to one of yours. edit: Figured it out, and for those wondering it really is as simple as copy paste, color edit, and re-gen Mipmaps when saving. Thanks!
Glad you got something you're happy with! Also yes you don't need to edit the mipmaps. Don't load them when you open the DDS, and generate new ones afterward.
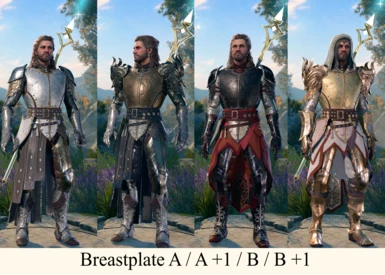
I am having trouble with using GIMP to add the Eilistraee stamp to my breastplate. When I open the DDS from the optional file in GIMP, the Kelemvor stamp is already on there, and since there are no layers, there seems to be no way to remove it. Is there a way to remove it or a blank version of the file somewhere that I could use instead to paste the stamp onto? I have never done this before, so apologies if this is a simple fix, and THANK YOU for all the excellent advice in this thread. My Seladrine Drow Cleric/Bard thanks you as well!
Unfortunately, I just cannot figure this out. It appears that the only DDS file for Breastplate A in the mod itself and the optional file is the one with the Kelemvor stamp already on it. This one might just be a bit beyond me. I really appreciate the helpful responses though! Thank you so much!!
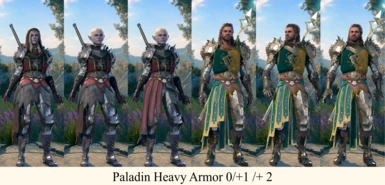
Follow your guide I finally figured out how to swap out the stamps to complete the set fitting for my paladin. Also combined with your Helm's Armory mod. Thank you & pooteeweet so much!!!
For anyone still confused about how to change the decal, here are more detailed instructions below that worked for me.
1. You need to extract the optional decal mod file first and then import the Pak file into modders multi tool program. The mod will be unpacked and it will create a folder called 'unpacked mods' within the multi tool file directories.
2. Open GIMP and then find the .dds file you want to add the decal to e.g. breastplate . The .DDS file will be in the unpacked mods folder created by multi tool inside the assets folder. Just keep opening each folder until you find it.
3. Open the new decal you want to use in separate tab in GIMP. Decals are from here: https://www.nexusmods.com/baldursgate3/mods/4337
4. In the DDS file, you should see the Kelemvor scale. This is the only part of the image we want to replace. So use the free select tool to select only the part with the Kelemvor scale. Now look below the toolbar for width and height numbers in pixels. This is the dimensions you need to resize the replacement decal to. If you can't see it, then make sure tool options panel is enabled. Go to the menu bar at the top. Click on Windows > Dockable Dialogs > Tool Options. The Tool Options dialog will appear, likely on the left side under the toolbox.5. Go to the tab where the replacement decal is. Go to Image > Scale Image.Set the Width and Height values to match the dimensions of the Kelemvor area on the DDS file you had selected.If the aspect ratio doesn’t match perfectly, uncheck “Lock Aspect Ratio” (chain icon next to Width/Height). Click OK to resize the replacement image. 6. Press CTRL+ C to copy the decal. Go back to the .DDS file and CTRL + V to paste it. Press M on your keyboard to move the decal to be on top of the Kelemvor scales. Adjust and resize if you need to. The image should only be contained within the green coloured parts of the DDS image.
7. Once the replacement image is in the correct position, go to Layer > Anchor Layer to merge it into the texture file.
8. Final step is to map the colours. Modders have already posted a link to table with hex codes to use. In basic terms, because we are changing the green part, the hex code should be #FF8000. So use free select tool to select the new decal again. Click the Foreground Color box in the Toolbox (left side of the screen, it is a button with a black and white square overlapping).In the color picker, enter the hex code #FF8000. Click OK. 9. Use the Bucket Fill Tool (Shift+B) to fill the selected area with the orange color #FF8000. Important to note: if your decal has any smaller details like the eye in Helm decal then it will need be recolored with a valid hex color that corresponds to the Accent Color or else it will just show up as black. So, use free select tool to isolate any small details in the decal design. Assign it a hex table, like Accent Color: Hex Code: #FF0080 (pink for accents). Use pain bucket tool to apply the accent to smaller decal details.
10. Export the DDS. Choose BC1/DXT1 compression. Tick generate mini maps and save in the same location the original .DDS was in. Choose to overwrite the original file.
11. Go back to modders multi tool and drag the unpacked mod folder into the multi tool window. It will now repack the mod and create a new zip file in the unpacked mod folder within multi tool. This is the Pak with the new decal. Load it into BG3 mod manager and you should now see your chosen decal on the breast plate
As a woman over 6 feet tall in a third world country, I am very used to the disappointment of not finding pretty clothes in my size. But my strong-bodied femTav not being able to use your mod is a new level of disappointment :C (Excuse my Google Translate English)


176 comments
Also, for anyone in comments unsure how to edit the MSK file:
1) Download GIMP.
2) Open file
3) Add your own decal. You can do this in a different program and just open it in GIMP to export to DDS if you want.
Use the table on this page as reference for the exact colours you should use for the MSKCloth.
4) Export file as .DDS, compression DXT1 + Generate Mipmaps(Kaiser). Remember to save as .DDS not .dds, as capitalisation matters in this game.
There's more here if it helps.
If it helps, all I'm trying to do is switch the decal to one of yours.
edit: Figured it out, and for those wondering it really is as simple as copy paste, color edit, and re-gen Mipmaps when saving. Thanks!
Also yes you don't need to edit the mipmaps. Don't load them when you open the DDS, and generate new ones afterward.
HUM_M_ARM_Bane_Plate_A_MSKcloth.DDS
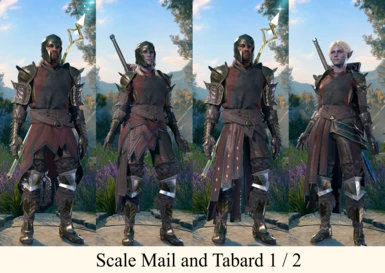
HUM_M_ARM_FlamingFist_Halfplate_A_0_Tabard_MSKcloth.DDS
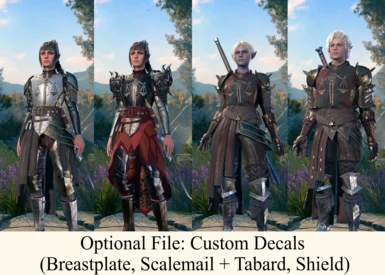
WPN_HUM_Shield_FlamingFist_MSKcloth.DDS
if it helps you. I believe the multitool can extract .dds format. There should be a free to use upscaled version of those MSKs here as well.
1. You need to extract the optional decal mod file first and then import the Pak file into modders multi tool program. The mod will be unpacked and it will create a folder called 'unpacked mods' within the multi tool file directories.
2. Open GIMP and then find the .dds file you want to add the decal to e.g. breastplate . The .DDS file will be in the unpacked mods folder created by multi tool inside the assets folder. Just keep opening each folder until you find it.
3. Open the new decal you want to use in separate tab in GIMP. Decals are from here: https://www.nexusmods.com/baldursgate3/mods/4337
4. In the DDS file, you should see the Kelemvor scale. This is the only part of the image we want to replace. So use the free select tool to select only the part with the Kelemvor scale. Now look below the toolbar for width and height numbers in pixels. This is the dimensions you need to resize the replacement decal to. If you can't see it, then make sure tool options panel is enabled. Go to the menu bar at the top. Click on Windows > Dockable Dialogs > Tool Options. The Tool Options dialog will appear, likely on the left side under the toolbox.5. Go to the tab where the replacement decal is. Go to Image > Scale Image.Set the Width and Height values to match the dimensions of the Kelemvor area on the DDS file you had selected.If the aspect ratio doesn’t match perfectly, uncheck “Lock Aspect Ratio” (chain icon next to Width/Height). Click OK to resize the replacement image.
6. Press CTRL+ C to copy the decal. Go back to the .DDS file and CTRL + V to paste it. Press M on your keyboard to move the decal to be on top of the Kelemvor scales. Adjust and resize if you need to. The image should only be contained within the green coloured parts of the DDS image.
7. Once the replacement image is in the correct position, go to Layer > Anchor Layer to merge it into the texture file.
8. Final step is to map the colours. Modders have already posted a link to table with hex codes to use. In basic terms, because we are changing the green part, the hex code should be #FF8000. So use free select tool to select the new decal again. Click the Foreground Color box in the Toolbox (left side of the screen, it is a button with a black and white square overlapping).In the color picker, enter the hex code #FF8000. Click OK.
9. Use the Bucket Fill Tool (Shift+B) to fill the selected area with the orange color #FF8000. Important to note: if your decal has any smaller details like the eye in Helm decal then it will need be recolored with a valid hex color that corresponds to the Accent Color or else it will just show up as black. So, use free select tool to isolate any small details in the decal design. Assign it a hex table, like Accent Color: Hex Code: #FF0080 (pink for accents). Use pain bucket tool to apply the accent to smaller decal details.
10. Export the DDS. Choose BC1/DXT1 compression. Tick generate mini maps and save in the same location the original .DDS was in. Choose to overwrite the original file.
11. Go back to modders multi tool and drag the unpacked mod folder into the multi tool window. It will now repack the mod and create a new zip file in the unpacked mod folder within multi tool. This is the Pak with the new decal. Load it into BG3 mod manager and you should now see your chosen decal on the breast plate
As a woman over 6 feet tall in a third world country, I am very used to the disappointment of not finding pretty clothes in my size. But my strong-bodied femTav not being able to use your mod is a new level of disappointment :C (Excuse my Google Translate English)