About this mod
Multi-body plugin for vanilla armors and clothes.
- Requirements
- Permissions and credits
- Changelogs
Description
This mod allows to craft multi-body versions for all vanilla armors and clothes, so they can match character bodies. It is an evolution of Skimpy Armors Multi-body System, but using a new system.
Important question:Since the morphs system included in Bodytypes of Skyrim V5 uses a unique set of meshes shared with all compatible bodies, so we can use an unique set of armor meshes and they change automatically to fit bodies… is the multi-body armor system still useful?
You don’t need multi-body armors:
- If you use a unique body or an unique body family for all characters. For example, you use only UNP based bodies, then you can create
all armors using UUNP zeroed preset with mophs support on Bodyslide and they will work with all option.
- You use UNP and CBBE bodies, but CBBE ones are based on UNP meshes. If you enable UnifiedCBBE option in Bodytypes MCM, CBBE bodies will use UNP meshes (but with CBBE morphs presets, obviously) so they use UNP textures too and can be compatible with UNP armors.
You need multi-body armors:
- If you use UNP and CBBE bodies, both with their original meshes and textures, so you need at least a set for UNP and other for CBBE.
- You use bodies not compatibles with Bodyslide/Morphssystem, so it can’t be obtained using morphs presets.
- You use a single body family but you want other body variants for armors, example: You only use UNP bodies, but you want some bodies to use Remodeled Armors, other ones to use Spice Gear, etc.
Anyway, if you want to take advantage of morphs system, you have to create armor meshes using zeroed sliders preset on bodyslide tool and checking Morphs option to export tri files. For example you can add a zero UUNP set to default armor slot, and a zero CBBE set to ArmorBody01 slot, then all UNP and CBBE based bodies are supported with only two set of meshes.
Installation
Warning: In this new version, the multi-body script has an important change (now uses factions to identify body types instead of keywords for better compatibility with custom characters), so it's only compatible with Bodytypes of Skyrim V5. Since armor lists now store factions, if you are upgrading from old version, you have to clear all lists on Bodytypes MCM, save game, reload and set list again. And note that crafted armors have old script attached, you have remove them (sell to a vendor is the best way) and craft new items.
Requirements: Bodytypes of Skyrim and its requirements, and an armor/clothes sets for each body you want to use.
Install as usual, but note that this file contains empty folders, if your mod manager remove them, extract and copy manually.
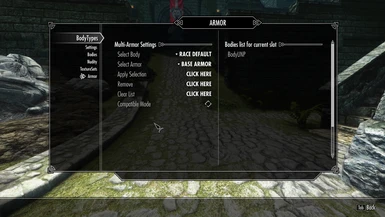
Go to Bodytypes MCM and set desired bodies in armor section, if you haven't done yet (see pic 2).
Create an armor/clothes set for each body or use others modders work, and copy meshes files to each variant folder.
Example: If you set CBBEslim body in "Armor Var. 3" slot, you have to copy CBBE slim based meshes to data\meshes\ArmorMulti\ArmorBody03\...
Obviously, you don't need to fill all folders, maybe you only like 3-4 bodytypes or you only want armors and don't want clothes...
Advice: Creating all armors and moving them to each body directory could be a tedious job, so the easier way is editing remodeled armor xml file and doing a batch build: go to CalienteTools\BodySlide\SliderSets and open xml file for remodeled armors using a editor which supports xml files, then find and replace all <OutputPath>Meshes\armor\ with <OutputPath>Meshes\ArmorMulti\Default\armor\ and save. Now you can do a Batch build in bodyslide and all meshes will be created in ArmorMulti directory, repeat this process with all body variants you want to create changing output path for ArmorBody01, ArmorBody02...
Uninstall: Use a mod manager or remove "ArmorMulti" folder and RemArmorMulti.esm manually
Notes:
Although this mod is indeed for remodeled armors, you can use other sets including no-revealing ones, but note that file paths, names, etc, are same as used in "Remodeled Armor for Bodyslide" by CT77, so if you use other sets probably you have to rename, replace... some files, example: for penitus armor default system use Tullius meshes with an attached textureset, but CT77 system use ist own meshes renamed.
You can add boots and gloves meshes to ArmorBody01 to ArmorBody04 directories and craft alternative, some items aren't supported because they haven't significant differences for each body type.
Add files for default option and male characters to data\meshes\ArmorMulti\Default... Default option doesn't need boots and gloves, it uses default vanilla items.
If you have texture issues, probably you are using an armor set that need extra texture files, add these textures from origunal mod.
Some meshes need extra bipped slots enabled in armoraddons, or some parts (panty, leggins...) will be invisible, in this case you have to create a patch to enable them. However, I recommend you remove these parts (using zap option) because significantly reduces files size, allows more customization since you can combine these armors with items from others mods, and add more inmersion for events which only need some armor parts to be unequipped...
Panties: added an experimental multi-panty feature to be used with panty-less armors and clothes. To use it you have to add panties meshes to folders called "PantyHeavy" (for heavy armors), "PantyLight" (for light armors) and "Panty" (on clothes directory), note that you can add a physics and no-physics option, so you can mix both types of armors in each armor set and combine them with these panties.
Important: Panty meshes should be renamed to Panty_0 and Panty_1 and should use bipped slot 49 to work.
How it works
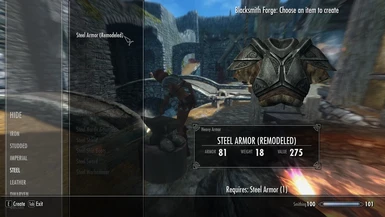
You can craft these armors using vanilla armors as base, multi-body armors are only visible in crafting menu if you have vanilla item in your inventory. Multi-body clothes can be crafted on tanning rack. These items are called: "vanilla armor name" + (remodeled) and "vanilla boots/gloves" + (Alt 1... Alt 4) to distinguish them from original items, you can change names when you use enchantment table.
Note that some vanilla armors aren't craftable or aren't playable, to solve this I've added some recipes to craft them in Skyforge.
Tip: You can convert all unwanted armors to multi version before selling them, probably this is a faster and cheaper way to increase crafting level than crafting a ton of iron daggers.
Warning: Don't convert quest items until you complete these quests to avoid issues.
When characters equip one of these armors, a script attached to armor validates character body and select a shape to match this body, if current body isn't found in bodies list (as you set in MCM) the system try to equip a compatible one (Example: If character body is 7Base, then equip UNP armor), if a compatible body isn't found then equip base armor.
For more realism, body armors have less weight and armor rate than vanilla ones because they usually are skimpy armors, however you can use the patch to restore these values if you are using no skimpy options.
Advanced
A little guide to help users with textures, bipped slots... issues, very frequent when we use meshes not created with bodyslide since there is no consensus for all armor replacers.
Most of these issues can be solved modifying plugin with Creation Kit or similar, or editing meshes with NifSkope. I recommend to use NifSkope because it's a lighter tool, I think it's easy to use, can reduce files size... but I'll explain both methods. And remember to backup files.
Missing Variants:
Problem: Vanilla and some replacers share same meshes for main armor and variants (Example: Penitus armor uses Tullius meshes with an attached textureset), but remodeled armors use independent files, so these items will be missing.
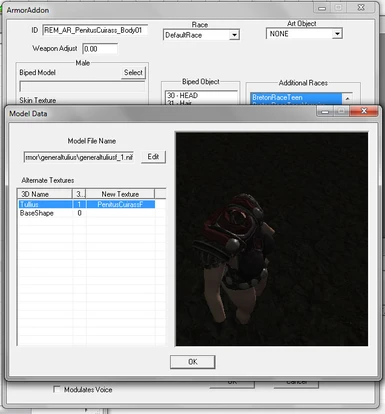
CK: Open Creation Kit and load RemArmorMulti.esm. Go to ArmorAddon, filter with "REM_" and open REM_AR_PenitusCuirass_Body...(If you want to fix meshes from ArmorBody01 folder, subfix will be _Body01). Open Model data for female and Clik Edit, change path to "generaltuliusf_1.nif". Then, double click on armor shape and select Penitus textureset (PenitusCuirassF) (See Pic03). If you don't know which textureset you need, use original armor as reference. Do it for all armor you want to fix and save changes in a new plugin.
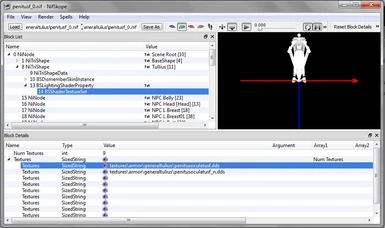
NifSkope: Duplicate armor meshes (generaltuliusf_0 & generaltuliusf_1) and rename them using remodeled armor names (penitusf_0 & penitusf_1), then, open first mesh with NifSkope (penitusf_0) and expand NiTriShape for armor shape. Go to BSShaderTextureSet and expand Textures in Block Details section. Now you have to change textures path (See Pic04), if you don't know which textures to use, get remodeled armor files as reference. Save changes, and repeat for the second mesh.
As you can see, this method is very simples and fast (rename file and change paths using remodeled mod as reference).
Missing Armor Parts:
Problem: Some armor parts use extra slots and will be invisible if these slots aren't enabled (Example: remodeled armors use slot 54 for leg parts).
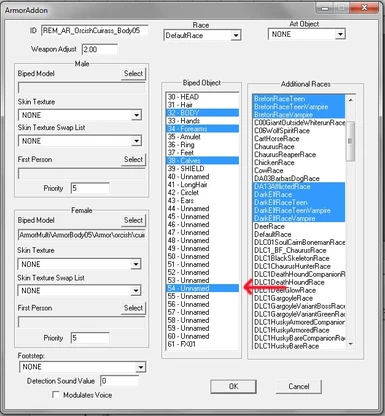
CK: Load RemArmorMulti.esm and go to armoraddon for desired item as explained previously. In Biped Object, click on desired slots to enable them (See Pic05). But, which slot use each part? probably you find a description in original mod page, readme, etc... or you can open original mod with CK or other editor to see these slots.
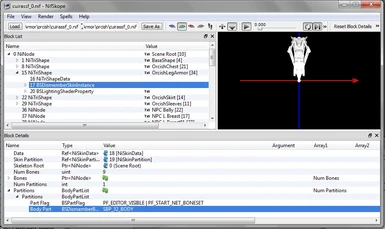
NifSkope: Open armor mesh and expand NiTriShape for desired part, click on BSDismemberSkinInstance and expand Partitions in Block Details section. Change Body part value to 32 (main armor slot) (See Pic06). Save file and repeat.
Remove Armor Parts:
Problem: Most meshes include independent shapes for some parts, maybe you want to remove them for a more skimpy look or combine main armor with complements...
BodySlide: Use zap options (if available) when you use bodyslide to create new armors.
Outfit Studio: Use "Load outfit" option in menu section, on meshes list (right side) select shape you want to remove and pess Del
key. Use "Export" in menu section to save changes.
CK: Use the reverse process explained in Missing Armor Parts (uncheck slots to disable them). Note that this method doesn't remove armor parts, only make them invisible.
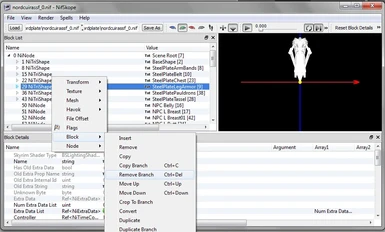
NifSkope: Open armor mesh, right click on NiTriShape for the part you want to remove, Block -> Remove Branch (or use Ctrl + Del) (See Pic07). Save file and repeat. This method will reduce files size since armor parts are physically removed.


