Documentation
Readme
View as plain text
-by drakshdw-
This guide teaches you how to make adjustments to the textures attached to .nif files.
The information is stuff that I learned through other guides or through experimentation.
I uploaded the original tutorial specifically to link to another member who was already familiar with modding, but it seems that in the short time it's been up it's gotten nothing but good reviews so I decided to expand on it. The original guide was short and sweet and highlighted only the things that the intended audience needed to know.
The images depicting Iron Armor are not displaying textures in the Render Window.
In fact, it was only recently that I learned how to add the bsa files to resource
files (read ADDING RESOURCE FILES). They are displaying just fine for me now, but
I cba to make new photos :)
CONTENTS
A) FINDING YOUR TEXTURES
B) ADDING ALPHAPROPERTY TO YOUR NIF
C) TEXTURES NOT DISPLAYING?
D) ADDING RESOURCE FILES
E) MAGIC SPELL TEXTURES
F) CREDITS AND STUFF
A) FINDING YOUR TEXTURES
This will help you edit the texture attached, or simply find out which texture is attached so you can edit it later.
1. Load up the .nif that you wish to edit.
2. Go to View, Block List, Show Blocks in List (img 01). This step makes it easier to find the desired block to edit, you can switch it back to Show Blocks in Tree later.
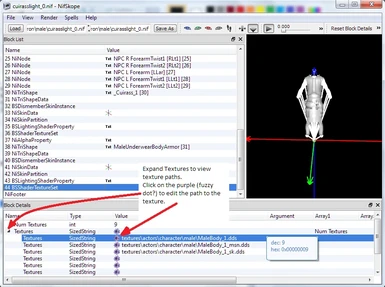
3. Locate the block named BSShaderTextureSet and click on it (img 02). The preceding number can be ignored, generally.
4. In the Block Details list at the bottom portion of the window expand Textures to see the texture paths. Click on the purple fuzzy dot thing to edit the texture paths (img 03).
5. Once satisfied with your texture path, click Save As and save your nif.
B) ADDING ALPHAPROPERTY TO YOUR NIF
This will put to use any alpha layer in your texture. This section will require
you to already have a .dds with an alpha layer. (if there is enough requests, I
will add a how-to tutorial for adding alpha layers in Photoshop)
1. Load up the .nif that you wish to edit.
2. Go to View, Block List, Show Blocks in Tree. I personally prefer doing this section in the tree form, it's easier for me to keep track of which block is attached to which parent.
3a. First check to see if the nif already has an alpha property set.
3b. Expand 0 NiNode and find the NiTriShape for the mesh your editing (in this game the PsiijicRobes NiTriShape, not the MaleUnderwearBody:0). Then expand BSLightingShaderProperty (img 04).
3c. If you do not see a block named NiAlphaProperty, then we'll need to add one. If the nif does have one, any extra alpha layer you added to the texture will already have benn applied.
4. In the Spell menu go to Block, Insert (click), NiA..., NiAlphaProperty. This will cause your 0 NiNode to collapse, now showing 0 NiAlphaProperty and 1 NiNode. (img 05)
5. Right-click NiAlphaProperty, Block, Copy Branch. (img 06)
6. Navigate back to the NiTriShape in 3b. Click it and scroll to the bottom in the Block Details. Expand BS Properties. Right click the None value and go to Block, Paste Branch. (img 07) Now your alpha property is ready! (img 08)
7. At the very top you'll need to right-click the 0 NiAlphaProperty, Block, Remove Branch. Click Save As to save your nif.
C) TEXTURES NOT DISPLAYING?
If the render window (the 3D model viewer) isn't loading the textures, you will need to tell NifSkope where to find them. You will notice my textures for Iron Armor aren't loading. If this is the case for you, read ADDING RESOURCE FILES.
1. In the Render menu at the very bottom select Settings... and click on the tab Rendering.
2. If Auto Detect Game Paths does not locate your Skyrim folder, you can manually add it by clicking Add Folder and navigating to your Skyrim folder. If your custom textures are not located in the Skyrim folder, you can also add that folder to the Custom list.
D) ADDING RESOURCE FILES
Textures located in .BSA files don't load properly if you don't tell NifSkope to look inside those.
1. In the File menu near the bottom select Resource Files.
2. Uncheck Automatic Selection then click Add and navigate to your Skyrim\Data folder. Select one or multiple .bsa files to add. To add multiple at once, hold ctrl while selecting. (img 09)
E) MAGIC SPELLS TEXTURES
My first mod upload was a recolored ward spell. I searched the ward nif for the correct BSShaderTextureSet for an hour before I finally figured out what I was doing wrong. Magic effects nifs use gradients in the nifs, so if you are looking to recolor a magic spell, this will be the section for you.
NOTE: This section was made purely off of my own trial and errors. I do not gaurantee that these are the correct steps, I just hope they are :)
1. Load up the .nif that you wish to edit.
2. Go to View, Block List, Show Blocks in List. The list makes finding the BSEffectShaderProperties much much easier.
3. Locate each BSEffectShaderProperty. Depending on the complexity of the magic effect nif, you may be searching through a list of several hundred blocks. (img 10, Block List)
4a. Select the BSEffectShaderProperty and scroll to the bottom of the Block Details. There you can change the Greyscale Texture which is the gradient affecting the color of the spell. (img 10, Block Details)
4b. You can find the spell gradient textures in Skyrim\Data\textures\effects\gradients\. You will need to extract these files from the meshes .bsa if altering a default magic effect. (img 11)
5. Once all BSEffectShaderProperties have been edited, Save As to save your nif.
F) CREDITS AND STUFF
Thanks for reading my tutorial and I hope it helped!
Thanks to the wonderful people at NexusMods, members and staff.
Thanks Bethesda for making such an enjoyable game.
Open permission to upload my tutorial, you do not need to contact me for any
reason at all.


