Documentation
Readme
View as plain text
A FALLOUT 3 MOD
Name: Graffiti1.esp
Category: Textures, A Modder�s Resource
Author: MtB
Date: 11/December/2009
1. Description
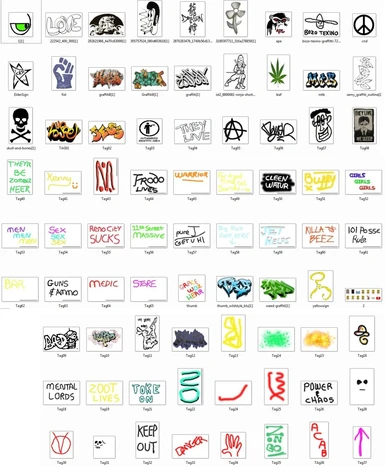
These graffiti grafs are to augment (not replace) the existing ones found in Fallout 3. There should be 89 new images in the .zip file.
2. Requirements
Fallout 3 / ArchiveInvalidation.txt (or its programme equivalent) / G.E.C.K.
* I have included the ArchiveInvalidation.txt with this .zip.
3. Installing / Uninstalling the textures
You should make the following folder tree: Fallout3 / Data / Textures / Architecture / Mtb. Now copy all the .DDs and _n.DDS files in to Mtb. To uninstall just delete the Mtb folder.
4. Viewing the textures (Hopefully)
Load Fallout 3 (remembering to load the data file) and at the main menu screen press the tilde key(~) or whatever is next to your '1' key on the main keyboard and type: coc graffiti1. This will take you to a small town.
5. Using the textures
You cannot simply copy the an item from this mod and put it into your mod and expect it to show up in-game. It would be nice if that would work but the GECK does not copy across unique item creations or texture sets.
If you want to use these images in your mod then you must create new texture files and then retexture existing grafs while remembering to create a new item when prompted. See below if you do not know what to do regarding this.
Note 1: If you plan on distributing your mod with these new textures you will have to package up all the .DDS and _n.DDS files you used and make known to the user the folder tree they should be installed to, as well as giving details of the archiveinvalidation text, as well as modifying the fallout.ini file.
Note 2: I'll attach a zipped copy of all the images I used with my mod download so that you can see what images there are. Several of the images appear to be blank when you view them. This is because the graf colour in the origial file is white and when it was saved as a jpeg it was put into a white background.
6. Conflicts & Known Errors
You can't just copy and paste items from this mod into your mod and think they will show up in-game.
7. Other Things To Be Aware Of
This is my first foray into retexturing graffiti so things won't be expertly done. I therefore call it an experimental work. If only I had proper instructions on what to do. Anyway...
For these textures to work and show up in your viewing of the mod it is necessary to edit your FALLOUT.INI file. Navigate to C:\Users\xxx\Documents\My Games\Fallout3 (or your computer's equivalent) and open up the fallout.ini file in a txt editor. Find (CTRL+F) the line "bInvalidateOlderFiles=0" (without the quotation marks) and change it from =0 to =1. The xxx refers to your computer's name.
Also, in your fallout 3 game folder you should have a text file called "ArchiveInvalidation.txt". This tells Fallout to use the textures within the document instead of the ones in the game. Those of you who already have the file just need to ammend theirs by copying and pasting the contents of the included file to their file. Those of you who do not have the file should copy the supplied "ArchiveInvalidation.txt" file in to your Fallout 3 game folder.
If you still cannot see the images you may need to create a texture set in the GECK and then replace the texture on the left of the decal RangerGraf02. I used this as the template for all my retexturing. I'll attach a copy of it.
Most of the images look decent from a distance, but once you get close you can see they have a grey-white outline around them. I assume this is due to the fuzzy selection tool setting within the package (GIMP 2.6) I used to make my images.
7. Author's Note
Feel free to use these in your own scenarios. If you can scruffy them up a bit then do so, and let me know so that I can get a copy. For that you'll get a co-author credit. If you can do better than me, go ahead. Fallout 3 requires a lot more unique graffiti images. The bare-bones town that you coc in to is also yours to do with as you want.
8. Credits/Acknowledgements
Everybody who had their hand in making the Fallout games. Also, everybody who is making mods that takes Fallout to new heights.
Texture Sets and Retexturing...
Step One, Creating A New Texture Set.
� In the Object Window open up Miscellaneous
� Click Texture Set
� Right click on any of the textures that appear and click new. The Texture Set window opens.
� In the text box at the top type the name of the texture you want to make. Typically I just use the name of the art file and end it with the suffix 't'to denote it as a texture. This also serves to prevent any conflicts with name IDs. To ease finding them (and to group them) in the Object Window we can add some kind of unique personal identifier prefix. I use 'mtb' or 'aa' but you can use whatever you like. In there we type, aaBozoTexinot.
� Now click and highlight Diffuse beneath the text window.
� Click add image (about half way down)
� A Select File window opens.
� Navigate your way to where the .dds files are (data/textures/architecture/mtb). Scroll down to and find the texture you want (bozo-texino-graffitti-721[1].dds) and open it.
� You should see Bozo Texino displayed now.
� Now click Normal/Gloss beneath Diffuse.
� Click add image.
� Scroll down to and find the texture you want (bozo-texino-graffitti-721[1]_n.dds) and open it.
� A blue embossed picture is displayed.
� Click OK to create this new texture and close the window.
Click on a texture in the Object Window and press the 'a' key. Unless you have other textures beginning with 'a' you should see your newly created texture aaBozoTexinot.
Step Two, Retexturing an existing model.
� Find the RangerGraf02 model in the Object Window and drag it into the rendering window just as you do when placing any other thing in the mod.
� X, Y, Z it into place where you want the poster to be.
� Double click it.
� A Reference window opens.
� Click Edit Base.
� A Static window opens.
� Change the current ID from RangerGraf02 to whatever you want. Again you can attach prefix an suffix identifiers to make things unique and easily found. Lets type in aaBozoTexinoGraf.
� Click edit.
� A Model Data window opens and here is where you change the Rangers image to your texture.
� Under Alternate Textures double click RangerGraf02:0.
� A Select Form opens.
� Click one of the textures then press the 'a' key. This will take you directly to the textures beginning with 'a'. Find aaBozoTexinot and double click it.
� You'll see the texture change in the Model Data window.
� Click OK to close the Model Data window.
� Click OK to close the Static window. As you do a box opens asking if you want to create a new form. Click yes.
� Click OK to close the Reference window.
� The ranger graf you placed in the render window of the GECK is replaced with Bozo Texino. Notice that it may be on its side, upside down, or back to front.
� Make sure you 'snap to grid' is depressed and set at 45 degrees increments.
� Double click the poster to bring up the Reference window again.
� In the middle of the window, on the right-hand side you can rotate the graf about on its X, Y, Z axis. Just click the up/down arrows until the image is rotated the correct way.
� Click OK.
Done. That's one graf done, now all you need to do is follow these procedures until you've recreated all the texture sets for all the graffiti you want to use and put them onto the renamed ranger graf....


