


0 of 0
About this mod
A complete guide, start to finish, for retexturing characters and models in The Witcher 2.
- Permissions and credits
- Donations
I'm sure there are several ways to go about retexturing characters for The Witcher 2, but this is the method I've developed for myself.
The process outline is roughly this: Export the Witcher 2 and 3 assets, prep them in photoshop, bake the Witcher 3 textures onto the Witcher 2 head mesh in blender, merge the 2 textures together in photoshop and convert them back into a useable format, load them into the game and enjoy the spoils of your labor.
I dedicate a folder for my Witcher 2 Modding. Inside, I make a folder for my projects and then for each character I'm working on. Inside the character folder I have one folder for the W2 assets, one for my W3 assets, a working folder where I keep my edited textures and blender files and a complete folder where I save my finished files and packed mod files.

Navigate to Radovid's files. characters > models > main_npc > radovid > h_01_ma__radovid.
Once there, you should see all the files we need: The head mesh, the diffuse map (d01.xbm), normal map (n01.xbm).
Right click and export the h_01_ma__radovid files (h_01_ma__radovid.w2mesh, h_01_ma__radovid_d01.xbm, and h_01_ma__radovid_n01.xbm) and save them to your "W3 assets" folder you created.

Your Witcher 3 folder should look like this. The head .w2mesh has automatically been converted to a .fbx file, which is usable in Blender and the texture files have been converted to .dds files.

Now, onto exporting our assets from the Witcher 2 REDkit.
Same as we did for the W3 REDkit, start up the W2 REDkit and click on the asset browser button to open the depot.
Navigate to King Radovid's files: characters > main_npc > radovid__knight > model.
For the W2 REDkit, before you can export assets you have to right click on the texture and select "load from disc" then you can right click again and export the two maps we need: radovid__h1 (diffuse) and radovid__h1_n (normal) to your "W2 assets" folder you created.

I have not been able to find a way to export meshes from the W2 REDkit. Luckily, the Witcher 3D models converter exists.
Once you open the program, make sure that the base directory is pointed to your exported files from when you set up the software.
Go to General tools and settings, on the Export tab, select "Export to an other folder" and make the path to your "W2 assets" folder you created. Deselect "copy textures" because we are using the textures from REDkit.

On the main UI, name you file to be exported, I named mine radovid_head, but it doesn't matter. Select .obj(Wavefront OBJ) for file format and when you click "Select a 3D model" you should be in the base directory that you previously selected. Navigate to templates > characters > appearances > main npc > radovid > and select "radovid_appearances.w2ent".

Click "Convert" and once you see the file is finished writing in the log window you should have the mesh file in your "W2 assets" folder.
Your W2 assets folder should look like this:

Your model will load in, in "Solid" view as shown in the viewport toolbar.

By selecting "wireframe" view in the viewport toolbar you can see the mesh as it's "Vertices", "Edges", and "Faces".

In this view when you select part of the model it will select all the way through the model as opposed to solid view that will only select parts of the model and can make it more difficult when trying to edit or delete part of the mesh.
Make sure the mesh is selected in the Scene Menu in the upper right.

We need to isolate Radovid's head so switch to Edit mode by the drop down menu in the top left of the screen or press tab.

The whole mesh will automatically be selected, just click off the mesh to deselect everything.
In the Context menu on the right go to the "materials" tab.

Radovid's model isn't that bad, but some of the models, especially ones for generic humans, soldiers, elves, etc, are all stacked on top of themselves so the only way I've figured out how to separate them is with this method.
To isolate the head mesh, ensure you are in Edit mode and:

You can do one material at a time or select multiple ones at once.
I select eveything, ensuring I have the eyes and mouth, until the only things left are the head meshes.
Press the delete key and choose "Vertices".


Now we have to choose which one we want to use. When we zoom in and inspect both, you will notice on the top mesh these z-fighting lines from multiple faces stacked ontop of eachother. In my experience, if you don't fix that problem when baking a texture onto it, it becomes a nightmare with the UV mapping. When inspecting the bottom head mesh, it doesn't have that problem.


You can see the isolated mesh in all its glory by going back to object mode with either the drop down menu or hitting tab again.

To see the skinned mesh you can select the "Look Dev" mode from the viewport toolbar.

Now it's time to import the W3 head mesh. The process is the same as we did before except you will select FBX (.fbx) this time.
Once loaded in, it should look like this:

Obviously the W3 mesh is much more complicated with multiple levels of LOD (level of detail) and "bones" for skeleton rigging.
In the Scene menu to the left shift click on the "Mesh_lod0" to deselect it while leaving the other lod meshes and bones highlighted and press delete.
After that you should be left just the W3 mesh (Mesh_lod0) and the W2 mesh (whatever you named it).

Switch to "Look Dev" view if you want. I have no idea why the W3 model looks so glossy, it doesn't effect anything though.

The next step is to try and mash up both meshes on top of each other as close as you can.
They usually start like this.


Adjust the camera to view the meshes from above, make sure you're using the rotate tool and rotate the W3 mesh (blue) until it's oriented the same way as the W2 mesh (white) is.


Adjust the camera as needed to help you get the apropriate angles for you to move/rotate/scale the W3 (blue) and W2 (white) meshes until they are as as close to one mesh as possible.
I think this looks good to me, I try to make the eyes, nose, and mouth match up so the rest of the facial feature will map correctly. It's really just trial and error until you get what you like.


Once youv'e cleared all the original materials, make a new one.

Select base color.

Image texture.

New.

Set its size, check your original W2 textures to match thier sizes, unless you upscaled the original of course.

For the W3 mesh, delete the original material and make a new one, but this time select open and choose your desired W3 .dds file that you exported.

Now that our materials are set, in Look Dev view, your model should look as shown. The W3 mesh with the texture mapped on it and the blank W2 mesh.
Be sure to select the meshes in this order:


Click "Bake" and wait for it to finish, it should take around 30 sec.

Now your model should look like two fully textured models meshed together.

Click the "eye" icon next to the W3 mesh to hide it and see your W2 model with the freshly baked W3 texture on it.

Side by side for comaparison.

With your W2 mesh selected, click "UV Editing" from the tabs on the top of the viewport to see the unwrapped texture you just baked.

Save the the new texture as whatever you want to your working folder.

Do the same for the Normal Map and Specular map (if you want).
The changes that the normal map makes is massive, it's really the thing that makes the biggest impact. I will show later in comparrison shots but I barely notice specular map changes. I think specular maps help show light shine wise but I'm not sure.
Here's the difference of normal maps from the original W2 one on the left and the W3 one baked onto the mesh on the right.

Once you have your new baked textures, open your new texture and the original W2 texture in photoshop.

Move the new baked texture on top of the original W2 one.


Even with just the textue you can see the better details.

With your new texture on top of the original and its layer selected, start by completely erasing the ears and other two bits.

Start melding the two textures together, focusing on these common problem areas: EYES, NOSE, MOUTH, EAR HOLES, NECK SEAM, and HAIRLINE.
I use the Eraser and starting with low to high opacity strengths until the textures you want to show underneath are blended with the new texture.
Here's the right eye and right side of the nose and mouth blended into the original texture underneath.


Focus on the common spots that need fixing/blending. Sometimes you'll need adjust the color/hue of the new texture to match the original one.

What the new texture layer looks like isolated without the original showing underneath.

Merge all the layers into one and then Save As: DDS - NVIDIA Texture Tools Exporter (*.DDS;*.DDS).

In the NVIDIA Texture Tools interface choose the BC3 - DXT5: interpolated alpha for the format and save it to your working folder.
For the normal map, open both up in photoshop but keep them seperate.
Go to the channels tab and select the GREEN layer for both textures.

On your new W3 baked texture while using the Clone Stamp Tool, clone the top left corner and then stamp it in the top left corner of the original normal map making sure to place in the exact same spot, otherwise the new details won't line up with the original texture.

Now that you are cloning the areas from the new to the original, start with a low strength and start applying the new detals onto the texture, going over the same area to strengthen the effect as desired.


When the main face is done, I clone part of the cheek and stamp it aound the ears and ear holes to help blend the transision while still on the GREEN channel.

Save the edited normal map the same way as the diffuse, through NVIDIA Texture Tools.
Browse to Radovids files again and take note of what kind of file type each texture is.

Now navigate to your newly edited textures and select them and then choose the corresponding file type to match which one you're importing.

Now you should see your new textures in the asset depot, if they don't look like the original textures thumbnails, ensure you imported them in the correct format.

Now navigate to your REDkit files folder in you game folder. [Drive] > GOG Galaxy > Games > The Witcher 2 > Data > whatever folder you chose to import them to in REDkit.
You should see your files with REDkit properly compressing and converting your files back into the .xbm format.

For Radovid, create this folder structure: characters > main_npc > radovid__knight > model. Put your newly packed .xbm files in the model folder. Every edit/mod that you do for the game goes in the CookedPC folder. So create a new CookedPC folder and drop your mod inside it so you can just drag and drop your file to the game folder.
One of the most tedious and time consuming things about publishing a mod to me is actually trying to take good screenshots to show off the changes and having to keep booting up the game, loading saves, getting to good locations/cutscenes and taking comparision shots.

Highlighting the impact and importance of the normal map. 
Hopefully this guide has helped you, this is my first guide and I am just an amateur learning as I go so any constructive criticism or better ways of doing something are welcome.
Thanks to Andrzej Sapkowski for creating such an incredible world.
Thanks to CDPR for making such an amazing trilogy.
Special thanks to:
hiuuz
flixster
hub997
Fuse00
Antonaros1999
PapcioVesemir
orochi0313
moonknight1993
for all their help and support during my modding journey of The Witcher 2.
The process outline is roughly this: Export the Witcher 2 and 3 assets, prep them in photoshop, bake the Witcher 3 textures onto the Witcher 2 head mesh in blender, merge the 2 textures together in photoshop and convert them back into a useable format, load them into the game and enjoy the spoils of your labor.
TOOLS NEEDED
- The Witcher 3 REDkit - Download it from GoG/Steam/Epic Launcher (User Guide)
- The Witcher 2 REDkit - Download it from GoG Launcher (Witcher 2 "Extras") or from the REDkit wiki.
- The Witcher 3D Models Converter Start up tutorial.
- Blender (Version 2.80)
- Photoshop / GIMP
- NVIDIA Texture Tools Exporter - There's a Photoshop plugin or a standalone application if using GIMP
- Upscayl - AI Image Upscaler or something similar if you want to use upscale the original textures.
FOLDER STRUCTURE AND CLEAN WORKING SPACE
Having a clean and organized workspace is important for a successful and minimally chaotic modding experience.I dedicate a folder for my Witcher 2 Modding. Inside, I make a folder for my projects and then for each character I'm working on. Inside the character folder I have one folder for the W2 assets, one for my W3 assets, a working folder where I keep my edited textures and blender files and a complete folder where I save my finished files and packed mod files.
EXPORTING ASSETS
We will start with the W3 REDkit.Launch REDKit and create a new project, I named mine "explorer" since all I'm doing with this project is browsing files.
Click on the Asset Browser to open the Asset Browser Depot.
Click on the Asset Browser to open the Asset Browser Depot.

Navigate to Radovid's files. characters > models > main_npc > radovid > h_01_ma__radovid.
Once there, you should see all the files we need: The head mesh, the diffuse map (d01.xbm), normal map (n01.xbm).
Right click and export the h_01_ma__radovid files (h_01_ma__radovid.w2mesh, h_01_ma__radovid_d01.xbm, and h_01_ma__radovid_n01.xbm) and save them to your "W3 assets" folder you created.
Your Witcher 3 folder should look like this. The head .w2mesh has automatically been converted to a .fbx file, which is usable in Blender and the texture files have been converted to .dds files.
Now, onto exporting our assets from the Witcher 2 REDkit.
Same as we did for the W3 REDkit, start up the W2 REDkit and click on the asset browser button to open the depot.
Navigate to King Radovid's files: characters > main_npc > radovid__knight > model.
For the W2 REDkit, before you can export assets you have to right click on the texture and select "load from disc" then you can right click again and export the two maps we need: radovid__h1 (diffuse) and radovid__h1_n (normal) to your "W2 assets" folder you created.
I have not been able to find a way to export meshes from the W2 REDkit. Luckily, the Witcher 3D models converter exists.
Once you open the program, make sure that the base directory is pointed to your exported files from when you set up the software.
Go to General tools and settings, on the Export tab, select "Export to an other folder" and make the path to your "W2 assets" folder you created. Deselect "copy textures" because we are using the textures from REDkit.
On the main UI, name you file to be exported, I named mine radovid_head, but it doesn't matter. Select .obj(Wavefront OBJ) for file format and when you click "Select a 3D model" you should be in the base directory that you previously selected. Navigate to templates > characters > appearances > main npc > radovid > and select "radovid_appearances.w2ent".
Click "Convert" and once you see the file is finished writing in the log window you should have the mesh file in your "W2 assets" folder.
Your W2 assets folder should look like this:
PREPPING MESHES FOR BAKING
Open Blender and import our Witcher 2 model. Navigate to File > Import > Wavefront (.obj) select your "radovid_head.obj" or whaterver you named your file from the Witcher 3D model converter. Your model will load in, in "Solid" view as shown in the viewport toolbar.
By selecting "wireframe" view in the viewport toolbar you can see the mesh as it's "Vertices", "Edges", and "Faces".
In this view when you select part of the model it will select all the way through the model as opposed to solid view that will only select parts of the model and can make it more difficult when trying to edit or delete part of the mesh.
Make sure the mesh is selected in the Scene Menu in the upper right.
We need to isolate Radovid's head so switch to Edit mode by the drop down menu in the top left of the screen or press tab.
The whole mesh will automatically be selected, just click off the mesh to deselect everything.
In the Context menu on the right go to the "materials" tab.
Radovid's model isn't that bad, but some of the models, especially ones for generic humans, soldiers, elves, etc, are all stacked on top of themselves so the only way I've figured out how to separate them is with this method.
To isolate the head mesh, ensure you are in Edit mode and:
- Click on a mat (material)
- Click Select to highlight the mesh that the material is attatched to.
You can do one material at a time or select multiple ones at once.
I select eveything, ensuring I have the eyes and mouth, until the only things left are the head meshes.
Press the delete key and choose "Vertices".
Now we have to choose which one we want to use. When we zoom in and inspect both, you will notice on the top mesh these z-fighting lines from multiple faces stacked ontop of eachother. In my experience, if you don't fix that problem when baking a texture onto it, it becomes a nightmare with the UV mapping. When inspecting the bottom head mesh, it doesn't have that problem.
Top Head Mesh
Bottom Head Mesh
You can see the isolated mesh in all its glory by going back to object mode with either the drop down menu or hitting tab again.
To see the skinned mesh you can select the "Look Dev" mode from the viewport toolbar.
Now it's time to import the W3 head mesh. The process is the same as we did before except you will select FBX (.fbx) this time.
Once loaded in, it should look like this:
Obviously the W3 mesh is much more complicated with multiple levels of LOD (level of detail) and "bones" for skeleton rigging.
In the Scene menu to the left shift click on the "Mesh_lod0" to deselect it while leaving the other lod meshes and bones highlighted and press delete.
After that you should be left just the W3 mesh (Mesh_lod0) and the W2 mesh (whatever you named it).
Switch to "Look Dev" view if you want. I have no idea why the W3 model looks so glossy, it doesn't effect anything though.
The next step is to try and mash up both meshes on top of each other as close as you can.
They usually start like this.
- Make sure you only have the W3 mesh (blue) selected.
- Change to Edit mode and make sure the whole mesh is selected.
- While using the move tool, grab the arrows to adjust the W3 mesh down onto the W2 mesh.
Adjust the camera to view the meshes from above, make sure you're using the rotate tool and rotate the W3 mesh (blue) until it's oriented the same way as the W2 mesh (white) is.
Adjust the camera as needed to help you get the apropriate angles for you to move/rotate/scale the W3 (blue) and W2 (white) meshes until they are as as close to one mesh as possible.
I think this looks good to me, I try to make the eyes, nose, and mouth match up so the rest of the facial feature will map correctly. It's really just trial and error until you get what you like.
ADDING NEW MATERIALS TO MESHES
With only the W2 mesh selected, go to the material menu and select each material, and then delete it by clicking the "-" button until there are no more materials left. Once youv'e cleared all the original materials, make a new one.
Select base color.
Image texture.
New.
Set its size, check your original W2 textures to match thier sizes, unless you upscaled the original of course.
For the W3 mesh, delete the original material and make a new one, but this time select open and choose your desired W3 .dds file that you exported.
Now that our materials are set, in Look Dev view, your model should look as shown. The W3 mesh with the texture mapped on it and the blank W2 mesh.
Be sure to select the meshes in this order:
- Select the W3 mesh
- Shift click on the W2 mesh
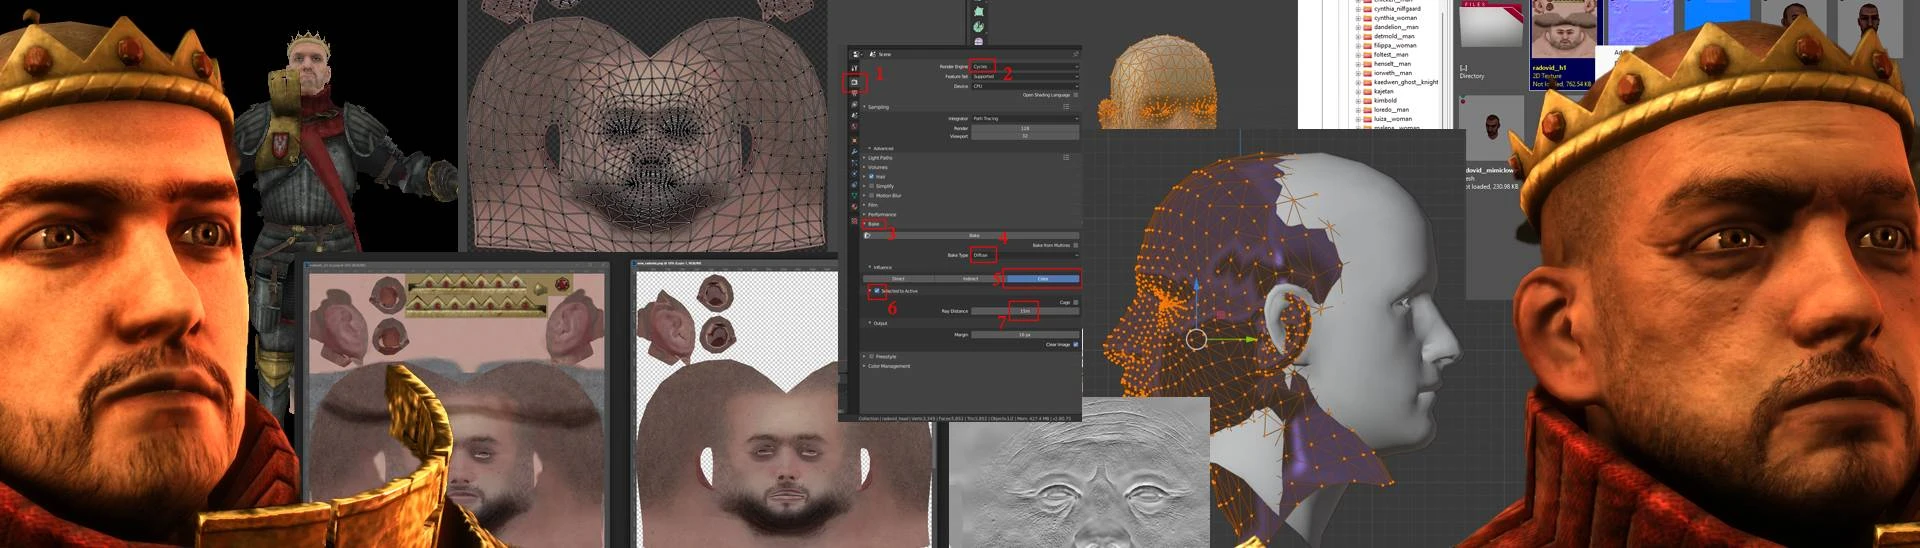
- Select the Render tab.
- Choose Cycles for the Render Engine.
- Expand the Bake menu.
- Choose Diffuse for Bake Type.
- Deselct all options except for Color.
- Check Selected to Active and expand its menu.
- Choose 15m for Ray Distance. (Not entirly sure what ray distance is, something more for mapping I think, but while testing baking textures "0" seemed to look worse).
Click "Bake" and wait for it to finish, it should take around 30 sec.
Now your model should look like two fully textured models meshed together.
Click the "eye" icon next to the W3 mesh to hide it and see your W2 model with the freshly baked W3 texture on it.
Side by side for comaparison.
With your W2 mesh selected, click "UV Editing" from the tabs on the top of the viewport to see the unwrapped texture you just baked.
Save the the new texture as whatever you want to your working folder.
Do the same for the Normal Map and Specular map (if you want).
The changes that the normal map makes is massive, it's really the thing that makes the biggest impact. I will show later in comparrison shots but I barely notice specular map changes. I think specular maps help show light shine wise but I'm not sure.
Here's the difference of normal maps from the original W2 one on the left and the W3 one baked onto the mesh on the right.
Once you have your new baked textures, open your new texture and the original W2 texture in photoshop.
Move the new baked texture on top of the original W2 one.
Even with just the textue you can see the better details.
With your new texture on top of the original and its layer selected, start by completely erasing the ears and other two bits.
Start melding the two textures together, focusing on these common problem areas: EYES, NOSE, MOUTH, EAR HOLES, NECK SEAM, and HAIRLINE.
I use the Eraser and starting with low to high opacity strengths until the textures you want to show underneath are blended with the new texture.
Here's the right eye and right side of the nose and mouth blended into the original texture underneath.
Right Side Eye Blended
Right Side of the Nose and Mouth Blended
Focus on the common spots that need fixing/blending. Sometimes you'll need adjust the color/hue of the new texture to match the original one.
What the new texture layer looks like isolated without the original showing underneath.
Merge all the layers into one and then Save As: DDS - NVIDIA Texture Tools Exporter (*.DDS;*.DDS).
In the NVIDIA Texture Tools interface choose the BC3 - DXT5: interpolated alpha for the format and save it to your working folder.
For the normal map, open both up in photoshop but keep them seperate.
Go to the channels tab and select the GREEN layer for both textures.
On your new W3 baked texture while using the Clone Stamp Tool, clone the top left corner and then stamp it in the top left corner of the original normal map making sure to place in the exact same spot, otherwise the new details won't line up with the original texture.
Now that you are cloning the areas from the new to the original, start with a low strength and start applying the new detals onto the texture, going over the same area to strengthen the effect as desired.
When the main face is done, I clone part of the cheek and stamp it aound the ears and ear holes to help blend the transision while still on the GREEN channel.
Save the edited normal map the same way as the diffuse, through NVIDIA Texture Tools.
IMPORTING NEW TEXTURES BACK INTO REDKIT
Now that we have our edited textures saved, open W2 REDkit. You can import your new files anywhere, but I made myself a working folder in the asset depot to keep things clean. Browse to Radovids files again and take note of what kind of file type each texture is.
In the folder you chose, right click and Import > 2D Texture.

Now navigate to your newly edited textures and select them and then choose the corresponding file type to match which one you're importing.
Now you should see your new textures in the asset depot, if they don't look like the original textures thumbnails, ensure you imported them in the correct format.
Now navigate to your REDkit files folder in you game folder. [Drive] > GOG Galaxy > Games > The Witcher 2 > Data > whatever folder you chose to import them to in REDkit.
You should see your files with REDkit properly compressing and converting your files back into the .xbm format.
ADDING YOUR MOD TO THE GAME
In order to make your new textures show up in game, follow the file path that you found Radovids files in REDkit and recreate that folder structure in your working folder, paying close attention to match the name spelling (which sometimes vary from ingame names) and with the correct number of underscores.For Radovid, create this folder structure: characters > main_npc > radovid__knight > model. Put your newly packed .xbm files in the model folder. Every edit/mod that you do for the game goes in the CookedPC folder. So create a new CookedPC folder and drop your mod inside it so you can just drag and drop your file to the game folder.
One of the most tedious and time consuming things about publishing a mod to me is actually trying to take good screenshots to show off the changes and having to keep booting up the game, loading saves, getting to good locations/cutscenes and taking comparision shots.
Before and After
Highlighting the impact and importance of the normal map.
Hopefully this guide has helped you, this is my first guide and I am just an amateur learning as I go so any constructive criticism or better ways of doing something are welcome.
Thanks to Andrzej Sapkowski for creating such an incredible world.
Thanks to CDPR for making such an amazing trilogy.
Special thanks to:
hiuuz
flixster
hub997
Fuse00
Antonaros1999
PapcioVesemir
orochi0313
moonknight1993
for all their help and support during my modding journey of The Witcher 2.