


0 of 0

File information
Created by
tutorial by peek and umodel by gildorUploaded by
peek6Virus scan
Safe to use
About this mod
umodel version for extracting Tekken 8 textures and meshes with correct weights to be able to make mesh mods
Also included the gltf plugin for importing to Blender
Uploading these here, since the links from the official umodel site keep going down.
umodel is not mine - all credit for umodel to Gildor ( https://www.gildor.org/en/proj
- Permissions and credits
Tekken 8 Mesh Modding Tutorial
by peek
OPTIONAL BUT HIGHLY RECOMMENDED: Grab fmodel (https://fmodel.app/), go to the top-level character folder, right-click, and export all JSONs. They shouldn't take up a ton of space, and they are useful for getting MI paths/names, skeleton paths/names, etc. If you do this, you can then easily find any info you need using grep (https://github.com/stefankueng/grepWin) .
In umodel:
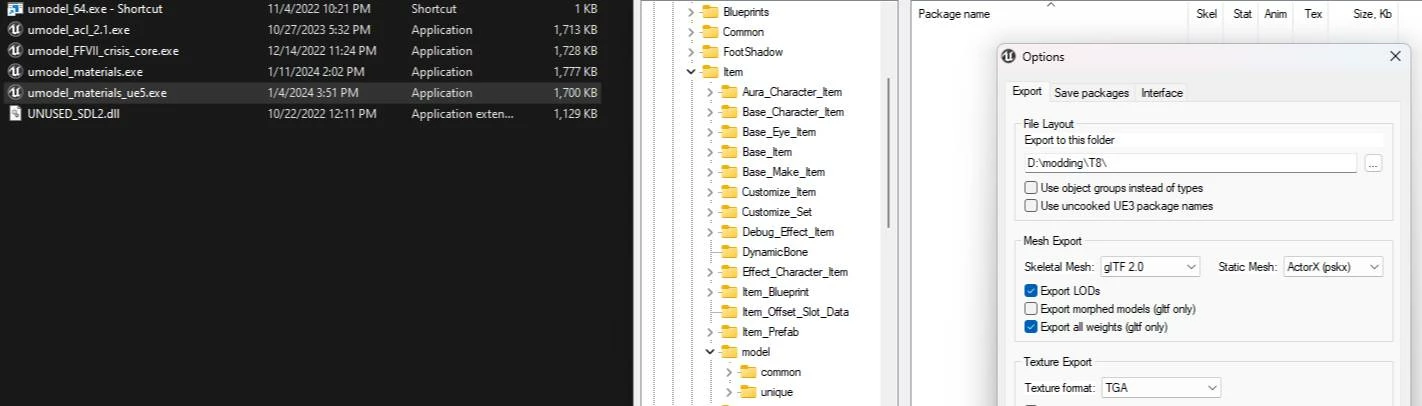
1) I uploaded the umodel version needed for Tekken 8 here, since it is required for extracting meshes and the google drive link from the official umodel site keeps going down. Umodel is not mine - all credit to Gildor ( https://www.gildor.org/en/projects/umodel ) for umodel. Grab umodel and set it to export as gltf with all weights per vertex as shown in the images, then export any meshes you want (e.g., any meshes you want to replace and/or any meshes you want to swap them with or use parts from).
In Blender (I use 3.6):
2) In the "Scene" properties change the "unit scale" to 0.01
3) Using io_scene_gltf2_ue4.zip , import the gltf of the original mesh you want to replace (the msl), which I'll call "target," and the new mesh you want to have instead, which I'll call "custom". Make any changes to "custom" you want (since this is your mod). Umodel does not properly name MIs for you, so you need to rename them all (for your custom mesh) by referring to the target mesh's JSON. You MUST have AT LEAST as many MIs in your custom as in the target (you can add more to your custom, but you CANNOT have fewer or the game will crash), and your life will be much easier if you match the MI names to the target JSON MI names exactly.
4) Align custom exactly to target using posing, etc. (for example, https://www.youtube.com/watch?v=XZ748t5KQv8 , from 5:37 to 14:56)
5) Rename skeleton of target to "Armature" and then parent custom to this Armature
6) Delete all weights from custom mesh and wt xfer from target to custom as described in https://www.youtube.com/watch?v=bR_Vke__voU
7) Export as FBX using https://github.com/matyalatte/blender3d_import_psk_psa/releases
In Unreal Engine (custom version 5.2):
Grab the UE 5.2 custom project from https://github.com/peek6/Polaris-Project/tree/mm_mi_tex and custom engine from https://drive.google.com/drive/folders/1TUmRc7qTq1xTUkGcWnPz6-2KuA4RTPOf , which should be set up as described in https://modding.wiki/en/hogwartslegacy/developers/getting-started
8) If your target only has MSL, then you're basically done at this point - import your FBX from step (7) into UE and point it to the skeleton and MIs from the target mesh's JSON file. You must match both paths and names exactly. Include only the mesh in your chunk, not the MIs or skeleton, and package. You can now skip to step (14).
If your target also has PRP:
9) Import the gltf of the target prp into the same Blender project/window where you did steps 1-7.
10) Rename the Armature skeleton you used in steps 1-7 to Armature MSL, and then rename the skeleton of the target PRP to "Armature"
11) Take the EXACT SAME custom mesh you exported in step (7) and parent it to this Armature (which is now the PRP Armature)
12) You are now just repeating steps (6-7) for the target PRP Armature/Mesh: Delete custom mesh's weights, transfer them from the PRP mesh, and export this new Armature/mesh as FBX.
13) Import both MSL and PRP into UE and point the MSL to the MSL skeleton and MIs from the target MSL's JSON file, and point the PRP to the PRP skeleton and MIs from the target PRP's JSON file. Include only the meshes in your chunk, not the MIs or skeleton, and package.
14) Your packaged mod goes into LogicMods and every filename must end with _P. I made a Python script you can use (after modifying it to point to your UE installation, T8 Logic mods folder, and setting the chunk IDs you used in your mod) to automate this step. You can find it in the Content/Python directory of the custom project or grab it directly from https://github.com/peek6/Json2DA/blob/tekken8/ue_mod_installer.py
***************************
Item Prefab based modding guide:
by peek
Tekken 8 has a really cool system where every slot has an asset called an Item Prefab (IP) which points to three other assets: a Base Character Item (BCI), a Customize Item (CI), and a Base Item (BI). The BI points to the mesh.
The following tutorial takes advantage of this system to allow you to put your own custom mods into any slot, without overwriting any of the game's existing assets other than IPs.
1) Grab fmodel (https://fmodel.app/) , go to the top-level character folder, right-click, and export all JSONs. They shouldn't take up a ton of space, and they are useful for getting MI paths/names, skeleton paths/names, etc. If you do this, you can then easily find any info you need using grep (https://github.com/stefankueng/grepWin) .
2) Grab the latest version of the custom project from my fork: https://github.com/peek6/Polaris-Project/tree/mm_mi_tex . Make sure you are on the mm_mi_tex branch if you want to have the version with the all the MIs already set up for you. You can now import most types of assets into the game as follows:
Now suppose that you created a mod with a custom mesh (e.g., in Blender) which points to custom textures (e.g. from Photoshop) and MIs.
4) Create your own custom mods directory with a separate subdirectory for each mod you make.
5) Stick all your custom meshes, textures, and MIs in this custom directory
6) Create a BI which points to your custom mesh. What I'll typically do is import an existing BI (as described in step (2) above) for a similar outfit and then modify it to point to my custom mesh.
7) Create a CI which sets up coloring slots for your MIs. What I'll typically do is import an existing CI which has the coloring slots for its MIs set up as I want, and modify it as needed to point to any new MIs I've made.
8) Create a blank BCI
So far, all of the above created files are brand new files in your custom mod directory, and are not overwriting any T8 files.
9) Import the original IP for your desired character and slot (as described in step (2) above) into its original T8 folder and name so that it overwrites that T8 asset.
10) Point the IP to your BI, CI, and empty BCI ( from steps 6-8 above ) .
11) Include the IP in your chunk, along with everything in your custom folder for this mod (e.g., BI, CI, BCI, meshes, MIs, textures). You can easily do this by creating a primary asset label in your mod directory, checking the box to label all assets in your directory, and adding your IP as an explicit asset. Then just package in UE as usual.
12) Your packaged mod goes into LogicMods and every filename must end with _P. I made a Python script you can use (after modifying it to point to your UE installation, T8 Logic mods folder, and setting the chunk IDs you used in your mod) to automate this step. You can find it in the Content/Python directory of the custom project or grab it directly from https://github.com/peek6/Json2DA/blob/tekken8/ue_mod_installer.py
Note that the only original T8 asset you are modifying with this approach is the IP. Everything else can (and should) be under your own custom directory for this mod.
As a bonus, if you followed the above approach, I included a Python script in the custom project which will allow you to let people choose which custom part they want to replace. Take a look in Content\Python\outfit_selector.py and follow the instructions I gave in the script's comments detailing how it should be setup and used.
by peek
OPTIONAL BUT HIGHLY RECOMMENDED: Grab fmodel (https://fmodel.app/), go to the top-level character folder, right-click, and export all JSONs. They shouldn't take up a ton of space, and they are useful for getting MI paths/names, skeleton paths/names, etc. If you do this, you can then easily find any info you need using grep (https://github.com/stefankueng/grepWin) .
In umodel:
1) I uploaded the umodel version needed for Tekken 8 here, since it is required for extracting meshes and the google drive link from the official umodel site keeps going down. Umodel is not mine - all credit to Gildor ( https://www.gildor.org/en/projects/umodel ) for umodel. Grab umodel and set it to export as gltf with all weights per vertex as shown in the images, then export any meshes you want (e.g., any meshes you want to replace and/or any meshes you want to swap them with or use parts from).
In Blender (I use 3.6):
2) In the "Scene" properties change the "unit scale" to 0.01
3) Using io_scene_gltf2_ue4.zip , import the gltf of the original mesh you want to replace (the msl), which I'll call "target," and the new mesh you want to have instead, which I'll call "custom". Make any changes to "custom" you want (since this is your mod). Umodel does not properly name MIs for you, so you need to rename them all (for your custom mesh) by referring to the target mesh's JSON. You MUST have AT LEAST as many MIs in your custom as in the target (you can add more to your custom, but you CANNOT have fewer or the game will crash), and your life will be much easier if you match the MI names to the target JSON MI names exactly.
4) Align custom exactly to target using posing, etc. (for example, https://www.youtube.com/watch?v=XZ748t5KQv8 , from 5:37 to 14:56)
5) Rename skeleton of target to "Armature" and then parent custom to this Armature
6) Delete all weights from custom mesh and wt xfer from target to custom as described in https://www.youtube.com/watch?v=bR_Vke__voU
7) Export as FBX using https://github.com/matyalatte/blender3d_import_psk_psa/releases
In Unreal Engine (custom version 5.2):
Grab the UE 5.2 custom project from https://github.com/peek6/Polaris-Project/tree/mm_mi_tex and custom engine from https://drive.google.com/drive/folders/1TUmRc7qTq1xTUkGcWnPz6-2KuA4RTPOf , which should be set up as described in https://modding.wiki/en/hogwartslegacy/developers/getting-started
8) If your target only has MSL, then you're basically done at this point - import your FBX from step (7) into UE and point it to the skeleton and MIs from the target mesh's JSON file. You must match both paths and names exactly. Include only the mesh in your chunk, not the MIs or skeleton, and package. You can now skip to step (14).
If your target also has PRP:
9) Import the gltf of the target prp into the same Blender project/window where you did steps 1-7.
10) Rename the Armature skeleton you used in steps 1-7 to Armature MSL, and then rename the skeleton of the target PRP to "Armature"
11) Take the EXACT SAME custom mesh you exported in step (7) and parent it to this Armature (which is now the PRP Armature)
12) You are now just repeating steps (6-7) for the target PRP Armature/Mesh: Delete custom mesh's weights, transfer them from the PRP mesh, and export this new Armature/mesh as FBX.
13) Import both MSL and PRP into UE and point the MSL to the MSL skeleton and MIs from the target MSL's JSON file, and point the PRP to the PRP skeleton and MIs from the target PRP's JSON file. Include only the meshes in your chunk, not the MIs or skeleton, and package.
14) Your packaged mod goes into LogicMods and every filename must end with _P. I made a Python script you can use (after modifying it to point to your UE installation, T8 Logic mods folder, and setting the chunk IDs you used in your mod) to automate this step. You can find it in the Content/Python directory of the custom project or grab it directly from https://github.com/peek6/Json2DA/blob/tekken8/ue_mod_installer.py
***************************
Item Prefab based modding guide:
by peek
Tekken 8 has a really cool system where every slot has an asset called an Item Prefab (IP) which points to three other assets: a Base Character Item (BCI), a Customize Item (CI), and a Base Item (BI). The BI points to the mesh.
The following tutorial takes advantage of this system to allow you to put your own custom mods into any slot, without overwriting any of the game's existing assets other than IPs.
1) Grab fmodel (https://fmodel.app/) , go to the top-level character folder, right-click, and export all JSONs. They shouldn't take up a ton of space, and they are useful for getting MI paths/names, skeleton paths/names, etc. If you do this, you can then easily find any info you need using grep (https://github.com/stefankueng/grepWin) .
2) Grab the latest version of the custom project from my fork: https://github.com/peek6/Polaris-Project/tree/mm_mi_tex . Make sure you are on the mm_mi_tex branch if you want to have the version with the all the MIs already set up for you. You can now import most types of assets into the game as follows:
- create the asset in UE by right-clicking within your desired folder and picking the asset type you want from the "Polaris" Menu.
- right-click the asset you just created, select "scripted asset actions" and select "Import JSON" then browse to the corresponding JSON you extracted using FModel (https://fmodel.app/)
Now suppose that you created a mod with a custom mesh (e.g., in Blender) which points to custom textures (e.g. from Photoshop) and MIs.
4) Create your own custom mods directory with a separate subdirectory for each mod you make.
5) Stick all your custom meshes, textures, and MIs in this custom directory
6) Create a BI which points to your custom mesh. What I'll typically do is import an existing BI (as described in step (2) above) for a similar outfit and then modify it to point to my custom mesh.
7) Create a CI which sets up coloring slots for your MIs. What I'll typically do is import an existing CI which has the coloring slots for its MIs set up as I want, and modify it as needed to point to any new MIs I've made.
8) Create a blank BCI
So far, all of the above created files are brand new files in your custom mod directory, and are not overwriting any T8 files.
9) Import the original IP for your desired character and slot (as described in step (2) above) into its original T8 folder and name so that it overwrites that T8 asset.
10) Point the IP to your BI, CI, and empty BCI ( from steps 6-8 above ) .
11) Include the IP in your chunk, along with everything in your custom folder for this mod (e.g., BI, CI, BCI, meshes, MIs, textures). You can easily do this by creating a primary asset label in your mod directory, checking the box to label all assets in your directory, and adding your IP as an explicit asset. Then just package in UE as usual.
12) Your packaged mod goes into LogicMods and every filename must end with _P. I made a Python script you can use (after modifying it to point to your UE installation, T8 Logic mods folder, and setting the chunk IDs you used in your mod) to automate this step. You can find it in the Content/Python directory of the custom project or grab it directly from https://github.com/peek6/Json2DA/blob/tekken8/ue_mod_installer.py
Note that the only original T8 asset you are modifying with this approach is the IP. Everything else can (and should) be under your own custom directory for this mod.
As a bonus, if you followed the above approach, I included a Python script in the custom project which will allow you to let people choose which custom part they want to replace. Take a look in Content\Python\outfit_selector.py and follow the instructions I gave in the script's comments detailing how it should be setup and used.