


0 of 0
About this mod
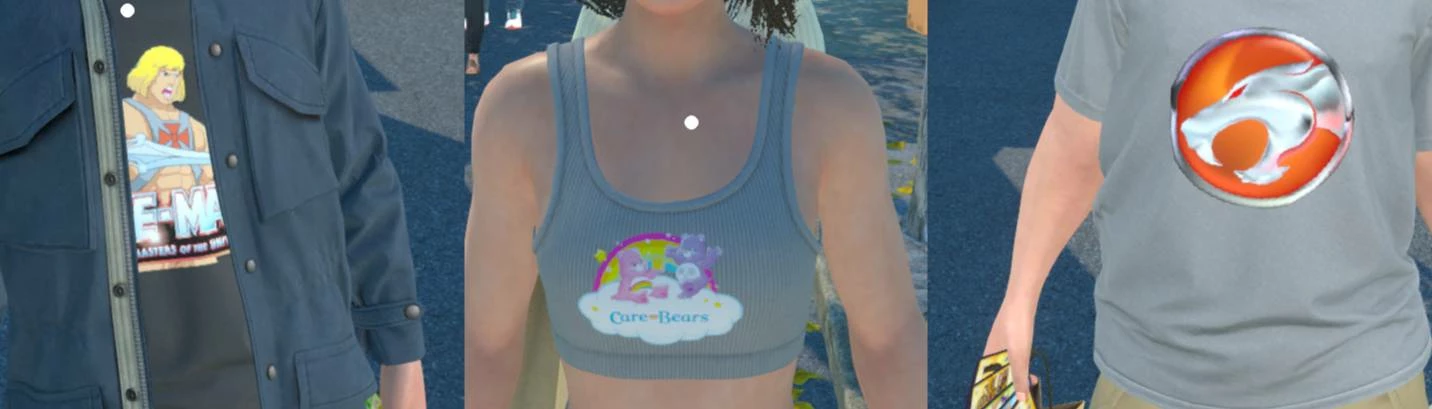
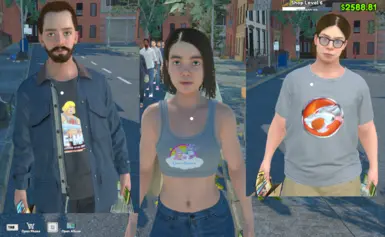
Framework mod for allowing 'booster' mods to replace, modify, and/or add character model textures. By itself this mod adds 80s cartoon decals. Create your own and share them! Mesh and model support coming soon.
- Requirements
- Permissions and credits
Description
Current Version: 0.0.2 (changelog)
Framework mod for allowing 'booster' mods to replace, modify, and/or add character model textures. By itself this mod adds 80s cartoon decals. Create your own and share them! Mesh and model support coming soon.
This is a very complicated mod and, as it's only v0.0.1, likely has a bug or two. Just let me know in the Posts section or put in issues on GitHub (see Bug Reporting section below).
This mod was a labor of love, but it was (and will likely continue to be) a lot of work. If you enjoy my mods then please consider a small donation on Ko-fi to help keep me going. Just click or scan the QR code below. Thanks!

All Users / Getting Started
This mod is primarily a framework / dependency mod designed to be required by other mods (A.K.A Boosters) that have developed new textures and looks for the customers. However, it adds a few decals on its own, just for fun. Install this mod using the standard installation instructions below.
Adding Other Texture "Booster" Mods Developed by Mod Authors
I'm hoping this is fairly straightforward for people, but I am in the process of getting some screenshots and working up a video just to make it easier.
At this point, unless you are planning to create booster mods or play around with the textures on your own then you should be good to go. Enjoy!
Mod Developers - Creating Boosters
Working on a video soon. For now here is the written guide (work in progress...)
Nerd Shirts Mod - Booster Developers Guide
As always, if you have ideas or issues see the Source Code and Bug Reporting section at the bottom of the page. Thanks!
Installation
Regular users (non-booster-developers) should not need to worry about config options or hotkeys.
Hotkeys
Config Options
Note that all of the options in this mod default to off (false, zero, blank, etc) to enable the user to have as little of a "cheaty" experience as possible.
For information on how to modify these options, see the Editing the Config File section below.
General
Hotkeys
Test Mode
Editing the Config File
NOTE: If you used the premade BepInEx pack mod or downloaded ConfigurationManager then you can hit F1 to open a dialog to modify options. Note that some options may not take effect without restarting the game.
To edit the config file outside of the game:
Source Code and Bug Reporting
All of my mods are open source on GitHub here: https://github.com/devopsdinosaur/tcgshop-mods
Please let me know in the Posts section if you have problems or ideas for new mods/features. Or, even better, you can submit issues directly on the GitHub page here).
PSA - It's been hard to find the time to create new mods and support the ones I've made. If you like my mods, please consider a small tip (any amount) on Ko-fi to help me convince my wife that this modding stuff is worth my time =) Just scan the QR code below with your phone or click it to get started.
Thanks a ton, and enjoy the mods!!
dd
Current Version: 0.0.2 (changelog)
Framework mod for allowing 'booster' mods to replace, modify, and/or add character model textures. By itself this mod adds 80s cartoon decals. Create your own and share them! Mesh and model support coming soon.
This is a very complicated mod and, as it's only v0.0.1, likely has a bug or two. Just let me know in the Posts section or put in issues on GitHub (see Bug Reporting section below).
This mod was a labor of love, but it was (and will likely continue to be) a lot of work. If you enjoy my mods then please consider a small donation on Ko-fi to help keep me going. Just click or scan the QR code below. Thanks!
All Users / Getting Started
This mod is primarily a framework / dependency mod designed to be required by other mods (A.K.A Boosters) that have developed new textures and looks for the customers. However, it adds a few decals on its own, just for fun. Install this mod using the standard installation instructions below.
Adding Other Texture "Booster" Mods Developed by Mod Authors
I'm hoping this is fairly straightforward for people, but I am in the process of getting some screenshots and working up a video just to make it easier.
- Download and install this mod using the insttructions below. It will create a folder under <tcgshop-home>/BepInEx/plugins called nerd_shirts. This is the folder under which all textures (images and configs) will be stored. By default, with just this mod installed you should see sub-folders called __shader_bundles__, base, and eighties_cartoon_shorts.
- Download and extract the contents of the other mod(s). If the mod does not include instructions then just copy the folder containing sub-folders called Female and/or Male to the <tcgshop-home>/BepInEx/plugins/nerd_shirts folder.
- For example: Let's say the mod is called Fancy Pants. When you extract the files there should be a folder called something like fancy_pants and it will contain sub-folders Female and/or Male. Copy that fancy_pants folder into <tcgshop-home>/BepInEx/plugins/nerd_shirts and start up the game.
- This plugin should pick up any new mod texture folders without any trouble. Check LogOutput.log for information.
At this point, unless you are planning to create booster mods or play around with the textures on your own then you should be good to go. Enjoy!
Mod Developers - Creating Boosters
Working on a video soon. For now here is the written guide (work in progress...)
Nerd Shirts Mod - Booster Developers Guide
As always, if you have ideas or issues see the Source Code and Bug Reporting section at the bottom of the page. Thanks!
Installation
- Install BepInEx
- Download and extract this mod.
- Copy the extracted files to <tcgshop-home>/BepInEx/plugins folder.
- Start the game and exit.
- Change configuration options (see below).
- Once you have the settings you want, start the game again and enjoy!
Regular users (non-booster-developers) should not need to worry about config options or hotkeys.
Hotkeys
- LeftControl or RightControl - Modifier
- [Modifier_Key] + F8 - Dump Textures (Test Mode only)
- [Modifier_Key] + Z - Spawn All Customer Presets (Test Mode only)
- [Modifier_Key] + X - Destroy All Spawns (Test Mode only)
Config Options
Note that all of the options in this mod default to off (false, zero, blank, etc) to enable the user to have as little of a "cheaty" experience as possible.
For information on how to modify these options, see the Editing the Config File section below.
General
- Enabled - Set to false to disable this mod.
- Force Wear - Comma-separated list of apparel items (i.e. Crop_Top_01, Polo_Shirt_01, etc) exactly matching (no wildcards) the second subfolder (directly under Female/Male) of the mod/dump textures folder. The mod will make its best effort to force all customers (of the apparel's gender) to wear the specified item(s). If two or more apparel items that apply to the same gender and clothing slot (i.e. Polo_Shirt_01 and Polo_Shirt_02) are specified then the mod will randomly select between them. Check LogOutput.txt for information if this setting does not seem to work and see the Nexus homepage for this mod for troubleshooting tips. Changes to this setting require a game reload.
- Log Level - [Advanced] Logging level, one of: 'none' (no logging), 'error' (only errors), 'warn' (errors and warnings), 'info' (normal logging), 'debug' (extra log messages for debugging issues). Not case sensitive [string, default info]. Debug level not recommended unless you're noticing issues with the mod. Changes to this setting require an application restart.
- Texture Subfolder - Subfolder under this plugin's parent folder (i.e. <game>/BepInEx/plugins) which in turn contains a set of mod-specific texture directories.
Hotkeys
- Hotkey - Destroy All Spawns (Test Mode only) - Comma-separated list of Unity Keycodes, any of which will (when combined with 'modifier' key) removes all the zombie customers spawned with a previous press of the 'Spawn All Presets' hotkey.
- Hotkey - Dump Textures (Test Mode only) - Comma-separated list of Unity Keycodes, any of which will (when combined with 'modifier' key) dump all apparel textures.
- Hotkey - Modifier - Comma-separated list of Unity Keycodes used as the special modifier key (i.e. ctrl,alt,command) one of which is required to be down for hotkeys to work. Set to '' (blank string) to not require a special key (not recommended). See this link for valid Unity KeyCode strings (https://docs.unity3d.com/ScriptReference/KeyCode.html)
- Hotkey - Spawn All Customer Presets (Test Mode only) - Comma-separated list of Unity Keycodes, any of which will (when combined with 'modifier' key) spawn all of the customer presets (32 of them) out on the street outside of the shop.
Test Mode
- Test Mode - Enabled - Set to true to enable test mode. If this value is false then all 'Test Mode' settings will be ignored. Changing this value requires a game restart.
Editing the Config File
NOTE: If you used the premade BepInEx pack mod or downloaded ConfigurationManager then you can hit F1 to open a dialog to modify options. Note that some options may not take effect without restarting the game.
To edit the config file outside of the game:
- Open notepad or your favorite text editor (Windows Key + R then 'notepad').
- File => Open. Navigate to <tcgshop-home>/BepInEx/config and open devopsdinosaur.tcgshop.nerd_shirts.cfg.
- Each of the options listed above can be modified according to the description. Lines starting with '#' are just comments. Lines in [] are section headers.
- After making changes, save the file and restart the game to try out the new settings!
Source Code and Bug Reporting
All of my mods are open source on GitHub here: https://github.com/devopsdinosaur/tcgshop-mods
Please let me know in the Posts section if you have problems or ideas for new mods/features. Or, even better, you can submit issues directly on the GitHub page here).
PSA - It's been hard to find the time to create new mods and support the ones I've made. If you like my mods, please consider a small tip (any amount) on Ko-fi to help me convince my wife that this modding stuff is worth my time =) Just scan the QR code below with your phone or click it to get started.
Thanks a ton, and enjoy the mods!!
dd