


0 of 0
About this mod
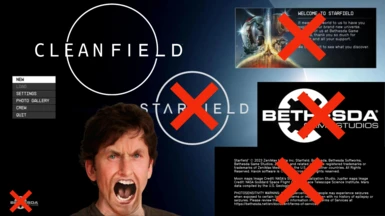
Cleanfield:
- No Epilepsy & Seizure Warning
- No Bethesda Logo Video
- No Bethesda Logo
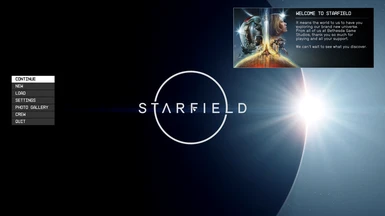
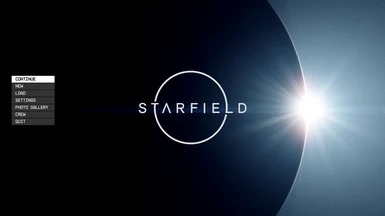
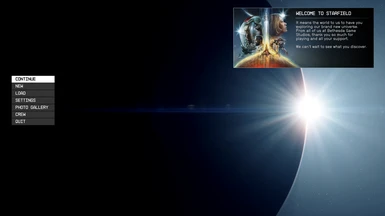
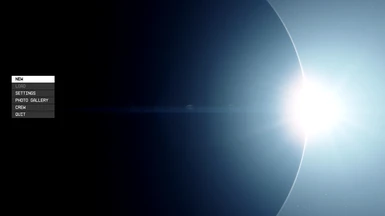
- No Message of the Day (Optional)
- No Starfield Logo (Optional)
- 30, 60 and 120 FPS
- Vortex & MO2 Support
- Requirements
- Permissions and credits
- Changelogs
- Donations
✦ CLEANFIELD
by Gametism
✦ DESCRIPTION
A No-Intro Videos & Clean Menu Fix
✦ INSTALLATION
1. Download and extract files (standard method):
Copy "StarfieldCustom.ini" to the "Documents\My Games\Starfield" folder
OR
Add the necessary lines to your existing "StarfieldCustom.ini"
Inside the ZIP there is a folder called Options. This folder has 4 options to choose from:
Keep MOTD
Keep MOTD and Starfield Logo
Keep Starfield Logo
Remove Everything
Inside each of these options, except "Bethesda Logo Video Dummy", there are 3 folders : 30 FPS, 60 FPS and 120 FPS and inside each of these folders you'll find an "Interface" folder.
Pick one and unpack the "Interface" folder to:
Steam-Version: X\Steam\steamapps\common\Starfield\Data
Microsoft-Store-Version: X\XboxGames\Starfield\Content\Data
For some users it also seems to help to copy the "Interface" folder to: "Documents\My Games\Starfield\Data"
Inside "Bethesda Logo Video Dummy\Data\Video" is a dummy file "BGS_LOGO_1080p_BinkVersion.bk2".
Copy that file to:
Steam-Version: X\Steam\steamapps\common\Starfield\Data\Video
Microsoft-Store-Version: X\Xbox Games\Starfield\Content\Data\Video
For some users it also seems to help to copy the "BGS_LOGO_1080p_BinkVersion.bk2" file to: "Documents\My Games\Starfield\Data\Video"
WARNING: Replacing it with a dummy file may cause the game to not work properly.
USE AT YOUR OWN RISK.
There is conflicting information out there about the process Game Pass users, please see comments for discussion, there are 2 or 3 solutions floating around that seem to work for some people.
2. Configure your INI to load loose files:
In the same directory you extracted or moved files to in the previous step, you may find a file named StarfieldCustom.ini. If this file does not exist, you must create it using a text editor. Add the following lines to this file:
A lot of people are having trouble with this file, so something you can also try is adding bInvalidateOlderFiles=1 directly to the Starfield.ini that is present in the same folder as the EXE. Add it under [Archive]
NOTE: Make sure Windows Explorer file extensions are turned on, so you can actually rename the file to StarfieldCustom.ini instead of StarfieldCustom.ini.txt! HowTo
NOTE: Make sure there are no spaces, tabs, or other characters. It should appear exactly as above. If you are having trouble with the INI file, I've included an INI file in the download.
✦ FEATURED ON

by Gametism
✦ DESCRIPTION
A No-Intro Videos & Clean Menu Fix
✦ INSTALLATION
1. Download and extract files (standard method):
Copy "StarfieldCustom.ini" to the "Documents\My Games\Starfield" folder
OR
Add the necessary lines to your existing "StarfieldCustom.ini"
Inside the ZIP there is a folder called Options. This folder has 4 options to choose from:
Keep MOTD
Keep MOTD and Starfield Logo
Keep Starfield Logo
Remove Everything
Inside each of these options, except "Bethesda Logo Video Dummy", there are 3 folders : 30 FPS, 60 FPS and 120 FPS and inside each of these folders you'll find an "Interface" folder.
Pick one and unpack the "Interface" folder to:
Steam-Version: X\Steam\steamapps\common\Starfield\Data
Microsoft-Store-Version: X\XboxGames\Starfield\Content\Data
For some users it also seems to help to copy the "Interface" folder to: "Documents\My Games\Starfield\Data"
Inside "Bethesda Logo Video Dummy\Data\Video" is a dummy file "BGS_LOGO_1080p_BinkVersion.bk2".
Copy that file to:
Steam-Version: X\Steam\steamapps\common\Starfield\Data\Video
Microsoft-Store-Version: X\Xbox Games\Starfield\Content\Data\Video
For some users it also seems to help to copy the "BGS_LOGO_1080p_BinkVersion.bk2" file to: "Documents\My Games\Starfield\Data\Video"
WARNING: Replacing it with a dummy file may cause the game to not work properly.
USE AT YOUR OWN RISK.
There is conflicting information out there about the process Game Pass users, please see comments for discussion, there are 2 or 3 solutions floating around that seem to work for some people.
2. Configure your INI to load loose files:
In the same directory you extracted or moved files to in the previous step, you may find a file named StarfieldCustom.ini. If this file does not exist, you must create it using a text editor. Add the following lines to this file:
[Archive]
bInvalidateOlderFiles=1
sResourceDataDirsFinal=

[General]
sIntroSequence=
uMainMenuDelayBeforeAllowSkip=0
A lot of people are having trouble with this file, so something you can also try is adding bInvalidateOlderFiles=1 directly to the Starfield.ini that is present in the same folder as the EXE. Add it under [Archive]
NOTE: Make sure Windows Explorer file extensions are turned on, so you can actually rename the file to StarfieldCustom.ini instead of StarfieldCustom.ini.txt! HowTo
NOTE: Make sure there are no spaces, tabs, or other characters. It should appear exactly as above. If you are having trouble with the INI file, I've included an INI file in the download.
✦ FEATURED ON