A small tutorial for making icons appear on custom items in the game menus instead of a ! box
Permissions and credits
Credits and distribution permission
Other user's assetsAll the assets in this file belong to the author, or are from free-to-use modder's resources
Upload permissionYou can upload this file to other sites but you must credit me as the creator of the file
Modification permissionYou must get permission from me before you are allowed to modify my files to improve it
Conversion permissionYou are not allowed to convert this file to work on other games under any circumstances
Asset use permissionYou must get permission from me before you are allowed to use any of the assets in this file
Asset use permission in mods/files that are being soldYou are not allowed to use assets from this file in any mods/files that are being sold, for money, on Steam Workshop or other platforms
Asset use permission in mods/files that earn donation pointsYou are not allowed to earn Donation Points for your mods if they use my assets
Author notes
This author has not provided any additional notes regarding file permissions
File credits
This author has not credited anyone else in this file
Donation Points system
Please log in to find out whether this mod is receiving Donation Points
Donations
No donations accepted
This is honestly pretty simple, I just haven't seen it properly documented elsewhere yet
Step 1:Obtain or make a .dds format icon for your item that is made to the following specifications Size: 128 x 128 pixels Colorspace: sRGB Type: PaletteAlpha Endianness: LSB Depth: 8-bit Channels: 4.0 Channel depth: Red: 8-bit Green: 8-bit Blue: 8-bit Alpha: 1-bit Channel statistics: Pixels: 16384
Step 2: Place your icons in Starfield\Data\Textures\interface\inventoryicons\MyMod.esm Starfield\Data\Textures\interface\shipbuildericons\MyMod.esm Starfield\Data\Textures\interface\workshopicons\MyMod.esm MyMod.esm needs to be a folder named the same as your mod's .esm file and must contain your icon .dds file or files named as described in the next step
Step 3: Open the Creation Kit and find the base ID of the item you made that needs an icon - this will usually (but not always) be your object's PackIn (PKIN) Form ID for shipbuilder and workshop items and the name must be preceded by cl Note - when doing this the .dds files should always start with zeroes.. don't change the first two numbers to match your load order, we will be packing these into a .ba2 file later
Example (for three different custom shipbuilder or workshop items) 0000081acl.dds 0000080fcl.dds 0000083dcl.dds
For inventoryicons they should be the Form ID of the item you want to make the icon for, not the constructible object They appear to need both a regular icon preceded by mc and an alpha icon preceded by af
Example (For one custom inventory icon, such as a new gun or ammo) 0000082emc.dds <-------- Regular icon 0000082eaf.dds <-------- Alpha icon
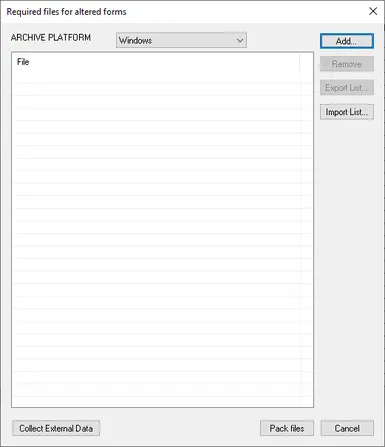
Step 4: Once you have all of your .dds icons inside the folder(s) you created in step 2 and named to match the form IDs from your mod's esm, load your mod's esp in the Creation Kit, press File - Create Archive and press the Add button in the upper right in the window that comes up, add the icons you just renamed then click Pack files in the bottom right This will create a new .ba2 file containing your icons MyMod - Textures.ba2
That's all there is to it, include the generated .ba2 file with your .esm mod when you publish it and the icons will actually show up in the menu!
Final Note: This WILL NOT work with a mod saved as an .esp file, even when testing - your mod must be in .esm format for this to work!