Since someone asked before, and my answer was uhhhhh... NOT right, here's how I made this mod non replacer:
1. Copy the original mod's meshes folder into Data\meshes 2. Load Skyrim, Update, Dawnguard, and Dragonborn up in CreationKit. DO NOT set an active file 3. Find the armor that the original mod replaced by clicking on the Armor tab and filtering by the name (if you can't find it, use a wiki to find the form ID) 4. Open up the armor and rename the ID to something unique (preferably use a prefix to organize it with the rest of your files) 5. Find the box labeled "Models" at the bottom of the second column and double click the entry 6. Rename the ID of this too 7. Select the biped model for the male and/or female versions of the armor 8. Load up the mesh from the mod's files that ends in 1 9. Press ok, and make sure you select yes when it asks you if you want to make a new Form 10. Right click on the entry that's currently in the Models box and delete it 11. Right click in the Models box and select new 12. Find the Armor Addon (the thing we made in steps 6-9) and press ok 13. (Optional) Above the Model box, select the modded world models if the original mod included them 14. Press ok, and make sure you select yes when it asks you if you want to make a new Form 15. Save and name your esp
Hello! I'm sorry that it doesn't have anything to do with the mod itself but I was curious, what hair mod is your character using in the pictures?? I've been trying to find a hair like that for such a long time!
It's either Holiday Gift (HG) Hairdos 1 or 2. This mod's description has direct download links to both: https://www.nexusmods.com/skyrimspecialedition/mods/127804
You said you've never modded Skyrim before this? I've been looking to do something similar (turning replacer armors into standalone) and have no Skyrim modding experience, so I was wondering if there was a guide you used and could recommend?
I followed multiple guides to figure it out, because I had trouble following them individually. I'll write the steps I took for my project, but I didn't need to bother with textures, so that part won't be included (it's more complex, so I don't want to give the wrong info). If the mod you want to convert includes it's own textures, here and here will help you. These are where I got most of my information. Also here is my own post asking for help.
Once again, this does not cover textures. You will need SSEEdit.
1. Download and extract the mod you want to make standalone into a new folder. (Can be put anywhere).
2. In your Skyrim SE meshes folder (\Skyrim Special Edition\Data\meshes) create a new folder and give it a title relating to your mod.
NOTE: For textures, create a new folder in \Data\textures.
3. Go into the extracted mod's contents and find the meshes. They will come in pairs, and be titled something like armor_0.nif and armor_1.nif. You will need to copy both of these files into your mod's folder, for each armor you wish to convert.
NOTE: This is the part where you'd copy the textures into the textures folder you made, and then edit the meshes in Nifskope to use those textures.
4. Launch SSEEdit. Only load the original mod's dependencies (the base game and any mods or dlc that it needs active in order to work). If the mod replaces a base game armor, you should be safe with both Skyrim.esm and Update.esm enabled. If it replaces a DLC armor, you will also need to enable that DLC. Same with mods.
5. Enlarge the Armor Addon section and search for the armor that is replaced by the mod you're converting. You can usually tell by the name. Right click on it and select "copy as new record into". Change the editor ID into something unique for your mod. Then select "new file.esp*". This will be your new mod, so name it accordingly.
6. Do the same thing for the Armor section, this time copying as a new record into the mod you just made.
7. Open the Armor section in your mod. Select the armor's entry and scroll down to the "armature" section. Double click on the value and select your mod's matching Armor Addon.
8. Open the Armor Addon section in your mod. Select the armor's entry and scroll down to where it says male world model, female world model, male first person model, etc. Replace the world model entries with the file paths for the meshes ending in _1 that you copied into Skyrim SE's data/meshes folder, starting from the folder you made.**
9. Replace the first person model entries as well. Some mods will have separate meshes for the first person models, since most of the armor isn't visible from that perspective, and there is a way to use those, but I just used the same meshes as the world models.
10. Save your mod and load it up in game for testing!
* The different options for ESM or ESL are for if you want your mod to be light or not. If ESL is checked, it's light. I'm not very knowledgeable about whether a mod can be light, and I'm not sure what ESM means (I assume it lets your mod be a master but unsure).
** Example: "PracticalFemaleArmorStandalone\glass\f\cuirass_1.nif". Explanation: I named my folder in /meshes "PracticalFemaleArmorStandalone", then, I have a series of subfolders, then the mesh itself. You only need the mesh that ends in _1.
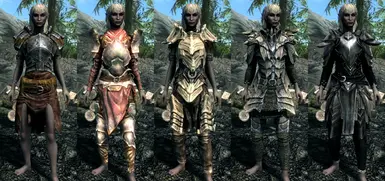
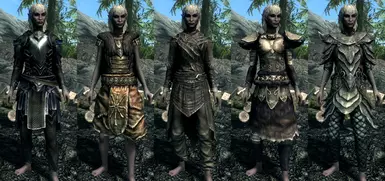
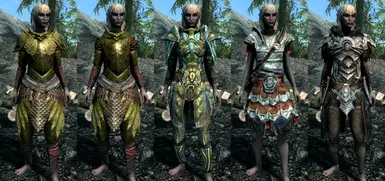
What exactly do you mean by this is a "standalone version"? Just wondering because I don't really understand what this mod does that JZBai's Practical Female Armors SE doesn't already do.


12 comments
1. Copy the original mod's meshes folder into Data\meshes
2. Load Skyrim, Update, Dawnguard, and Dragonborn up in CreationKit. DO NOT set an active file
3. Find the armor that the original mod replaced by clicking on the Armor tab and filtering by the name (if you can't find it, use a wiki to find the form ID)
4. Open up the armor and rename the ID to something unique (preferably use a prefix to organize it with the rest of your files)
5. Find the box labeled "Models" at the bottom of the second column and double click the entry
6. Rename the ID of this too
7. Select the biped model for the male and/or female versions of the armor
8. Load up the mesh from the mod's files that ends in 1
9. Press ok, and make sure you select yes when it asks you if you want to make a new Form
10. Right click on the entry that's currently in the Models box and delete it
11. Right click in the Models box and select new
12. Find the Armor Addon (the thing we made in steps 6-9) and press ok
13. (Optional) Above the Model box, select the modded world models if the original mod included them
14. Press ok, and make sure you select yes when it asks you if you want to make a new Form
15. Save and name your esp
Congrats! You did it!
Once again, this does not cover textures. You will need SSEEdit.
1. Download and extract the mod you want to make standalone into a new folder. (Can be put anywhere).
2. In your Skyrim SE meshes folder (\Skyrim Special Edition\Data\meshes) create a new folder and give it a title relating to your mod.
NOTE: For textures, create a new folder in \Data\textures.
3. Go into the extracted mod's contents and find the meshes. They will come in pairs, and be titled something like armor_0.nif and armor_1.nif. You will need to copy both of these files into your mod's folder, for each armor you wish to convert.
NOTE: This is the part where you'd copy the textures into the textures folder you made, and then edit the meshes in Nifskope to use those textures.
4. Launch SSEEdit. Only load the original mod's dependencies (the base game and any mods or dlc that it needs active in order to work). If the mod replaces a base game armor, you should be safe with both Skyrim.esm and Update.esm enabled. If it replaces a DLC armor, you will also need to enable that DLC. Same with mods.
5. Enlarge the Armor Addon section and search for the armor that is replaced by the mod you're converting. You can usually tell by the name. Right click on it and select "copy as new record into". Change the editor ID into something unique for your mod. Then select "new file.esp*". This will be your new mod, so name it accordingly.
6. Do the same thing for the Armor section, this time copying as a new record into the mod you just made.
7. Open the Armor section in your mod. Select the armor's entry and scroll down to the "armature" section. Double click on the value and select your mod's matching Armor Addon.
8. Open the Armor Addon section in your mod. Select the armor's entry and scroll down to where it says male world model, female world model, male first person model, etc. Replace the world model entries with the file paths for the meshes ending in _1 that you copied into Skyrim SE's data/meshes folder, starting from the folder you made.**
9. Replace the first person model entries as well. Some mods will have separate meshes for the first person models, since most of the armor isn't visible from that perspective, and there is a way to use those, but I just used the same meshes as the world models.
10. Save your mod and load it up in game for testing!
* The different options for ESM or ESL are for if you want your mod to be light or not. If ESL is checked, it's light. I'm not very knowledgeable about whether a mod can be light, and I'm not sure what ESM means (I assume it lets your mod be a master but unsure).
** Example: "PracticalFemaleArmorStandalone\glass\f\cuirass_1.nif". Explanation: I named my folder in /meshes "PracticalFemaleArmorStandalone", then, I have a series of subfolders, then the mesh itself. You only need the mesh that ends in _1.