


0 of 0

Documentation
Readme
View as plain text
# AutoTest
**In-game automatic testing framework for Bethesda games**
When modding a Bethesda game (Skyrim, Fallout...) there comes a time when the game becomes unstable.
This unstability comes from the complex interactions different mods can have, and the difficulty in integrating those interactions, in terms of game objects' properties, scripting, files priorities.
A lot of tools in the modding communities already tackle this issue by providing a lot of checks between mods and their files.
Other tools also offer automatic patches to make mods integration easier.
However some issues are too complex to be diagnosed only by looking at the esp files or the load orders.
For such problems **the gamer has to test in-game**: load different locations, fly around a little bit, check NPCs interactions, etc...
All those in-game tests are really time consuming, and some of those tests could be automated.
The purpose of AutoTest is to **provide a simple in-game testing framework that can execute some of those tests automatically**.
This can save hours of manual testing to have a better confidence in a game's stability.
The list of games that are eligible to this tool (non-exhaustive list):
* Skyrim Special Edition - Tested successfully.
* Skyrim - Not tested yet - Feedback welcome!
* Fallout 4 - Not tested yet - Feedback welcome!
## Requirements
1 tool and 3 mods are needed for AutoTest to work:
* [SKSE](https://skse.silverlock.org/) to support a lot of scripting. - You have to install on your Bethesda game.
* [PapyrusUtils](https://www.nexusmods.com/skyrimspecialedition/mods/13048) to interact with external JSON files for tests run and statuses.
* [SkyUILib](https://www.nexusmods.com/skyrim/mods/57308) to provide a nice menu interface. - This can be installed for both Skyrim and SkyrimSE.
* [ConsoleUtil](https://www.nexusmods.com/skyrimspecialedition/mods/24858) to execute some commands that are not accessible in Papyrus.
## Installation
**AutoTest packages are downloadable from [Nexus Mods](https://www.nexusmods.com/skyrimspecialedition/mods/42520).**
Once requirements are installed, you can use AutoTest either by copying its package content to your Bethesda game's Data folder, or by using its packaged content with a mod manager like [ModOrganizer](https://www.nexusmods.com/skyrimspecialedition/mods/6194).
## Usage
AutoTest is a tool for gamers that want to test the game stability, using in-game testing. Therefore it has to deal with CTDs and must rely on a configuration that is the least intrusive to the game.
For this purpose, the main way to use AutoTest is by using JSON files to pilot the tests to be run and check the tests statuses later.
Alternatively, an in-game menu in a test cell can also be used to configure those JSON files and run tests.
Command consoles can also pilot the tests execution.
The [Modsvaskr](https://www.nexusmods.com/skyrimspecialedition/mods/42521) is a tool that can also use AutoTest based on your mods and provide you with much more potential - highly recommended.
AutoTest is organized around tests suites: each tests suite represents a given type of test to perform. For example the tests suite `NPCs` will be able to test various NPCs from the game, thus realizing several tests.
Test suites are like plugins for AutoTest: they are handled as Papyrus scripts named `AutoTest_Suite_*.psc` and can easily be completed with new ones to implement new kinds of tests. **Contributors more than welcome to provide new test suites that will benefit the whole community!** - Please create a PR on this repo or your fork or contact me if you want to share: I'll be very happy to add your contribution and credit in this project!
### JSON files
AutoTest uses JSON files stored in your game's Data folder, following the pattern `SKSE\Plugins\StorageUtilData\AutoTest_*.json`, and only this pattern.
By default those files do not exist (they are optional), and they can be either created by hand, or by the in-game menu if needed.
#### The main configuration file: `AutoTest_Config.json`
This file configures AutoTest behaviour.
Here is an example of its content:
```json
{
"string": {
"on_start": "run",
"on_stop": "exit",
"tests_execution": "end"
}
}
```
Here is an explanation of each one of its properties:
* **on_start**: Gives an action to perform once a game is being loaded. If absent it does nothing. If set to `run` then tests execution will start as soon as the game is loaded.
* **on_stop**: Gives an action to perform once tests have finished executing. If absent it does nothing. If set to `exit` then the game will exit to desktop.
* **tests_execution**: The value is set by AutoTest in-game testing. `run` indicates that a tests session is being executed. `end` indicates that the tests execution has ended.
#### The tests suites' Run files: `AutoTest_*_Run.json`
Each test suite has a JSON file storing the list of test names to be run.
This file is being updated when registering tests to be run.
Here is an example of its content:
```json
{
"stringList": {
"tests_to_run": [
"test_name_1",
"test_name_2",
"test_name_3"
]
}
}
```
Here is an explanation of each one of its properties:
* **tests_to_run**: A list of test names to be run when the tests session will start. By default, no test is to be run.
Please refer to the different tests suites sections below to know which test names can be used for each tests suite.
#### The tests suites' Statuses files: `AutoTest_*_Statuses.json`
Each test suite has a JSON file storing the statuses of tests.
This file is being updated when executing tests.
Here is an example of its content:
```json
{
"string": {
"test_name_1": "ok",
"test_name_2": "failed"
}
}
```
For each test name, the corresponding status is indicated. By default, the status is considered as not run.
Please be aware that statuses should be considered case-insensitive (meaning that `failed` and `Failed` refer to the same status, and you can encounter both cases in the same file, due to a [strange Papyrus bug](https://github.com/xanderdunn/skaar/wiki/Common-Tasks)).
Statuses can vary depending on the test being performed, except for the status `ok` that should be the only one used to indicate a successful test.
Please refer to the different tests suites sections below to know which test names can be used for each tests suite.
When AutoTest starts a tests session, it will run all the tests defined in a Run list, and skip the tests that already have a status `ok`.
#### The tests suites' Config files: `AutoTest_*_Config.json`
Each test suite has an optional JSON file storing its configuration, that could alter the way tests are being performed.
Configuration files are always organized as a set of key -> value string pairs.
Here is an example of such a configuration file content:
```json
{
"string": {
"config_option_1": "value_1",
"config_option_2": "value_2"
}
}
```
The meaning and values of each configuration option is specific to the tests suite. See below sections for details.
### The tests suites
Different tests suites allow for different kind of tests.
The following sections enumerate the different tests suites that can be used in AutoTest.
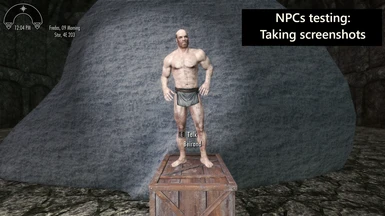
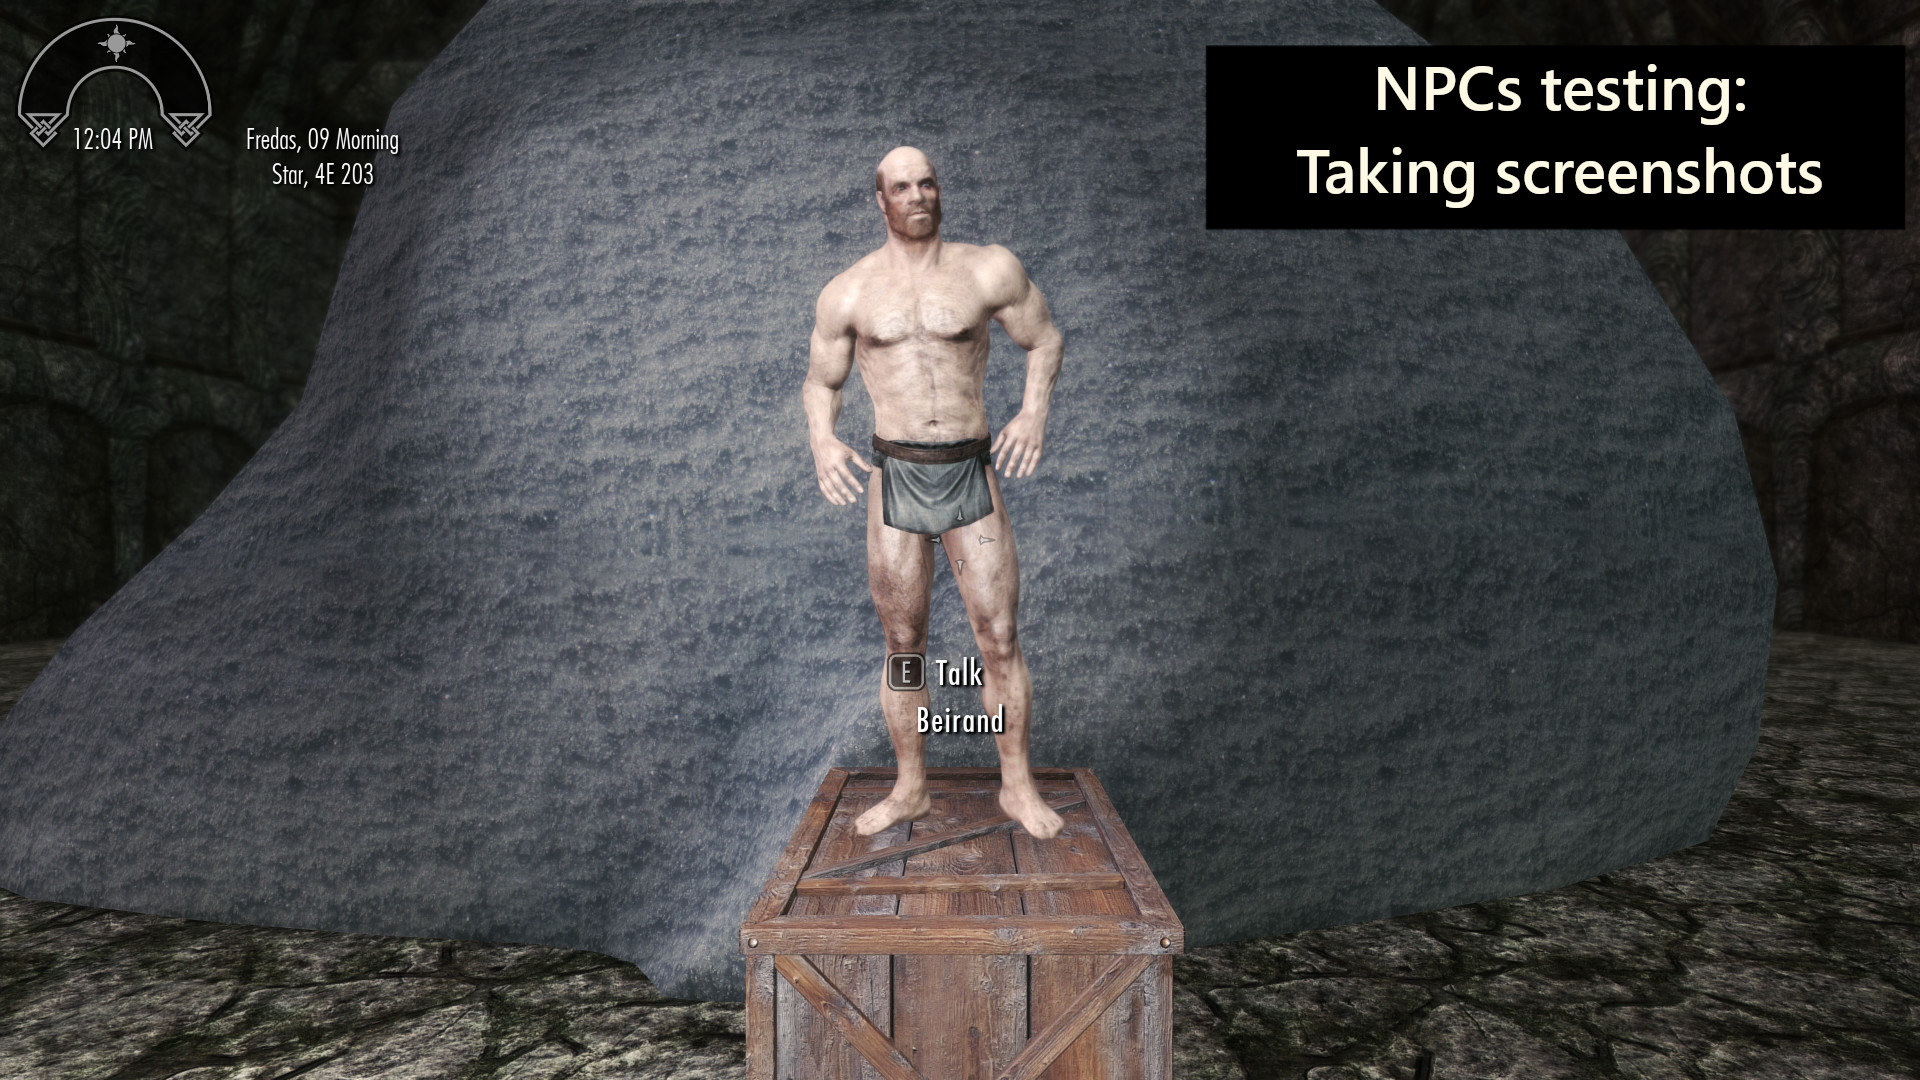
#### NPCs
The `NPCs` tests suite will take screenshots of NPCs without any inventory.
This is useful to later look at the screenshots to detect black faces, neck gaps, missing meshes, missing textures etc...
Screenshots are taken in the usual game directory, the same way they are taken with the `PrintScreen` key.
The test names used by this suite have the following format: `esp_name/form_id`.
The `form_id` part can be given either directly as decimal, or hexadecimal (in this case it is prefixed with `0x`).
For example: `skyrim.esm/78433` or `skyrim.esm/0x00013261` for the NPC named Beirand in Skyrim Special Edition.
A test run will:
1. Put the player in god mode (as some NPCs can be hostile or knock the Player).
2. Disable Combat AI, so that NPCs should not attack player.
3. Disable Non-combat AI, so that NPCs should not initiate actions.
4. Teleport the player to the test cell `AutoTest_TestHall`.
5. Summon a copy of the NPC to be tested in front of him, without any inventory.
6. Take a screenshot.
Example of Run file for this test, in `SKSE\Plugins\StorageUtilData\AutoTest_NPCs_Run.json`:
```json
{
"stringList": {
"tests_to_run": [
"skyrim.esm/78433",
"skyrim.esm/78434"
]
}
}
```
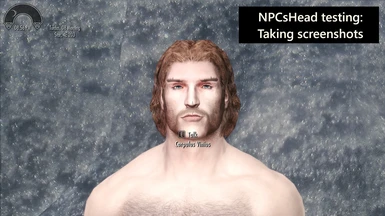
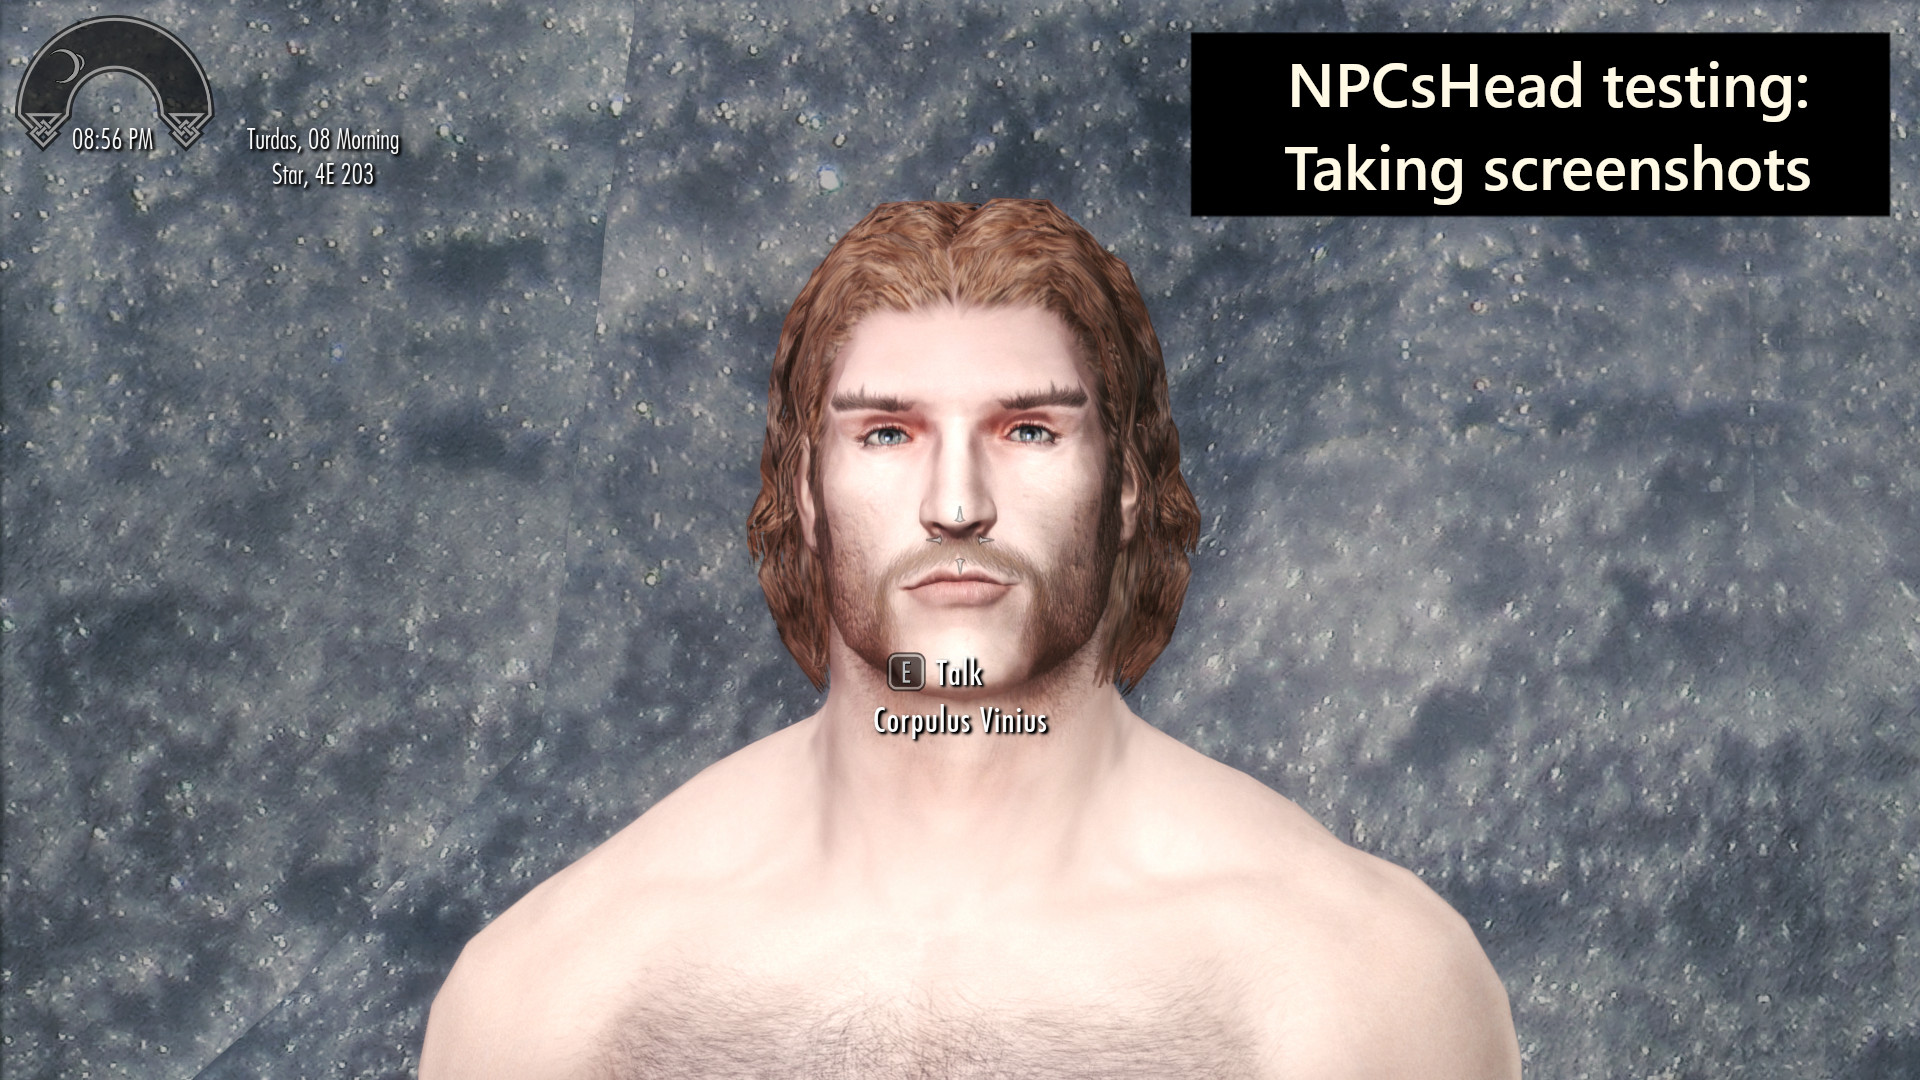
#### NPCsHead
The `NPCsHead` tests suite will take screenshots of NPCs' head without any inventory.
This is especially useful to detect neck gaps.
Screenshots are taken in the usual game directory, the same way they are taken with the `PrintScreen` key.
The test names used by this suite have the following format: `esp_name/form_id`.
The `form_id` part can be given either directly as decimal, or hexadecimal (in this case it is prefixed with `0x`).
For example: `skyrim.esm/78433` or `skyrim.esm/0x00013261` for the NPC named Beirand in Skyrim Special Edition.
A test run will:
1. Put the player in god mode (as some NPCs can be hostile or knock the Player).
2. Disable Combat AI, so that NPCs should not attack player.
3. Disable Non-combat AI, so that NPCs should not initiate actions.
4. Change fov to 20 (as it is much easier to detect neck seams this way).
5. Teleport the player to the test cell `AutoTest_TestHall`.
6. Summon a copy of the NPC to be tested in front of him, without any inventory.
7. Take a screenshot.
Example of Run file for this test, in `SKSE\Plugins\StorageUtilData\AutoTest_NPCsHead_Run.json`:
```json
{
"stringList": {
"tests_to_run": [
"skyrim.esm/78433",
"skyrim.esm/78434"
]
}
}
```
#### Locations
The `Locations` tests suite will teleport the player to a given location and make a small camera circle around.
This is useful to make sure that visiting this location does not result in a CTD.
The test names used by this suite have the following formats:
* `worldspace/x/y`. For example: `tamriel/10/6` to test the cell of coordinates (10, 6) in the `tamriel` worldspace.
* `cellname`. For example: `alftand01` to test the interior cell named `alftand01`.
A test run will:
1. Put the player in god mode (as teleporting can put the player in dangerous situations).
2. Teleport the player to the cell to be tested (using a `cow` or `coc` console command).
3. Set the camera in third-person view far away.
4. Make the camera perform a circle around the player for a few seconds.
Example of Run file for this test, in `SKSE\Plugins\StorageUtilData\AutoTest_Locations_Run.json`:
```json
{
"stringList": {
"tests_to_run": [
"Tamriel/17/20",
"DLC01SoulCairnOrigin",
"Tamriel/10/0",
"SolitudeBardsCollege"
]
}
}
```

The `Locations` tests can be configurable and accepts the following configuration options:
* `panoramic_time_secs`: Number of seconds (as a float in a string) taken by the test to make a quick panoramic turn around the player. Defaults to `"5.0"`.
Example of Config file for this tests suite, setting the panoramic time to 30 seconds, in `SKSE\Plugins\StorageUtilData\AutoTest_Locations_Config.json`:
```json
{
"string": {
"panoramic_time_secs": "30.0"
}
}
```
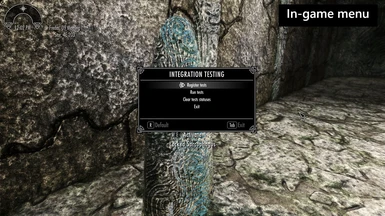
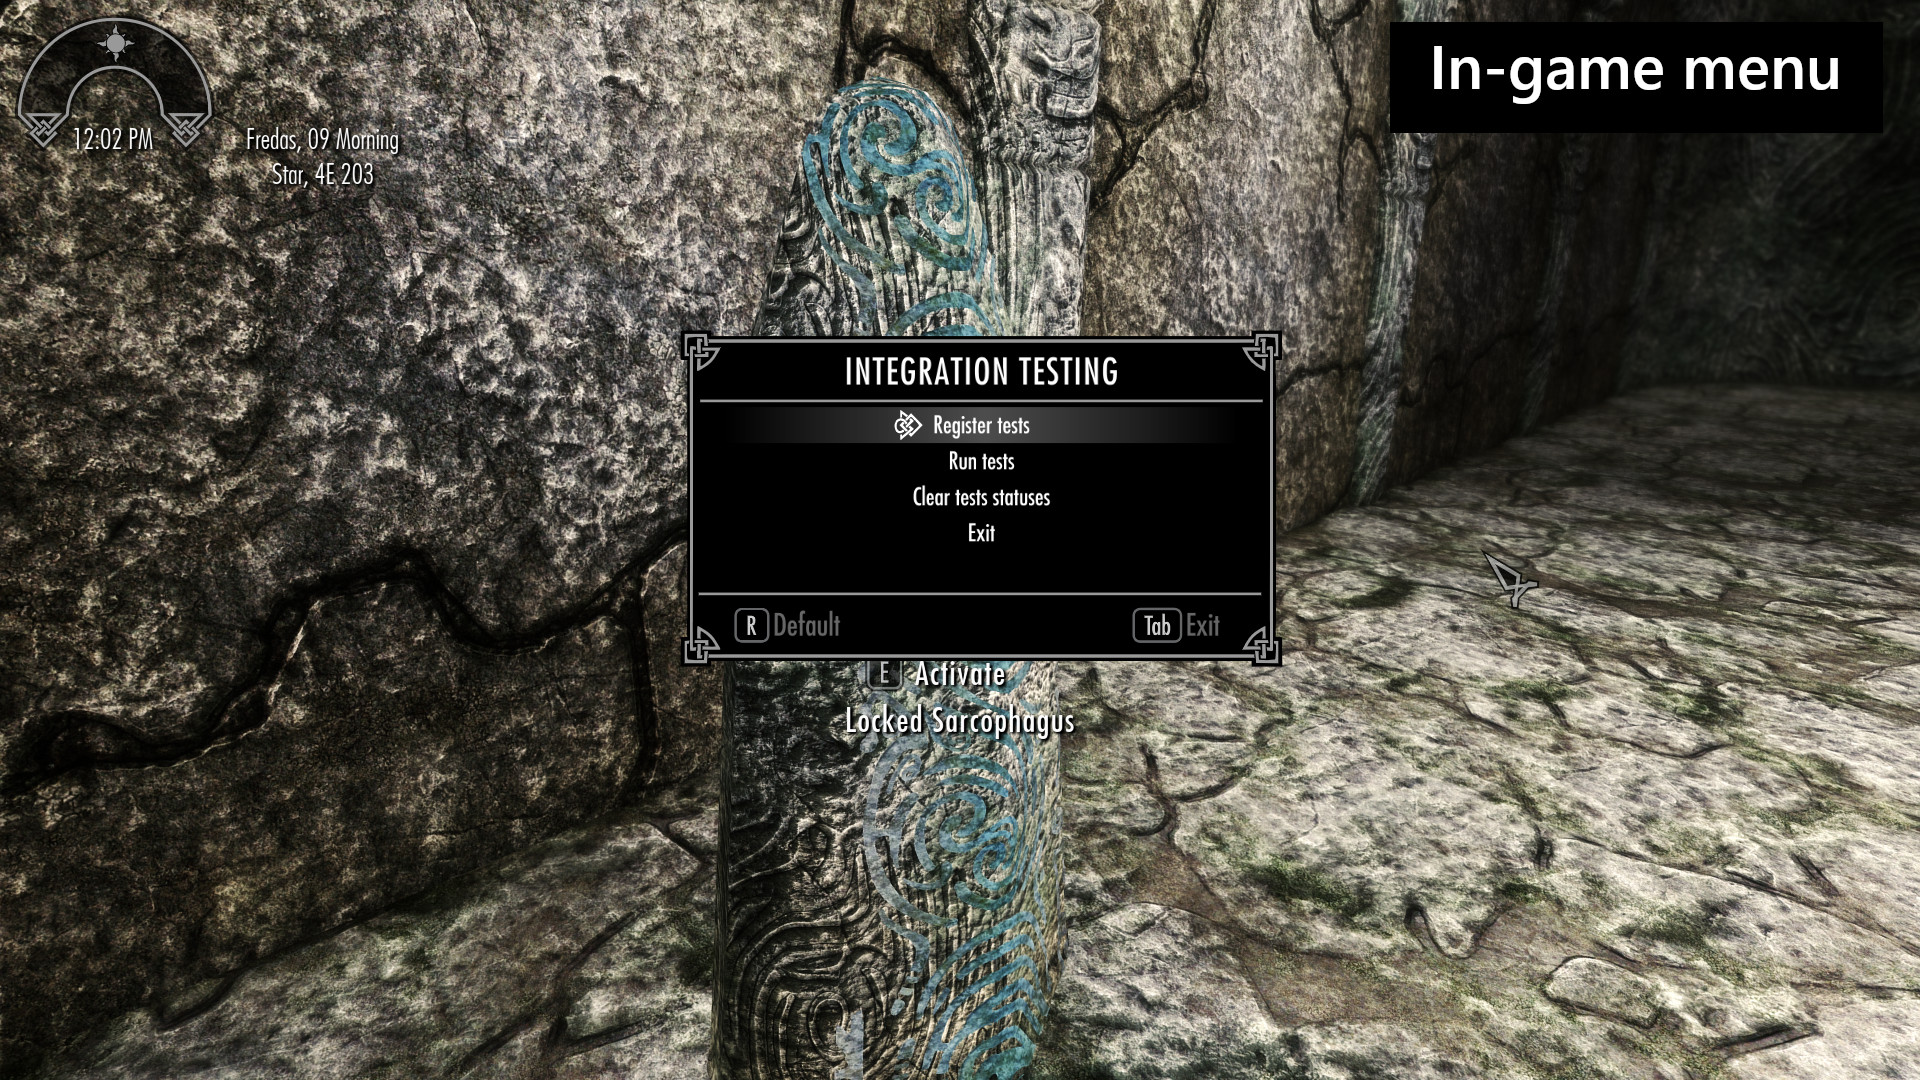
### The in-game menu
A small menu is accessible from a test cell, to register some pre-defined tests and run them.
To access this menu, you have to open the console with the `~` key and teleport to the test cell: `coc AutoTest_TestHall`. Once in the test cell you'll find a stone named `Locked Sarcophagus`. Activate it and the menu will appear.
### The console commands
Some console commands are available to pilot tests run:
* **`start_tests`**: Start the tests session. This will immediately trigger the run of all tests defined in Run lists that do not have yet the status `ok`.
* **`stop_tests`**: Stop the tests session. This will end the current test and stop the tests session.
### Running a tests session
When starting a tests session (either automatically on game load, or using console or the in-game menu), AutoTest will:
1. Mark the session as running in the main JSON config file (`"tests_execution": "run"`).
2. Create a save game named `auto_test`. This is useful to later get back to testing immediately using this save game.
3. Loop over all tests suites, and for each one get its list of tests to execute from the Run list JSON file.
4. Execute all tests that do not have an `ok` status, in the order of the Run list.
5. Mark the session as finished in the main JSON config file (`"tests_execution": "end"`).
6. Exit to desktop if the config file has `"on_stop": "exit"`.
The JSON files are being updated in real-time, so that an external process can use their information while the tests are being executed.
## Simple step-by-step how-to: Add 1 NPC test for J'Zargo + 2 Location tests around Whiterun exterior
This section explains the exact steps to perform 3 simple tests (1 NPC and 2 locations).
### 1. Create the tests run file for NPCs tests suite
Create a file named `SKSE\Plugins\StorageUtilData\AutoTest_NPCs_Run.json` in your game data folder, and edit it with a simple text editor, like Notepad.
*For Mod Organizer users*: You can create a new empty mod to put those JSON files. This way you keep your game data folder clean.
Here is the content to save in this file:
```json
{
"stringList": {
"tests_to_run": [
"skyrim.esm/0x0001C195"
]
}
}
```
In this example, the test name to be used for J'Zargo (`skyrim.esm/0x0001C195`) can be found using xEdit:
1. Execute xEdit, loading all your mods.
2. Right-click on the left pane and select `Apply filter`.
3. Check the check-box `Name contains` and enter `J'Zargo` in the text field below.
4. In the `by Record Signature` list (the middle-one), make sure `NPC_` is selected, then click on the `Filter` button.
5. In the results shown on the left pane, you see which plugins define or overwrite your NPC (in this case `skyrim.esm`), and if you expand the list you'll see the NPC's form ID (in this case `0001C195`).
6. The resulting test name to be used in the NPC test is just the concatenation of those 2 information, separated with `/`: `skyrim.esm/0x0001C195`.
### 2. Create the tests run file for Locations tests suite
Create another file named `SKSE\Plugins\StorageUtilData\AutoTest_Locations_Run.json` in your game data folder, and save it with the following content:
```json
{
"stringList": {
"tests_to_run": [
"WhiterunExterior01",
"Tamriel/2/-3"
]
}
}
```
The test names can be found again in xEdit: browse any mod you want to test, and check for the Worldspace node, showing cells (organized under the blocks/sub-blocks). If the cell has an EditorID (like `WhiterunExterior01`) you can use it directly as a test name. Every cell can also be targeted using a test name having the worldspace name (in this case `Tamriel`), followed by the cells coordinates (which are displayed by xEdit next to the EditorID column), separated by `/`. For example: test name `Tamriel/2/-3` will target the cell at coordinates `< 2, -3 >` from the `Tamriel` worldspace.
### 3. Run your game like you usually do
Make sure AutoTest mod is part of your game data folder (or enabled in Mod Organizer).
Load a saved game, or start a new game.
### 4. Run the tests from the game
To run the tests, open the console (`~` key) and type `start_tests` followed by Enter.
This will run the 3 tests: it will teleport your Player in a test cell and summon J'Zargo to take a screenshot, and then teleport your Player to the 2 locations to be tested near Whiterun and automatically perform some camera movement around.
### 5. Check NPCs tests results
Quit your game, and check the following file that has been generated by AutoTest in your game data folder: `SKSE\Plugins\StorageUtilData\AutoTest_NPCs_Statuses.json`
*For Mod Organizer users*: The file is certainly created in your Overwrite area the first time. You can move it into the mod you created earlier to store AutoTest JSON files.
The file should look like the following if the J'Zargo test has run successfully:
```json
{
"string" :
{
"skyrim.esm/115093" : "OK"
}
}
```
For this test you can also check the screenshot of J'Zargo that has been taken in your screenshots folder (defaults to your game folder: check the last file named `ScreenShotXXXX.png`).
### 6. Check Locations tests results
Check the following file that has been generated by AutoTest in your game data folder: `SKSE\Plugins\StorageUtilData\AutoTest_Locations_Statuses.json`. It should look like the following if the Whiterun tests ran successfully:
```json
{
"string" :
{
"WhiterunExterior01" : "OK",
"Tamriel/2/-3" : "OK"
}
}
```
If you don't have an `OK` status for some tests (or if lines are missing), it means those tests have failed to run correctly, or that they have not been run at all.
### 7. What next?
The in-game menu can register for you some tests to be run (it will generate the tests's run lists) (access this menu from the test hall, in the console type `coc AutoTest_TestHall`).
If you want to interrupt testing in the middle of a tests session, you can use the `stop_tests` console command anytime.
Check also the content of `SKSE\Plugins\StorageUtilData\AutoTest_Config.json` (see details in the previous sections) to automatically run the tests when game is loaded, and automatically quit the game when tests session is finished.
## Compatibility
This mod is compatible with all mods without conflict.
## Troubleshooting
Logs of execution are stored as Papyrus logs in files named `My Games/Skyrim Special Edition/Logs/Script/User/AutoTest.*.log`.
Here is an example of execution logs:
```
[11/18/2020 - 02:25:10PM] AutoTest log opened (PC)
[11/18/2020 - 02:25:10PM] Initialize tests from quest Quest used to attach scripts using Reference Aliases
[11/18/2020 - 02:25:10PM] Run tests from quest Quest used to attach scripts using Reference Aliases
[11/18/2020 - 02:25:10PM] Start running NPCs tests...
[11/18/2020 - 02:25:10PM] [ NPCs / skyrim.esm/78433 () ] - Start test
[11/18/2020 - 02:25:10PM] [ NPCs ] - [ Skyrim.esm/78433 ] - [ Start ] - Take screenshot of FormID 0x78433 (Beirand)
[11/18/2020 - 02:25:12PM] [ NPCs ] - [ Skyrim.esm/78433 ] - [ OK ] - Take screenshot of FormID 0x78433 (Beirand)
[11/18/2020 - 02:25:12PM] [ NPCs / skyrim.esm/78433 (OK) ] - Test end
[11/18/2020 - 02:25:12PM] [ NPCs / skyrim.esm/78434 () ] - Start test
[11/18/2020 - 02:25:13PM] [ NPCs ] - [ Skyrim.esm/78434 ] - [ Start ] - Take screenshot of FormID 0x78434 (Bjartur)
[11/18/2020 - 02:25:14PM] [ NPCs ] - [ Skyrim.esm/78434 ] - [ OK ] - Take screenshot of FormID 0x78434 (Bjartur)
[11/18/2020 - 02:25:15PM] [ NPCs / skyrim.esm/78434 (OK) ] - Test end
[11/18/2020 - 02:25:15PM] All NPCs tests run.
[11/18/2020 - 02:25:15PM] Start running Locations tests...
[11/18/2020 - 02:25:15PM] [ Locations / DLC2ApocryphaWorld/-2/6 () ] - Start test
[11/18/2020 - 02:25:15PM] [ Locations ] - [ Start ] - Testing location DLC2ApocryphaWorld -2, 6
[11/18/2020 - 02:25:22PM] [ Locations ] - Clean memory with PCB
[11/18/2020 - 02:25:22PM] [ Locations ] - [ OK ] - Testing location DLC2ApocryphaWorld -2, 6
[11/18/2020 - 02:25:22PM] [ Locations / DLC2ApocryphaWorld/-2/6 (OK) ] - Test end
[11/18/2020 - 02:25:22PM] [ Locations / Alftand01 () ] - Start test
[11/18/2020 - 02:25:22PM] [ Locations ] - [ Start ] - Testing cell Alftand01
[11/18/2020 - 02:25:38PM] [ Locations ] - [ OK ] - Testing cell Alftand01
[11/18/2020 - 02:25:38PM] [ Locations / Alftand01 (OK) ] - Test end
[11/18/2020 - 02:25:38PM] All Locations tests run.
[11/18/2020 - 02:25:39PM] End the tests session
[11/18/2020 - 02:25:39PM] Quit game as required at the end of the tests session
[11/18/2020 - 02:25:40PM] Log closed
```
Every log also appears in-game on the upper-left corner.
The ESP plugin defines:
* A new start quest and a new reference alias to be able to start tests upon game load.
* A new quest that references all the tests suites that are available, as attached scripts to a reference alias.
* A test cell named `AutoTest_TestHall` with some markers and an activator to run tests.
## Tools you can use with AutoTest
* [Modsvaskr](https://www.nexusmods.com/skyrimspecialedition/mods/42521): This command-line application is helping gamers making a heavy-modded game stable. It automates a lot of setup and tests, and will use AutoTest when such tests are required to be automated in-game.
* [AutoTest Worldspace Location Generator](https://github.com/KenR9001/AUTOTEST_Worldspace_Location_Generator/releases): This command-line application generates Locations tests' run list based on user input (worldspace and ranged coordinates). This way you can easily have a full tests run that covers an area of any worldspace.
## Developers corner
### Build a packaged version of AutoTest from the source
This can be achieved using the `build.cmd` tool, from a command-line session:
1. If the game directory is not the default one (standard Skyrim SSE installed via Steam), then set the `gameDir` variable to the game path.
Example:
```bat
set "gameDir=C:\My Games\Skyrim"
```
2. If PapyrusUtils is installed in another location than the game data path, set the `papyrusUtilDir` variable to its path.
Example:
```bat
set "PapyrusUtils=C:\My Mods\PapyrusUtils"
```
3. If ConsoleUtil is installed in another location than the game data path, set the `consoleUtilDir` variable to its path.
Example:
```bat
set "consoleUtilDir=C:\My Mods\ConsoleUtil"
```
4. If SkyUILib is installed in another location than the game data path, set the `skyUILibDir` variable to its path.
Example:
```bat
set "skyUILibDir=C:\My Mods\SkyUILib"
```
Please note that you may have to move the script sources of SkyUILib from `Scripts\Source` to `Source\Scripts` as their default location changed between Skyrim and Skyrim Special Edition.
5. You'll need [7-zip](https://www.7-zip.org/) to package AutoTest. If 7-zip is installed to a non-standard location, specify the path to 7-zip using the `sevenZipDir` variable.
Example:
```bat
set "sevenZipDir=C:\Programs\7zip"
```
6. You'll need [md_to_bbcode](https://github.com/Muriel-Salvan/md_to_bbcode) to generate documentation for NexusMods. Make sure it is installed (meaning that `md_to_bbcode --version` works).
7. Launch the `build.cmd` command from the root of the repository:
```bat
build.cmd
```
This will compile the Papyrus scripts and generate a packaged version of AutoTest in the file `AutoTest.7z`.
It will also generate a `README.bbcode` file which is a conversion of this `README.md` file in BBCode, ready to be copy-pasted in the NexusMod's description.
## Special thanks
* To [KenR9001](https://www.nexusmods.com/skyrimspecialedition/users/5534351) for providing the [AutoTest Worldspace Location Generator](https://github.com/KenR9001/AUTOTEST_Worldspace_Location_Generator/releases), making the usage of AutoTest much easier!
* To [WCH3](https://www.nexusmods.com/skyrimspecialedition/users/40320760) for helping in designing the NPCsHead tests suite.
## Contributions
Don't hesitate to fork the [Github repository](https://github.com/Muriel-Salvan/AutoTest) and contribute with Pull Requests.