


0 of 0


About this mod
Want the Diversity NPC overhauls bring to your game, but tired of black or grey faced NPCs. I will explain how to successfully merge as many overhauls as you like without getting the black face bug. While it isn't difficult to do, it does require consistency and a basic understanding of the tools and assets.
- Requirements
- Permissions and credits
Trouble shooting the Black face bug, go here
Because some of the NPC Overhauls may require the use of Tes5Edit/SSEedit/Xedit, this tutorial is not meant for Beginning Modders. While the use of Xedit is not strictly necassary, patching your game to the best of your ability is in your best interest and will help in creating a stable gaming environment. NPC patching can be done before the merge process with Xedit, during the merge process with the use of patches or after the merge process is finished, again with Xedit.
Patching prior to merging requires every NPC overhaul to be patched independently, and while more labor intensive to start with, it will only ever need to be patched once. Patching after will require additional patching everytime you recreate your Merge. The easiest option of course, is to use combination patches during the merge for any and all NPC overhauls in your merge.
This system is for Skyrim or Skyrim SE and Mod Organizer 2 users, though I am pretty sure it will work for any Bethesda game. While it may work with other mod managers, I can only vouch for results in Mod Organizer 2. What will be consistent across all mod managers is the setup of assets and esp load orders. The asset folders and the load order of the esps must stay consistent in any mod manager to avoid the black face bug. Also, be aware that this requires a 64bit capable mod manager as zEdit is a 64bit program.
I use Mod Organizer 2 and currently have 40 NPC overhauls, as well as 10 or so RS Children patches and even more High poly patches if I chose to include them. If I used patches for all of them, I could easily have over 60 esp slots used up on NPCs alone. Patches for USSEP, AI-Overhaul, Cutting Room Floor, and so on. So what to do? Simple. Merge them down to one esp. Is it difficult? No it really isn't. So long as you are careful and follow load order for both the assets and the esps, they will all turn out just fine. Be aware that multiple patches for the same overhaul will only use the last patch, regardless of whether you merge or not. Having a cutting room floor patch for Pan's NPCs followed by an AI-Overhaul patch also for Pan's NPCs, will only use the edits from the last patch, in this case AI-overhaul. So If you need multiple patches for a single mod, you will need to edit them with xedit, (Tes5Edit or SSEedit are also known as Xedit.) or alternatively, find the necessary combination patches. Only the last record for an npc is ever used, so multiple patches have multiple records for the same npc and therefore are overwritten by the lowest patch in the load order. It is the primary reason I generally patch a mod directly with xedit. You can often find combination patches for the more popular mods that have been around for awhile, but newer overhauls don't always come with premade patches so learning to use Xedit is a necessary part of modding.
A good patching source can be found below.
QUASIPC - Qwinn's Unified Automated Self Installing Patch Compendium. https://www.nexusmods.com/skyrimspecialedition/mods/18369
While not the only source of npc overhaul patches, it is the largest that I am aware of.
While zMerge can read an archive, I have always had the best success when using loose files during merging. I always unpack any npc overhauls that come in archives. Some of PoeticAnt44's NPC overhauls are archived, so I thought it best to mention here for the sake of clarity.
The first thing you need to know, is that load order for both the esps and the asset folders are extremely important. If you don't have your load orders consistent across all panels you will end up with the black face bug. I say all panels, because if you follow my directions, you will be creating a profile to use exlusively for merging NPC overhauls. That means that you will need to have consistency in two left hand panels as well as the right hand panel you are merging your esps in. Your two left hand panels would be your merge profile panel and your default gaming profile panel where you would normally play the game from.
The first thing you need to do is get zEdit if you don't already have it. Get the latest copy. You can get it here: https://github.com/z-edit/zedit/releases
zEdit was created by matortheeternal, and is the successor to Merge Plugins, also created by matortheeternal. Some people will already have merge plugins, but i don't recommend using it for NPC overhauls as I can't garantee the results, and it just doesn't have the versatility of zEdit\zMerge.
One of the beauties of zMerge and profiles is how easy it is to rebuild your merge. Don't like a particular overhaul, or you're swapping out AI-overhaul for Immersive Citizens and need to get rid of it's patches, simply rebuild your merge without the patches. Found a great overhaul and want to include it into your merge. Easy. Just include it and rebuild your merge.
I learned this system from the pages of Lexy's LOTD, DarkLadyLexy's Legacy of the Dragonborn. It totally revolutionized the way I mod, and while the system is virtually the same as the one they use, I will break it down a little more and explain the process so you can customize your npc overhaul to your liking successfully.
While you are at it, MO-2 users can download and install Hide Plugins: https://github.com/deorder/mo2-plugins/tree/1.0.1
A great little utility for hiding plugins after a merge. Can be set to use an optional folder or the mohidden feature in MO-2s settings icon under plugins. Then it is accessed through the tools icon for use. Note. the optional folder is case sensitive. Install it into your plugins folder of Mod Organizer 2. If MO-2 is still active, close it and restart.
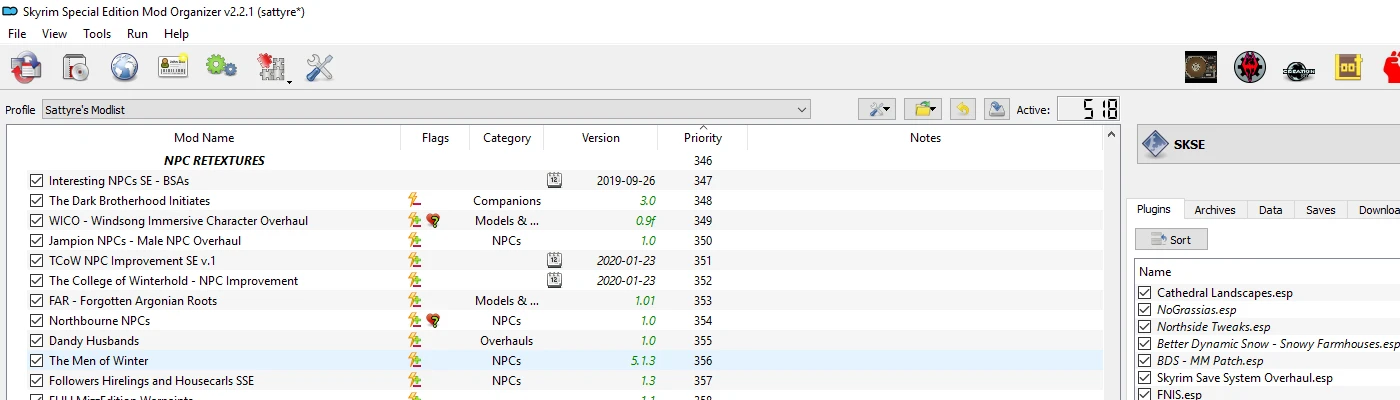
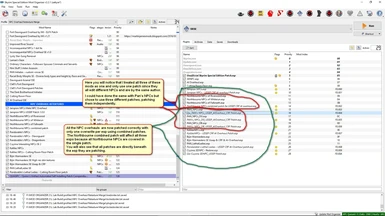
The next step is to order your NPC overhauls as you want them to appear in game. They should all be placed together under a titled Separator so they are easier to find and sort. If you like one particular mod author over another, place those ones lower in the list which gives them a higher priority. This is your asset load order. Asset load order is of particular importance with NPC overhauls as many NPCs will be covered by multiple overhauls and the assets from lower mods will overwrite the same assets in mods higher in the list.
This part of the setup is all about your preferences. What order you set them up in is all about you and what you like. Love a certain NPC overhaul? Place it at the bottom of your NPC overhaul list in the Left pane of MO-2. You can usually be sure that any NPC overhauls by the same author won't conflict, and so it won't matter what order they appear in. If an NPC overhaul comes prepatched for Ussep\Usleep, it is always the one I recommend getting. If you aren't using the Unofficial patch, you should be and I really can't recommend it strongly enough. Once you are done with sorting your NPC overhauls in the order you like, you are ready to continue. Just remember Left list is favorites at the bottom.
Now you can create a profile for your NPC Overhaul Retexture. In Profiles, copy your game profile and call it NPC Overhaul Retextures Merge. The reason to copy your game profile is simply to maintain you current asset load order or priority. Disable all mods that are not directly related to your NPC overhauls or npc patches and their master files. Just highlight them all, Right click and Disable selected will do the trick. USSEP, Cutting Room Floor and AI-overhaul are typical npc patch masters, though not the only ones, and will need to be active.
If you look at your right pane you should only see esps related to NPC overhauls, NPC patches and their masters. If you see other esp's deactivate them so you have only your necessary NPC esps. All your NPC esps need to be below any master files, and in exactly the same order as the NPC Assets in the left panel. Any patches for your npc overhauls need to be directly below the overhaul they are patching or you will get black faces. This mostly applies to the esps in the right pane, but because it is possible for a patch to have npc assets, make sure it also applies to the assets pane on the left.
NOTE: Forwarding NPCs to the front of the line.
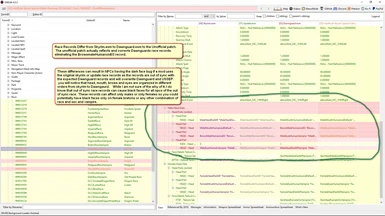
This is the stage where you can tweak your overhauls or just a few particular faces. If there are any NPC's you really like that end up being buried behind other overhauls, now is the time to bring them forward. It is quite easy to do in Xedit and is much better then deleting NPC records from mods with a higher priority. Lets take the NPC Enthir. In my own load order, Enthir is covered multiple times and the Enthir I want to use is 7 Enthirs back. Now I can do this one of two ways. I can delete the records and the facegen from all the mods ahead of the one I want, that is 6 records to delete and 12 facegen in 12 different folders in 6 different mods. or alternatively, I can forward the record for Enthir (Enthirs formid is 0001C19C) into a new esp and copy the facegen for Enthir from that same mod into the new one. (Facegen files are always the same as the formids, in this case 0001C19C.nif and 0001C19C.dds) So delete 18 files or forward 3.
Forwarding the files has a further benefit of not touching the other NPC overhauls. Any time you update or reinstall an npc overhaul, anything you did to it is undone. But if you forward the NPCs to a new esp you can update to your heart's content and not touch those files. You can forward as many npc records as you want into a single esp. It doesn't matter what mods they come from, all the records can go into one esp. The Facegen files are mostly the same. You can put all of them into the one mod, but they MUST follow the original folder tree. So Meshes must follow the meshes folder tree that ends in a name with .esm such as Skyrim.esm or Dawnguard.esm, Hearthfire.esm or Dragonborn.esm. This applies to Textures as well. They too must follow their original texture path ending in Skyrim.esm or Dawnguard.esm, Hearthfire.esm or Dragonborn.esm. All vanilla npcs come from one of those folders. Newly modded NPCs can also be forwarded the same, but their last folder may be a .esp instead. (An example would be 3DNPC.esp). All NPC records contain the data they need to find the assets they rely on so only the two facetint or facegen files starting with the npc formid is required to be forwarded. (In addition to the actual record itself.)
In Xedit, Forwarding the record you want consists of going into the "Non-Player Character (Actor)" data tab and right clicking on the formid record you want to forward and clicking "copy as over-ride". You will get a list of your mods. Scroll down to the end and select "new", click enter. It will ask you to name the esp. Give it an appropriate name and hit enter. done. Move the newly created esp into a mod folder and copy the npc facegen consisting of one .nif and one .dds file into that same folder. In the example above, this was : 0001C19C.nif and 0001C19C.dds. Make sure you maintain the folder file structure as mentioned above.
Your new NPC mod may then be positioned in all three panes of MO-2 in it's correct position so it is overwriting the mods above it. This is effectively a new mod, but it does still depend on it's parent mods for additional assets such as eyes, brows and hair.
NOTE: Make sure you Click on the backup buttons in both the left and right panes of MO-2 so it remembers both load orders, otherwise you will have to redo your load order whenever you want to rebuild your merge.
NOTE: Remember that any load order of assets and esps must be reflected in all three panes. Left assets pane of your game profile and both the left assets and right esp panes of your Retexture profile.
Click on zEdit and it will bring you to the main window. Change the drop down zEdit so it reads zMerge. Make sure the game dropdown is pointing to the game you want. (Skyrim or Skyrim SE) Click on the start button.
At the top right of the next page, you will see three cubes, a gear icon, and a question mark. Click on the gear icon and open it.
click on Integration settings. Make sure that the dropdown boxes on the right are all pointing to the appropriate folders or instance. It should read from top to bottom
1: Mod Manager - should say Mod Organizer 2 or your appropriate mod manager if you aren't a MO-2 user.
2: MO-2 instance - Mine says portable, but if you set up MO to use instances it may read as the name you named your MO instance at setup.
3: Mod Manager Path - this needs to point to the folder that has your Mod Organizer.exe
4: Mod Manager mods path - this needs to point to the folder that Mod Organizer places your mods in. By default this is \Mod Organizer\Mods.
Click on Merge Settings.
Merge output path - should be the same folder as 4 above, the Mod Manager Mods path
Under the Integrations title bar, make sure only the box beside "Disable plugins" is checked
click OK.
You are now at the main merge window. At the bottom of the window click Create Merge.
In the details tab, highlight New Merge and type - NPC Overhaul Retexture Merge - .
change the merge method to read, Clean - Merge down (improved)
Open the plugins tab and you will see all your NPC esps and masters. Highlight only the NPC overhauls and any patches and click on toggle selected. Make sure no master files are checked.
Note: If one of your esps won't accept a checkmark, it is probably because it is missing a master file. You will have to close zMerge and activate the correct master file in your assets pane and\or the esp pane and then reopen zMerge.
Open the Load order tab and place a check mark on "use game load order"
Open the Data tab and make sure Handle NPC voice data is checked. No other actions are required in this tab.
Click ok.
You will now see your merge details in a box in the window.
In the top right corner you will see three buttons. Build Edit Delete.
Press the build button and wait for zMerge to create your build.
Do NOT delete the merge when it is done. X out of zMerge.
Go to your game profile and click on the tools icon at the top of the left pane, Not the one at the top of Mod Organizer, and click refresh. Scoll to the bottom of the Left pane and you will see your new NPC Overhaul merge. Activate it and place it either at the bottom of your NPC List or alternatively, at the bottom of your Mod list. This merged esp should stay very close to the bottom of your load order. With a list of 563 active esp's, esl's and esm's my npc merge has a priority of 487 I then edit it with xedit to patch for USSEP, Cutting Room Floor and any other patching it requires and my final merged patch sits at 558 of 563 esps. This will of course depend on your own load order, but normally it should be within around 10 esp slots of the bottom.
Now it is time to use Hide Plugins. Go up to the puzzle icon at the top of MO-2 and left click. Scroll down to hide plugins and left click again. You should now see a box with your NPC Overhaul retexture merge. Right click on it and select disable. This will hide all the esp's merged into your NPC Overhaul Retexture merge while still keeping the assets active. This last part is very important. Deactivating the assets for your merge will give you the black face bug. Happily this is fixed simply by reactivating the affected mods.
You are now done. Enjoy your merged NPCs.
If and when you want to rebuild your merge, simply unhide all the esps associated with your merge and switch to your Merge profile. You may have to hit the esp panes, restore backup button to return your esp's to the proper order.
TROUBLESHOOTING.
There are several possiblities as to why people get the black/greyface bug. Probably the most common reason is load order/asset order conflicts.
Load order. Mod A has Aela as an NPC. Mod B also has Aela. Mod A's assets load before Mod B's assets, meaning that Mod B's Aela overwrites the assets of Aela in mod A. Now we move over to esp load order. Mod B's esp loads before mod A's esp, so mod A overwrites, mod B, including Mod B's Aela. So now I have assets from mod B, but facegen information from mod A's esp and a black face on Aela. Asset and esp load order matters. As long as assets and esp's are overwriting in sequence, it doesn't matter how many Aela's there are in 100 mods. Only the last one is ever used.
The solution to this is to make the left pane assets and the right pane esp's mirror each other so that Mod A's assets are first in line and Mod A's esp is also first in line. Mod B would be second in both panes, Mod C would be third, etc. Any patch for mod A need to come directly after Mod A's esp, but is still considered Mod A
Patch Placement: Mod patches often have face data for npcs. Any patch containing such data needs to be above the NPC overhaul merge.esp if it isn't already inside of the merge. If you use a bashed or a smashed patch, these can also contain facegen data. Normally smash does a pretty good job with patching NPC overhauls, but it doesn't always get it right. I verify any data in the NPC tabs of both Bash and smash and edit as required. If you continue to have issues with Bash and smash, you can, "copy as over-ride with overwriting," the entire content of your npc tab from the merge into the bashed or smashed patch, which ever is lowest in the load order.
Asset overwrites. This is also a common cause of the black face bug and is very much related to the load order issue above, with some differences. There are many types of assets used in mods, and while some of those assets may be used by NPC overhauls, they are not limited to NPC overhauls. So assets from a mod that change your characters mustache may conflict with an NPC overhaul and overwrite some NPC assets causing the black face bug on some NPCs.
The solution is to move the offending mod above the NPC overhauls so it is no longer overwriting them. Another alternative is to archive the offending mod into a .bsa as loose files alway overwrite archived files. Or alternatively deleting or disabling the offending mod. The conflicts tab in your various NPC overhauls will tell you which files are being overwritten by or are overwriting another mod.
File corruption. File corruption also causes black face bug. Usually it is a simple matter of reinstalling the mod, though sometimes the source file is corrupted and requires a fresh download and reinstall. If there are no file conflicts and load orders are good, this is likely the cause and the easiest to verify. This seems to be much more common for SSD users.
Race Records. Less common causes of the black face bug can come from other sources including race records. If you get black faces and you can't find a cause, this could be the culprit. Race Records from the skyrim esp are different then the race records from the Dawnguard esp. Most of it is the same, but head parts can be different, and because NPCs are relying on records to be in a certain order, when npc's are looking for head parts from Dawngaurd but getting skyrim headparts, it can cause the black face bug. This type of black face bug affects all npcs of a certain race and or sex. If only female breton vampires have the black face bug then this is likely the source. Race records causing the black face bug can affect any race and can affect both male and females seperately. It is possible to have the black face bug on any combination of race and sex and also includes vampires, both male and female. Any mod that alters or contains race records could potentially be the cause of this. Possible fixes are updating the responsible mod or forwarding the apropriate records from USSEP or Dawnguard. It is always recommended that the Mod author fix these kinds of errors.
Now that you have read and hopefully understand the issues causing blackface and how to avoid them, I would recommend focustense's EasyNPC if you use any amount of NPC overhauls. It makes picking which NPC you want to use from Multiple overhauls much easier.
Thanks to all the Modders out there who keep giving us new content.
GamerPoet for his fantastic tutorials
Lexy's LOTD for the fantastic guide. You guys taught me so much.
Tannin and the Developers @ Mod Organizer 2. Wow what an absolutely delightful and powerful tool. Everything I never even knew I wanted.
Elminster, Sharlikran, sheson and company for Xedit. Where would we be without you guys.
The USSEP team for fixing all the bugs Bethesda didn't.
All the Developers hanging out on discord answering questions, there are far too many of you to name.
matortheeternal Thanks for the great tools. zEdit, Mator Smash. Skyrim would be less without you.
Pandorable for her great NPC overhauls and her understanding when I mess up.
wellden for his patience and great insights.
Bethesda
Nexus and all the members for a great community.
Other mods by sattyre:
Unofficial Skyrim Modder's Patch - USMP SE
Unofficial Skyrim Modders Patch - USMP Patch Emporium
sattyre's patch and esp replacer collection
Various Mystic Condensor Patches
Tharash Dol - Orc Stronghold and Player Home
Paarthurnax Choices plus3
Hi-Resgar - High Hrothgar in HD
RDO - Infinite Gold for Merchants Patch
Merging NPC Overhauls made easy.
A Novice Guide to Modding
TM Thalmor Overhaul SSE
Another Whiterun Patch SE
College Students SE
Whiterun house foundations
Because some of the NPC Overhauls may require the use of Tes5Edit/SSEedit/Xedit, this tutorial is not meant for Beginning Modders. While the use of Xedit is not strictly necassary, patching your game to the best of your ability is in your best interest and will help in creating a stable gaming environment. NPC patching can be done before the merge process with Xedit, during the merge process with the use of patches or after the merge process is finished, again with Xedit.
Patching prior to merging requires every NPC overhaul to be patched independently, and while more labor intensive to start with, it will only ever need to be patched once. Patching after will require additional patching everytime you recreate your Merge. The easiest option of course, is to use combination patches during the merge for any and all NPC overhauls in your merge.
This system is for Skyrim or Skyrim SE and Mod Organizer 2 users, though I am pretty sure it will work for any Bethesda game. While it may work with other mod managers, I can only vouch for results in Mod Organizer 2. What will be consistent across all mod managers is the setup of assets and esp load orders. The asset folders and the load order of the esps must stay consistent in any mod manager to avoid the black face bug. Also, be aware that this requires a 64bit capable mod manager as zEdit is a 64bit program.
I use Mod Organizer 2 and currently have 40 NPC overhauls, as well as 10 or so RS Children patches and even more High poly patches if I chose to include them. If I used patches for all of them, I could easily have over 60 esp slots used up on NPCs alone. Patches for USSEP, AI-Overhaul, Cutting Room Floor, and so on. So what to do? Simple. Merge them down to one esp. Is it difficult? No it really isn't. So long as you are careful and follow load order for both the assets and the esps, they will all turn out just fine. Be aware that multiple patches for the same overhaul will only use the last patch, regardless of whether you merge or not. Having a cutting room floor patch for Pan's NPCs followed by an AI-Overhaul patch also for Pan's NPCs, will only use the edits from the last patch, in this case AI-overhaul. So If you need multiple patches for a single mod, you will need to edit them with xedit, (Tes5Edit or SSEedit are also known as Xedit.) or alternatively, find the necessary combination patches. Only the last record for an npc is ever used, so multiple patches have multiple records for the same npc and therefore are overwritten by the lowest patch in the load order. It is the primary reason I generally patch a mod directly with xedit. You can often find combination patches for the more popular mods that have been around for awhile, but newer overhauls don't always come with premade patches so learning to use Xedit is a necessary part of modding.
A good patching source can be found below.
QUASIPC - Qwinn's Unified Automated Self Installing Patch Compendium. https://www.nexusmods.com/skyrimspecialedition/mods/18369
While not the only source of npc overhaul patches, it is the largest that I am aware of.
While zMerge can read an archive, I have always had the best success when using loose files during merging. I always unpack any npc overhauls that come in archives. Some of PoeticAnt44's NPC overhauls are archived, so I thought it best to mention here for the sake of clarity.
The first thing you need to know, is that load order for both the esps and the asset folders are extremely important. If you don't have your load orders consistent across all panels you will end up with the black face bug. I say all panels, because if you follow my directions, you will be creating a profile to use exlusively for merging NPC overhauls. That means that you will need to have consistency in two left hand panels as well as the right hand panel you are merging your esps in. Your two left hand panels would be your merge profile panel and your default gaming profile panel where you would normally play the game from.
The first thing you need to do is get zEdit if you don't already have it. Get the latest copy. You can get it here: https://github.com/z-edit/zedit/releases
zEdit was created by matortheeternal, and is the successor to Merge Plugins, also created by matortheeternal. Some people will already have merge plugins, but i don't recommend using it for NPC overhauls as I can't garantee the results, and it just doesn't have the versatility of zEdit\zMerge.
One of the beauties of zMerge and profiles is how easy it is to rebuild your merge. Don't like a particular overhaul, or you're swapping out AI-overhaul for Immersive Citizens and need to get rid of it's patches, simply rebuild your merge without the patches. Found a great overhaul and want to include it into your merge. Easy. Just include it and rebuild your merge.
I learned this system from the pages of Lexy's LOTD, DarkLadyLexy's Legacy of the Dragonborn. It totally revolutionized the way I mod, and while the system is virtually the same as the one they use, I will break it down a little more and explain the process so you can customize your npc overhaul to your liking successfully.
While you are at it, MO-2 users can download and install Hide Plugins: https://github.com/deorder/mo2-plugins/tree/1.0.1
A great little utility for hiding plugins after a merge. Can be set to use an optional folder or the mohidden feature in MO-2s settings icon under plugins. Then it is accessed through the tools icon for use. Note. the optional folder is case sensitive. Install it into your plugins folder of Mod Organizer 2. If MO-2 is still active, close it and restart.
The next step is to order your NPC overhauls as you want them to appear in game. They should all be placed together under a titled Separator so they are easier to find and sort. If you like one particular mod author over another, place those ones lower in the list which gives them a higher priority. This is your asset load order. Asset load order is of particular importance with NPC overhauls as many NPCs will be covered by multiple overhauls and the assets from lower mods will overwrite the same assets in mods higher in the list.
This part of the setup is all about your preferences. What order you set them up in is all about you and what you like. Love a certain NPC overhaul? Place it at the bottom of your NPC overhaul list in the Left pane of MO-2. You can usually be sure that any NPC overhauls by the same author won't conflict, and so it won't matter what order they appear in. If an NPC overhaul comes prepatched for Ussep\Usleep, it is always the one I recommend getting. If you aren't using the Unofficial patch, you should be and I really can't recommend it strongly enough. Once you are done with sorting your NPC overhauls in the order you like, you are ready to continue. Just remember Left list is favorites at the bottom.
Now you can create a profile for your NPC Overhaul Retexture. In Profiles, copy your game profile and call it NPC Overhaul Retextures Merge. The reason to copy your game profile is simply to maintain you current asset load order or priority. Disable all mods that are not directly related to your NPC overhauls or npc patches and their master files. Just highlight them all, Right click and Disable selected will do the trick. USSEP, Cutting Room Floor and AI-overhaul are typical npc patch masters, though not the only ones, and will need to be active.
If you look at your right pane you should only see esps related to NPC overhauls, NPC patches and their masters. If you see other esp's deactivate them so you have only your necessary NPC esps. All your NPC esps need to be below any master files, and in exactly the same order as the NPC Assets in the left panel. Any patches for your npc overhauls need to be directly below the overhaul they are patching or you will get black faces. This mostly applies to the esps in the right pane, but because it is possible for a patch to have npc assets, make sure it also applies to the assets pane on the left.
NOTE: Forwarding NPCs to the front of the line.
This is the stage where you can tweak your overhauls or just a few particular faces. If there are any NPC's you really like that end up being buried behind other overhauls, now is the time to bring them forward. It is quite easy to do in Xedit and is much better then deleting NPC records from mods with a higher priority. Lets take the NPC Enthir. In my own load order, Enthir is covered multiple times and the Enthir I want to use is 7 Enthirs back. Now I can do this one of two ways. I can delete the records and the facegen from all the mods ahead of the one I want, that is 6 records to delete and 12 facegen in 12 different folders in 6 different mods. or alternatively, I can forward the record for Enthir (Enthirs formid is 0001C19C) into a new esp and copy the facegen for Enthir from that same mod into the new one. (Facegen files are always the same as the formids, in this case 0001C19C.nif and 0001C19C.dds) So delete 18 files or forward 3.
Forwarding the files has a further benefit of not touching the other NPC overhauls. Any time you update or reinstall an npc overhaul, anything you did to it is undone. But if you forward the NPCs to a new esp you can update to your heart's content and not touch those files. You can forward as many npc records as you want into a single esp. It doesn't matter what mods they come from, all the records can go into one esp. The Facegen files are mostly the same. You can put all of them into the one mod, but they MUST follow the original folder tree. So Meshes must follow the meshes folder tree that ends in a name with .esm such as Skyrim.esm or Dawnguard.esm, Hearthfire.esm or Dragonborn.esm. This applies to Textures as well. They too must follow their original texture path ending in Skyrim.esm or Dawnguard.esm, Hearthfire.esm or Dragonborn.esm. All vanilla npcs come from one of those folders. Newly modded NPCs can also be forwarded the same, but their last folder may be a .esp instead. (An example would be 3DNPC.esp). All NPC records contain the data they need to find the assets they rely on so only the two facetint or facegen files starting with the npc formid is required to be forwarded. (In addition to the actual record itself.)
In Xedit, Forwarding the record you want consists of going into the "Non-Player Character (Actor)" data tab and right clicking on the formid record you want to forward and clicking "copy as over-ride". You will get a list of your mods. Scroll down to the end and select "new", click enter. It will ask you to name the esp. Give it an appropriate name and hit enter. done. Move the newly created esp into a mod folder and copy the npc facegen consisting of one .nif and one .dds file into that same folder. In the example above, this was : 0001C19C.nif and 0001C19C.dds. Make sure you maintain the folder file structure as mentioned above.
Your new NPC mod may then be positioned in all three panes of MO-2 in it's correct position so it is overwriting the mods above it. This is effectively a new mod, but it does still depend on it's parent mods for additional assets such as eyes, brows and hair.
NOTE: Make sure you Click on the backup buttons in both the left and right panes of MO-2 so it remembers both load orders, otherwise you will have to redo your load order whenever you want to rebuild your merge.
NOTE: Remember that any load order of assets and esps must be reflected in all three panes. Left assets pane of your game profile and both the left assets and right esp panes of your Retexture profile.
Click on zEdit and it will bring you to the main window. Change the drop down zEdit so it reads zMerge. Make sure the game dropdown is pointing to the game you want. (Skyrim or Skyrim SE) Click on the start button.
At the top right of the next page, you will see three cubes, a gear icon, and a question mark. Click on the gear icon and open it.
click on Integration settings. Make sure that the dropdown boxes on the right are all pointing to the appropriate folders or instance. It should read from top to bottom
1: Mod Manager - should say Mod Organizer 2 or your appropriate mod manager if you aren't a MO-2 user.
2: MO-2 instance - Mine says portable, but if you set up MO to use instances it may read as the name you named your MO instance at setup.
3: Mod Manager Path - this needs to point to the folder that has your Mod Organizer.exe
4: Mod Manager mods path - this needs to point to the folder that Mod Organizer places your mods in. By default this is \Mod Organizer\Mods.
Click on Merge Settings.
Merge output path - should be the same folder as 4 above, the Mod Manager Mods path
Under the Integrations title bar, make sure only the box beside "Disable plugins" is checked
click OK.
You are now at the main merge window. At the bottom of the window click Create Merge.
In the details tab, highlight New Merge and type - NPC Overhaul Retexture Merge - .
change the merge method to read, Clean - Merge down (improved)
Open the plugins tab and you will see all your NPC esps and masters. Highlight only the NPC overhauls and any patches and click on toggle selected. Make sure no master files are checked.
Note: If one of your esps won't accept a checkmark, it is probably because it is missing a master file. You will have to close zMerge and activate the correct master file in your assets pane and\or the esp pane and then reopen zMerge.
Open the Load order tab and place a check mark on "use game load order"
Open the Data tab and make sure Handle NPC voice data is checked. No other actions are required in this tab.
Click ok.
You will now see your merge details in a box in the window.
In the top right corner you will see three buttons. Build Edit Delete.
Press the build button and wait for zMerge to create your build.
Do NOT delete the merge when it is done. X out of zMerge.
Go to your game profile and click on the tools icon at the top of the left pane, Not the one at the top of Mod Organizer, and click refresh. Scoll to the bottom of the Left pane and you will see your new NPC Overhaul merge. Activate it and place it either at the bottom of your NPC List or alternatively, at the bottom of your Mod list. This merged esp should stay very close to the bottom of your load order. With a list of 563 active esp's, esl's and esm's my npc merge has a priority of 487 I then edit it with xedit to patch for USSEP, Cutting Room Floor and any other patching it requires and my final merged patch sits at 558 of 563 esps. This will of course depend on your own load order, but normally it should be within around 10 esp slots of the bottom.
Now it is time to use Hide Plugins. Go up to the puzzle icon at the top of MO-2 and left click. Scroll down to hide plugins and left click again. You should now see a box with your NPC Overhaul retexture merge. Right click on it and select disable. This will hide all the esp's merged into your NPC Overhaul Retexture merge while still keeping the assets active. This last part is very important. Deactivating the assets for your merge will give you the black face bug. Happily this is fixed simply by reactivating the affected mods.
You are now done. Enjoy your merged NPCs.
If and when you want to rebuild your merge, simply unhide all the esps associated with your merge and switch to your Merge profile. You may have to hit the esp panes, restore backup button to return your esp's to the proper order.
TROUBLESHOOTING.
There are several possiblities as to why people get the black/greyface bug. Probably the most common reason is load order/asset order conflicts.
Load order. Mod A has Aela as an NPC. Mod B also has Aela. Mod A's assets load before Mod B's assets, meaning that Mod B's Aela overwrites the assets of Aela in mod A. Now we move over to esp load order. Mod B's esp loads before mod A's esp, so mod A overwrites, mod B, including Mod B's Aela. So now I have assets from mod B, but facegen information from mod A's esp and a black face on Aela. Asset and esp load order matters. As long as assets and esp's are overwriting in sequence, it doesn't matter how many Aela's there are in 100 mods. Only the last one is ever used.
The solution to this is to make the left pane assets and the right pane esp's mirror each other so that Mod A's assets are first in line and Mod A's esp is also first in line. Mod B would be second in both panes, Mod C would be third, etc. Any patch for mod A need to come directly after Mod A's esp, but is still considered Mod A
Patch Placement: Mod patches often have face data for npcs. Any patch containing such data needs to be above the NPC overhaul merge.esp if it isn't already inside of the merge. If you use a bashed or a smashed patch, these can also contain facegen data. Normally smash does a pretty good job with patching NPC overhauls, but it doesn't always get it right. I verify any data in the NPC tabs of both Bash and smash and edit as required. If you continue to have issues with Bash and smash, you can, "copy as over-ride with overwriting," the entire content of your npc tab from the merge into the bashed or smashed patch, which ever is lowest in the load order.
Asset overwrites. This is also a common cause of the black face bug and is very much related to the load order issue above, with some differences. There are many types of assets used in mods, and while some of those assets may be used by NPC overhauls, they are not limited to NPC overhauls. So assets from a mod that change your characters mustache may conflict with an NPC overhaul and overwrite some NPC assets causing the black face bug on some NPCs.
The solution is to move the offending mod above the NPC overhauls so it is no longer overwriting them. Another alternative is to archive the offending mod into a .bsa as loose files alway overwrite archived files. Or alternatively deleting or disabling the offending mod. The conflicts tab in your various NPC overhauls will tell you which files are being overwritten by or are overwriting another mod.
File corruption. File corruption also causes black face bug. Usually it is a simple matter of reinstalling the mod, though sometimes the source file is corrupted and requires a fresh download and reinstall. If there are no file conflicts and load orders are good, this is likely the cause and the easiest to verify. This seems to be much more common for SSD users.
Race Records. Less common causes of the black face bug can come from other sources including race records. If you get black faces and you can't find a cause, this could be the culprit. Race Records from the skyrim esp are different then the race records from the Dawnguard esp. Most of it is the same, but head parts can be different, and because NPCs are relying on records to be in a certain order, when npc's are looking for head parts from Dawngaurd but getting skyrim headparts, it can cause the black face bug. This type of black face bug affects all npcs of a certain race and or sex. If only female breton vampires have the black face bug then this is likely the source. Race records causing the black face bug can affect any race and can affect both male and females seperately. It is possible to have the black face bug on any combination of race and sex and also includes vampires, both male and female. Any mod that alters or contains race records could potentially be the cause of this. Possible fixes are updating the responsible mod or forwarding the apropriate records from USSEP or Dawnguard. It is always recommended that the Mod author fix these kinds of errors.
Now that you have read and hopefully understand the issues causing blackface and how to avoid them, I would recommend focustense's EasyNPC if you use any amount of NPC overhauls. It makes picking which NPC you want to use from Multiple overhauls much easier.
Thanks to all the Modders out there who keep giving us new content.
GamerPoet for his fantastic tutorials
Lexy's LOTD for the fantastic guide. You guys taught me so much.
Tannin and the Developers @ Mod Organizer 2. Wow what an absolutely delightful and powerful tool. Everything I never even knew I wanted.
Elminster, Sharlikran, sheson and company for Xedit. Where would we be without you guys.
The USSEP team for fixing all the bugs Bethesda didn't.
All the Developers hanging out on discord answering questions, there are far too many of you to name.
matortheeternal Thanks for the great tools. zEdit, Mator Smash. Skyrim would be less without you.
Pandorable for her great NPC overhauls and her understanding when I mess up.
wellden for his patience and great insights.
Bethesda
Nexus and all the members for a great community.
Other mods by sattyre:
Unofficial Skyrim Modder's Patch - USMP SE
Unofficial Skyrim Modders Patch - USMP Patch Emporium
sattyre's patch and esp replacer collection
Various Mystic Condensor Patches
Tharash Dol - Orc Stronghold and Player Home
Paarthurnax Choices plus3
Hi-Resgar - High Hrothgar in HD
RDO - Infinite Gold for Merchants Patch
Merging NPC Overhauls made easy.
A Novice Guide to Modding
TM Thalmor Overhaul SSE
Another Whiterun Patch SE
College Students SE
Whiterun house foundations