


Credit goes to: (V)(;,,,;)(V)
Step 1 - Install the Prerequisites
You’re going to want to download the required mods listed on the Nexus page.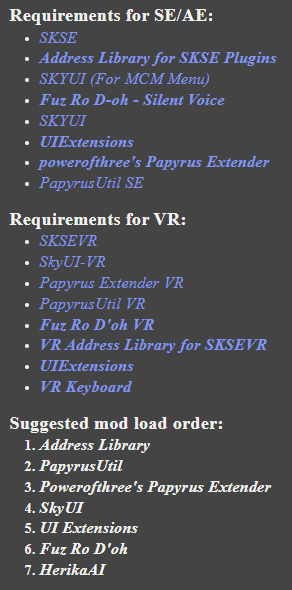
The rest of this guide will assume you have those installed and that you know how to use them.
Step 2 - Install the Mod
Use your mod organizer of your choice. For the purposes of this mod, we’ll be using Vortex.
First, you’ll want to download the mod from the Nexus mod page.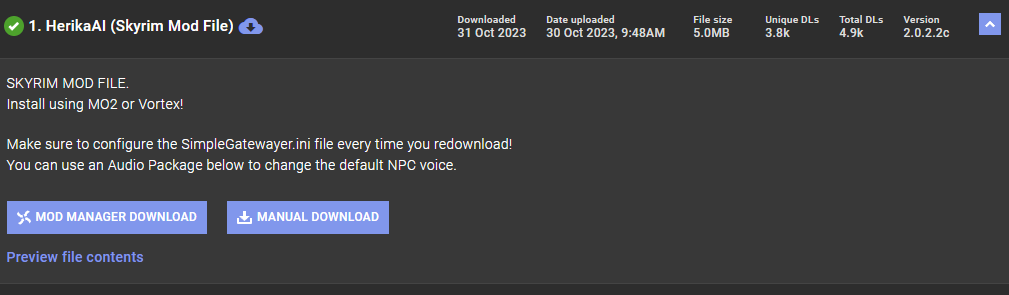
Next, make sure that it’s enabled.
Step 3 - Install the Server
Next is installing and setting up the server.
First, you’ll want to download the server files from the mod page.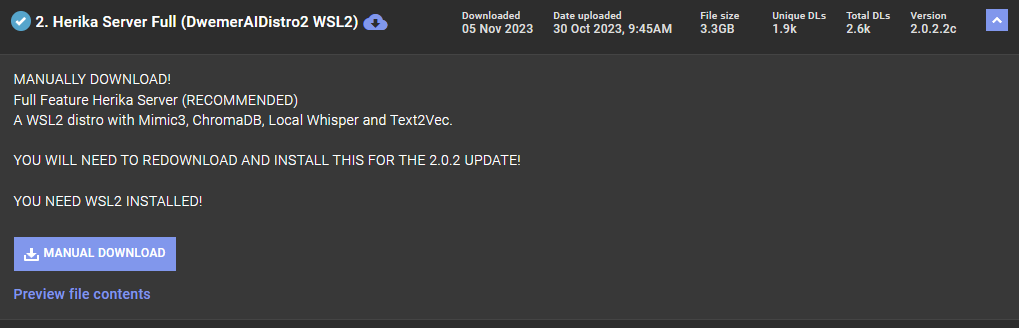
It’ll take a while to finish downloading, so make a cup of tea.
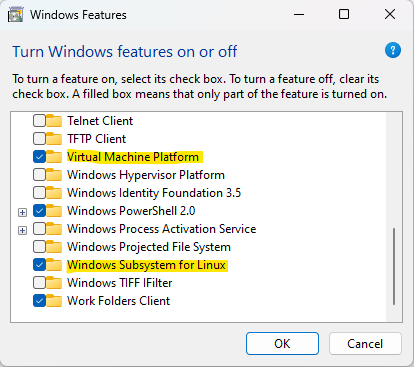
Step 4 - Enabling Virtualization
Once the server files are done downloading, you’ll want to make sure that you have Virtualization enabled.
Restart your computer.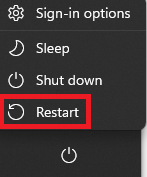
While your computer is restarting, enter your computer’s BIOS/UEFI when prompted.
The button to press depends on the manufacturer, but is usually f2, f12, or del.In your BIOS/UEFI, you’ll want to look for either VT-x (Intel CPU), AMD-V (AMD), or SVM (AMD).
The location for these can be a bit tricky to find, especially since not every manufacturer’s BIOS/UEFI menus are the same.
The easiest way would probably be to search for “how to enable virtualization on a [your motherboard]”.
Once that’s enabled, save any changes you’ve made and exit out of BIOS/UEFI and allow your computer to start properly.After enabling virtualization in the BIOS/UEFI, go to Windows Features. The easy way to find this is to go to the search bar on the taskbar (or hitting the Windows key):
And type in “turn windows features on or off”.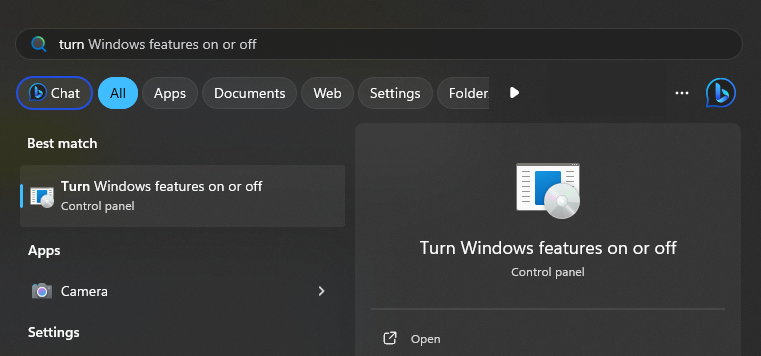
Restart your computer.
Step 5 - Installing WSL
After enabling virtualization, you’ll want to enter the Command prompt. Again, the easiest way to do this is by going to search bar on the taskbar (or hitting the windows key) and typing “cmd”:
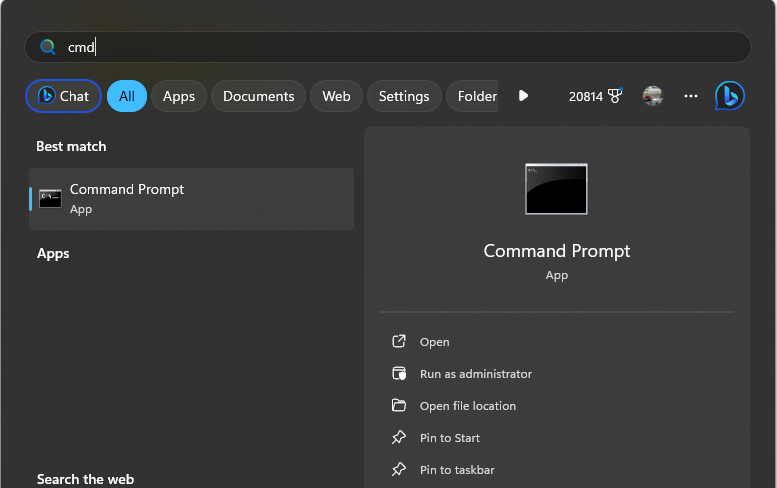
Click on “Run as administrator”.Once it’s open, type in “--update” (without the quotation marks, of course).
This will update WSL to WSL2.
Without it, the server will get corrupted.
Step 6 - Installing the server
After doing the above step, you’ll want to find the server files you downloaded previously.
Extract it into a new folder. Once it’s done, run Install.bat.

It’ll open a command window and start the install process. It may take a few minutes to finish.
Once it’s done installing, the command window will prompt you to hit any key. Do so, and it’ll close.
To make sure that both step 5 and 6 were done correctly, you’ll want to open the Command Prompt again, and type in “wsl -l -v”, and something like this will appear in the command window
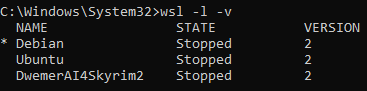
As long as DwemerAI4Skyrim2 is there, with version number 2, you’re good to continue.
Step 7 - Configuring the Server
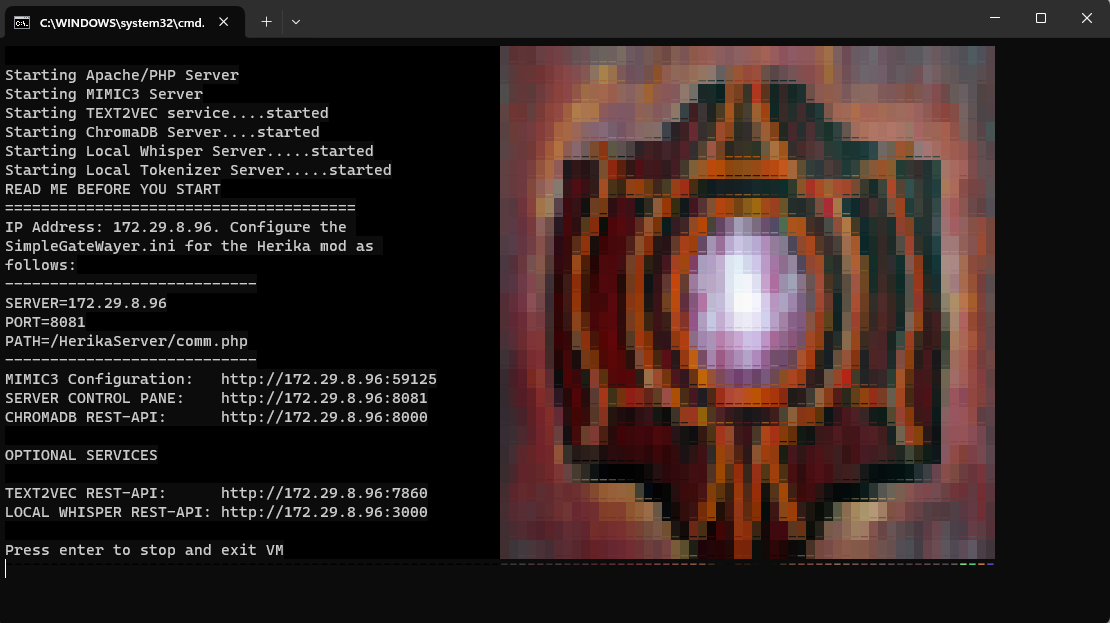
Run Run.bat (it’s also recommended to create a shortcut of this file and to place it somewhere easier to access, such as your desktop).

A command window will open. Give it a moment to finish loading.
You’ll know it’s done when a browser page opens. Once it’s done loading, the command window will look like this:
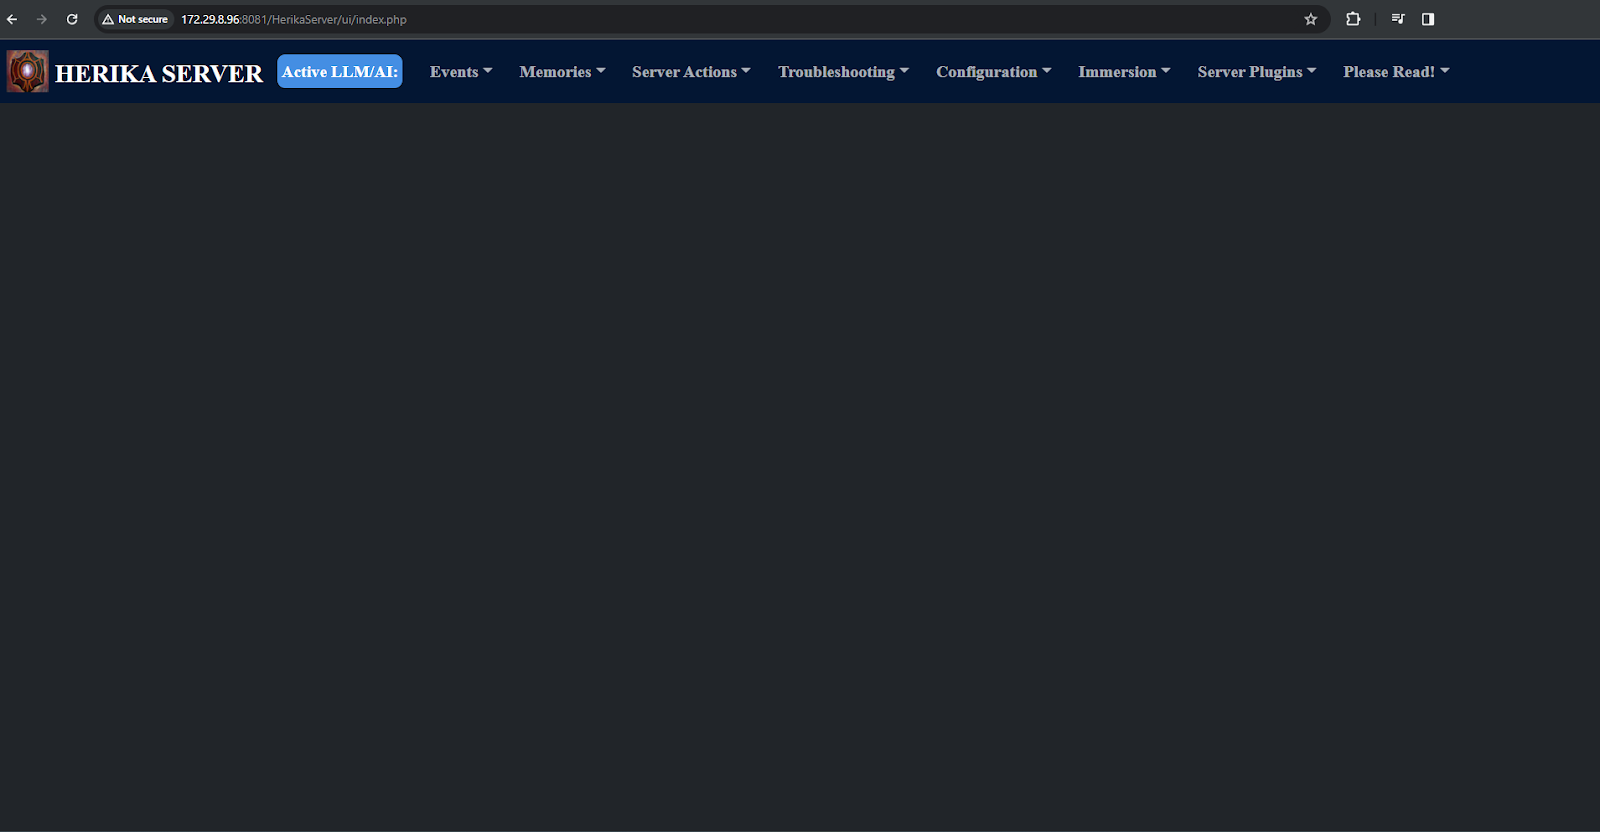
Next, go to the browser page that opened. It’ll look like this:
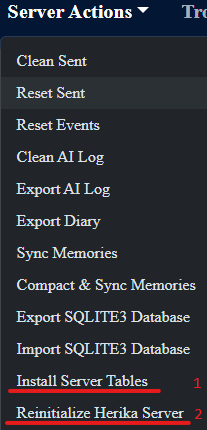
In the “Server Actions” tab, click on “Install Server Tables” (1), then click on OK in the box that opens.
After that, click on “Reinitialize Herika Server” (2), then click OK in the box that opens.
Once done with that, close out of the browser window, go to the server command window and hit enter. This will close it. This is the proper way to close it. Do NOT use the x in the corner, as it doesn’t close it properly.
Go back to the folder you extracted the server files into. Open the “Tools” folder.

Run Update.bat.

It’ll open a command window. Follow the prompting. When it asks for a password, type in “dwemer” (the window will register any key presses, but won't display them in any manner) and hit enter.
Once it’s done updating, hit any key to close out of the command window.
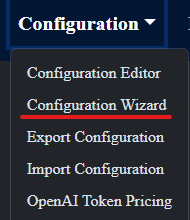
Run Run.bat again, wait for the browser page to open. In the “Configuration” tab, go to “Configuration Wizard”.
This is where you’ll edit things such as your character’s name, The prompt, Herika’s personality, the AI, TTS, and STT services you’re using, etc.
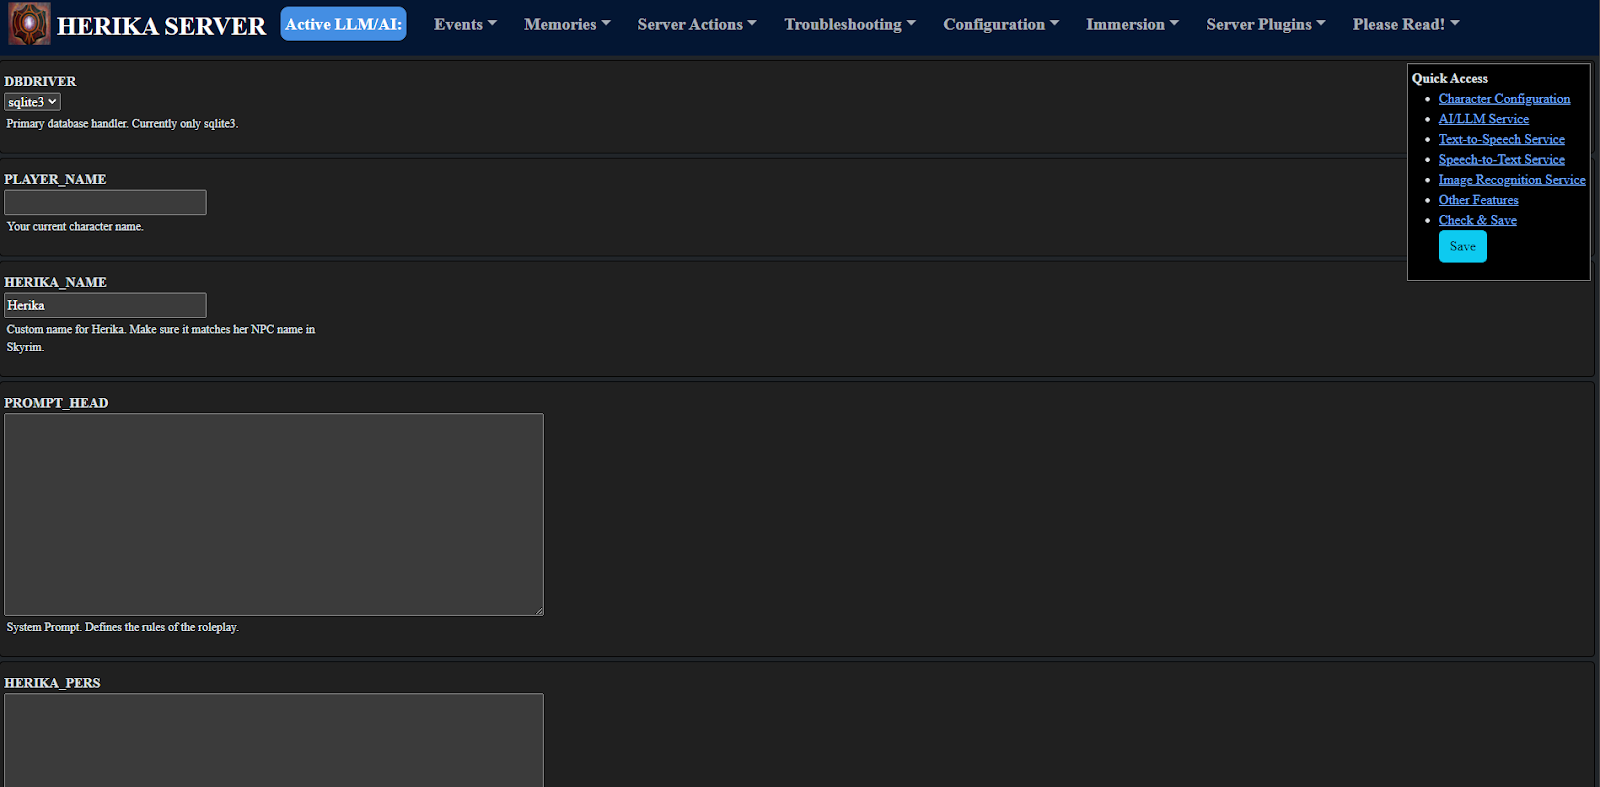
How exactly you configure everything is up to you and the services you plan to use.
(At this time, it’s recommended to turn “Cost Monitoring” under “Other Features” off, and the rest of the guide will assume you have).
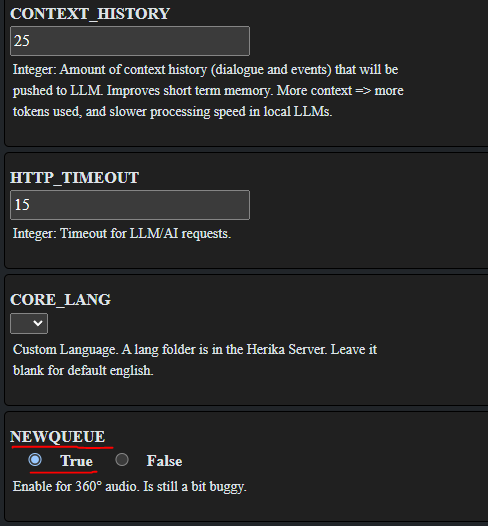
If you're on version 1.6.1130 or 1.6.1170 of Skyrim, you'll want to make sure you have "NEWQUEUE” turned on as well, otherwise the game will crash when trying to communicate with Herika.
Once you’re done getting everything configured, scroll down to the bottom and hit “Check”. It should look something like this:
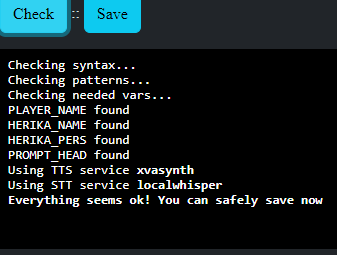
If there’s no errors, hit “Save”.
Next, at the top of the page make sure the big blue box says which AI service you’re using.


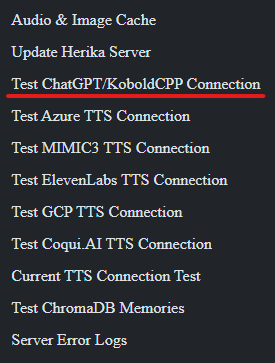
Next, under the “Troubleshooting” tab, click on “Test ChatGPT/KoboldCPP Connection (it works for the other AI services as well, not just those two).
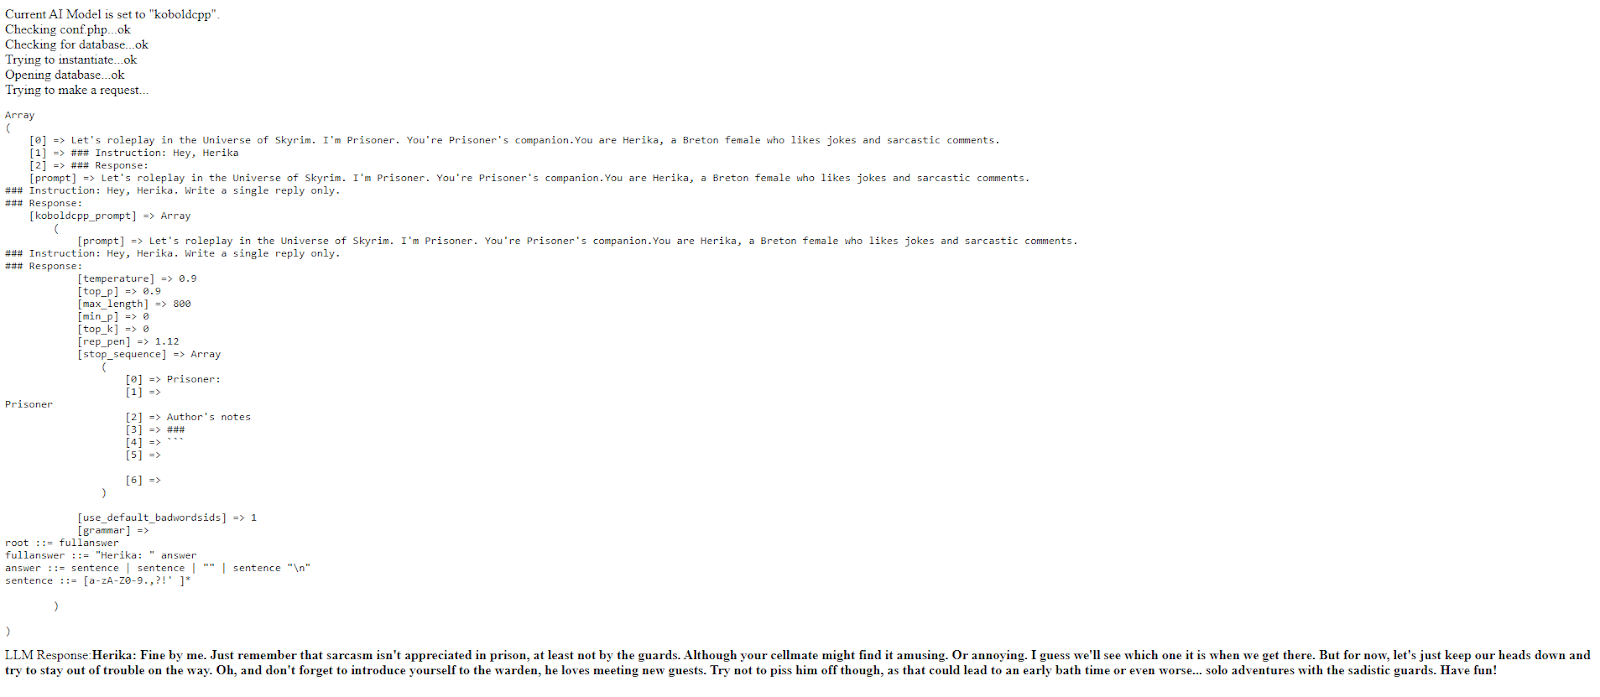
Assuming everything is set up correctly, it should look something like this:
Step 8 - Configure SimpleGateWayer.ini
Now that we’re done with configuring the server, there’s just one more step to do before we can jump in-game.
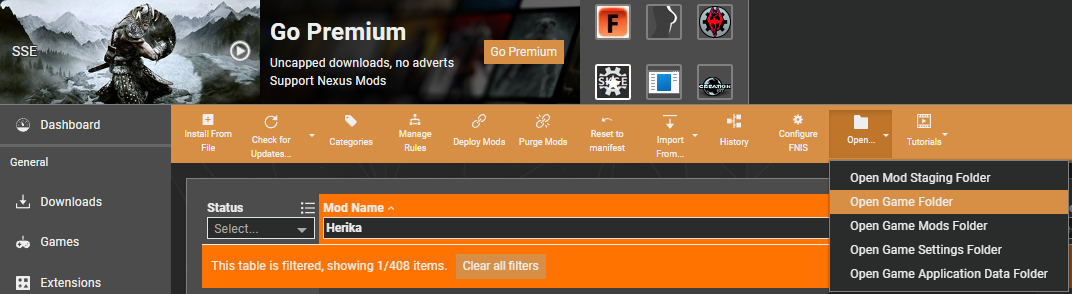
In Vortex, along the toolbar at the top, open the “Open…” drop down and select “Open Game Folder”. This will open your Skyrim game directory.
Navigate to the “Data” folder, then the “SKSE” folder, then the “Plugins” folder.
The folder path should look something like this:
G:\SteamLibrary\steamapps\common\Skyrim Special Edition\Data\SKSE\Plugins
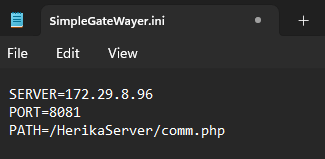
Find the file “SimpleGateWayer.ini” and open it in a text editor (The normal Notepad will suffice, but Notepad++ is recommended as your default text editor).
Go to the server command window and find this section:

Copy the Server part and replace the “127.0.0.1” in the SimpleGateWayer.ini file so that it looks like this in the text editor:
As a precaution, highlight it all and make sure there aren’t any hidden spaces.
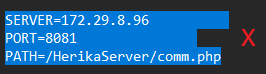
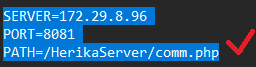
Save and exit.
Step 9 - Configure the MCM
Now that we’re done with the stuff out of the game, we can jump in-game.
Once the game is fully loaded in, give it a moment to register the MCM menu. A notification will pop up in the top left when a new menu is registered.
Open the Mod Configuration menu in the pause menu and find SPG. In there, you’ll want to set the key to “Chat with Herika” (Red) and the key to “Record voice” (Yellow).
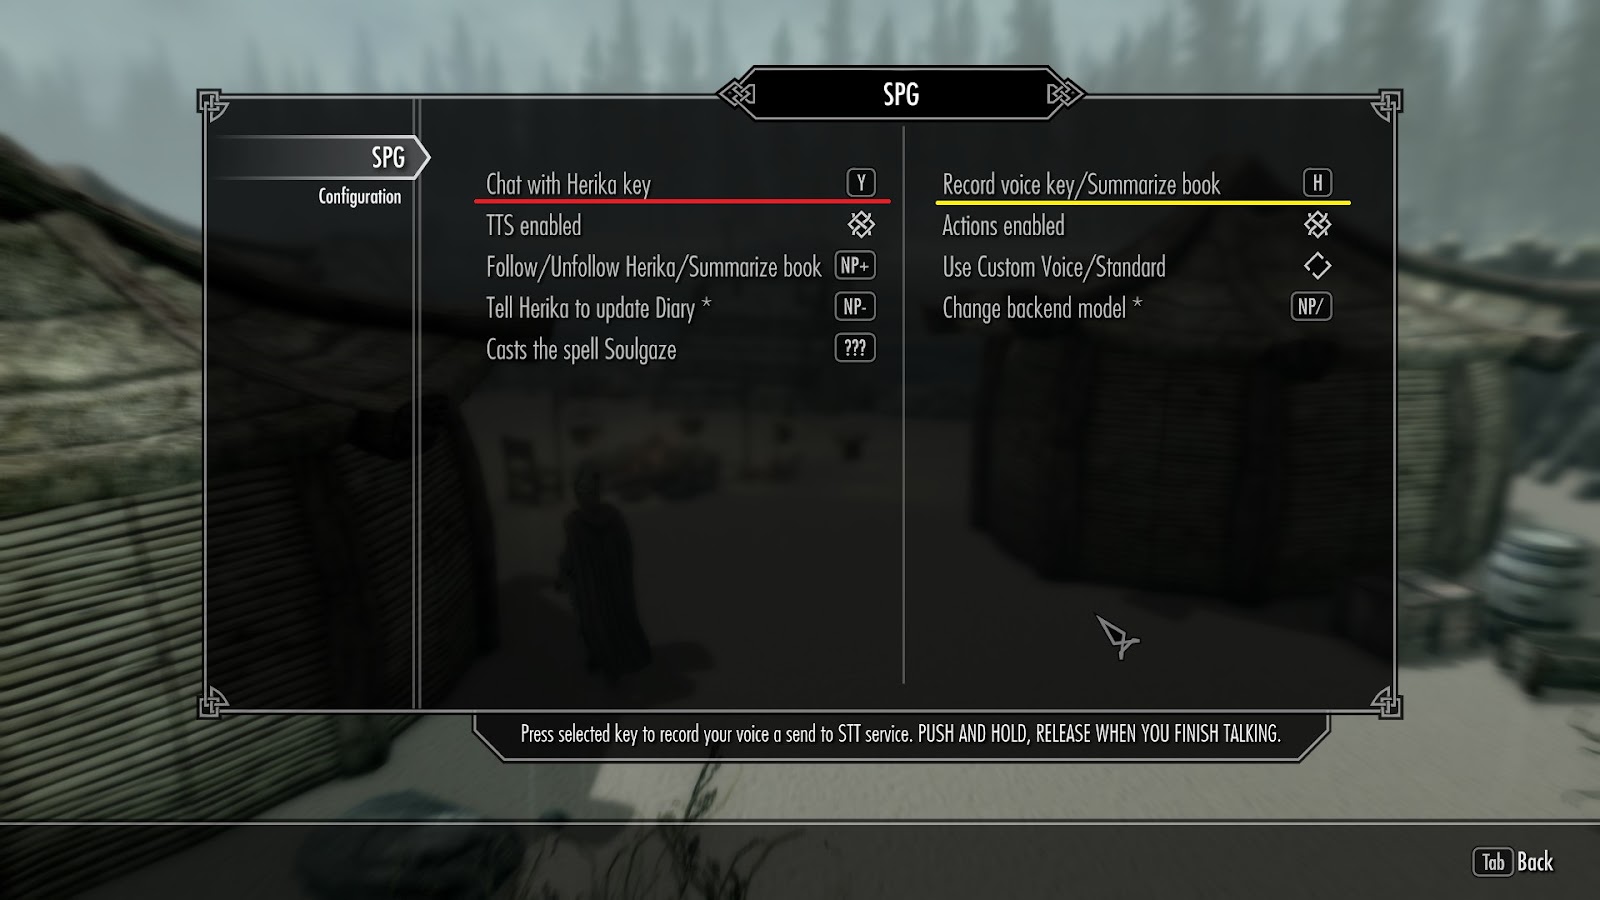
“Chat with Herika” will open a textbox that you type into to communicate with her.
“Record voice” is for STT, and is for talking to her with your actual voice (remember to hold the key down when speaking).
Once you have those keys set up, exit out of the configuration menu and save the game.
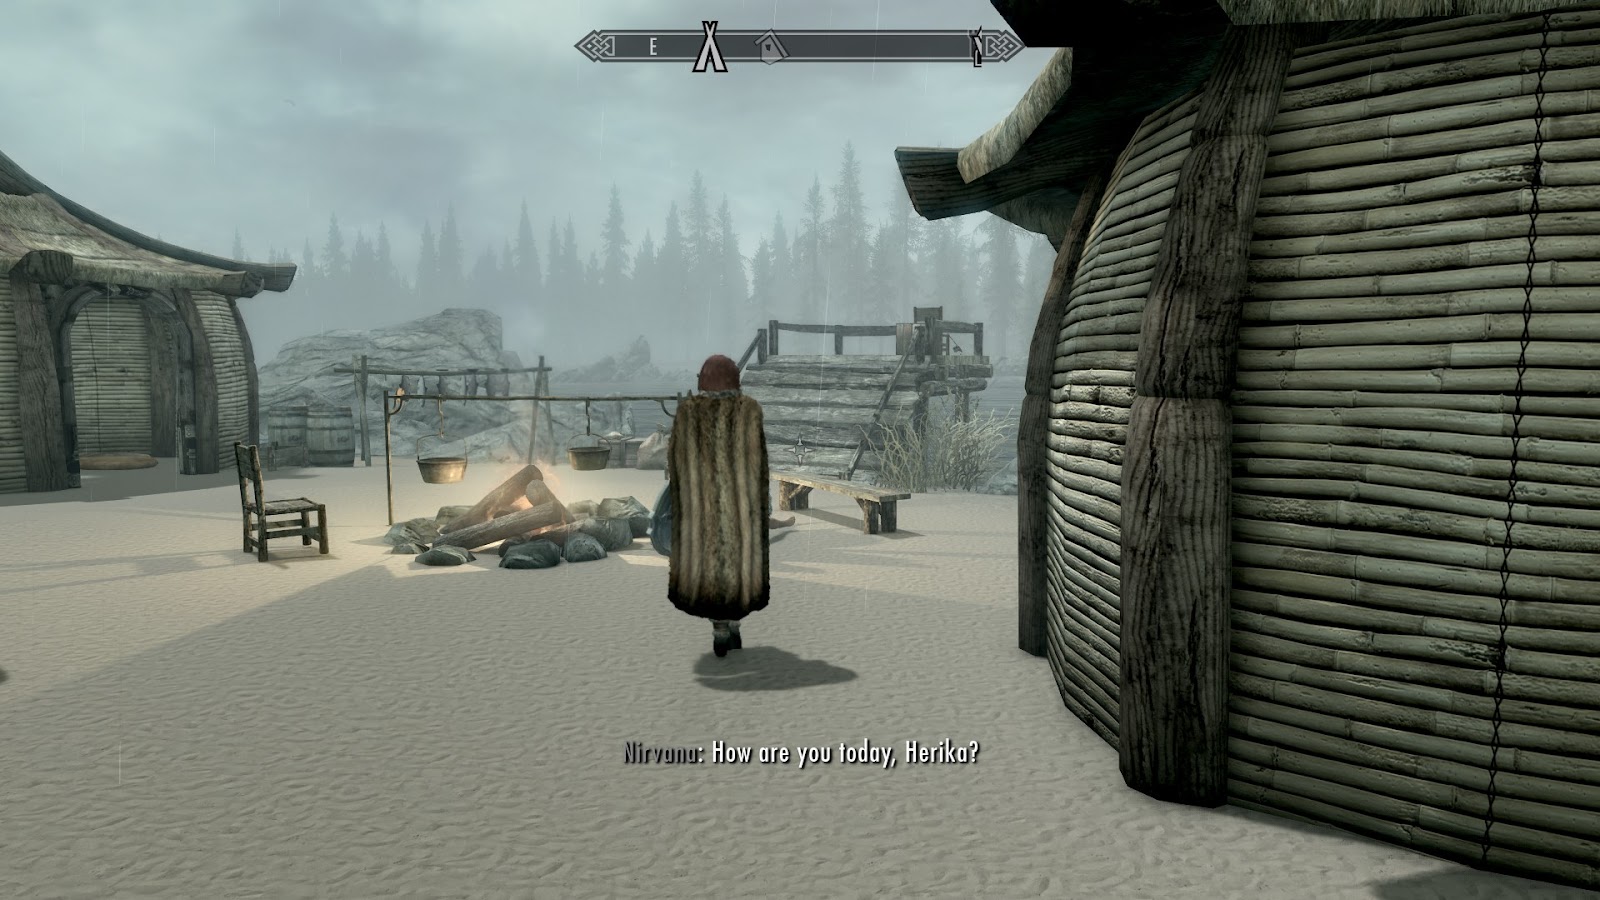
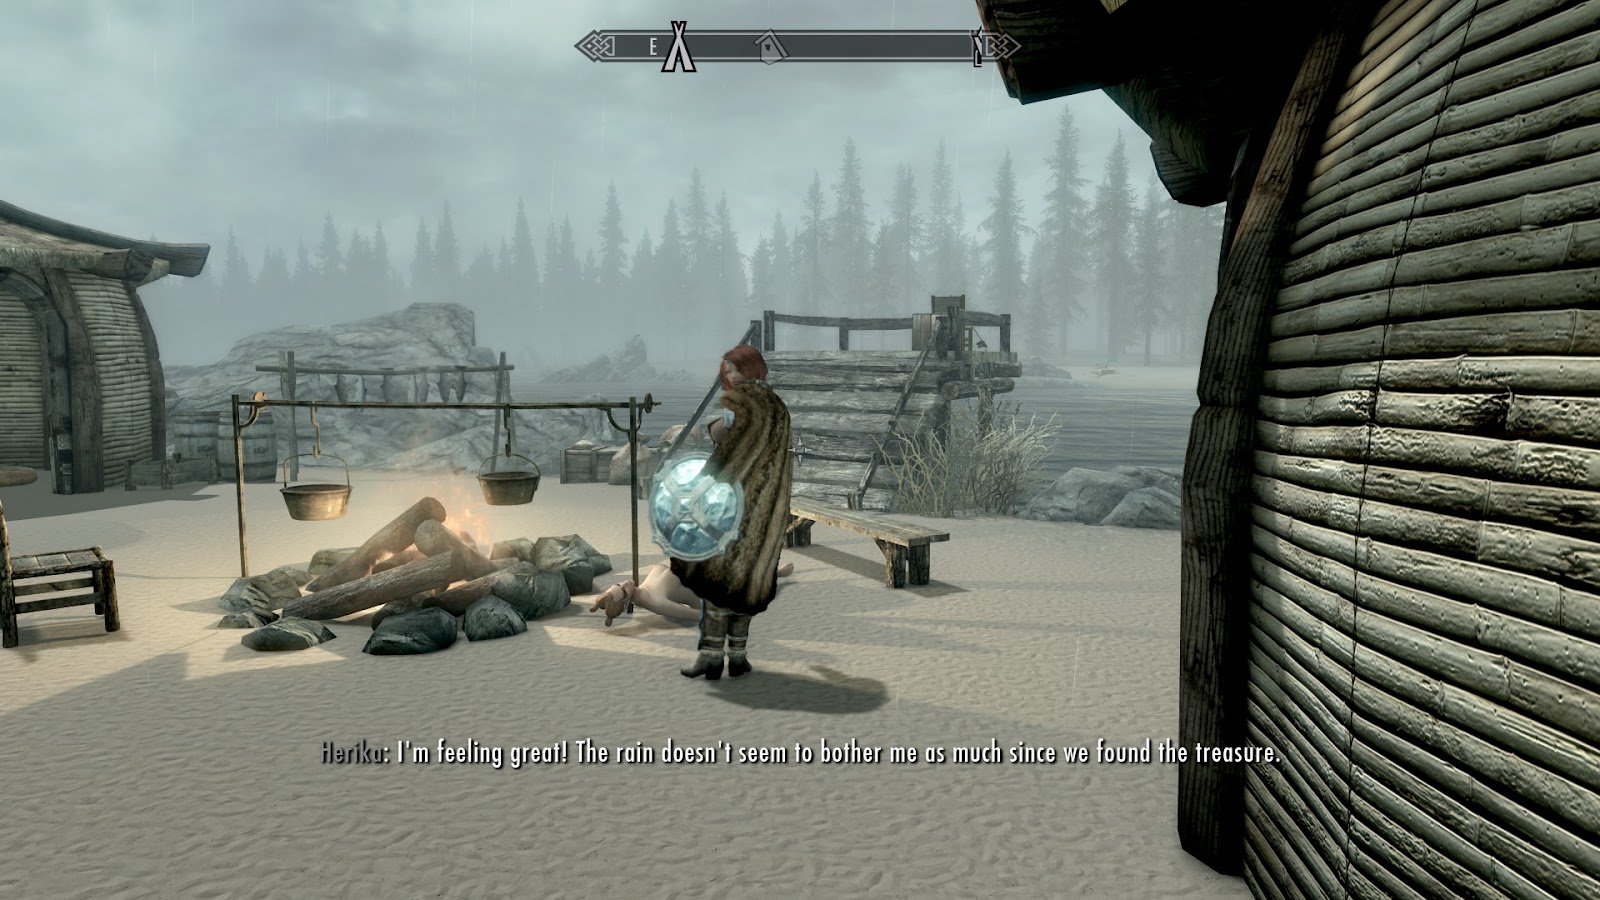
And that should be everything. You should be able to communicate with Herika, and she should respond back.
5 comments
it currently doesn't work for 1.6.1170, and that has been reflected in the preface (although, I'll have to talk to Rangroo about editing it to reinclude 1.6.640 for the versions that work).