Spoilers ahead. This walkthrough will cover all choices that have effects on the story, and explain others that are meant for exposition.
Starting the Quest
Begin the quest by speaking to Frissa Black-Briar at Elgrim’s Elixirs in Riften. No dialogue options asking about the job have consequences.
Tell her that you’ll take the job, and the diving team will spawn next to the water by Merryfair Farm.
Dialogue Exposition, Foreshadowing:
Spoiler:
Show
Her initial comment about paying a courier is expanded on later in Yineel’s main section, where you can find the rest of the copies of the diving notice in a bag.
Asking her “Why send a whole team?” unlocks “What’s this about a scholar?”, foreshadowing the Ayleid ruins & Cayrice’s involvement.
Team Intro
Approaching the team will cause Tilael to forcegreet you. This first conversation has no consequences.
You can then speak to Yineel to start the job or talk to the team members. While there are no major consequences, speaking to Cayrice unlocks a special route later on. Peletius and Yineel’s comments may help the player later on.
FORESHADOWING SPOILERS:
Spoiler:
Show
Cayrice: “Tell me about yourself,” and “What are you doing here?” Asking the first option allows the player to save her during her main section using an alternate route. The player must also remember the details of what she says from both options.
Peletius: “Tell me about yourself.” → “What’s special about your gear?” Peletius mentioning his necklace resembles Vivec may help the player with his main section.
Yineel: “Tell me about yourself.” → “What about working before them?” → “I need to know more before working with you.” Succeeding the persuasion check changes a minor dialogue option in his main section, which may help the player.
The quest continues linearly through the first cell. Attempt to harvest the plant, and the cave will collapse, dropping you down a tunnel below the cave, and then into Ayleid ruins.
HONRICH RUINS
Getting close to the opposite side of the room causes the Climbing Tutorial to show. Press the button by the door to instead open the nearby gate above the water. Dive into the water, and follow the Welkynd crystals until you come into another room. The button there opens the previous door.
EXPOSITION & Author’s Notes:
Spoiler:
Show
The note in the room with the button hints at adventurers making irrational decisions.
Author’s Note: I wanted moments where things didn’t quite do what you expected them to. Allows for more ‘Aha!’ moments from the player, and is a subtle way to make them think about what’s happening rather than auto-piloting.
I also wanted the player to rely on the welkynd stones, as it sets up more situations where I can guide the player’s eyes to important things.
Continue through the rooms linearly until you reach the pedestal with sapphire Ayleid text. You’ll need the Sapphire Varla Stone. To the left of the stone is a note that shows the names for each of the gem symbols, intended for colorblind players. Proceed up the stairs to the right, and you’ll see two paths: The closed door with the Emerald Hourglass, and the drop down to the gates with the Ruby Swirls. Drop down, and wrap around to the other side of the 3-way doors where the Emerald Switch is.
This is a basic puzzle using color-coded/symbol-coded doors. The Emerald Switch toggles any door marked with the Emerald Hourglass. The Sapphire Switch toggles any door marked with the Sapphire Diamond. The drop-down also has a quick climb back up shortcut to prevent having to jump down to the bottom floor.
PUZZLE SOLUTION:
Spoiler:
Show
With all doors closed, press the Emerald switch. Walk in, press the Sapphire Switch. Walk back out the door you came in, press the Emerald Switch. Run back around, use the climb prompt, and you can now pass through to the right, giving you access to the Ruby Switch.
Continue through the now open Ruby-coded Gates, which will bring you to find Tilael unconscious.
There is one major choice here: “What have you seen so far? Is it dangerous?” This affects her situation in Tilael’s First Section.
After finishing the conversation, she’ll stand next to the Sapphire Varla Stone. Interact with the pedestal, and you will take the stone. The room will flood, allowing you to return to the other side. Tilael will follow you.
Placing the stone at the previous pedestal will open the door, giving you access to the Honrich Atasel. (King Halls)
HONRICH ATASEL
This is the 'main hall' as the characters will call it. You will return here often, so be sure to get comfortable here.
Tilael will say some brief comments, and then take a moment to rest in the hall while the player proceeds alone. The objective “Find the corresponding keystone” appears for the Topaz Pedestal. The player can ask Tilael what they should do: she hints at the stairs at the bottom of the room.
EXPOSITION:
Spoiler:
Show
Under the bridge, there is a note titled “Telvanni Levitation.” This hints at flooding the room with water to reach the button on the underside of the bridge. Regardless of whether the player sees said button doesn’t matter, Tilael will comment on it later.
After the stairs on the left, there is a ledge the player cannot climb due to the waterfall above. Pressing the button stops the water, allowing you to climb. Proceeding brings you to Honrich Varlorsel. (Hall of Symbols)
Author’s Note:
Spoiler:
Show
Mainly used to introduce the concept. Didn’t want to jump into a hard puzzle without this.
HONRICH VARLORSEL
Proceed linearly through the next cell, pressing the button to raise water, crossing the pool, fighting enemies, until the ankle-deep water and the waterfall. The button inside the small room turns off the drains, allowing you to climb, but also closes the gate.
PUZZLE SOLUTION:
Spoiler:
Show
With the gate closed, jump down from the hole above, press the button inside, opening the door and disabling the waterfall, allowing you to climb up.
Proceed linearly- the next button opens the next two doors, bringing you to Cayrice.
She will ask you to find her Translation Documents, which is optional. Finding them directly affects her main section.
SPOILERS - TRANSLATION DOCUMENTS LOCATION:
Spoiler:
Show
The platform under the Topaz Stone, but above the interactable plaque. It’s hidden in the grass.
Platform up to the top of the room to take the Topaz Varla Stone. Taking it affects the previous room. Cayrice will not follow you. She’s busy >:(
Go back to the room with the pool, and you’ll find the water drained with a new door open. Press the button in that room, and you’ll find another door open on the right side of the pool. Speak to Peletius to continue.
Peletius’ dialogue is inconsequential, but is important to manipulate the player in a certain way. It changes some minor dialogue later on. You will receive the objective: Find a way onto the bridge Finishing the conversation makes him press the button next to him, allowing you to return to the Main Hall.
Author’s Notes:
Spoiler:
Show
I wanted a situation where the player realizes the consequence of their actions, and give them an opportunity to change their mind. This conversation is extremely similar to Tilael’s- is this place safe? Should we be reckless? This is addressed in Tilael’s First Section, and Peletius’s next conversation.
RETURN TO HONRICH ATASEL
Return to the Main Hall and Tilael will forcegreet the player. You can then place the Topaz Varla Stone on the pedestal, causing a cutscene to play, showing the room filling with water, and a shot of the easiest way to climb onto the bridge.
When the player reaches the bridge and gets close to an adjacent door, if the gates are closed (the player had the opportunity to open them themselves,) Tilael will comment on the button on the underside of the bridge.
You have the opportunity to control Tilael briefly, as she has waterbreathing. This has no consequence. Pressing the button opens the gates.
Author’s Notes:
Spoiler:
Show
I wanted an easy, no-stress hint at the possibility of hidden buttons on ceilings, making the player look up. There's another button on the ceiling right after this.
Larelleis whispers to the player, hinting at an entity within the dungeon.
The doors behind the gates both lead to “Skyrim.”
THE SIREN'S DAYDREAM
When in the Siren’s Daydream, Tilael will disappear. The door does not lead back to the Main Hall. After speaking to Larelleis, she will ask you to rest. This has significant possible consequences on the story.
MAJOR SPOILERS:
Spoiler:
Show
The player can find go on invisible paths in the Daydream (on the floating Welkynd crystals) where there are two notes with missing letters. Together, they spell: “Fight back.” Therefore, the player has two options: Sleep, or kill Larelleis. Sleeping results in the debuff, killing her avoids it. This changes many things later on.
HONRICH WELKESELI
When the player rests, they wake up in a new room with the “Clutches of the Siren” debuff added.
The next room is a timed puzzle to reach the door at the top.
The button at the bottom of the tall room makes the room flood, slowly. The lever and door are connected by Sapphire Diamond symbols. The lever is on a ~20 second timer, but cannot be used while underwater.
PUZZLE SOLUTION:
Spoiler:
Show
You cannot reach the door quickly enough using the water to ascend. Press the button on the broken bridge to permanently move down one of the blocks attached to a chain. The note nearby hints at a button to move the other two blocks. (please flip the page. I have seen 4 playthroughs of people not flipping the page.) Drop down to the button below, and use the water to move into the room with the lever, and press the button on the ceiling. With all three blocks moved down, you can now use the lever to begin the timer, and quickly reach the door using the climbing prompts on the now lowered blocks, rather than the water.
YINEEL SECTION
The player continues linearly until they reach Yineel. His dialogue is inconsequential, but hints at his Main Section. The player can optionally control him to progress. When he opens the next door, the player can speak to him again.
If the player has the Clutches of the Siren debuff, a ghostly assassin appears behind Yineel. The player can warn him about it, which affects his main section.
The player continues and uses the side entrance to the previous room, where a button opens a new door.
The next puzzle is a combination of color/symbol-coded doors + timing. The Ruby Switch starts a timer, and once the timer is over, all doors reset to the original position, as indicated by the nearby note.
PUZZLE SOLUTION, Author’s Notes:
Spoiler:
Show
As stated in the nearby note, pressing the Sapphire switch prior to the Ruby button allows you to complete the puzzle quickly. The order then goes: Sapphire, Ruby, Emerald, Sapphire, exit.
It is also possible to wait in the side Emerald Switch room and wait for the timer to be over, then press the Emerald Switch. However, if the player doesn’t understand the puzzle, they may fail the next section.
To prepare the player for the next section, I wanted to make them attempt the puzzle multiple times until they had a good understanding of it, so the timing is very strict.
TILAEL SECTION
After finishing the puzzle and reaching the opposite end, the player will see the Amethyst Varla Stone lying on the ground, just out of reach behind a door. The player will hear Tilael shout, and they will be prompted to return to the start of the puzzle.
She will then comment on the player’s first dialogue choice when they had woken her up, whether the ruins are safe or not. This directly affects what happens next. The player then has two choices: Control Tilael to solve the puzzle, or tell her that you’re not sure of the solution, and she will attempt to solve it herself.
MAJOR SPOILERS, SOLUTION:
Spoiler:
Show
To solve it quickly with the timer, same as before: Run to Sapphire > turn back & press Ruby > Emerald > Sapphire > through the doors.
If the player had said either: “It’s alright. Just water. Some undead.” or “Nothing I can’t handle. Stick behind me,” Tilael will become reckless and thus add a timer for her to solve the puzzle. If the player does not control her in this section, she is guaranteed to die.
If the player had said “It’s dangerous. There’s tons of undead, and I’ve seen corpses of other adventurers,” Tilael has an infinite amount of time to solve the puzzle, and even if the player does not control her, she will auto-complete it after some time. (The timer music will still play just to keep the player on their toes.)
Should she survive, she will hand the player the Amethyst Varla Stone, and then depending on whether the player has the Siren debuff, a ghostly figure will appear behind her. The dialogue is inconsequential, but foreshadows her next section.
Regardless of outcome, the player can then take the Amethyst Varla Stone, and return to the main hall through the nearby exit.
RETURN TO HONRICH ATASEL 2
The player is prompted to approach Peletius, and they then repeat a similar conversation to the previous one: The player can tell Peletius they will accompany him, or attempt to convince him to wait/gather with the group. This directly affects his main section, with major consequences for his fate.
The player can then place the Amethyst Varla Stone down at the bridge pedestal, re-opening the two adjacent doors that originally lead to the Siren's Daydream. The player has the choice to go through either door, leading to the Honrich Gordarseli or the Honrich Buroseli.
PELETIUS MAIN SECTION (OPTIONAL), HONRICH GORDARSELI
MAJOR SPOILERS FOR PREVIOUS CONVERSATION, Author’s Notes:
Spoiler:
Show
There are two states that Peletius can be in for his main section: Fine or Injured. Any dialogue choice that results in the failed objective: 'Accompany and loot with Peletius' immediately places him into the Injured state. Essentially, the player MUST accompany him first if they do not want him to be in that state. Moving too far into the Honrich Buroseli will also fail the objective and force Peletius into the injured state if he isn’t already.
As mentioned in the previous Author’s Notes, I wanted to give the player a second chance to appeal to Peletius after they get to see the consequences of their choices with Tilael. However, because Tilael and Peletius are fundamentally different personality-wise, the outcome may not be exactly what they want- Tilael is receptive and understanding, while Peletius shrugs off any warnings of danger.
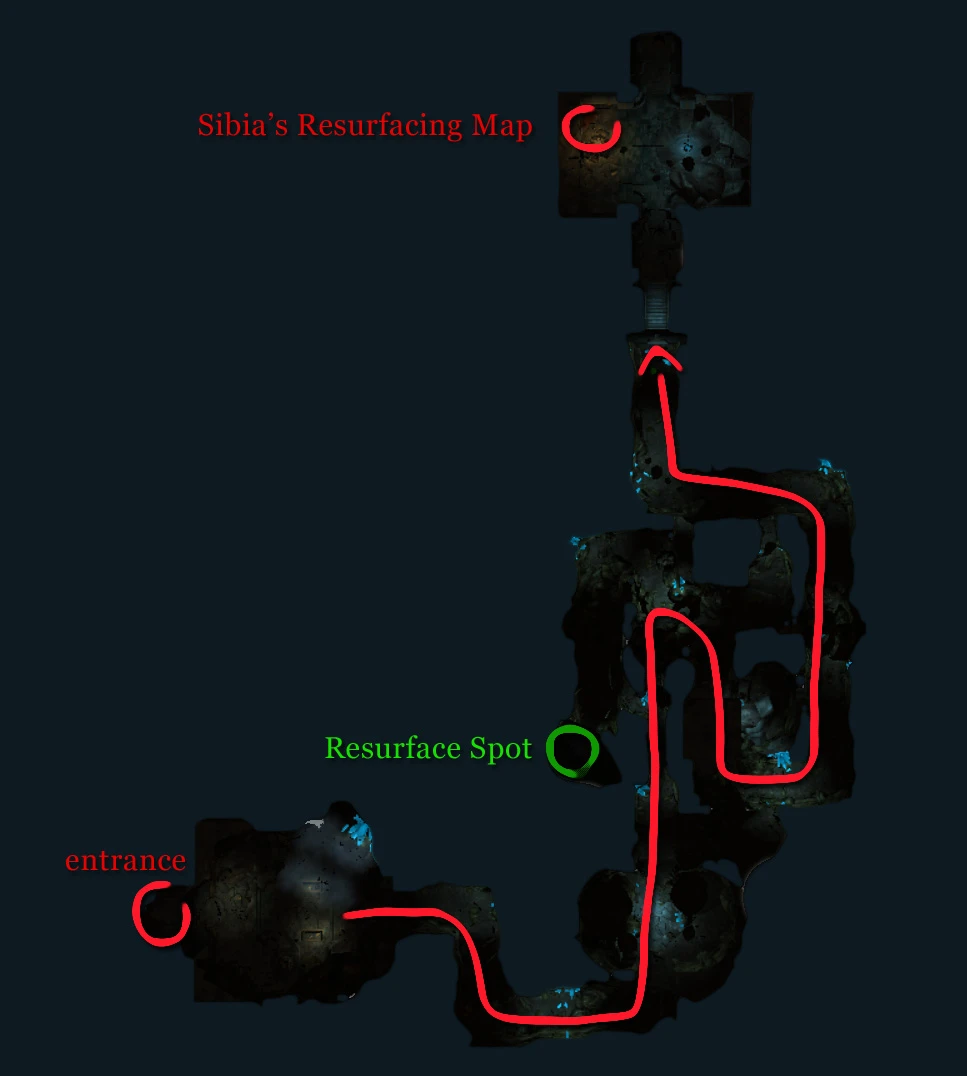
The player comes across a long stretch of an underwater section- they will cause guaranteed damage to any character without Waterbreathing. After the dive, they can find Sibia’s Resurfacing Map, which highlights areas where the player can breathe if they are taking a straight path from the Main Hall to Peletius.
MAP SECTION: Main Hall to Sibia’s Resurfacing Map
Spoiler:
Show
The next underwater dives are linear- there are two doors that require you to go down the branching side paths to press buttons, then return back to the door using the shortcut. This is also the first time where the player will encounter a Lost Soul, hinting at Yineel's section.
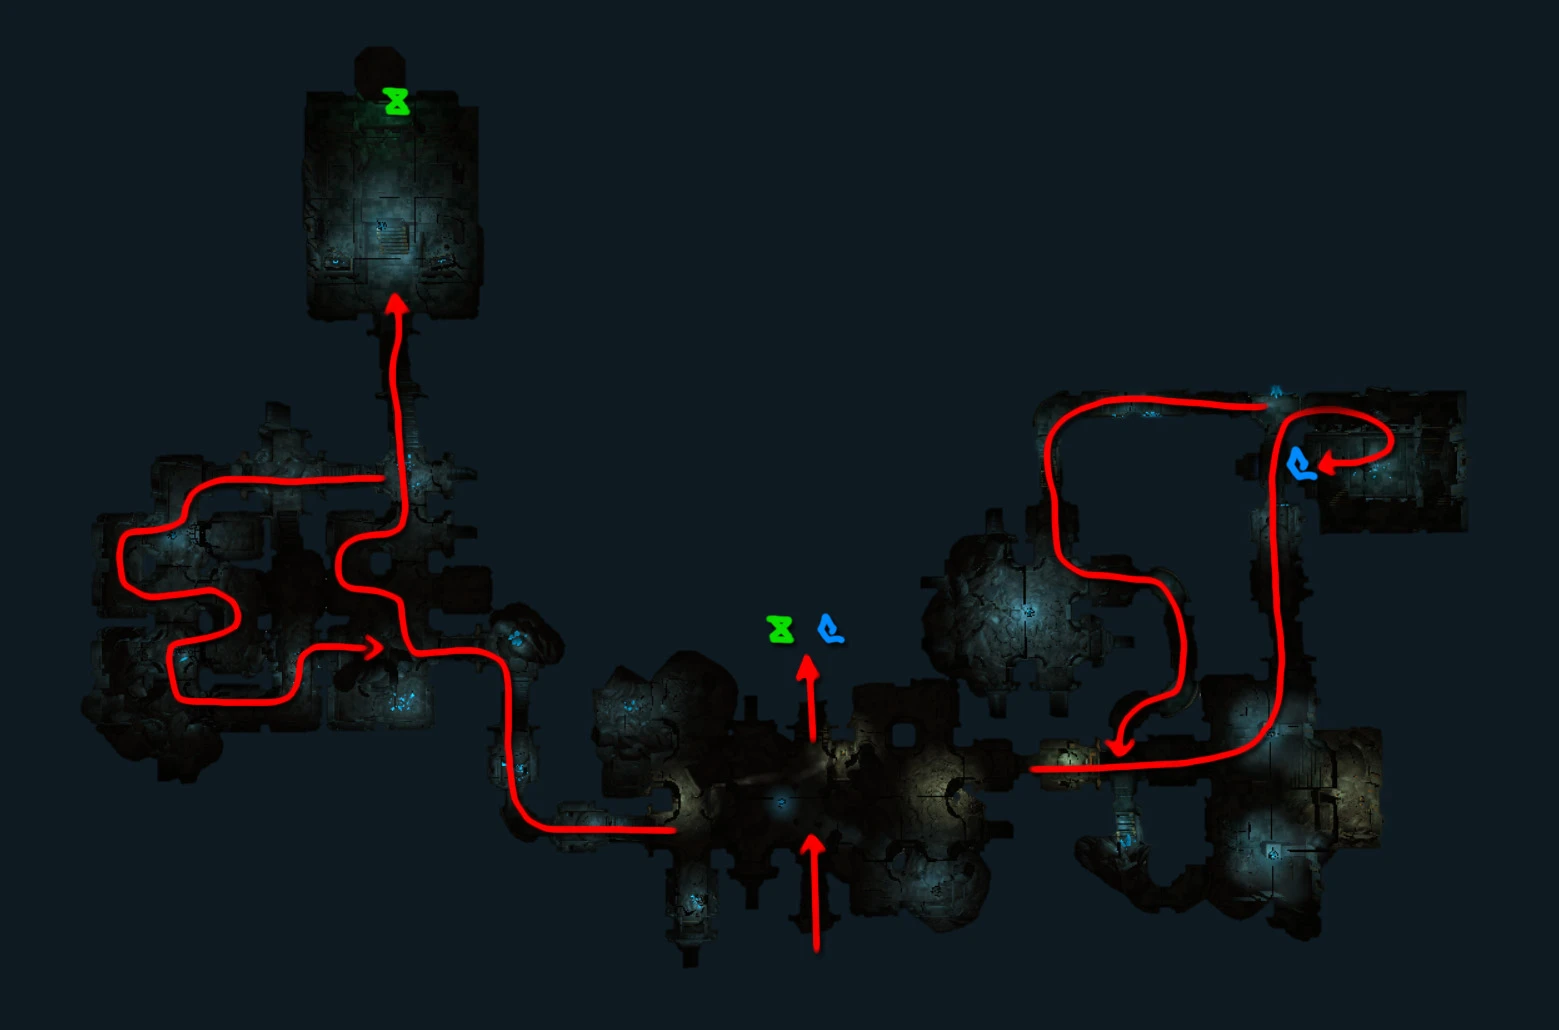
MAP SECTION: Emerald & Sapphire Button Path
Spoiler:
Show
This repeats again, but in a smaller connected area with no linear shortcuts, fully underwater with breathing spots.
MAP SECTION: Amethyst & Topaz Button Path
Spoiler:
Show
They will then come across Peletius who can be in two states: Fine or Injured. This affects the route to save him, as well as his fate for the quest. Peletius will ask the player to find his Waterbreathing necklace in the waters below. The player does not need to help him- they can find the next corresponding Varla Stone and leave him to die.
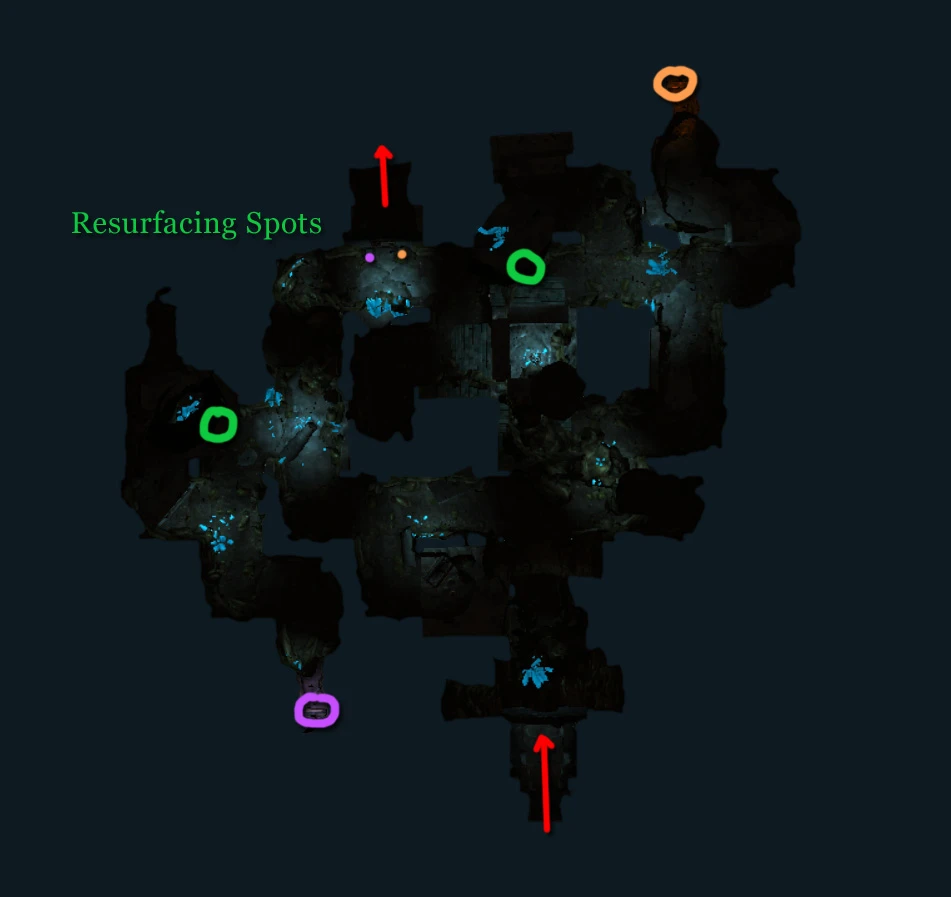
Taking the Ruby Varla stone causes the whole Honrich Gordarseli cell to begin to collapse. Certain underwater side routes and linear paths become cut off, and the player may need to take many detours to reach resurfacing spots a few times before finding the correct way to the beginning of the cell.
PELETIUS ROUTES, MAJOR SPOILERS:
Spoiler:
Show
The player will find various necklaces below, all looking similar to his. The player must give him the correct necklace. The number of necklaces and general difficulty of similarity is affected by the Siren debuff. Giving him an incorrect necklace will cause him to drown when he attempts to escape. If Peletius is Injured, he will take ANY necklace you give him. If Peletius is Fine, he will refuse all incorrect necklaces, except for ones added by the Siren debuff.
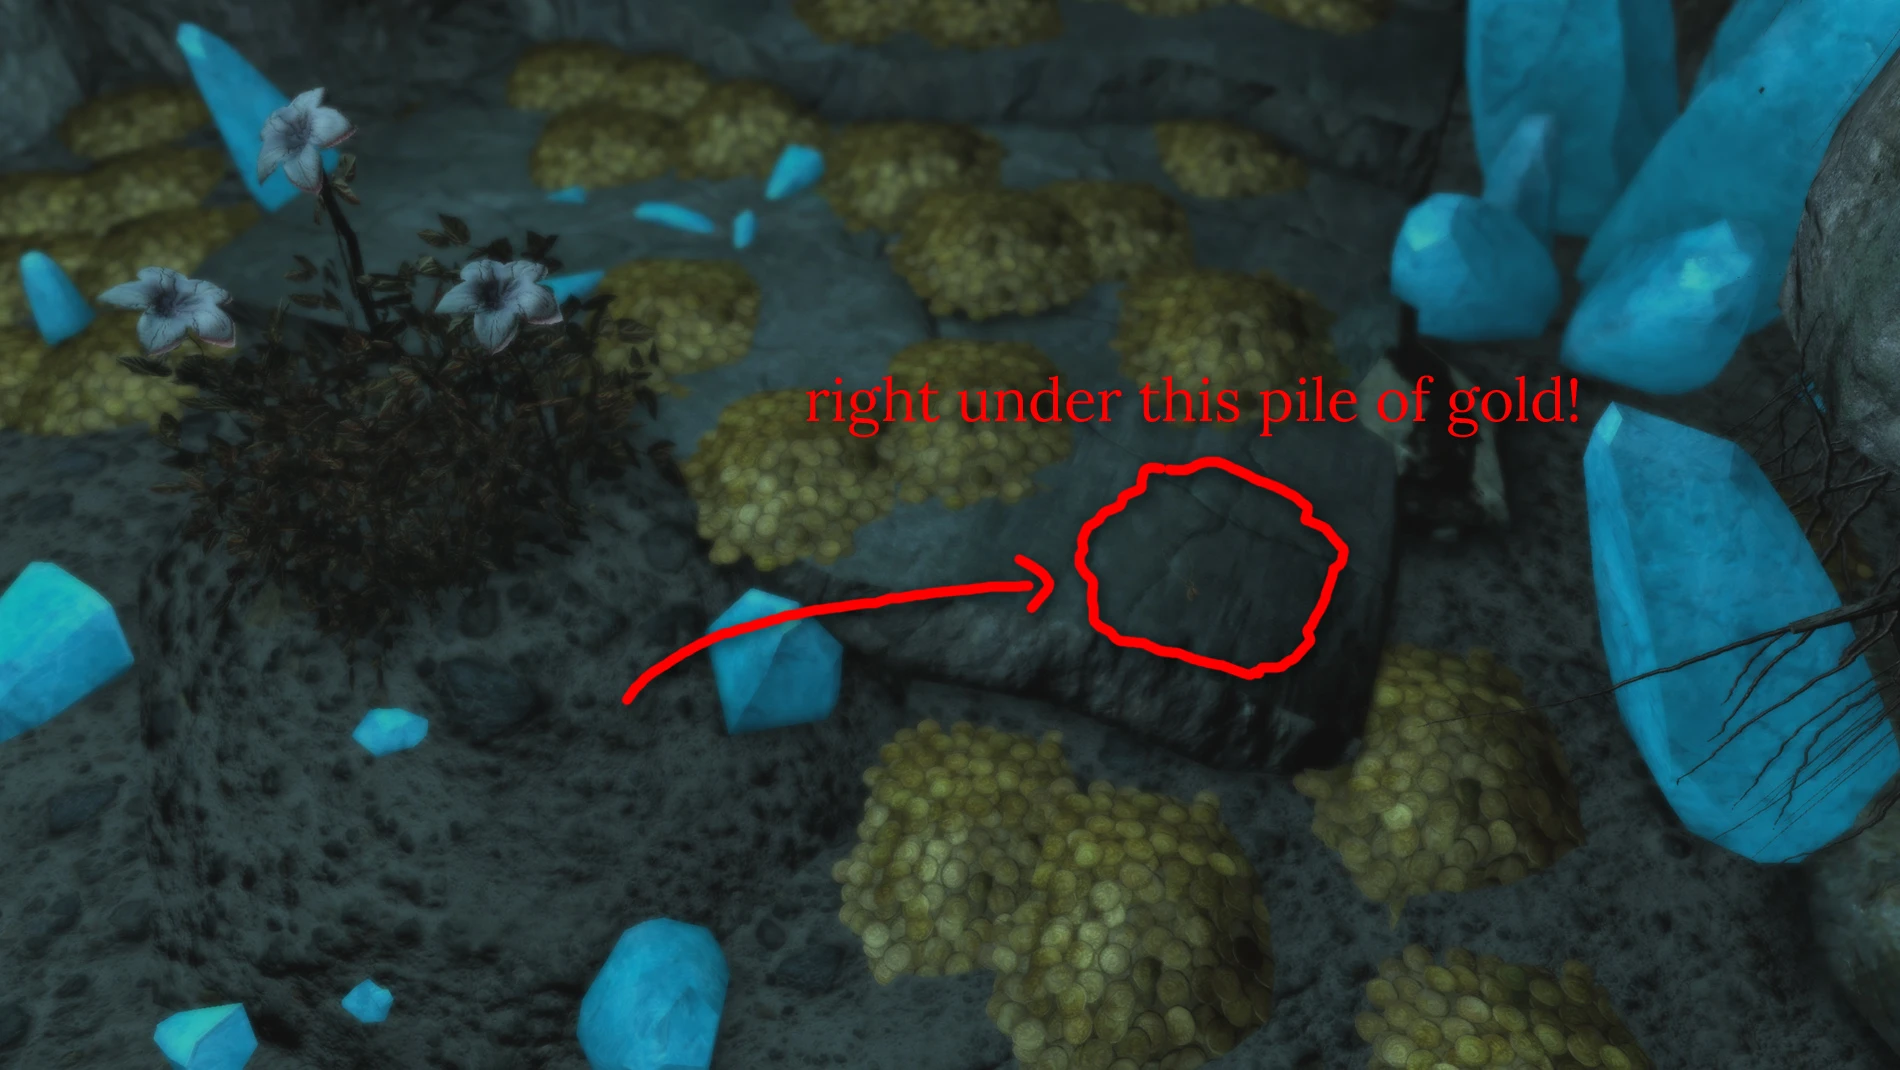
Solution - Location of Peletius’ Original Necklace:
Spoiler:
Show
It’s under a pile of gold, close to the Sirenroot flower. It literally just sank to the bottom. (Version 1.0-1.03): It's possible on some load orders for havok physics to cause the necklace to go missing. Will patch asap. If you'd like to add it through the console, add the Miscellaneous Item version of the "Sapphire Twin Gold Leaf Necklace"
Route 2: Waterbreathing potion The player can only give an Injured Peletius a waterbreathing potion, as he will refuse it if he is Fine. The player must take the Ruby Varla Stone and return to Peletius before this option is available. You can find 2 potions in the dungeon, near the very beginning and one after opening the cell doors in Honrich Buroseli.
Route 3: Control The player can only control Peletius if he is Injured as well, and the player is holding the Resurfacing Map. The player must perfectly navigate the cell back to the beginning, as a single wrong turn will kill Peletius.
If this section is completed successfully, Peletius will return to the main hall and wait there until all four Varla Stones have been found. He can be spoken to, and will comment when other characters are nearby.
CAYRICE MAIN SECTION (OPTIONAL), HONRICH BUROSELI
The player finds a large cavern, where one side leads directly to Cayrice, but she is behind a locked door with an Emerald Hourglass. In the water, wooden boards cover an entrance to a tunnel, but the player (likely) cannot attack the boards until the water is drained. The pool of water nearby can be drained using the lever at the top of the stairs. If the player did not do Peletius's section first, then they will encounter a Lost Soul for the first time, hinting at Yineel's section.
The player can find a note showing a slightly hidden door to continue linearly. Wrap back around and find a chained-cube that can be lowered as a shortcut. The next room has another Emerald Hourglass Signature, with a note that states the button inside seems to control all the slave cell doors. The player keeps moving, and then encounters Cayrice. The Emerald Varla Stone will open any hourglass-marked door. The player does not need to help her- they can take the stone and return to the main hall.
Cayrice seems oddly uninterested in gathering with the group, showing that she’s been affected by the Siren. The player can convince her to leave.
CAYRICE ROUTES, MAJOR SPOILERS:
Spoiler:
Show
The player MUST have unlocked either route, or it is impossible to save Cayrice.
If the player has found her Translation Documents previously, they can ask for them back (or if they kept them) to translate Ayleid writings they may have found around the Honrich Buroseli. The player must find all 4 plaques and relay the information to Cayrice. If the Siren debuff is active, 2 other plaques can also be translated, and relaying those translations (they are written a bit differently as a warning) will immediately fail the section.
Solution - Location of Translatable Plaques:
Spoiler:
Show
The cell close to Cayrice, the Candlelight scrolls are right in front of the door. The cell by the 'ring of bones,' shown in the cutscene. Just behind the sitting skeleton. The cell on the floor with the lever & Sirenroot flower, shown by the cutscene. On a ledge on the opposite side of the cave with the controlled water+lever. You may need to raise the water back up to reach it.
Alternate route: Reminder of the Past This is only available if the player had asked about Cayrice by Merryfair Farm, as stated at the beginning. Cayrice explains that the reason she stays is because her family has passed away. If the player was paying attention to earlier dialogue, they’d know this isn’t true, and can convince her otherwise.
Solution - Dialogue Choices to Convince Cayrice:
Spoiler:
Show
Can’t you tell me what’s wrong?
I don’t know what you’re talking about.
No you haven’t. Tell me what the problem is!
That can’t be right..
You mentioned two sons..
They wanted you to cook them horker stew..
They’re waiting in Cheydinhal, for you.
If this section is completed successfully, Cayrice will return to the main hall and wait there until all four Varla Stones have been found. Some minor dialogue post-quest is changed based on the route used. She can be spoken to, and will comment when other characters are nearby.
RETURN TO HONRICH ATASEL 3
The Main Hall's music changes to the 'Shelter from the Rain' track, as this is a safe place :D
Placing down both the Ruby and Emerald Varla Stones will cause a collapse, striking the area where Peletius was sitting before. The water level rises slightly, and the player can now use the new climbing prompts to reach the Honrich Gardens.
HONRICH GARDENS
The progression is linear- the player goes up the shortest tower, uses the lever, and all chained-cubes will lower. The lever will break, and the player can find a replacement soon. They then have access to the middle tower, and the button there raises the water. The player can optionally access the tower with the soul gem shards, meant for the character section. The cubes must be raised again to reveal a side entrance on that same tower, opening the Ruby gates on the opposite side of the room. The replacement lever is found on the roof of the tower with the lever. Past the Ruby Gates, the button raises the water one level higher, granting access to the tallest tower with stairs leading to the opposite side of the cave. The player can take the Prismatic Varla Stone, and move to the Honrich Morbalseli.
SPOILERS: CHARACTER MAIN SECTION (OPTIONAL)
Spoiler:
Show
If she is alive, Tilael is found with Crilduin, who the player may have seen before if they have the Siren debuff. She says that she will stay in the halls to learn more about the Maormer, and the player must convince her to leave. She had linked her soul to a soul gem, causing her to siphon (and give) power to Larelleis.
TILAEL ROUTES, MAJOR SPOILERS:
Route 1: Convince
Spoiler:
Show
This is only possible if the player has either: 75+ Conjuration - “(Conjuration Expert) You soul trapped yourself?! That’s not a risk you can take! We have to get that gem, now!”
Or if the player had completed Beyond Death in the Dawnguard DLC - “(Beyond Death) No! I’ve been to the Soul Cairn, you need that soul gem back now!”
Tilael will follow the player through the cell until they reach the platform with the soul gem shards. She will unlink her soul gem, placing her in the Weak state. This directly affects her dialogue and quest outcome.
Route 2: Shattered
Spoiler:
Show
The player can read a note at the top of the soul gem tower, which enables them to smash Tilael’s linked soul gem. She will be upset with the player, but otherwise will place her in the same Weak state.
Route 3: Crilduin
Spoiler:
Show
The player can find a secret side entrance to the tallest tower, where they can find Crilduin’s body and a note written by him, exposing the Siren. Return to Tilael, and she will ask to see his body. Return to the tower. She will read the note, speak to Crilduin’s ghost, then ask to go to the soul gem tower. After going there, she will take her soul gem.
Regardless of route taken, Tilael will head to the main hall and wait until all 4 Varla Stones have been found.
YINEEL MAIN SECTION (OPTIONAL,) HONRICH MORBALSELI
The player finds Yineel locked behind a door. He refuses to leave, as he claims there is an assassin from the Morag Tong.
After some distance, there is a tall open area, with balconies around the rim of the cavern, that circles around a large pillar. Drop down next to the nearby waterfall to safely reach the bottom of the cavern. There are two adjacent rooms you can go to, but one cannot be completed as there is a level too high to reach. The opposite room has a button that raises the water one level. After pressing the button in the next room, the water raises again, reaching the second level balcony of the cavern. There are two rooms you can go to, and the passage next to the wooden ramps leads to a timed puzzle.
PUZZLE SOLUTION: Once you press the button, the two nearby doors will toggle from open/closed, trapping you in the room unless you drop down through the center hole in the room. Jump down, swim back up to the entrance of the room, and quickly press the button through the unlocked door. You will need to be quick.
The water level will rise again, and you can continue to the opposite room. After raising the water in that room, the player has access to the tall pillar in the center, with the Amethyst switch. Continue linearly through the now open Amethyst door nearby until the Pearl Varla Stone, which can be placed in the Main Hall.
YINEEL ROUTES, MAJOR SPOILERS:
Spoiler:
Show
Route 1: Illusions
Spoiler:
Show
The player can convince Yineel that the assassin he’s seen is an illusion. This is only possible if the player has the Siren debuff, and told him about the person behind him in his previous section. This has major consequences.
Asking Yineel about coincidences reveals how each dialogue option that he remembers is related to the assassin.
Route 2: Safety
Spoiler:
Show
If all 3 characters are waiting in the main hall, the player can convince Yineel to join them for safety.
Route 3: Proof
Spoiler:
Show
The player can also find the Assassin. They will forcegreet the player, and ask for “Primes-His-Poison.” After killing the Assassin, the player can return and repeat his real name as proof of encountering the assassin.
Regardless of the outcome, Yineel will return to the main hall.
RETURN TO HONRICH ATASEL 4
After placing all four Varla Stones, a portal will form between them. A forcegreet conversation will start based on who is present, in a specific priority ('Leader-ness.') They will comment on the number of people left, and there may be small changes based on their route taken.
SECRET PORTAL FIGHT, MAJOR SPOILERS:
Spoiler:
Show
If the Illusion route was taken for Yineel, he will fully succumb to the Siren. A fight with him starts, and he can kill the other characters. Once he is dead, the other characters will comment briefly.
HONRICH ARANSELI
After entering the portal, any surviving characters will follow the player until the end. (Unless the player skipped the previous secret fight, in which case it will try to trigger again.)
SECRET INTERACTION, TILAEL:
Spoiler:
Show
If Crilduin’s route was taken for Tilael, she cast a spell on Larelleis’s grave. This affects the ending.
Harvesting the Sirenroot plant gives the player a "Warm Sirenroot Flower" consumable, granting a permanent buff.
Spoiler:
Show
+15% magic resist.
After harvesting, a barrier will form around the altar, and a Wispmother Larelleis will spawn inside it. The player must take the two side soul gems in the room to break her barrier.
FINAL FIGHT SPOILERS:
Spoiler:
Show
Any main characters with uncompleted sections who are not explicitly dead will be teleported in as enemies.
After defeating Larelleis, the arena will begin to flood, and her crown will appear on her altar.
LARELLEIS' CROWN:
Spoiler:
Show
You can craft an upgraded (or non-enchanted) version of the crown, using Dead Sirenroot Flowers. Location of all the flowers:
Spoiler:
Show
(Honrich Ruins) The very first cell after the cave collapses, at the end of the diving section, next to the sapphire button.
(Honrich Varlorsel) Next to Cayrice, the first time you find her after the collapse.
(Honrich Gordarsel) At the bottom of the pool of water surrounded by gold piles.
(Honrich Buroseli) In the center of a room next to the lever & chained cube (not the one in water.)
(Honrich Buroseli) Right next to Cayrice.
The player can then take a shortcut back to the very first portion of the HONRICH RUINS, and back up the tunnel they initially fell down.
ENDING
The player wakes up by Merryfair Farm, surrounded by the remaining members of the team. They can speak to each member, and they will have differing dialogue based on the route taken, and how many are still alive.
Return to Frissa Black-Briar to finish the quest. She will ask if you have any samples, and will reward you with gold if you hand her the Warm Sirenroot Flower.
The player can also return to the plant in the lake, and get flavor text that tells them which ending they received.
Ending Flavor Text:
Spoiler:
Show
Ending 1: Only time will tell
The roots of the plant are rotting and cold. The soft hums of the Siren can be heard faintly below, enticing you to return..
Tilael had not soul trapped Larelleis
Ending 2: Lost souls
The roots of the plant have decayed and softened from the lake. There is no song, no voice, no whisper- nothing.
The only words you hear are the ones you heard just moments ago.. If only you could have saved them.
Tilael had soul trapped Larelleis
A lead NPC had died
Ending 3: True Peace (Perfect Ending)
The roots of the plant have decayed and softened from the lake. There is no song, no voice, no whisper- nothing.
The silence is peaceful.
Tilael had soul trapped Larelleis
All lead NPCs have survived
SECRET YOUNG SCROLLS EASTER EGG
It's related to Crilduin.
Spoiler:
Show
You must get the 'best' ending for Tilael.
Spoiler:
Show
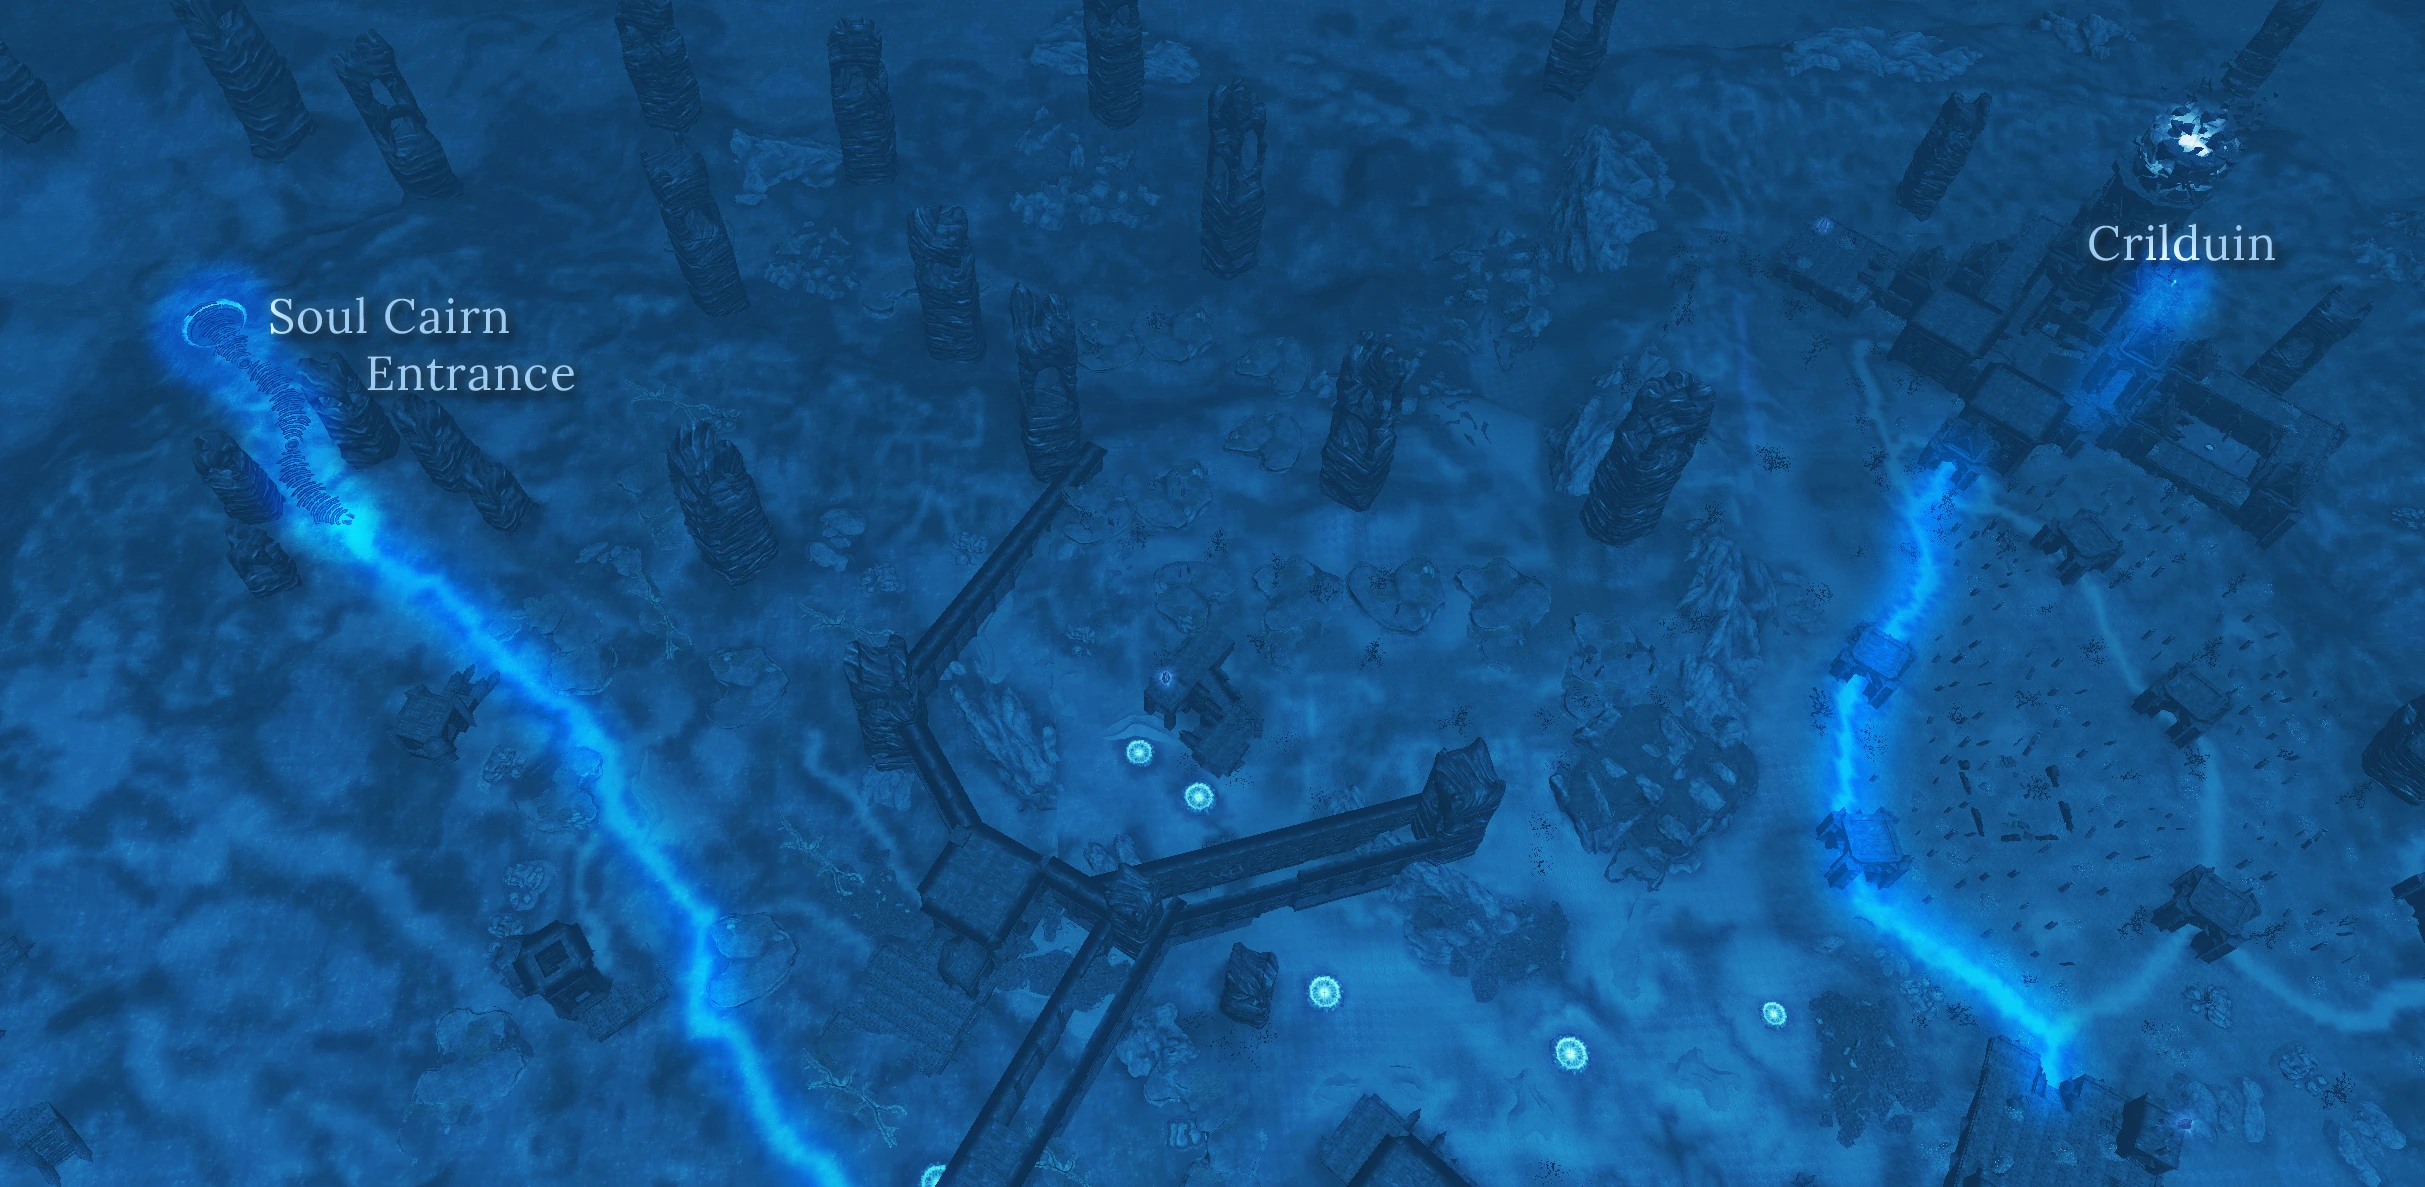
You can find Crilduin somewhere after the quest, hinted in his note.
Spoiler:
Show
He's in the Soul Cairn.
Spoiler:
Show
He's here:
Thank you for reading! If you have played Sirenroot, I hope that you enjoyed it as much as I loved making it.
This is a fantastic quest mod. I was so impressed with the quality of everything: NPCs and their stories, lore, puzzles, interiors, difficulty, attention to detail and level design. Really awesome addition to Skyrim that I only discovered through another mod collection, so it was a very pleasant surprise. I spent most of today immersed in this, so it's several hours' worth of top quality content. Thank you!
LOVED LOVED LOVED this quest mod! This really was well done, despite me not liking much platform puzzles. Wish there was more info on who this Larelleis was though. Who or what was she anyways?
I'm guessing she was one of the Ayleids who followed Molag Bal based on the evidence of the flesh art in the part with the slave cells. In Elder Scrolls lore, groups of the Ayleid would worship Molag Bal and brutally tortured humans, whom they kept as slaves. This is just a guess based on obscure lore, and you can use any interpretation you want.
Or someone trying to usurp one of the older king by manipulating more recent population and stolen necromancy, like a character did in oblivion (the questline wth the two crowns)
possibly including manipulating other, more recent, actual ayleid.
mostly because she does not actually seem to be an ayleid, and the extremely present water theme is distinct from their star themes
I did all the Crilduin Requirements and i still can't find him anywhere in the soul cairn, The map on here to his location isn't very detailed and helpful at all. a Video guide would've sufficed unless someone here can give me a detailed screenshot and the name of the location he's at in Soul Cairn.
Edit : After going outta my mind and round n round in circles for several game hours, I finally found his location so just in case anyone else has any trouble finding him he's behind Keepers Cemetary (as it's named in Arthmoors Dawnguard Map Marker mod)
Yeah I had trouble finding him too, there's a tower to the right of the stairs, you need to go around it to be able to get in, but you need to raise water level first. I saw it on youtube, also hard to find
an absolutely beautiful mod! i loved every second of it
i did have issues finding the entrance for tilael's crilnuin ending(spent an hour and a half looping around the place before i finally found it), and i couldnt for the life of me find the assassin in yineel's part, but otherwise it was smooth gameplay all around! i always expected something to jumpscare me when i climbed up a ledge, so needless to say the tension was amazing as well. stunning work, ill have to keep an eye out for any other mods you make! oh, and! there may be some fanart for this lovely mod in the future... i have so many good ideas, im just itching to get started on some!
This mod was awesome although I sucked at saving anyone woops!
Unfortunately as the end the game glitched and the 3 ghosts came out attacking thin air, and LARELLEIS' did not agro on me until I attacked her, during the fight she disappeared or died and turned to ash, so I got the quest to escape so did not pick up the crown.
Is there a way to return, or can I craft the crown without picking it up / spawn it with console commands? Thanks!
Hello, thank you very much for all of your work creating this mod. I had a very wonderful time completing it . I manage to save everyone and also soul trap at the end.
Can someone tell me how do i return the flower to the lake ? I have completed the quest by not giving the flower to black-briar lady i had no option to return it to the lake or something before finishing the quest and i can only see the flower as a consumable...
The extra necklaces, the ones that we could’ve given to Peletius, is there anything we can do with them? Will they ever be able to be worn, or are they simply always an extra item?
I’m at the part of the quest right after tileal finishes the puzzle, she gives me the gem and then it gives me a marker to “find her” the marker is right infront of the cracked glass crystal thing you talk to tileal from when the draugr are chasing her. But when I go to the marker she isn’t there, i wait still nothing. iis this a bug? Or am I doing the quest wrong.


38 comments
possibly including manipulating other, more recent, actual ayleid.
mostly because she does not actually seem to be an ayleid, and the extremely present water theme is distinct from their star themes
Edit : After going outta my mind and round n round in circles for several game hours, I finally found his location so just in case anyone else has any trouble finding him he's behind Keepers Cemetary (as it's named in Arthmoors Dawnguard Map Marker mod)
Skyrim Mods: SIRENROOT - Deluge of Deceit - THE FINALE | "The Siren of Deceit" (youtube.com)
i did have issues finding the entrance for tilael's crilnuin ending(spent an hour and a half looping around the place before i finally found it), and i couldnt for the life of me find the assassin in yineel's part, but otherwise it was smooth gameplay all around! i always expected something to jumpscare me when i climbed up a ledge, so needless to say the tension was amazing as well. stunning work, ill have to keep an eye out for any other mods you make!
oh, and! there may be some fanart for this lovely mod in the future... i have so many good ideas, im just itching to get started on some!
There is an entrance to a tunnel in the wall, at the floor, in the really big flooding room during the Yineel part.
You have to have press the final button in that room for this entrance to be unlocked.
Then just swim around the bottom of that room next to the wall until you find the tunnel.
Do not try to do it if the water has not flooded the tunnel as it will be impossible (unless you have certain other mods).
Unfortunately as the end the game glitched and the 3 ghosts came out attacking thin air, and LARELLEIS' did not agro on me until I attacked her, during the fight she disappeared or died and turned to ash, so I got the quest to escape so did not pick up the crown.
Is there a way to return, or can I craft the crown without picking it up / spawn it with console commands? Thanks!
thank you very much for all of your work creating this mod.
I had a very wonderful time completing it .
I manage to save everyone and also soul trap at the end.
Can someone tell me how do i return the flower to the lake ?
I have completed the quest by not giving the flower to black-briar lady
i had no option to return it to the lake or something before finishing the quest and i can only see the flower as a consumable...
Thanks again !
iis this a bug? Or am I doing the quest wrong.