


0 of 0


About this mod
injFX_settings.h custom fine-tuning config file for \"FXAA Post Process Injector\" mod
- Permissions and credits
rendermax fine-tuning injFX_settings.h
FX mods are awesome, but its hard to get the right settings, it took me many hours to get mines, and maybe someone will like to use.
This mod is basically a settings file for "FXAA Post Process Injector" mod by [some dude] originally uploaded by Retspadez (old version)
///// FEATURES /////
1.0
- Balanced sharpen effect.
- Balanced saturation (more realistic).
- Get rid of overall greenish atmosphere.
- Slightly bluish atmosphere will make your sunsets look awesome.
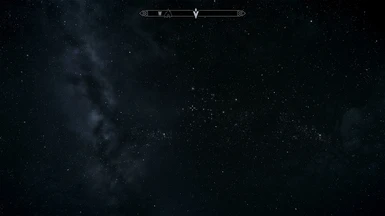
- More realistic deep blue starry sky at night, best ever with "Enhanced Night Skyrim" mod.
- More dark sense inside dungeos or in shadow spots (if you like immersion).
- Instant HD textures in most of weapon/equipment in 1st and 3rd view and inventory/vendors.
- Instant HD textures in most of buildings in mid and far range.
- Light weight, dont use too many resources, dont use FXAA or pre-sharpen, great for low/mid/old rigs
- You get a pseudo-AA for free as post-sharpen side effect :P
2.0
- Removed bloom filter.
- Slightly lowered sharpen effect.
- Slightly increased saturation effect.
- Lower impact on corner darkness (VIGNETTE), but still there (i love it).
- Same brightness as vanilla, dont look like you wearing sun glasses.
- More overall vanilla look alike but still with sharpen and more blue sky.
*Look at the new screenshots
///// TIPS /////
Its recommended a minimum of 8 anisotropic filtering samples to get good looking roads and far away stuff, you can configure this with the game launcher.
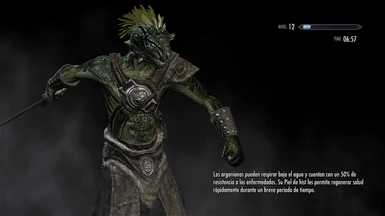
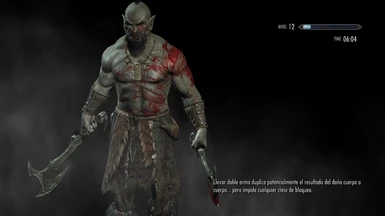
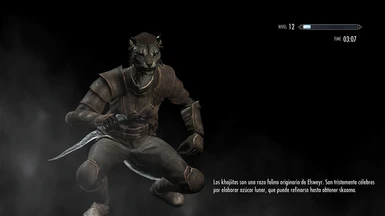
You can use texture packs to make it look even better, but i dont recommend resized+sharpen texture packs, cause you will get double sharpen and its not a good idea, its better to get real HD texture packs. Just look at loading screen screenshots, those models uses HD textures and they looks amazing.
If you are looking at the screenshots with a resizable window, just copy URL with right click on image, and open in a new window to see all the details. All the screenshots are included in the zip file in 1080p 100% quality jpg.
I dont use AA nor pre-sharpen cause i need some performance with my GTS250 @ 1080p but if you have enough graphic card, just turn FXAA on (inside config file). All screenshots are without FXAA, so if you dont have the last hardware you still can enjoy the game with awesome graphics and great framerate.
Imo, with this config (or any sharpen mod) text books are lot more readable, without the sharpen effect text is really blurry, you will need glasses after reading 3 or 4 books! PC screens are not TV screens.
With this recommendations you will get a more fine-tuning experience and less frustration when testing your best settings. This are not final values cause everyone has diferent hardware and it may vary a bit (display, drivers, etc..), so ill guide you with some reference values from my own testings to get the best values whithout losing too much performance.
As said before, this settings are more focused to low end/mid/old game rigs or ppl who dont want to waste performance on fx.
///// HOW-TO /////
=== Activate FXAA ===
#define USE_ANTI_ALIASING 1
____________________________________
=== Increase/decrease sharpen ===
in POST_SHARPEN section search for:
float Sharpen = 0.15;
to reduce the effect replace for:
float Sharpen = 0.12; (to 0.10)*
to increase the effect replace for:
float Sharpen = 0.18; (to 0.20)*
____________________________________
=== Activate/remove dark corners ===
1 to activate, 0 to deactivate:
#define USE_VIGNETTE 1
#define USE_VIGNETTE 0
____________________________________
=== Increase/decrease dark corners darkness ===
decrease:
#define VignetteAmount -0.20 (you can try with -0.10 or -0.05)
increase:
#define VignetteAmount -0.20 (you can try with -0.25 to -0.50)
*All modifications are allways inside injFX_Settings.h file.
*Values inside () are fine-tuning recomended values, dont copy into the settings file.
*You can activate/deactivate FX ingame with PAUSE key (from keyboard)
*Remember to disable FXAA from game launcher.
*You cannot use any OSD program with this kind of filters.
*If your game crashes to desktop at start, just re-run launcher options and save settings.
*Shadows in ultra quality may cause some slow-downs, just change shadows to lower quality.
///// BEFORE INSTALL /////
-Remember to download the -- Full Pack -- version first, all that files are needed to work.
-Dont overwrite without a backup!
-If you had another FX mod installed, just move/uninstall first or overwrite when installing this one.
-Make sure you got last directx and drivers.
-Dont install many mods at same time without test if it works (specially mods outside Data folder)
-Use common sense.
///// YOU WILL NEED /////
FXAA Post Process Injector by [some dude]
*included in the -- FULL PACK -- download
* -- FULL PACK -- includes 1.0 settings
Installation and info inside -- FULL PACK -- readme.txt
Basically, just copy the content in the same folder as TESV.exe and remove to uninstall.
///// INSTALL/UPDATE SETTINGS //////
Copy/replace injFX_settings.h in the same folder as TESV.exe (backup old file if necessary)
///// OPTIONAL RECOMMENDED MODS /////
Enhanced Night Skyrim
http://skyrimnexus.com/downloads/file.php?id=85
Enhanced Blood Textures
http://skyrimnexus.com/downloads/file.php?id=60
///// CREDITS /////
I just done the fine-tuning, all credits goes to mod creators:
Injection method provided by:
[some dude]
-----------------------------
Code added and aranged by:
[some dude]
BeetleatWar1977
[DKT70]
Violator
fpedace
FX mods are awesome, but its hard to get the right settings, it took me many hours to get mines, and maybe someone will like to use.
This mod is basically a settings file for "FXAA Post Process Injector" mod by [some dude] originally uploaded by Retspadez (old version)
///// FEATURES /////
1.0
- Balanced sharpen effect.
- Balanced saturation (more realistic).
- Get rid of overall greenish atmosphere.
- Slightly bluish atmosphere will make your sunsets look awesome.
- More realistic deep blue starry sky at night, best ever with "Enhanced Night Skyrim" mod.
- More dark sense inside dungeos or in shadow spots (if you like immersion).
- Instant HD textures in most of weapon/equipment in 1st and 3rd view and inventory/vendors.
- Instant HD textures in most of buildings in mid and far range.
- Light weight, dont use too many resources, dont use FXAA or pre-sharpen, great for low/mid/old rigs
- You get a pseudo-AA for free as post-sharpen side effect :P
2.0
- Removed bloom filter.
- Slightly lowered sharpen effect.
- Slightly increased saturation effect.
- Lower impact on corner darkness (VIGNETTE), but still there (i love it).
- Same brightness as vanilla, dont look like you wearing sun glasses.
- More overall vanilla look alike but still with sharpen and more blue sky.
*Look at the new screenshots
///// TIPS /////
Its recommended a minimum of 8 anisotropic filtering samples to get good looking roads and far away stuff, you can configure this with the game launcher.
You can use texture packs to make it look even better, but i dont recommend resized+sharpen texture packs, cause you will get double sharpen and its not a good idea, its better to get real HD texture packs. Just look at loading screen screenshots, those models uses HD textures and they looks amazing.
If you are looking at the screenshots with a resizable window, just copy URL with right click on image, and open in a new window to see all the details. All the screenshots are included in the zip file in 1080p 100% quality jpg.
I dont use AA nor pre-sharpen cause i need some performance with my GTS250 @ 1080p but if you have enough graphic card, just turn FXAA on (inside config file). All screenshots are without FXAA, so if you dont have the last hardware you still can enjoy the game with awesome graphics and great framerate.
Imo, with this config (or any sharpen mod) text books are lot more readable, without the sharpen effect text is really blurry, you will need glasses after reading 3 or 4 books! PC screens are not TV screens.
With this recommendations you will get a more fine-tuning experience and less frustration when testing your best settings. This are not final values cause everyone has diferent hardware and it may vary a bit (display, drivers, etc..), so ill guide you with some reference values from my own testings to get the best values whithout losing too much performance.
As said before, this settings are more focused to low end/mid/old game rigs or ppl who dont want to waste performance on fx.
///// HOW-TO /////
=== Activate FXAA ===
#define USE_ANTI_ALIASING 1
____________________________________
=== Increase/decrease sharpen ===
in POST_SHARPEN section search for:
float Sharpen = 0.15;
to reduce the effect replace for:
float Sharpen = 0.12; (to 0.10)*
to increase the effect replace for:
float Sharpen = 0.18; (to 0.20)*
____________________________________
=== Activate/remove dark corners ===
1 to activate, 0 to deactivate:
#define USE_VIGNETTE 1
#define USE_VIGNETTE 0
____________________________________
=== Increase/decrease dark corners darkness ===
decrease:
#define VignetteAmount -0.20 (you can try with -0.10 or -0.05)
increase:
#define VignetteAmount -0.20 (you can try with -0.25 to -0.50)
*All modifications are allways inside injFX_Settings.h file.
*Values inside () are fine-tuning recomended values, dont copy into the settings file.
*You can activate/deactivate FX ingame with PAUSE key (from keyboard)
*Remember to disable FXAA from game launcher.
*You cannot use any OSD program with this kind of filters.
*If your game crashes to desktop at start, just re-run launcher options and save settings.
*Shadows in ultra quality may cause some slow-downs, just change shadows to lower quality.
///// BEFORE INSTALL /////
-Remember to download the -- Full Pack -- version first, all that files are needed to work.
-Dont overwrite without a backup!
-If you had another FX mod installed, just move/uninstall first or overwrite when installing this one.
-Make sure you got last directx and drivers.
-Dont install many mods at same time without test if it works (specially mods outside Data folder)
-Use common sense.
///// YOU WILL NEED /////
FXAA Post Process Injector by [some dude]
*included in the -- FULL PACK -- download
* -- FULL PACK -- includes 1.0 settings
Installation and info inside -- FULL PACK -- readme.txt
Basically, just copy the content in the same folder as TESV.exe and remove to uninstall.
///// INSTALL/UPDATE SETTINGS //////
Copy/replace injFX_settings.h in the same folder as TESV.exe (backup old file if necessary)
///// OPTIONAL RECOMMENDED MODS /////
Enhanced Night Skyrim
http://skyrimnexus.com/downloads/file.php?id=85
Enhanced Blood Textures
http://skyrimnexus.com/downloads/file.php?id=60
///// CREDITS /////
I just done the fine-tuning, all credits goes to mod creators:
Injection method provided by:
[some dude]
-----------------------------
Code added and aranged by:
[some dude]
BeetleatWar1977
[DKT70]
Violator
fpedace