


0 of 0


About this mod
Realism-driven ENB preset based on RealVision ENB. Designed specially for Climates of Tamriel V (5.0) in combination with either ELFX, RLO or Vanilla interior lighting. Users can choose between several performance levels. Features unique installation using your preferred mod manager and a new automated Setup without any copy-pasting/editing files!
- Requirements
- Permissions and credits
- Changelogs


________________________________________________________________________________________

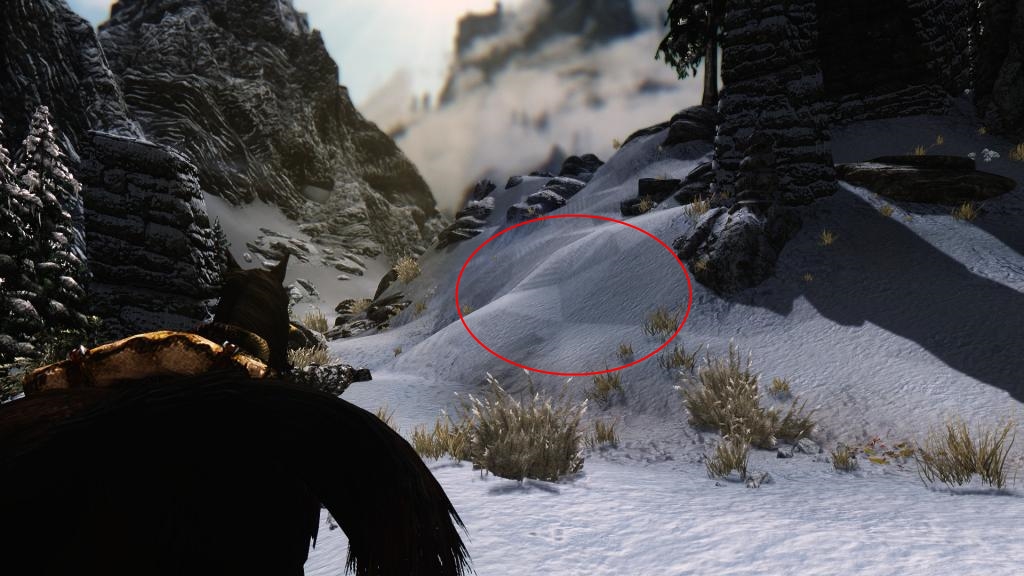
Showcase by Sinitar Gaming / DonProtein (ENB version 308R2.0.2):
________________________________________________________________________________________

Past
RealVision ENB for Climates of Tamriel V
SkyrimTuner's RealVision ENB is not very well optimized for use with the latest version of Climates of Tamriel. In fact, it isn't at all.
This will sometimes result in unintended, different or weird visuals, especially so for the skies.
After keeping CoT 3.1 for a while, I decided to go with CoT V while attempting to adjust RealVision instead to make it work better with CoT V.
The first results worked out pretty well and so I continued adjusting RealVision. Since I had noticed a rising demand for RealVision + CoT V, I decided to upload my RealVision based preset to the Nexus as SkyrimTuner retired from modding, with full permissions from him of course. And so, RealVision ENB for Climates of Tamriel V came to be.
Present
Revenant ENB
Revenant ENB is the successor of my RealVision ENB for Climates of Tamriel V preset. Just like its predecessor, Revenant ENB is still based on the original RealVision ENB by SkyrimTuner under the hood (mainly with regard to shaders). It's just much more personalized and refined than RealVision ENB for Climates of Tamriel V, making it a completely new ENB that deserves a name of its own.
Revenant ENB aims for ultimate realism and is designed specially for CoT V in combination with either ELFX, RLO or vanilla interior lighting. Revenant ENB targets mid-range to high-end systems with priority on visuals and effects, but people have the option to choose from four different performance presets to suite their needs, so an older or less powerful system does not have to be a limiting factor.
As of now, Revenant ENB does not use custom weathers. For this reason, not every weather will look as flawless as the other, simply because it's impossible to make one single preset work with the hundreds of weathers that a weather mod brings into the game.
However, I strive to keep improving and updating Revenant ENB (both graphically and ENBSeries wise) until there's literally nothing that can be improved while maintaining balance with only one configuration file. When I get to that point, I will start integrating custom weathers.
One unique feature that really separates Revenant ENB from most other ENBs out there, besides the highly detailed installation guide, is the ability to install this ENB using a mod manager of your choice to utilize the FOMOD installer, just like you would install any other mod in your mod manager. And if that wasn't enough, it even comes with a new unique Setup script that offers you fully automatic (un)installation and configuration of Revenant ENB, ENBoost and Skyrim's settings after installing it in your mod manager. In other words, no copying, pasting and editing files anymore!
The installation guide is divided into 4 main Installation Steps, plus reinstalling/updating and uninstallation instructions, which are all indicated with headings and bright green numbers.
If you want to switch to CoT V, or you are simply looking for something new or different than the old but good RealVision, go ahead and give Revenant ENB a try and leave a comment about your experience!
________________________________________________________________________________________

ENB is a collection of visual effects created by Boris Vorontsov. It overhauls everything from anti-aliasing and depth of field to lighting and water. It gives Skyrim the eye candy effects it deserves.

Revenant ENB is a finely tuned compilation of ENB effects and post processing. Each setting has been hand tweaked to deliver most realism at the lowest performance cost possible.

Technically, an ENB is compatible with every mod on the Nexus. However, Revenant is designed to look especially good with a particular set of lighting and weather mods. Using any weather or lighting mods beside the ones listed in this guide will result in your game looking weird. All other mods are fine.

ENB is very GPU intensive, and Revenant ENB is designed for mid-range to high-end systems with priority on visuals. It will most likely be the most FPS hungry part of your game. Its impact will be larger or more noticeable on low-end to mid-range systems though, with only a few mods installed. However, this doesn't mean that Revenant can't be used on older systems! This ENB comes with several performance levels to choose from to suite your needs, and you can disable even more effects if better performance is desired.

- Improve the graphics and keep Revenant ENB updated for the latest ENB binaries
- Make custom weathers + extensive weather patch (one of current projects, no ETA on that)
- Make a preset for Mangaclub's Vivid Weathers (maybe, no ETA on that)
________________________________________________________________________________________

General Video Tutorials:
How to use Nexus Mod Manager (NMM), not recommended:
YouTube Playlist by Gopher
How to use Vortex (Bèta), not recommended:
YouTube Playlist by Gopher
How to use Mod Organizer (MO), highly recommended, even for beginners:
YouTube Playlist (MO1) by Gopher
YouTube Playlist (MO1) by GamerPoets
YouTube Playlist (MO2) by GamerPoets
Revenant ENB versioning scheme:
binariesRmajor.regular(.minor/bugfix)
Before we begin:
Revenant ENB is designed to be installed using a mod manager
I highly recommend you to start using Mod Organizer (MO) from now on!
IMPORTANT NOTES regarding Mod Organizer:
As you may have noticed, since version 1.3.11 MO is no longer officially supported for LE (v1.3.11 also doesn't work properly anymore). Instead, go to this page and download "Mod Organizer 1 Legacy" from the Miscellaneous files section.
Updating from MO1 to MO1 Legacy:
To update your old MO1 installation to MO1 Legacy, I recommend this procedure: Go to your MO root folder and delete (or move/cut to a backup folder) everything EXCEPT your downloads, mods, overwrite and profiles folders. Then, open the new MO1 Legacy .zip archive you just downloaded and copy/drag ALL of its contents to your MO root folder (where your 4 remaining folders are located). You might have to log in again and reconfigure some of the settings when starting MO1 Legacy for the first time.
Updating from MO1 to MO2 (not necessary):
If you really want to update from MO1 to MO2, have a look at this video. Be sure to read MO2's mod page description first to see what is different and to decide whether those changes are important to you or not, because MO2 handles some major features differently compared to MO1. MO1 Legacy still works fine, and some of you might think "don't fix what ain't broken", like I do ^^
Mod Organizer will make your life, and also my life, so much easier! In addition, Mod Organizer is a lot less demanding in terms of rules and requirements in verifying scripts when it comes to installing (FOMOD powered) mods, whereas NMM will not allow any kind of deviation from its standards as it verifies these scripts before using them. NMM will just throw an error at you when it sees something it doesn't like, preventing installation.
Don't be afraid to switch, the process of installing mods is very similar. If you have any questions along the road, I'll help you out personally!
________________________________________________________________________________________

>>> Jump to Installation Step 2 if you JUST want Revenant ENB, or come back here later!
Spoiler:
Show
Install all or some of the following mods listed here in their specific order if you want your Skyrim to look like it should!
These are all mods selected to enhance your graphics or visuals, mostly concerning textures. It will make your Skyrim just look a lot better like in my screenshots. You can choose different texture resolutions for many texture mods to maintain desired performance levels.
The mods below represent just a handful of must-have mods from my personal modlist. Personally I'm using around 600 mods, including a lot of texture mods (mainly 2/4K), so my screenshots will probably still look quite a bit different for that matter, compared to your game.
>>> If you want to run Skyrim after every (few) mod(s) you install to test your game (which isn't necessary when dealing with textures only), and you already run into CTD (crash to desktop) and/or infinite loading screen problems, you are most likely experiencing memory issues (in other words: hitting memory limits), providing your load order is solid.
There are a couple of things you can do first that will probably solve your memory issues straight away:
- Go to Installation Step 4.1 and install the Skyrim Memory Patch using SKSE.
- If that doesn't help, also try installing ENBoost temporarily without Revenant ENB as explained here, in conjunction with Installation Step 3.5 (settings don't have to be perfect yet). When you then get to Installation Step 3 later on after installing the mods you want, first delete these 3 files before proceeding to avoid any problems.
- If still no luck, take a deeper dive into Installation Step 4 and the FAQ.
>>> NMM users: Always overwrite when prompted (say NO to update and YES to install normally)! If files need to be deleted/hidden, do this manually prior to installing and overwriting mods.
>>> MO users: Always overwrite the previous mod in the order, just like other users. MO users can however play around with the mods and files after installation by just dragging them around and hiding them when needed.
>>> Always install all patches after the mod you've downloaded it from, AND after the mod the patch is made for, obviously!
E.g., Install the ELFX patch from Vivid Landscapes - Dungeons and Ruins after that mod (the main file), but ALSO after ELFX itself further down in your mod list (when you install that later on).
>>> Apart from patches for ELFX or RLO, you generally should never let any mod overwrite ELFX or RLO if not stated otherwise on the mod page! These meshes are crucial for these lighting mods to work properly.
>>FPS<< Stands for potentially performance/VRAM hungry mods!
>>FPS<< Stands for potentially very performance/VRAM hungry mods!
- Skyrim Particle Patch & Skyrim Subsurface Scattering Patch for ENB by mindflux - Download from there, or my Optional Files with my nifty, modular All-in-One FOMOD installer (up-to-date)
- Ruins Clutter Improved by raiserfx
- Farmhouse Chimneys by Scarla - Install all needed patches
- SkyFalls and SkyMills - Animated Distant Waterfalls and WindMills by SjoertJansen - Use the FOMOD-Bain installer and install all needed patches
- Ultimate HD Fire Effects by rheadude >>FPS<< - Also install the Ultimate HD Candle Flames from the Optional Files
- Vivid Landscapes - Dungeons and Ruins by Hein84 - Install for ENB, also install the SMIM, ELFX and BDS patches (in that order) from the Optional Files if using those mods
- Static Mesh Improvement Mod - SMIM by Brumbek
- Skyrim HD - 2K Textures by NebuLa1 >>FPS<< - Install the "Complete Full" all-in-one package, or the "Lite" package if you need better performance. I recommend NOT using his "skyrimgalaxy.dds", Vanilla HighRes texture looks a lot more natural and realistic with great nebulosity imo, delete or hide it
- Skygazer - Constellations HD 2K (with nebulae) by fadingsignal
- Skygazer Moons - Masser and Secunda Ultra HD 4K (2K and 1K) Moon Textures by fadingsignal
- The Ruffled Feather - Mod Collection by OpticShooter - Custom Install: I'm using Better Dynamic Snow (BDS), Just-Ice, Moss Rocks, Suped-Up Stalhrim and Red Mountain Particle Plume. (The Ruffled Feather is currently only available in the Miscellaneous Files section of STEP)
- Transparent and Refracting Icicle and Frost Atronach by Skysan4298
- TreesHD_Skyrim_Variation by namotep >>FPS<< - Install the "High" or "Low" version if you need better performance
- Skysight - Simply Bigger Trees (SSBT) by fadingsignal >>FPS<< - Also install the "Slower Moving Branches Plugin"
- Detailed Terrain and Tree LoD by Rennn
- Skyrim High Definition LODs - Dark LOD Textures by AnarchoArchitect - I recommend the "Darker and Grassy" version. If using "A Quality World Map" (+ HQ3DMap meshes), install that first
- Skyrim Flora Overhaul (SFO) by vurt >>FPS<< - I'm using the latest version + Large Juniper Trees
- Bent Pines II by vurt
- 4K Parallax Treebark >>FPS<< by FKPX3118 - Also install the SSBT patch if using that mod, and 2K textures if you need better performance
- Gildergreen 4K Parallax by SRW0
- Project Parallax Remastered by osmodius - If using Skyrim HD, ONLY install the HD2K version from the Optional Files, also install the 2 updates afterwards. If using STPT, DON'T use his "road01snow01_p.dds", delete or hide it
- Skyrim 2017 Terrain Parallax Textures (STPT) by Exalerion - My own texture mod. Install the 1K or 2K package if you need better performance
- Unbelievable Grass 2 REDUX (UG2) >>FPS<< by AceeQ - My personal preference, comes with its own INI file so no tweaking needed (increase iMinGrassSize in UG2's INI file for better performance). Load the plugin AFTER any SFO plugins (I recommend making a rule in LOOT)
- OR Verdant - A Skyrim Grass Plugin by preeum >>FPS<< - Set iMaxGrassTypesPerTexure=15 and iMinGrassSize=60 (or >60 for better performance) in Skyrim.ini
- OR Grass on Steroids by skyrimaguas - For more Vanilla grass with better performance than regular grass mods (or even Vanilla grass), use the SFO Edition if using SFO
- Vivid Landscapes - Rocking Stones and Mountains Two by Hein84 - Also install the Moss Rocks patch if using Moss Rocks from The Ruffled Feather
- Vivid Landscapes - Volcanic Area by Hein84 - Install for ENB, also install the Update for All Types afterwards
- Vivid Landscapes - Cliffs and Creeks by Hein84 - Install for ENB, also install the xRocking Stones and Mountains Parallax patch
- Vivid Landscapes - Tundra Moss Revised by Hein84 - Also install Parallaxmap for ENB, plus the Rocking Stones and Mountains Two and SMIM patches
- Vivid Landscapes - Birthsigns by Hein84
- Vivid Landscapes - Imperial Forts by Hein84 - Install for ENB, and also install the ELFX patch after ELFX if you will use that lighting mod
- Vivid Landscapes - Castle Volkihar by Hein84 - For Dawnguard users, also install the ELFX patch after ELFX if you will use that lighting mod
- Vivid Landscapes - Orc and Farmhouses by Hein84 - Also install the ELFX patch again and the SMIM Carriage, SMIM Fences and SMIM Ropes
- Fences of Skyrim - No more flickering fences by Therobwil - ONLY install the Vivid Landscapes - Orc and Farmhouses Compatibility Patch version from the Miscellaneous Files if using that mod!
- aMidianBorn Caves and Mines by CaBaL
- Immersive Fallen Trees Mod by Jurassic4LIFE
- Unique Flowers And Plants by navajothkk
- Deathbell HD - All-New Textures (2K-1K) by fadingsignal
- High Definition Ivy by joshezzell
- Replacement Ivy by thonk
- Snowy Thicket by Hein84
- Dust Effects by HHaleyy
- Realistic Smoke and Embers by isoku
- Ultimate HD Torch by BuzzDee84
- Smoking Torches and Candles by mindflux - Install the main file only. (Alternatively, only install the "Smoking Torches" optional file if you prefer ELFX's or RLO's candle smoke or if you don't want both.)
- RUGNAROK by Gamwich
- PELTAPALOOZA - Pelts of Skyrim Expansion by Gamwich
- Pelt by Pfuscher by Pfuscher - Install all 4 Main Files
- Realistic Water Two by isoku >>FPS<< - Also install Realistic Water Two - ENB Textures from the Optional Files
- Watercolor for ENB and Realistic Water Two by paganmetalf - Install the Realistic Needs and Diseases version if using that mod
- Transparent wave spray Retexture by Pfuscher by Pfuscher
- Dynamic Distant Objects LOD - DynDOLOD by Sheson For more experienced users or screenarchers who want something new and better than the old, standalone LOD mods should give DynDOLOD a try. It has more features and possibly even gives better performance.
>>> Instead of installing every Vivid Landscapes mod separately, you can also try Vivid Landscapes - All in One by Hein84. This mod includes most of the mods from the Vivid Landscapes series listed above. The All-in-One (AiO) package will offer easier installation, but at the cost of customizability because it's everything or nothing in this case, and you're mostly bound to one single texture resolution for all the mods in the package. Therefore, I actually do not recommend it! (If you want to use the All-in-One pack, remember to install all the patches for the mods you use.)
===>>> NOW USE LOOT to sort your Load Order <<<===
>>> The settings FixParallaxBugs and FixParallaxTerrain under [FIX] in enblocal.ini will already be set to true by default after installing Revenant ENB so that the parallax effect actually shows up on textures. FixParallaxBugs must always be enabled when using parallax textures of any kind. FixParallaxTerrain only needs to be enabled as well when using terrain (ground) parallax textures, obviously.
If you don't use any object and terrain parallax texture mods, you should disable the settings to avoid any artifacts.
>>> Also, if you want to compare textures yourself, download this little handy tool called Windows Texture Viewer!
________________________________________________________________________________________

2.1 Weather mods
>>> Revenant ENB is optimized for use with a particular set of weather and lighting mods, especially Climates of Tamriel V and Vivid Clouds and Fogs. Install these mods in this order:
- Climates Of Tamriel - Weather - Lighting - Audio (CoT) by jjc71 - Install v5.0 using only the Default Experience settings in the installer, and also install the official DLC patches if you have those
- Vivid Clouds and Fogs - Vanilla and Climates of Tamriel (VCaF) by Mangaclub - This is basically an extended, updated version the Weather Patch, but designed for CoT 5.0 with many great features! Install all 6 categories of preferred resolution in the first step, and also install the Extended Weathers: Groundfogs + Windyclouds for both Vanilla AND CoT. Optionally, also install the AOS patch if using that mod (if so, DON'T install the CoT 3.1 patch from AOS2)
>>> Not required, but still very much recommended (install after CoT and VCaF):
- True Storms - Thunder and Rain Redone by fadingsignal - Install only for Vanilla, NOT for CoT (because of the patch below). Set Enable=false in the [RAIN]-section of enbseries.ini (or the in-game ENB GUI) to enable True Storms' own rain textures if you prefer those over ENB rain
- True Storms- Climates of Tamriel v5 patch by colinswrath - Install and load after TrueStorms.esp. It must be used INSTEAD of the CoT patch from the original True Storms mod
- Real Skyrim Snowflakes - (Physical) Vivid Snow by Mangaclub - Hishutup - Kesta - Carefully read the description, especially the installation section! You have to install it using the installer and then run the script in TES5Edit. I don't recommend using Physical Snow yet
- Lightning during Thunder Storms by Minty - In the MCM-menu, I recommend changing the minimum and maximum cell distances for both fork and sheet lightning to 2 and 5 to avoid (almost) getting struck all the time or to avoid R.I.P.-headphone-users scenarios (lol), and also to see lightning more distant, which is more realistic imo
- Lightning during Thunder Storms - Climates of Tamriel - Patch by Minty - Only if using the main mod of course, still works with CoT 5.0, but not all weathers will match perfectly
- Obsidian Mountain Fogs For Legendary Edition by HiShutUp Arindel Dr Megaloblast
- Morning Fogs Refined by egocarib
2.2 Lighting mods (interiors)
>>> Now decide to go on with Enhanced Lights and FX (ELFX), Realistic Lighting Overhaul (RLO), or neither of these.
These videos from Gopher might help you with your decision: Video 1 - Video 2
Option A: Enhanced Lights and FX (recommended, my personal preference!)
Install the latest version of Enhanced Lights and FX by anamorfus:
- Window 1: Install ELFX Enhancer + ELFX - Exteriors + ELFX - Enhanced Ice
- Window 2: Install SMIM Meshes if using SMIM (+ Moonpath and/or "No player home" patches if needed)
- Window 3: Install No Candle Smoke if you prefer the candle smoke from Smoking Torches and Candles or don't want both
- Optional: Install Enhanced Torches and Fire for ELFX from my Optional Files and load after it
Option B: Realistic Lighting Overhaul (less realistic/refined than ELFX)
Install the latest version of Realistic Lighting Overhaul by The Realistic Lighting Team:
- Window 1: Install all options (except "RLO Effects" if you prefer the candle smoke from Smoking Torches and Candles or don't want both, but you'll miss out on some other features)
- Window 2: Install the CRF and/or IC patch if needed
- Optional: Install Enhanced Torches and Fire for RLO from my Optional Files and load after it
Option C: Vanilla (new: vanilla interior lighting)
Choose this option to use Revenant ENB without any interior lighting mod (for your personal compatibility or performance reasons). It can also be useful when playing a quest/new lands mod that adds content not covered by lighting mods. This version of Revenant ENB further darkens and enhances the interiors in an attempt to somewhat match the ambient lighting levels of Option A and B together with the respective lighting mods.
However, this option will of course not look as great and realistic compared to using a real lighting mod, and keep in mind that you will also miss out on some of the additional features that these lighting mods come with.
- Optional: Install Enhanced Torches and Fire for Vanilla Lighting from my Optional Files
===>>> NOW USE LOOT to sort your Load Order <<<===
________________________________________________________________________________________

3.1 Install DirectX
- If you haven't already, download and install the "DirectX End-User Runtimes (June 2010)" from the Miscellaneous Files. It's required for ENB to work!
3.2 Install ENBSeries
- Download ENBSeries v0.407 (latest v7, updated 2020-03-09) from enbdev.com (scroll down all the way to the bottom and click on the download icon) or mirror and put the .zip archive somewhere convenient on your PC.

- Extract the archive, open the folder, and copy ONLY d3d9.dll AND enbhost.exe from the WrapperVersion folder to your Skyrim root folder ...\Skyrim\ (i.e. where "TESV.exe" is located). Alternatively, just open the archive and drag these 2 files from there directly to ...\Skyrim\.
3.3 Activating Revenant ENB in your mod manager (FOMOD installer)
- Download Revenant ENB from the Main Files section using your preferred mod manager and install the options of your choice in the offered FOMOD installer, carefully reading the description of each option. When done, activate the mod. Installation Step 3.4 below is about the last step (step 8) in the FOMOD installer: installing Revenant ENB in your Skyrim root folder.
>>> In the table below, you can see which effects are enabled and disabled for each performance preset, and also the quality level of the effects. Revenant ENB utilizes all existing ENB effects except "Prepass", "SkinSpecular" and "ProceduralSun". Therefore, other effects not listed in the table below will always be enabled by default in order to maintain the intended look.
3.4 Installing Revenant ENB in your Skyrim root folder (Revenant ENB Setup)
After installing AND activating Revenant ENB in your mod manager, one more step needs to be done to finish the installation: copying all the necessary files to your Skyrim root folder with the correct settings.
Installation instructions for this step are included in the last step (step 8) of the FOMOD installer, but here they are as well for your convenience in case you need to look back:
Automatic installation using the Revenant ENB Setup: (highly recommended)
For NMM/Vortex/Wrye Bash users:
- Go to ...\Skyrim\Data\Revenant ENB Files\, start Revenant ENB Setup.vbe, choose "Install" and follow the instructions.
For Mod Organizer (MO) users:
- Go to ...\Skyrim\Mod Organizer\mods\Revenant ENB\Revenant ENB Files\, start Revenant ENB Setup.vbe, choose "Install" and follow the instructions.
>>> If you don't see the .vbe file extensions, don't worry! This is just a matter of how Windows' folder view setting are configured on your PC. Wanna know more? Just Google "hide extensions for known file types".
Manual installation: (much more work and more error-prone)
For NMM/Vortex/Wrye Bash users:
- Copy all files and folders starting with the letter 'e' from ...\Skyrim\Data\Revenant ENB Files\ to ...\Skyrim\.
For Mod Organizer (MO) users:
- Copy all files and folders starting with the letter 'e' from ...\Skyrim\Mod Organizer\mods\Revenant ENB\Revenant ENB Files\ to ...\Skyrim\.
________________________________________________________________________________________
* VERY IMPORTANT: Installation Steps 3.5 to 3.7 are about correctly configuring your ENBoost, Skyrim and GPU settings for Revenant ENB!
3.5 Configuring ENBoost settings (enblocal.ini)
>>> You ONLY need to perform this step manually (using the spoiler below) if you have either:
- skipped the automatic ENBoost configuration while performing an automatic installation using the Revenant ENB Setup
- performed a manual installation of Revenant ENB by means of copying and pasting the files into your Skyrim root folder
Spoiler:
Show
Navigate to your Skyrim root folder ...\Skyrim\, open "enblocal.ini" and adjust/verify the following settings accordingly:
[MEMORY]
ExpandSystemMemoryX64=true <--- If you have 32-bit Windows, set it to "false". ALSO: if you are going to use the Skyrim SKSE Memory Patch, set it to "false" (read here why)! However, you can experiment yourself as the size of your "initial heap allocation" (Block 1 or DefaultHeapInitialAllocMB in SKSE.ini from Installation Step 4.1) at which Skyrim will start to CTD (when 'ExpandSystemMemoryX64' is set to 'true') will be different from system to system and modlist to modlist.
ReduceSystemMemoryUsage=true <--- Enables the ENBoost features to dramatically reduce CTDs and other issues caused from reaching Skyrim's memory limit.
DisableDriverMemoryManager=false <--- Set to true when experiencing CTDs even while ENBoost features are enabled, mainly intended for AMD-users (helps to confirm video driver issues).
DisablePreloadToVRAM=false <--- Enabling could potentially help to load a save game which fails to load otherwise but may cause stuttering.
EnableUnsafeMemoryHacks=false <--- Enabling this is generally not safe, but it's a workaround for users experiencing large amounts of stuttering with more than 4 GB VRAM. ReduceSystemMemoryUsage=true is required for this setting when set to true. Set to false if ExpandSystemMemoryX64=true. Also, EnableUnsafeMemoryHacks=true can contribute to CTDs at startup when using the Skyrim Memory Patch. So you should probably never have to enable this setting.
ReservedMemorySizeMb=XXX <--- Sets the size of a buffer in megabytes used for swapping geometry and textures between VRAM and system memory.
For graphics cards with 1 GB VRAM or more, start with 128 as a baseline and increase with increments of 128 (256, 384, 512, ..., 1024) until stuttering has ceased. Min. value is 64, max. value is 1024.
A general rule of thumb: [MB VRAM] / 8 (e.g., 4096 / 8 = 512)
VideoMemorySizeMb=XXXX <--- Sets the total memory in megabytes that will be used for the ENBoost dynamic memory allocation. All available VRAM, except for the amount set with ReservedMemorySizeMb, will be used first. If VideoMemorySizeMb is set to a value higher than the total VRAM of the user's graphics card, then ENBoost will use system RAM, if necessary, by running instances of enbhost.exe.
- For Windows XP systems, use this formula: [MB RAM] + [MB VRAM] - 2048 (1 GB = 1024)
- For Windows Vista and 7 systems, use this formula: [Total Available Graphics Memory] - 350
- For Windows 8 and 8.1 systems, use this formula: 4064 (OR [Total Available Graphics Memory] - 700 IF [TAGM] < 4064)
- For Windows 10 systems, use this formula: [Total Available Graphics Memory] - 700 (OR 4064 IF [TAGM] > 4064 AND you still have the DX9 4GB limit)
IMPORTANT:
Your [Total Available Graphics Memory], or TAGM, is not the same as your VRAM. To find your [Total Available Graphics Memory]:
Open the the Shortcut in the "Revenant ENB Files" folder and then click on "Advanced settings" (Windows Vista - 8.1) or "Advanced display settings > Display adapter properties (for Display *)" (Windows 10) in the new window.
The shortcut will probably not work for Windows Vista users, use Google to find out how to find your TAGM in this case.
IMPORTANT for Windows 8-10 users:
If you have 4 GB VRAM/TAGM or more and you use Windows 8/8.1, or Windows 10 and you have NOT yet received and installed the "Windows 10 Fall Creators Update", which was released on the 17th of October, 2017 (to enable your system to use more than 4 GB VRAM for DX9 applications), the maximum amount of VRAM you can use (and set in enblocal.ini) is 4064 MB, no matter how much VRAM you have and what the formula says. This is because Microsoft has, unintentionally, introduced a memory limit for DirectX 9 games/software (like Skyrim). This limit is 4064 MB and there is nothing which can be done to circumvent this limitation otherwise.
If you have no idea whether you've already installed the Update or not (very likely that you have by now), use Boris Vorontsov's VRamSizeTest tool for DX9. If it reports 4064, you have not installed the update yet.
EnableCompression=false <--- Enables/disables memory compression. Deactivating compression can reduce stuttering, but at the cost of more RAM usage. It's generally only recommended to be disabled on systems with more than 2 GB of VRAM, unless you're hitting your VRAM limit on a regular basis.
AutodetectVideoMemorySize=false <--- Because it keeps guessing wrong.
>>> Also, be sure to check out this page on STEP for more detailed info about memory settings and how to configure them correctly.
>>> I do NOT recommend using Boris Vorontsov's VRamSizeTest tool to calculate your "VideoMemorySizeMb" value as it keeps giving a different value every time you run it, and it also deviates from your [Total Available Graphics Memory], or TAGM. Use your TAGM instead, which is a reliable and fixed value calculated by your system based on your hardware.
>>> This is ENBoost! Don't get ENBoost from anywhere else, you already have it included with Revenant ENB and these INI tweaks! <<<
3.6 Configuring Skyrim settings (Skyrim.ini & SkyrimPrefs.ini)
>>> This ENB comes with its own AA (anti-aliasing) methods, which are Edge anti-aliasing (EdgeAA), Sub-Pixel anti-aliasing (SubPixelAA) and Anisotropic Filtering (MaxAnisotropy). Therefore, any AA methods provided by Skyrim need to be disabled to avoid any conflicts. Also some other Skyrim settings need to be adjusted for the ENB to work properly.
>>> There are exactly 2 ways you can go about this:
- Ignore the spoiler below. Use the fully automatic "INI Configurator" of the Revenant ENB Setup supplied by Revenant ENB (Revenant ENB Setup.vbe, also located in your "Revenant ENB Files" folder) to automatically configure your Skyrim.ini and SkyrimPrefs.ini settings (highly recommended). The INI Configurator will automatically make a backup of your INI files before doing anything. Also, don't worry about any comments/annotations you've made in your INI files, they will remain untouched!
- Manually configure your Skyrim.ini and SkyrimPrefs.ini settings, following the instructions in the spoiler below:
Spoiler:
Show
Of course, before doing anything, make a backup your INI files just to be on the safe side. This way you can look back at what you've changed when uninstalling Revenant ENB for example and restore your settings if wanted.
For NMM/Vortex/Wyre Bash-users:
- Go to ...\Documents\My Games\Skyrim\
For Vortex users who have enabled per-profile game settings:
- Go to C:\Users\*username*\AppData\Roaming\Vortex\skyrim\profiles\*profile ID*\
For MO-users:
- Go to ...Skyrim\Mod Organizer\profiles\*your profile name*\
Open Skyrim.ini and adjust/verify and save the following setting accordingly:
[DISPLAY]
iPresentInterval=1 <--- This, combined with EnableVSync=true in enblocal.ini, is important to avoid tearing. It enables VSync if you don't have it disabled in your Video Driver Control Panel.
Open SkyrimPrefs.ini and adjust/verify and save the following settings accordingly:
[IMAGESPACE]
bDoDepthOfField=1 <--- Set it to 0 if you want crystal clear underwater.
[DISPLAY]
bDeferredShadows=1 <--- Required for ENB, bDrawLandSchadows and bShadowsOnGrass to work!
bDrawLandShadows=1 <--- Required for ENB to work! (Get ugly landscape shadows? Go to the FAQ-section for solutions.)
bFXAAEnabled=0 <--- Set it to 1 if you prefer Skyrim's FXAA. But if you do so, deactivate EdgeAA in enblocal.ini to avoid too strong blur.
bFloatPointRenderTarget=1 <--- IMPORTANT! ENB won't work properly without it!
bShadowsOnGrass=1 <--- Required for ENB to work!
bTreesReceiveShadows=1 <--- Required for ENB to work!
fGamma=1.0000 <--- IMPORTANT! This is the in-game brightness Revenant ENB is optimized for! Don't touch the in-game brightness after setting this.
iMaxAnisotropy=0 <--- IMPORTANT! Disables hardware Anisotropic Filtering to prevent visual bugs and artifacts. ENB already comes with its own AF.
iMultiSample=0 <--- IMPORTANT! Disables hardware Antialiasing to prevent visual bugs and artifacts. ENB already comes with its own AA methods.
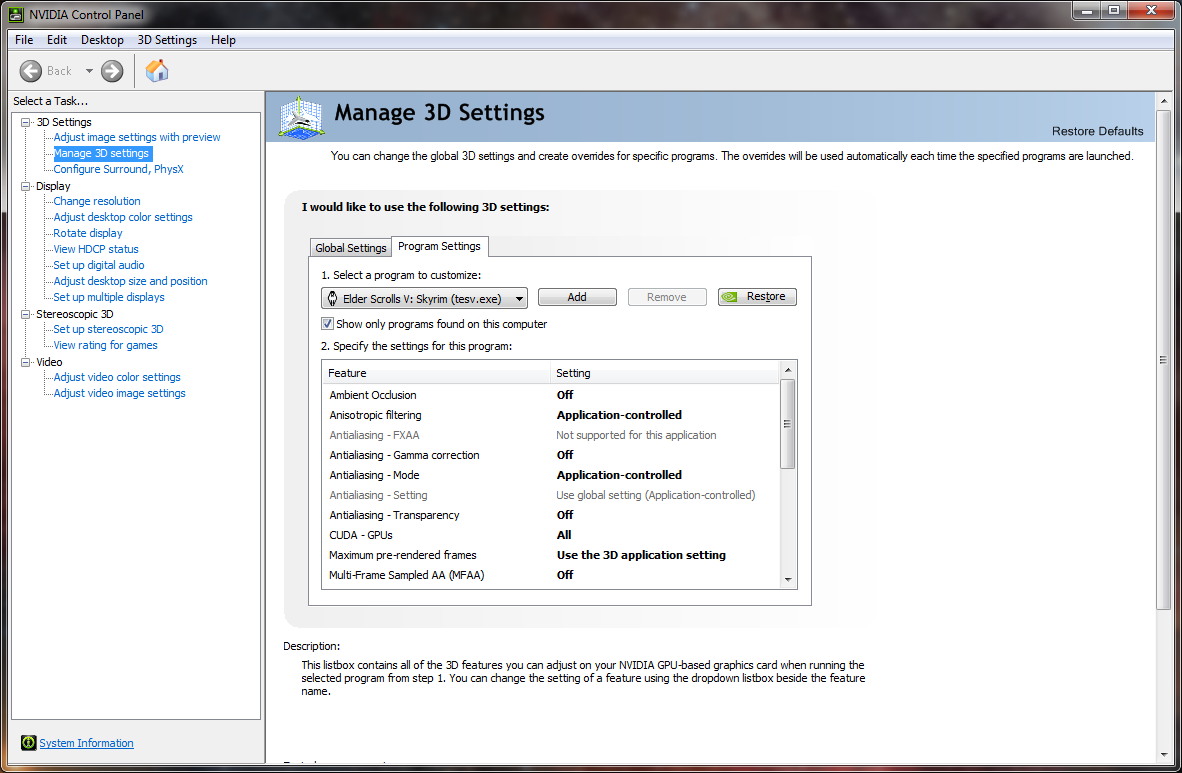
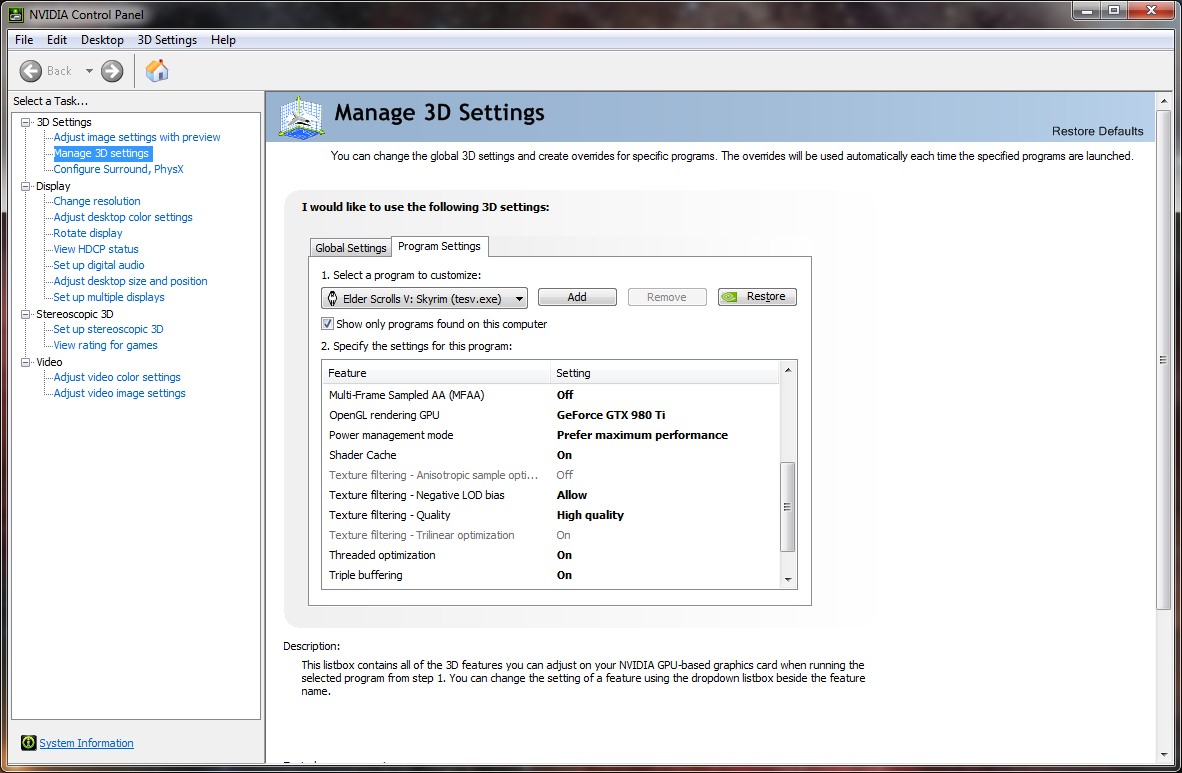
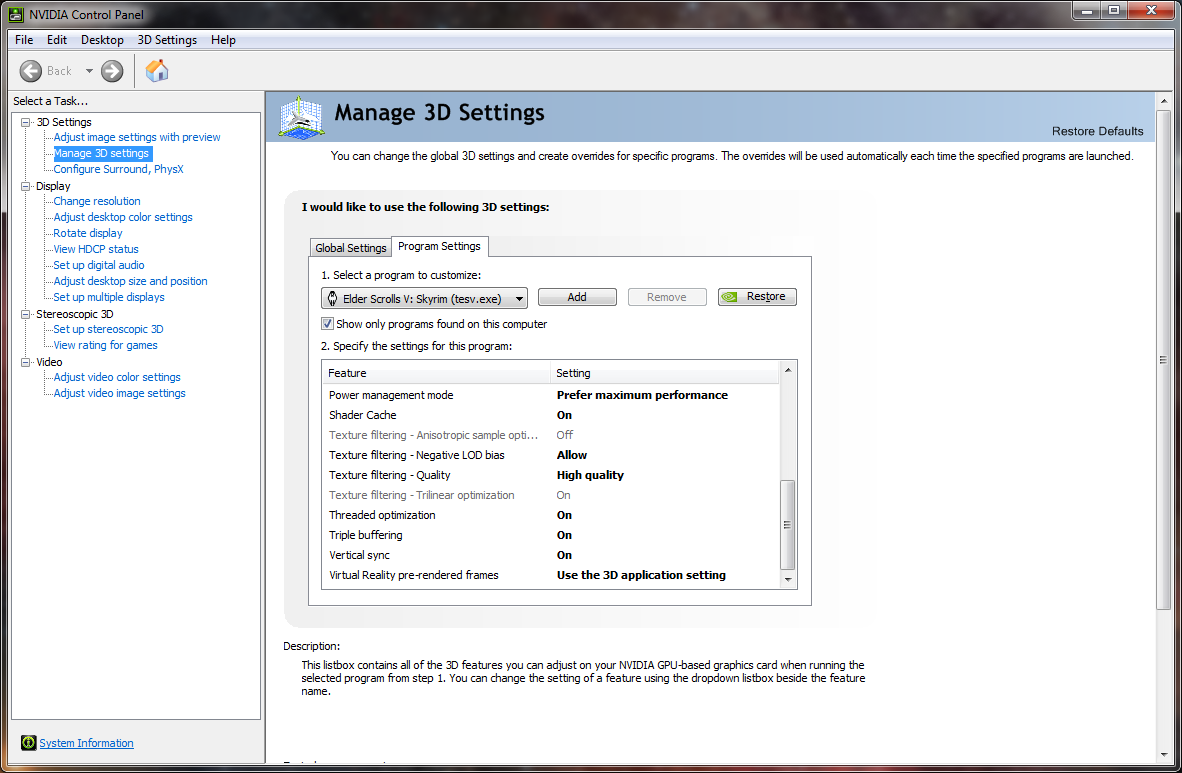
3.7 Graphics Card (GPU) settings
Spoiler:
>>> This ENB comes with its own AA (anti-aliasing) methods, which are Edge anti-aliasing (EdgeAA), Sub-Pixel anti-aliasing (SubPixelAA) and Anisotropic Filtering (MaxAnisotropy). Therefore, any AA methods provided by your GPU need to be disabled or set to application controlled to avoid any conflicts.
Show
>>> This ENB comes with its own AA (anti-aliasing) methods, which are Edge anti-aliasing (EdgeAA), Sub-Pixel anti-aliasing (SubPixelAA) and Anisotropic Filtering (MaxAnisotropy). Therefore, any AA methods provided by your GPU need to be disabled or set to application controlled to avoid any conflicts.
- Open up your GPU's Control Panel/Driver Settings and set Anti-aliasing and Anisotropic Filtering to "Application-controlled" (NVIDIA) / "Use application settings" (AMD). NVIDIA users also set FXAA and Ambient Occlusion to "Off".
- The settings from above are the most important ones, but NVIDIA users should take a look here, here and here to see the the full list of required driver settings for best compatibility and optimization. AMD users will probably have less but similar settings, and should also definitely take a look to compare.
- If you don't want all these settings set like this for every other game, it could come in handy to make a profile in your GPU Control Panel for the executable only (being TESV.exe and/or skse_loader.exe).
________________________________________________________________________________________
3.8 Optional & Miscellaneous Files
Take a look at my Optional and Miscellaneous files and choose your desired patches, plugins and other files!
3.9 Starting the game
Start your game using SKSE (skse_loader.exe) or TESV.exe. It's neither recommended nor needed to use the Skyrim Launcher anymore because this can reset some of the Skyrim(Prefs).ini settings we just changed! Besides, you should be running your game with SKSE anyway if you are using/going to use the Skyrim SKSE Memory Patch from Installation Step 4.1 below, which I strongly recommend! I personally can't even run VANILLA Skyrim without it!!!
3.10 Have fun!
________________________________________________________________________________________

Spoiler:
Show
4.1 Skyrim Memory Patch
Install the Skyrim Memory Patch using SKSE following the next steps:
- Install the latest version of SKSE if you haven't already.
- Navigate to ...\Skyrim\Data\ and see if there's a SKSE folder with a SKSE.ini file inside in the Data folder.
[Debug]
WriteMiniDumps=1
[Display]
iTintTextureResolution=2048
[General]
ClearInvalidRegistrations=1
EnableDiagnostics=1
[Memory]
DefaultHeapInitialAllocMB=768
ScrapHeapSizeMB=256
If there's no SKSE.ini file in your SKSE folder (in the Data folder), or no SKSE folder to begin with, then create them yourself:
- Make a new folder inside the Data folder and name it "SKSE".
- Inside the new Data\SKSE folder, create a text (.txt) file, copy the lines from above to the file and save the file as an INI (.ini) file (or just create an INI file right away and edit it directly if you know what you're doing).
Note for Mod Organizer (MO) users: The Memory Patch will only work when running Skyrim through MO if you install it using MO.
Make sure whether you've installed another mod that comes with a SKSE.ini file of its own that will overwrite the one you just created. If that is the case, adjust that SKSE.ini file by changing/adding the aforementioned lines to it or just delete or overwrite it if it adds nothing new.
See this page for more info on the SKSE Memory Patch and the above settings.
Also, if you want, watch these two videos from GamerPoets to get a better understanding of how the SKSE Memory Patch, Memory Blocks and the Memory Blocks Log from below work: SKSE, Memory Blocks Log
NOTE about DefaultHeapInitialAllocMB setting:
We started off with 768 MB as baseline, effectively doubling your memory, giving you a total of 512 MB on-screen memory which should be enough for most users. If you use a lot 4/8K textures and new content/lands mods, you could use higher values to prevent Block 1 from filling up (check this with "Memory Blocks Log", instructions further down). I personally use 896, giving me 640 MB memory with more room as buffer. Any value is possible (1, 15, 27, 1000, etc.), but it's not recommended to go over 1280 as setting this value too high can cause things to stop working, resulting in CTDs all over again.
NOTE about ScrapHeapSizeMB setting:
Never change this value! Leave it at 256! The Scrap Heap Block is actually stable, but for it to be it has to be left at 256 MB.
Now that you've installed the SKSE Memory Patch, follow these steps:
- If you previously used SSME, delete it completely!
- Also delete Safety Load and ShowRaceMenu Precache Killer if you have them installed. They're not needed with either Sheson's Memory Patch, the SKSE Memory Patch or SSME.
- Download and install Memory Blocks Log.
- Go to an exterior ingame, press "~" to open the console and type the following commands, each followed by pressing Enter: "tgm", "tcl", "player.setav speedmult 500". Now go fly around like an idiot to ensure maximum stress on the game engine for about a minute, it's like a torture test for Skyrim. You can increase the speedmult value if you want to stress the engine even more.
- Go to ...Skyrim\Data\SKSE\Plugins\. For Mod Organizer (MO) users (if you've installed SKSE and the Memory Patch with MO), go to ...Skyrim\Mod Organizer\overwrite\SKSE\Plugins\.
- Open MemoryBlocksLog.log and verify that the value directly under "Block1" is 512 (for DefaultHeapInitialAllocMB=768), and 256 under "Block2", indicating that the Memory Patch is working. If this isn't the case, you've either installed SKSE wrong, or your SKSE.ini is set up incorrectly or being overwritten. Else, try adding "-forcesteamloader" as an argument to your SKSE executable when using MO.
Optional but recommended (especially if still experiencing crashes or freezes):
...if you want to do it exactly by the book, or if you're just very frugal with your memory allocation:
- Check the last number in the "Block1" column of your MemoryBlocksLog.log file, we'll call this value 'X' (peak usage).
- In SKSE.ini, set DefaultHeapInitialAllocMB to (X + 320). Do not set it lower than 512 (that would be rather pointless as that results in the default 256 MB).
- Go stress Skyrim again and make sure that Memory Block 1 (DefaultHeapInitialAllocMB - 256) stays at least 64 higher than your peak usage, adjust if needed. This value may need to be adjusted over time as you add more high-res texture mods, new content/lands mods, increase your uGridsToLoad value (not recommended), etc. I recommend that you check your log file regularly after a long gaming session to see if you need to increase your DefaultHeapInitialAllocMB value (and therefore your buffer) to avoid getting too close to the limit.
- Still crashing or freezing and you're not hitting your Block 1 limit? Maybe you've set "DefaultHeapInitialAllocMB" too high, hitting the limits of the Memory Patch itself. Lower your value (try not to go over 1280), and get rid of some ultra high-res texture mods and new content/lands mods if your buffer is getting too small.
Alternatively, you could use SSME instead if you REALLY don't want/need SKSE for whatever reason (I can't think of any). Remember: Memory Blocks must be set using hex values if using SSME.
4.2 Sort your Load Order with the latest version of LOOT.
MO users must run LOOT through MO. Also, a basic version of LOOT is integrated into MO 1.2.1+ as the "Sort" button.
4.3 Install Skyrim Project Optimization and Remove Underwater Grass and other stuff too - A Performance Mod for extra FPS.
Skyrim Project Optimization has a lot of incompatibilities with mods that modify buildings in major cities.
4.4 Clean your Master Files.
4.5 Take a look at the following guides:
- Speed and Stability Guide for ENB by tony971
- Skyrim Project Stability by GrandBulwark
- Skyrim Stability Guide by FireFreak111
- Guide to ENBSeries - Teaching you how to tweak ENB by --JawZ--
- Skyrim Enthusiast Graphics - Tweak Guide by Freemanhl2
- Beginner's Guide to Modding Skyrim YouTube Playlist by Gopher
4.6 Use Disable CPU Core Parking Utility to consistently use all of your CPU's cores for more performance.
Learn more about this process here, here, and here.
________________________________________________________________________________________

This section applies to completely reinstalling or updating Revenant ENB after uninstalling it first.
This is NOT the same as rerunning the Installer of the Revenant ENB Setup. Repeating the installation multiple times from the "Revenant ENB Files" folder (after activation of Revenant ENB in your mod manager) will only allow you to reconfigure your ENBoost (enblocal.ini) settings or install different options of the same version of Revenant ENB, in which case overwriting your current installation (when prompted) is safe to do because the same Revenant ENB files will be used in this process, outside of your mod manager.
This is NOT the same as rerunning the Installer of the Revenant ENB Setup. Repeating the installation multiple times from the "Revenant ENB Files" folder (after activation of Revenant ENB in your mod manager) will only allow you to reconfigure your ENBoost (enblocal.ini) settings or install different options of the same version of Revenant ENB, in which case overwriting your current installation (when prompted) is safe to do because the same Revenant ENB files will be used in this process, outside of your mod manager.
>>> In this context, a reinstallation of the same version of Revenant ENB in your mod manager would be performed if you wanted to change the options you selected in the FOMOD installer during a previous installation, like quality settings or optional effects. You don't have to redownload Revenant ENB in order to reinstall it, providing you didn't delete the original download archive which contains all the files.
Updating Revenant ENB of course means that a new version of Revenant ENB will be downloaded and installed in your mod manager.
>>> Did you make some significant changes to your enblocal.ini and/or enbseries.ini files after the installation and you don't want to lose those changes? No worries! The Revenant ENB Setup will offer you to make a backup of these files when you reinstall (by overwriting) or uninstall Revenant ENB. This way, you can easily copy specific changes you've made back to the new INI files after updating or reinstalling.
Of course, you can also just replace newly installed INI files entirely with your backups, but ONLY do this when reinstalling the SAME version of Revenant ENB!
NEVER replace new INI files with old ones after updating to a NEW version of Revenant ENB (at least not without comparing the files), because this will probably negate the whole update, obviously!
5.1 First, regardless of whether you want to reinstall or update, you need to uninstall Revenant ENB from your Skyrim root folder in order to avoid any conflicts!
>>> If you performed an automatic installation in Installation Step 3.4, you can either uninstall Revenant ENB automatically using the Setup (recommended), or manually. If you performed a manual installation, you have to uninstall Revenant ENB manually.
Automatic uninstallation:
For NMM/Vortex/Wrye Bash users:
- Go to ...\Skyrim\Data\Revenant ENB Files\, start Revenant ENB Setup.vbe, choose "Uninstall" and follow the instructions.
For Mod Organizer (MO) users:
- Go to ...\Skyrim\Mod Organizer\mods\Revenant ENB\Revenant ENB Files\, start Revenant ENB Setup.vbe, choose "Uninstall" and follow the instructions.
Manual uninstallation:
Go to your Skyrim root folder ...\Skyrim\ and delete all the files you've copied over to there when you installed Revenant ENB. If you're not sure, go to your "Revenant ENB Files" folder and compare the files. All files and folders in the "Revenant ENB Files" folder that start with the letter 'e' should be deleted from your Skyrim root folder.
5.2 Then, deactivate and delete Revenant ENB in your mod manager. This way the ENB is now also deleted from the Data folder (or mods folder, for MO users).
You can also choose not to delete Revenant ENB and just completely overwrite/replace your currently installed version with a new one when you download and install that in your mod manager in the next step. Just make sure that you're actually overwriting or replacing the entire mod, instead of just merging old and new files together.
5.3 Repeat the instructions in Installation Step 3 where applicable.
________________________________________________________________________________________

>>> Did you make some significant changes to your enblocal.ini and/or enbseries.ini files after the installation and you don't want to lose those changes? No worries! The Setup will offer you to make a backup of these files when you uninstall Revenant ENB.
6.1 First, you need to uninstall Revenant ENB from your Skyrim root folder!
>>> If you performed an automatic installation in Installation Step 3.4, you can either uninstall Revenant ENB automatically using the Setup (recommended), or manually. If you performed a manual installation, you have to uninstall Revenant ENB manually.
Automatic uninstallation:
For NMM/Vortex/Wrye Bash users:
- Go to ...\Skyrim\Data\Revenant ENB Files\, start Revenant ENB Setup.vbe, choose "Uninstall" and follow the instructions.
For Mod Organizer (MO) users:
- Go to ...\Skyrim\Mod Organizer\mods\Revenant ENB\Revenant ENB Files\, Revenant ENB Setup.vbe, choose "Uninstall" and follow the instructions.
Manual uninstallation:
Go to your Skyrim root folder ...\Skyrim\ and delete all the files you've copied over to there when you installed Revenant ENB. If you're not sure, go to your "Revenant ENB Files" folder and compare the files. All files and folders in the "Revenant ENB Files" folder that start with the letter 'e' should be deleted from your Skyrim root folder.
6.2 Deactivate Revenant ENB in your mod manager. Deleting it completely is up to you.
6.3 Optional and only applicable if NOT reinstalling Revenant ENB again:
For NMM/Vortex/Wrye Bash users:
- Go to ...\Documents\My Games\Skyrim\
For Mod Organizer (MO) users:
- Go to ...Skyrim\Mod Organizer\profiles\*your profile name*\
Restore your Skyrim.ini and SkyrimPrefs.ini backup files (if you want).
Of course, you don't need to do this if you like the INI tweaks suggested by Revenant ENB.
________________________________________________________________________________________

PLEASE READ THE FAQ FIRST BEFORE ASKING FOR HELP
And also visit:
Skyrim Revisited: Legendary Edition (SR:LE)
Speed and Stability Guide for ENB
Spoiler:
"I don't know what's wrong"
Does LOOT say something's wrong?
It says that everything's fine? Check the rest of the FAQ, Skyrim Crash Compendium and Skyrim Revisited: Legendary Edition.
Avast AntiVirus is known for affecting the enbhost process by blocking it completely. Try to disable, it and in general, try to kill processes which are not Windows related to avoid issues before you start Skyrim + ENB.
"My game crashes (CTD) before I even get to the main menu or while loading (infinite loading screen)"
Show
"I don't know what's wrong"
Does LOOT say something's wrong?
It says that everything's fine? Check the rest of the FAQ, Skyrim Crash Compendium and Skyrim Revisited: Legendary Edition.
Avast AntiVirus is known for affecting the enbhost process by blocking it completely. Try to disable, it and in general, try to kill processes which are not Windows related to avoid issues before you start Skyrim + ENB.
"My game crashes (CTD) before I even get to the main menu or while loading (infinite loading screen)"
- First ensure that you have the correct language set in your Skyrim.ini, for example if you are using my optimized ini-files you will have to adjust "sLanguage=ENGLISH" to your in-game used language.
- Use LOOT and let it sort your loadorder.
- Start TES5Edit, let everything selected and press OK. TES5Edit will give you an error if something (a master) is missing.
- If you are a Dawnguard-user: Ensure to have ClimatesOfTamriel-Dawnguard-Patch.esp installed!
- After a fresh Windows installation, you must update your DirectX runtime for DX9. You can get it from my Miscellaneous Files, extract the files and start DXSETUP.exe.
- You probably either need DirectX updated or you installed a mod without installing another mod that it needs. Use LOOT to find out if it's the latter. LOOT requires Internet Explorer 11 to generate its report.
- Watch these essential videos by Gopher: CTDs - Load Order - Cleaning Master Files
- Monitoring tools like MSI Afterburner, EVGA Precision, and Rivatuner OSD can also cause problems with ENB. Find the FAQ about it for a workaround.
- Disable all "Game Booster" programs similar like Razer Game Booster and try to disable all not needed programs running in the background.
- Try to set ProxyLibrary=other_d3d9.dll in enblocal.ini.
- Are you using SSME and SKSE 1.7.x? If so, delete SSME! Why? SKSE 1.7.x is able to include the Skyrim Memory Patch by Sheson if you add the lines from below, and it's much more stable. You're probably using SKSE anyway, so why not use the Memory Patch with it? Using SSME and the SSME.ini could cause CTDs. Delete all your SSME-files and set your SKSE.ini accordingly to the lines below. See Installation Step 4.1 for more detailed information about configuring the SKSE Memory Patch and your SKSE.ini.
[Debug]
WriteMiniDumps=1
[Display]
iTintTextureResolution=2048
[General]
ClearInvalidRegistrations=1
EnableDiagnostics=1
[Memory]
DefaultHeapInitialAllocMB=768
ScrapHeapSizeMB=256
Still nothing? Try deleting your RendererInfo.txt file.
Still nothing? Try to set ExpandSystemMemoryX64=false in enblocal.ini.
"I'm using Mod Organizer and Revenant ENB is not working for me, what should I do?"
If you're using Mod Organizer and it isn't working, you MUST edit the SkyrimPrefs.ini that belongs to Mod Organizer (NOT only the one in Documents\My Games\Skyrim). To do that, press the puzzle button named 'Tools', click INI Editor and set bfloatpointrendertarget=1 in SkyrimPrefs.ini. ALSO, you need to turn off MSAA and AF in the Skyrim Launcher through Mod Organizer, not just the Skyrim Launcher outside MO.
You can also just go to ...Skyrim\Mod Organizer\profiles, open your profile folder and edit the .ini files there with Notepad++ (recommended).
"What should be adjusted in the optimized INI files?
Skyrim.ini:
sLanguage=ENGLISH <--- Change to your in-game used language.
SkyrimPrefs.ini:
sD3DDevice="NVIDIA GeForce GTX 980 Ti" <--- Change to your card. Exact info can be found in your RendererInfo.txt file inside ...\Documents\My Games\Skyrim.
"There are blue lines on the edges of roots, roofs or other textures!"
Open enblocal.ini and set EnableZPrepass=false.
"What are the default key bindings used in Revenant ENB?"
BACKSPACE = reloads configuration file and shaders
SHIFT = primary key pressed and held for key combinations
SHIFT + F12 = toggles the ENB effects
HOME = toggles the FPS limiter
NUM * = toggles the real-time FPS counter
PRINT SCREEN = takes a screenshot, obviously
SHIFT + ENTER = toggles the ENB editor GUI
F4 = clears VRAM
SHIFT + B = toggles "brute force" mode
SHIFT + F7 = toggles Depth of Field effect
"Can I change the ENB key bindings?"
Of course! Open enblocal.ini in your Skyrim root folder.
"I have a major performance drop in heavy rain in forests!"
Open enbseries.ini and set:
[RAIN]
Enable=false
"My sky is pitch black, no clouds, nothing!"
Disable HiAlgo BOOST.
"What happened to Option C - Fantasy?"
I've fully reworked the versions, the technique, the installation process, the settings and such. Option C - Fantasy isn't a separate Option anymore, but no need to panic! During the installation in your mod manager, you will find "Fantasy Effects" in the optionals. Activate it additional to your selected Option, and you'll have the same Fantasy Effects. Option C - Fantasy is now supplied as an additional effect.txt.ini file, an add-on for Revenant ENB!
To adjust the colors/vibrancy, simply open the ENB menu ingame with SHIT + ENTER, then in the "Shader Parameters" window, open effect.txt and adjust the vibrancy for Day, Night and Interiors.
"What setting or level should I use for the in-game brightness?"
Set fGamma=1.0000 in SkyrimPrefs.ini or use the Revenant ENB - INI Configurator.vbe. fGamma=1.0000 is the in-game brightness Revenant ENB is optimized for! Don't touch the in-game brightness after setting this.
"The white text at the top left corner of the screen when in the Skyrim Main Menu shows the wrong graphics card"
You either forgot to change the graphics card in the (optimized) .ini-files or you have a buggy driver (probably from an Optimus card). Use the InjectorVersion of ENBSeries to get around this if still not working.
"How do I use the InjectorVersion of ENBSeries?"
1. If you have d3d9.dll in your Skyrim root folder (...\Skyrim), delete it. Don't delete enbhost.exe!
2. Extract the ENBSeries archive and move the 3 files from InjectorVersion to your Skyrim root folder. DO NOT OVERWRITE WHEN ASKED.
3. Set/adjust the following values in enbinjector.ini:
[LIBRARY]
LibraryName=enbseries.dll
[TARGETPROCESS]
ProcessName0=skse_loader.exe
ProcessName1=SkyrimLauncher.exe
ProcessName2=tesv.exe
4. Run ENBInjector.exe.
5. Start your game and enjoy!
Note: You will have to run ENBInjector.exe every time before starting Skyrim from now on. I'd make a shortcut or a small script somewhere.
"Help, also the InjectorVersion does not detect my graphics card correctly!"
Try the NVIDIA OPTIMUS D3D9 DLL FIX.
"I get a warning that bFloatPointRenderTarget isn't set to 1 but it is"
You've edited the wrong .ini file. The one you were looking for is in ...\Documents\My Games\Skyrim or ...Skyrim\Mod Organizer\profiles\*your profile name* if you're a MO-user.
"I'm using ELFX and get massive FPS drops in interiors, what should I do?"
Try the Unofficial Enhanced Lights and FX ELFX SMIM ENB fps performance patch.
"Half of my screen is black"
Set EnableMist=false in enbseries.ini.
"I crash every X minutes"
Follow the bug fixing and memory patch sections of the Speed and Stability Guide for ENB.
"How do I use MSI Afterburner, EVGA Precision, or Rivatuner OSD with ENB?"
The steps below are for MSI Afterburner but all 3 are based on the same program so the steps will be similar, if not identical.
- Update and start MSI Afterburner.
- Switch to the "MSI On-Screen Display Server" window.
- Create a new profile for your game and change to it.
- Click the big wrench icon to change advanced settings.
- Go to General -> Compatibility properties and turn on "Enable compatibility with modified Direct3D runtime libraries".
"The sun is behind a mountain but I still see its reflection in the water"
Deal with it. It was the only way to get the sun to reflect in flat areas. Some people have reported that using the InjectorVersion can fix this.
"There are black bars on the top and bottom of my screen"
You did that. You checked the box for the Letterbox Effect under Optionals when you installed Revenant ENB. If you don't want it, reinstall Revenant ENB not selecting the Letterbox Effect.
"My shadows/textures are patterned/striped/squared and have bad quality!"
Open the Skyrim Launcher and increase the shadow quality, then repeat Installation Step 3.7.1.
"The screen is black but I still hear music"
You didn't listen when I said that monitoring tools don't like ENB.
"My game doesn't look like your screenshots or videos"
Most of my screenshots and videos are made during Climates of Tamriel weathers like 02d46e, 029e8a, 05b7e7, 05b799, 47e33, 056092 etc. with a lot of contrast and bright lighting. Force one of these weathers and then compare again. Also see the Misc. Files for more CoT weather ID's!
To force a CoT weather, first open NMM/MO, go to your plugins list and find out your HEX load order number of ClimatesOfTamriel.esm, as shown here. Remember/write down this code and type for example "fw 0C02d46e" in the console ingame. If your HEX number differs, just put that number in front of the weather ID.
"I have a very dark landscape but it's bright and sunny outside"
Set EnableCloudShadows=false in enbseries.ini, or lower the Opacity of the cloud shadows under [CLOUDSHADOWS].
"My character's face is black while the rest of the body is fine"
Uninstall any programs that run over Skyrim such as Overwolf or any overclock programs, or other programs that tell you your fps.
"Underwater is crystal clear"
You're using Realistic Water Two and forgot to set bDoDepthOfField to 1 in your SkyrimPrefs.ini.
"It's too dark inside"
I've tried to balance interior lighting as much as possible, but with my main focus/baseline being dungeons where there are barely any light sources. I want those to be very dark (they should be), and as a result some normal interiors will be very dark too because of a lack of either sufficient candles/fireplaces or light sources with too small radii. This is something that can't be fixed with an ENB, you'll just have to live with it and imagine you're living in a place without electricity lol.
If you really don't like it, increase AmbientLightingIntensityInteriorDay and/or AmbientLightingIntensityInteriorNight in enbseries.ini (or SHIFT+ENTER ingame).
If still too dark and you are using Option A - ELFX, try to deactivate the ELFX Enhancer or reinstall ELFX without the Enhancer option. I do however not recommend this.
"It's too dark outside at night"
Increase AmbientLightingIntensityNight in enbseries.ini.
"It's too bright outside"
Decrease DirectLightingCurveDay in enbseries.ini.
"I have super blown out brightness as hell..."
Crossfire and SLI causes issues and problems with ENB, deactivate one card.
"The sun is too bright"
Decrease SunIntensity and/or SunRaysMultiplier in enbseries.ini.
"The sun is flickering and pulsing"
This is normal when using ENB. If you don't like it, open enbsunsprite.fx, go to section "Enable / Disable Light Emulation (Flashes or Pulses)" and set all values for "#define..." to 0.
"How do I change the Saturation?"
To adjust the colors/vibrancy, simply open the ENB menu ingame with Shift + Enter, in the "Shader Parameters" window, open effect.txt and adjust the vibrancy for Day, Night and Interiors.
"My game looks too pale"
Set ForceBorderlessFullscreen=false in enblocal.ini or set Brightness=0.65 in enbseries.ini.
"Any special notes for OneTweak users?"
Yep! You have to set BWmode to 2 in OneTweak.ini. You can find it in ...\Skyrim\Data\SKSE\Plugins, or ...\Skyrim\Mod Organizer\mods\OneTweak\SKSE\Plugins if you're a MO-user.
"I can't load up an old save"
Did you change your uGridsToLoad value in the middle of your playthrough? If so, use Stable uGridsToLoad. If you've uninstalled a (scripted) mod since during your playthrough, use Savegame script scalpel. Also, set EnableFPSLimit=true in enblocal.ini.
"Textures are flickering, mainly in cities and at night, what should I do?"
Try Guard Torch Remover - Reduced Light Flickering.
"Why is this wall invisible?"
You skipped Installation Step 3.7.
"Depth of Field isn't working"
If you're using a Performance version of Revenant ENB, that's normal by default. If you want DoF, set EnableDepthOfField=true in enbseries.ini or in the in-game ENB GUI.
If you're using a Medium version or higher and you don't have DoF, you should repeat Installation Step 3.7 and ensure you did everything correctly.
"Depth of Field Crossfire FIX"
To get DoF to work for Crossfire users, rename TESV.exe to Oblivion.exe and add "[Loader] RuntimeName=Skyrim.exe" to SKSE.ini. This should make Crossfire use the Oblivion profile. If still having problems with DoF, the lower performance option is to use the acbh.exe (assassins creed BH) Crossfire profile for TESV.exe. Credits go to surenintendo.
"My eyes are black/missing"
Seriously, no one did Installation Step 3.7? It's Step 3.7!
"The shadows are too dark"
Black or very dark shadows appear when EnableSkyLighting is set to true. To fix it, increase AmbientMinLevel in enbseries.ini or decrease AmbientLightingCurve.
"Underwater is green"
Try the Green Water Fix.
"My head and body have different colors"
Set FixTintGamma=false in enblocal.ini.
"Skyrim Launcher has stopped working - missing D3x9_43.dll"
Download and install the DirectX End-User Runtimes (June 2010) from my Optional Files.
"I have screen tearing but VSync and Limiter are enabled in enblocal.ini"
Set iPresentInterval=1 in Skyrim.ini AND EnableVSync=true in enblocal.ini and set VSync to application-controlled in your video driver settings.
ENB VSync only works if iPresentInterval=1!
If this does'nt help, try to set VSync to adaptive in your drivers.
"My main menu/loading screens are red"
Delete RealisticWaterTwo - Waves - Falskaar.ini, Skyrim.ini, and SkyrimPrefs.ini. Repeat Installation Step 3.7.1 and then run LOOT again.
"I have ugly landscape shadows using the Performance version"
Set bDrawLandShadows=0 in SkyrimPrefs.ini, or set fSpecularLODStartFade=2500.0000, fShadowLODStartFade=3500.0000, fLightLODStartFade=3500.0000, and fShadowBiasScale to 0.7500 or 1.0000 in SkyrimPrefs.ini.
"Purple objects after installing SMIM using Mod Organizer"
There is a bug in Mod Organizer handling some FOMOD installers like SMIM uses. Contact the MO-page for help.
"After uninstalling Revenant ENB, all textures & meshes disappear except for eyes, sky and light effects."
You forgot to reset your .ini files. Please read the Uninstallation instructions again.
"How do I revert my save game back to one with uGridsToLoad=5?"
- Open Skyrim.ini in your text editor.
- Start Skyrim and load your save game with your custom uGridsToLoad setting.
- Alt-Tab out of Skyrim and go to your text editor, change uGridsToLoad=5 and uExteriorCellBuffer=36 and save the Skyrim.ini file.
- Go back to Skyrim, open the console, type refreshini and then close the console.
- Create a new save game and you have a uGridsToLoad=5 save game again. I recommend to save indoors to avoid issues.
"Night Vision isn't working"
Try Better Vampire Sight and Night Eye (only works for exteriors).
OR:
Turn off the ENB while using Predator Vision - Vampire Werewolf and Khajiit made by Gopher and set the used Key Binding for activating Predator Vision to the same one as for activating/deactivating ENB effects (which is Shift + Enter by default).
Look here for a video tutorial.
- Go to your enblocal.ini file in your main Skyrim folder folder and open it.
- Go to the [INPUT] section.
- Find and set KeyCombination=0.
- Go to this site and copy the value of the key you are using for your Night Vision from Predator Vision (for example: 86 for "V").
- Set KeyUseEffect=X, where X is the value you just copied in the previous step.
- Save the file.
OR:
Open the enbeffects.fx file in your text editor, find the entry "//#define APPLYGAMECOLORCORRECTION" and remove "//" in front of it.
To compensate the desaturation, increase "#define SATURATION" in effect.txt. Or go further down in enbeffect.fx to the section called "//POSTPROCESS 2", change the {float EColorSaturationV2=1.40;} to something higher like 2.0 in order to compensate for the wash-out.
OR:
Go ingame and enter in the console:
playerenchantobject 1cf2b 1ea6c
This command will put a gold ring with Candle Light Effect into your inventory.
OR:
Try Rings of Light Enchantment - Dungeon Gear-Pack 1.
________________________________________________________________________________________

SkyrimTuner, for his original RealVision ENB, description page and scripts, and his screenshots and videos
Gopher and GamerPoets on YouTube, for their invaluable NMM and MO video tutorials
prod80, for making the Realistic Sun for Climates of Tamriel and Vanilla
JJC71, for making Climates Of Tamriel - Weather - Lighting - Audio
The Realistic Lighting Team, for their Realistic Lighting Overhaul
ewi65, for making tuned Bokeh DoF and NOVA Sun for ENB
All the mod creators of the used and suggested mods
Kyokushinoyama, for making the Sunsprite Shader
anamorfus, for making Enhanced Lights and FX
bronze316, for his Depth of Field Pack
Bethesda, for making TESV: Skyrim
Boris Vorontsov, for making ENB
The STEP Project Wiki Page
All Revenant Users
The Nexus
~
________________________________________________________________________________________