


0 of 0


File information
Created by
drigger - Tikarah and ibeas7nUploaded by
tikarahVirus scan
Some manually verified files
About this mod
Skyrim Mod Combiner (SMC) is a free, fast and light-weight mod combiner utility for Skyrim.
When you run SMC, it will hand-pick textures & models from all available mods and merge them into a new customized collection, where each and every file has been tested, compared and selected with careful consideration.
- Requirements
- Permissions and credits
- Mirrors
- Changelogs
CONTENTS:
1. What is SMC and what it does
2. What it isn't
3. But why?
4. How does it do it?
5. How were textures selected?
6. Installation guide
7. Requirements & Recommendations
8. FAQ
1. WHAT IS SMC AND WHAT IT DOES
Skyrim Mod Combiner (SMC) is a free, fast and light-weight mod combiner for Skyrim created by Drigger, it is designed to be as universal and user-friendly as possible. SMC was initially made as an extended GUI wrapper for a batch-file from the no longer supported Texture Pack Combiner (TPC) by Cestral, but uses its own updated batch-files now for compatibility with newer mods. SMC improves upon where Cestral left off, and its use has been recommend by him.
When you run SMC, it will hand-pick textures & models from all available mods and merge them into a new customized collection, where each and every file has been tested, compared and selected with careful consideration. So what you'll end up with is a stunningly beautiful Skyrim where the majority of the game's textures and low-poly meshes have been replaced.
You no longer have to extract archives or manually place mods in particular folders. However, with this installer, you can simply direct it to the downloaded archives for each mod. It will then extract and combine everything automatically, and can even compress it and place it in your NMM mods folder for you.
2. WHAT IT ISN'T
SMC is not a texture or model pack in itself. There are no textures or meshes supplied with it (except for a few extra files you can find in optional downloads section). Drigger had nothing to do with the making of any files from any mods used, as they are the work of other authors. SMC is merely a tool that combines them automatically for you. You will still have to download any mods you choose, but once you've done that, that's when SMC comes into play. Just remember to endorse every modder's work after you download them (they deserve it)!
3. BUT WHY?
Typically, if you wanted to install more than one texture pack, you would have to install them in a particular order. This was not only confusing, but also extremely inconvenient, and neither would you have any control over the fact that better textures could get overwritten by worse ones. Neither were there any control over different texture combinations. Some textures might look great individually, but when put together would create a totality that just looked unfitting or outright terrible. The only way to work around this would be to manually look up which texture is used on which surface, what its name is and then find a better replacement. If you'd do it properly, you'd even go as far as to try each and every texture in different combinations to see which would be the most appealing. The downside to this is that it'd require a lot of time and work. A lot of it. Luckily enough, this is exactly what SMC will do. Automatically. For you.
4. HOW DOES IT DO IT?
SMC uses its own updated and improved batch-files that were originally created by Cestral, it will hand-pick textures and meshes from all available mods and merge them into a new customized collection, where each and every file has been tested, compared and selected with careful consideration. So what you'll end up with is a stunningly beautiful Skyrim. For this utility to do its magic, the only thing you have to make sure, after downloading is to place all the mod archives you want to use into a single folder for SMC to recognize them. More on that under the installation instructions.
5. HOW TEXTURES ARE SELECTED
Textures were selected based on their qualities in several different key areas. Let me explain each of these in a little more detail:
Texture quality
Let's begin with the obvious. A texture's resolution, detail, sharpness, depth, colors and light reflection are all important areas in themselves. The overall quality of a texture is very important.
Repetition
A texture might look completely perfect when viewed by itself, but as soon as you use them at a larger scale, obvious patterns may appear that will catch your eye and look very unrealistic. For example, if I use a grass texture with one big, shiny rock in it and then repeat this texture over a large surface, you will see this rock repeated on the ground at regular squarish intervals. This is really bad for immersion and is generally something any texture creator struggles to avoid.
Transitions
A lot of hard work has been going into different texture transitions. If you have grass over here, some dirt over there, and a road down there, you will want all of these textures to agree with each other where they meet. If they don't, you'll end up with very apparent borders, smudges and loss of detail where different terrain and objects meet.
Blending
Again, a texture that looks superb by itself may look completely terrible when mixed in with others. It has taken a lot of effort in finding the right combinations of textures.
Distance
Distance can be subcategorized into three basic parts: close, midrange and distant. Textures often have the tendency to look great in one or two of these and then really bad in the third. For example, a smudgy, low-res texture might look awful when viewed right at your feet, but as you put some distance to it, it can suddenly begin to look wonderful. Move away even further and eventually it might lose detail and look bad again. There are a million examples of this and why it happens, but without delving further into it, this is the basic principle.
Realism
Generally speaking, if there was a choice between two great textures, and one looked great in an artificial way while the other looked great in a realistic way, then the one with a more realistic look would be preferable.
VRAM
Ah yes, the limits of video card memory. Rest assured that visual quality has never been compromized due to VRAM usage unless the texture was abnormally large. For example, there are textures out there for small objects that individually takes over 40 Mb of VRAM. This is completely nonsense use of VRAM since not even high quality mountain textures generally use this much. At the end of the day, though, I can tell you the good news that the best visual combination is NOT using the most VRAM, so what you'll end up with is quite efficient VRAM wise, while still enjoying the best textures.
6. INSTALLATION GUIDE
The installation instructions below are split into three parts. The first part will explain how to install SMC and get acquainted with it, the second part will explain how to acquirer the mods listed within SMC, and the third part covers mod installation. Please do not skip reading anything from the installation instructions because we often get questions that are already covered here!
INSTALLATION PART 1: INSTALLING AND USING SMC
Download SMC by Drigger from here or from his website SMC on BitBucket. Extract the contents of SMC to a folder Ex: C:/SMC. Navigate to the folder where you extracted into and click on SMC_Launcher.exe. SMC will now install and download any updates needed, it will also update it self automatically when Drigger releases a newer version.
Note: Some antivirus programs might say you have luhe.packed.c virus or some other form of virus and will not let you go further even if you ignore the warning. There is NO virus. Either give permission in your AV or suspend it. Antivirus Analysis
When you launch SMC for the first time you will be greeted by a list of mods, these are the mods that Drigger uses to pull meshes and textures from. On the left side of the utility you should see a portrait with the SMC logo, right-clicking this portrait will bring up a menu with various options. The option we are going to focus on here is "Open application settings" so go ahead and click on it to bring up the SMC settings menu. I will now go into further detail about what these settings do, and I will also list a couple other helpful tips on how to access the Help Menu and SMC Lite mod list as well.
CleanInstall
Check this if you want to completely erase all the output folder contents before compilation.
DDSoptimize
Check this if you want to optimize combined output with DDSopt. DDSopt is a tool which manages (preview & resizes) and recompresses DDS-files. It is a tool mod authors typically use to ensure their textures are saved in the right format, to create high quality DDS-textures from their sources (PNG etc.) and to package down-scaled versions of their textures. SMC uses this tool on mods that are unknown to have been optimized by their author, if a mod has already been optimized but the author never clarified in doing so then DDsopt will optimize it again thus creating issues. A good portion of mods have already been optimized by their authors so using this tool isn't very necessary, only use it if you are an advanced user and know exactly what you are doing.
BSAoptUnpack
Check this if you want to unpack input BSA files with BSAopt.
BSAoptPack
Check this if you want to pack combined output with BSAopt. BSAopt is a tool which manages and recompresses BSA-files. SMC uses this to compress all the combined output textures/scripts/strings/meshes folders into single (or multiple, if >2Gb) BSA file. SMC ESP file(s) will also be created for Skyrim engine to use this BSA accordingly. If there are other BSA files included in compilation, like, say WhitePhialReplacer.bsa, they (and also their ESP files) will be excluded during packing phase and copied into output folder afterwards.
CreateArchive
Check this if you want to pack combined output as an NMM-compatible archive (an old version would be overwritten, if exists). If you are using NMM then go ahead and check this.
UseCompression
Check this if you want to use 7-zip ultra compression level while creating NMM-compatible archive. This option is only available if you have CreateArchive checked, NMM users should go ahead and check this as well for easier installation.
NoParallax
Check this if you want to completely exclude parallax maps from compilation.
NoAutoUpdate
Check this if you want to completely disable application update functions (self-updating, definitions file update, mod graphic logos cache update). Only use this if for some reason you don't want SMC to automatically update itself.
NoLogging
Check this if you want to completely disable application logging. Activating this is not recommended since the log file generated after compilation can be used to diagnose any errors that might have occurred.
EditorMode
Check this if you want to enable mod settings editor. I highly recommend you activate this as it will help in determining which mod archives and patches to download. Further information on using this feature is written below in part 2 of the guide.
SMC Help Menu
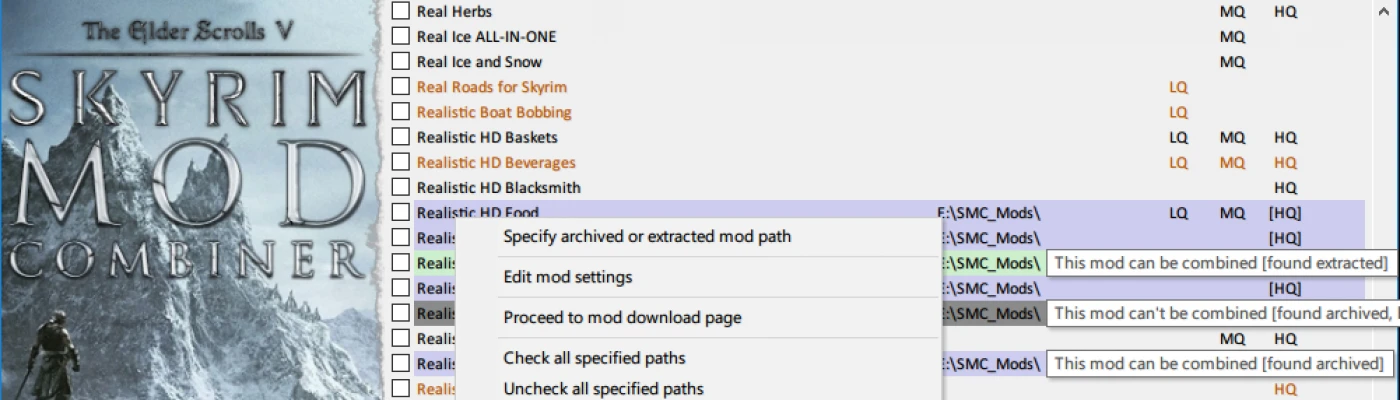
You can access the Help Menu by right-clicking the portrait and selecting "Open application help" or you can simply press F1. The Help Menu will give various information on SMC, but the most helpful section within the menu is "Compatible Mods". Compatible Mods lists every mods status, when it was last edited, the mods latest version, and any additional info pertaining to the mod. You can click on any of these headers to sort the list the way you want; However, I usually sort the list by Last edit so that I can easily view the latest mod updates that Drigger has made.
SMC Lite
While SMC is launching you can press and hold ctrl in order to select a lite version of list files (with a bit different priorities and/or choices made especially for low/middle-end PCs). I recommend you use SMC Lite if you do not have an up-to-date graphics card and/or have 2Gbs or less of available VRAM.
INSTALLATION PART 2: GETTING THE MODS
Begin by creating a folder on your desktop called "Texture Pack" (you can name the folder whatever you like, but for this guide we will leave it at that). Now you can start browsing the mods listed within the SMC launcher and choose the ones you want to use. Right-click the mod to bring up the drop down menu, from here you can select "Proceed to mod download page" which will then direct you to the mods page on Nexus. To find out which files you need to download click "Edit mod settings" from the drop down menu (EditorMode should be enabled beforehand), after which a window will pop up with various info about the mod. The two sections you want to look at here are "Properties" and "Compatibility Patches".
Properties
Here you'll see which mod archives you need to download for either UQ (Ultra Quality), HQ (High Quality), MQ (Medium Quality), and finally LQ (Low Quality). Choose the quality you prefer and then download the mod files listed. Older file versions of a mod may be present, but I recommend only using the latest supported version and any optional files that you may want as well (optional files will have a "?" before them). Some mods in SMC offer a different look for the texture that they are replacing and typically these variants will be listed. If a mod has multiple files listed and they all replace the same texture but only offer a different version/color of it then you only need to download the one you prefer; However, if the files replace different textures from one another then you would download all the files that are listed.
Compatibility Patches
This will list any patches that are needed, if there are any patch files listed here make sure to download them. Compatibility patches should be installed the same way you install any other archives: simply place them along with any of the mods these patches are intended to be used with, and SMC will include them in the compilation automatically.
With the mods and patches now downloaded to your computer all that's left to do is simply place the archive's into the Texture Pack folder you created. There is no need to extract the archives or to place each mod into it's own sub folder (You can do this if you like, but remember you will have to direct SMC to each sub folder). To have the complete intended SMC experience you should get all of the mods, but you will need some time and patience to collect them. All mods are optional, if you personally don't like the texture that a mod is providing then don't use it. Textures were picked on what Drigger thought looked best, he doesn't expect everyone to agree with him on that.
INSTALLATION PART 3: INSTALLING THE MODS
Once you have placed all the mods into the Texture Pack folder you will have to direct SMC to it by right-clicking a mod within the launcher and selecting "Specify archived or extracted mod path". Now specify that path for all the other mods by right-clicking again and selecting "Specify (path) for rest". All that's left is to check the boxes for each of the mods you want to use. This can be quickly done for all mods by right-clicking a mod and selecting "Check all specified paths". Then there are 3 ways to install.
IMPORTANT: Always back up your Skyrim/data folder in case you want to revert back!!!!
NMM Install
Start by right-clicking the portrait on the left to bring up the drop down menu. Now select "Open application settings" and check the "CreateArchive" and the "UseCompression" option, this will automatically archive the folder after you combine it and place it into NMM for you. You will have to restart NMM in order to see the changes, re-open NMM and activate the plugins that were added to finish installation.
Mod Organizer Install
Click Begin Combining and set an output path for the finished folder. Now take the combined SMC folder that you created and place it into the Mod Organizer/mods folder. Restart Mod Organizer and activate all plugins to finish installation.
Wrye Bash Install
Start by right-clicking the portrait on the left to bring up the drop down menu. Now select "Open application settings" and check the "CreateArchive" option, this will automatically archive the folder after you combine it. When SMC has finished you should have an archived folder called SMC.7z. All you have to do now is place that archive into Wrye Bash and install it like you would any other mod. Make sure to activate the plugins you just added to finish installation.
Manual Install
Click Begin Combining and set an output path for the finished file. Open the SMC folder and copy ALL its content into your Skyrim/data folder.
WARNING: this will change the game files and you cannot undo it. Use one of the above methods instead if you want to be able to safely remove SMC.
That's it, you're finished! Just run LOOT to fix your load order and enjoy playing a more beautiful Skyrim!
7. REQUIREMENTS & RECOMMENDATIONS
To enjoy the full SMC experience it is imperative that you follow all the requirements and recommendations made below. If you do not meet the PC system requirements or do not follow any of our recommendations, then you may experience poor visuals and performance, crash to desktop, or game freezing.
Required PC System Hardware
OS: Win 7+
Processor: Intel i5+ or AMD equivalent
Memory: 8GB+ RAM (16GB+ RAM if also using ENB)
Graphics: Nvidia GTX 670+ or AMD HD7770+ w/ 2GB+ VRAM (3GB+ VRAM if also using ENB)
DirectX: Version 11
Hard Drive: 22GB+ available space
Skyrim HD DLC
Having this DLC installed is required unless you decide to use Optimized Vanilla Textures listed below. The HD DLC provides some great looking textures that aren't covered by other mods in SMC. If you have this installed then I highly recommend you optimize it and your other Skyrim data files for a large performance gain that comes with no noticeable visual loss. The easy to do optimization instructions can be found in our Performance Guide.
Unofficial Skyrim Patch
Having this patch installed is absolutely required as it fixes many of the bugs in Skyrim left behind by Bethesda. Many mods require this as well for them to function properly. Also make sure to grab the unofficial patches for Dawnguard, Hearthfire, Dragonborn, and the HD DLC as well if you have them installed.
SKSE
This tool is absolutely required as many mods need it in order to function properly, so make sure you have the latest SKSE build 1.7.1 installed. Then you can download and install the required SKSE.ini file from our downloads section to activate the Skyrim memory block fix and other game related fixes.
ENBoost
This memory patch created by Boris will increase Skyrim's memory performance substantially and is required to take full advantage of the SKSE memory block fix above. Having both SKSE and ENBoost installed should fix any memory related CTD or game freezing that you are experiencing.
LOOT
This highly recommended tool will help ensure that your .esp files are being loaded in the correct order. Run it after you have installed your SMC compilation.
Optimized Vanilla Textures
Bethesda never optimized their own textures, which left Skyrim's game files unnecessarily large. Loading these large files puts unwanted strain on your system causing fps loss and sometimes CTD, or game freezing. Luckily Tony971, Vano89, SkyrimTuner, and The STEP Team have you covered and have optimized all the vanilla game textures for you! Installing these files aren't required but I can't recommend it high enough, because optimizing your Skyrim game files can help increase system performance by 10-20fps and fix CTD related issues. When finished you shouldn't see any difference visual wise, but you will notice a large performance increase! Remember not to install the Skyrim HD DLC if you choose to use this mod, because it is already included with it.
ENB
This graphics mod created by Boris enhances post processing effects to make games look better graphically. Installing this isn't required, but it's highly recommended since it fixes many of Skyrim's visual bugs and will make your SMC visual experience even more spectacular. Many Skyrim ENB presets can be found here on the Nexus, but before you download one let it be known that we will NOT help you troubleshoot any issues you may have with it. Installation instructions and help guides for ENB presets can be found on their respected pages.
8. FAQ
Before posting about any issues that you may be having please take a look below to see if there is already a solution for your problem.
What is parallax?
Parallax changes textures to make them look less flat, but it can also cause visible distortions when viewed closely. Some like it, some don't. Parallax REQUIRES ENB v0.112 or newer or your textures will look messed up!! If you don't even know what an ENB is, then my recommendation is that you wait with installing a mod with parallax. I also recommend that you familiarize yourself with what exactly the mod does before you install it.
Why hasn't [insert your mod with parallax name here] been included?
The reason is because SMC is so configurable with texture combinations that it will never be fully right. The more mods that are added to SMC the less and less any parallax mod will become compatible.
SMC will not recognize my zip/rar files!
Make sure that you have the files going into the folder you are specifying and make sure you have not changed the name of the zipped/rar file from the original.
How do I configure the extraction path for SMC?
Open SMC's settings.ini and at the top under [System] you should see the TempDir = option. Place the path of the drive you want SMC to extract to after the equals sign. You can also find the answer to this question within the SMC Help Menu.
Some textures are showing up purple! Why?
This is caused by corrupt mod files and to fix this all you have to do is re-download the mod that has the corrupt files. If re-downloading the mod didn't work then try again, if after multiple re-downloads and it's still not working then there is potentially an issue with the file uploaded to the nexus servers by the mod author. All you can do from that point is notify the author of the mod and hope that they fix it, but all mods used by SMC are verified to work correctly so this shouldn't ever be an issue.
Multiple versions of a mod are listed! Do I download all of them?
Some mods in SMC offer a different look for the texture that they are replacing and typically these variants will be listed under edit mod settings. I've explained this up above in part 2 of the installation guide, but I'll give an example here for anyone who still might be confused on the matter. To begin let's look at 2k HD Pickaxe, it has 8 variants listed that all change the same texture but offer different colors of it, so choose the color you prefer and download only that file. So to clarify, it is unnecessary to download multiple files if they are all replacing the same texture, just choose the version of that texture you prefer and use it. However, if the files listed are replacing separate textures from one another then you would download all of them.
After installing SMC I am experiencing CTD or Game Freezing!
CTD or Game Freezing can be caused by a number of things. If you followed our Requirements and Recommendations above, then you are most likely not experiencing memory related issues, but something else entirely. Please take a look at our Performance Guide to help troubleshoot the most common issues.
SMC works successfully but doesn't find certain files.
Not having the download path set correctly and also having a different version number of the mod can cause this. Also SMC will only list mods compatible with DLCs you've correctly installed.
Files that need the DLC installed are not showing up in SMC, although I have the DLC and I use Mod Organizer.
This seems to be an issue with just Mod Organizer users. To remedy: Simply execute your SkyrimLauncher.exe (game default launcher, that is) once and check your main DLCs there, that's all you need to do.
What do the different colors indicate with the mods?
Background color notifications for specified paths:
- [Red] - no extracted or archived mods found
- [Green] - only extracted mod found
- [Blue] - only archived mod found
- [Yellow] - extracted and archived mod found
- [Dark Gray] - only unsupported archived mod found
- [Light Gray] - this mod was already combined during current session
- [Brown] - mod contains scripts
- [Orange] - mod contains ESP
- [Purple] - mod contains both scripts & ESP