


0 of 0


About this mod
A template and guide for creating custom voice sets for Pillars of Eternity 2: Deadfire .
- Permissions and credits
Introduction
This is a slightly updated version of the guide I originally posted on the Obsidian Community forums for creating a new custom voice set.
I've include all the files mentioned in this guide in a single download for your convenience.
The 2 files in the download are:
I hope this will prove helpful to anyone interested to give new and interesting voices to the Watcher and hired Adventurers!
Part 1 - Game data:
Go to the PillarsOfEternityII_Data directory, you can find this by default:
Steam: C:\Program Files (x86)\Steam\steamapps\common\Pillars of Eternity II Deadfire\PillarsOfEternityII_Data\
GOG: C:\Program Files (x86)\GOG Games\Pillars of Eternity II Deadfire\PillarsOfEternityII_Data\
Inside the override folder (if this doesn't exist, create it) create a new folder, give it the name of your mod (E.g. Something like “Kvellens Custom Voice”, “Zealous Voice Mod”, something along those lines but it's really up to you). Inside this folder place the TEMPLATE.gamedatabundle file. Change the name of this file to something that matches the name of your mod, making sure to keep the .gamedatabundle file extension intact. Eg. "example_f_voice.gamedatabundle".
I'll refer to this as your .gamedatabundle file in the rest of this guide.
Now open it with Notepad (or your choice of code editor) and change the following:
Finally:
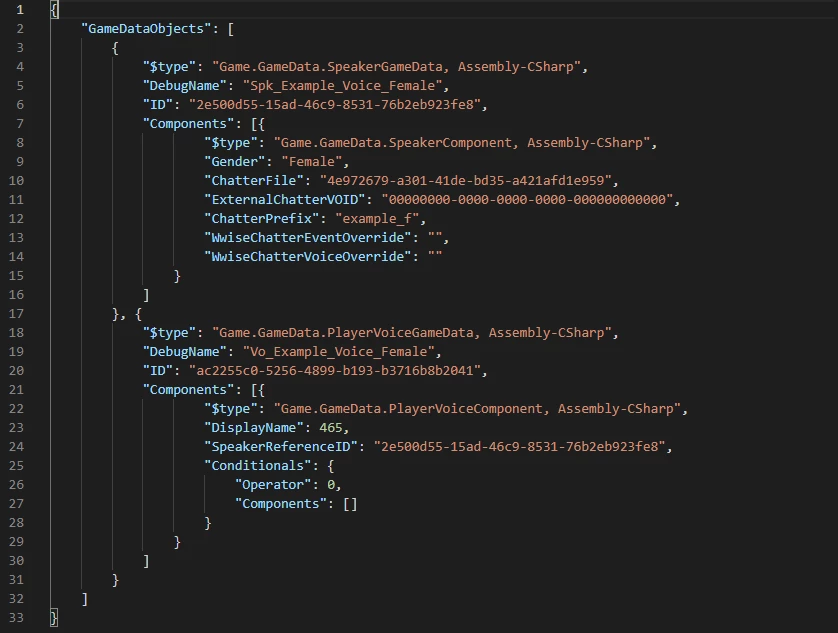
Example of what your .gamedatebundle file will look like once filled in:
A new voice called "test" should now appear in the list of voices in character creation. I'll go into how to change the name of your voice set at the end of the guide.
Part 2 - Audio files:
Now comes the tricky part, giving the files the correct names so that they correspond to the correct action, and converting them so that the game can play them.
There are a total of 121 files that can make up this voice set, some of which will only play pretty rarely so it is up to you if you want to include all audio files in your voice set. You can get a rough idea of the context of each type of line by looking at Obsidian's documentation.
As mentioned in the introduction to this guide, the CustomVoiceLines.txt file has a list of all the names for each file and the context it will play during. You can use Find&Replace (Ctrl+H) to change all instances of "FILE_PREFIX" in this text file to the chatterprefix defined in your .gamedatabundle file, which will allow you to copy and paste file names.
Common lines like, "selected" (clicking on the character), "confirm" (telling the character to move), and "scouting" (when your character starts sneaking) are scenarios that really easy to test and a good place to start.
Deadfire uses the .wem format for all audio files. As such the program Wwise is needed to convert your audio into this format. Wwise is free to use for non-commercial projects so can be used for most mods without the need for a licence.
I won't be going into detail on how to use Wwise for conversion, as the video below explains the process pretty well:
Frustratingly after converting your audio files, Wwise adds a string of numbers at the end of each file. This needs to be removed from the file name to work in Deadfire correctly.
Removing this can be a real hassle when handling a large number of files, so I would advise using this script mentioned in Step 12 of this post by Finchyy:
https://forums.obsidian.net/topic/100130-possible-to-change-sounds/?tab=comments#comment-2032932
You're audio files should have names like this once converted and ready to implement:
ch_example_f_confirm_0025.wem
ch_example_f_battlecry_0028.wem
Once you have some (or all of your) files converted go to:
PillarsOfEternityII_Data\StreamingAssets\Audio\Windows\Voices\English(US)\
and create a new folder, and name it the same as the chatterprefix line of your .gamedatabundle file. Place all audio files for your voice set in this folder.
You can test the voice at any time by creating an adventurer at an Inn, or by opening the customization menu on an existing custom character. When loading for the game it might take clicking a character a few time get audio to play at the correct volume as it takes a few seconds to load audio files.
The voice should still work with less than 121 files, but there will be gaps for actions where there is no corresponding audio file or in cases where there are more possible lines than audio files. E.g. if you have only implemented one audio clip for when you select the character, repeatedly clicking on the character will have some instances of gaps between repetitions of that single line.
Final thoughts:
If you have made it this far, thank you for checking this out!
This is a slightly updated version of the guide I originally posted on the Obsidian Community forums for creating a new custom voice set.
I've include all the files mentioned in this guide in a single download for your convenience.
The 2 files in the download are:
- TEMPLATE.gamedatabundle - After following all the instructions in Part 1 this file sets up all the data for the game to create a new listing for a voice set.
- CustomVoiceLines.txt - This is a text file containing a list of all names and contexts for each of the 121 possible files that make up this voice set. The intention of this file is to hopefully make things easier when it comes to correctly naming audio files.
I hope this will prove helpful to anyone interested to give new and interesting voices to the Watcher and hired Adventurers!
Part 1 - Game data:
Go to the PillarsOfEternityII_Data directory, you can find this by default:
Steam: C:\Program Files (x86)\Steam\steamapps\common\Pillars of Eternity II Deadfire\PillarsOfEternityII_Data\
GOG: C:\Program Files (x86)\GOG Games\Pillars of Eternity II Deadfire\PillarsOfEternityII_Data\
Inside the override folder (if this doesn't exist, create it) create a new folder, give it the name of your mod (E.g. Something like “Kvellens Custom Voice”, “Zealous Voice Mod”, something along those lines but it's really up to you). Inside this folder place the TEMPLATE.gamedatabundle file. Change the name of this file to something that matches the name of your mod, making sure to keep the .gamedatabundle file extension intact. Eg. "example_f_voice.gamedatabundle".
I'll refer to this as your .gamedatabundle file in the rest of this guide.
Now open it with Notepad (or your choice of code editor) and change the following:
- DEBUG_NAME_1: change to something distinctive to your mod, that way should some issue arise as a result of the mod it might be easier to track down. e.g. “DebugName”: “Spk_Example_Voice_Female”,
- GUID_1: Generate a GUID and paste it over GUID_1 (inside the quotes). e.g. "ID": "2e500d55-15ad-46c9-8531-76b2eb923fe8",
- GENDER: Put "Male" or "Female" inside the quotes depending on which gender you want the voice to be available for. e.g. “Gender”: “Female”,
- FILE_PREFIX: Change to something short, something easy to retype and remember. You will use this later as the name of a folder for your audio and as a prefix on all your audiofiles. Don't use spaces in the name, use_underscores_instead_to_separate_words. e.g. “ChatterPrefix”: “example_f”
- DEBUG_NAME_2: same idea as DEBUG_NAME_1 but make sure they aren’t exactly the same. e.g. “DebugName”: “Vo_Example_Voice_Female”,
- GUID_2: Generate another different GUID and paste it over GUID_2 (inside the quotes). e.g. "ID": "ac2255c0-5256-4899-b193-b3716b8b2041"
- For “SpeakerReferenceID” paste the first GUID you generated over GUID_1 again. e.g. "SpeakerReferenceID": "2e500d55-15ad-46c9-8531-76b2eb923fe8
Finally:
- Make sure everything you've replaced still has quotes around it.
- Make sure there are no spaces inside of the “quotes”.
- Save the file.
Example of what your .gamedatebundle file will look like once filled in:
A new voice called "test" should now appear in the list of voices in character creation. I'll go into how to change the name of your voice set at the end of the guide.
Part 2 - Audio files:
Now comes the tricky part, giving the files the correct names so that they correspond to the correct action, and converting them so that the game can play them.
There are a total of 121 files that can make up this voice set, some of which will only play pretty rarely so it is up to you if you want to include all audio files in your voice set. You can get a rough idea of the context of each type of line by looking at Obsidian's documentation.
As mentioned in the introduction to this guide, the CustomVoiceLines.txt file has a list of all the names for each file and the context it will play during. You can use Find&Replace (Ctrl+H) to change all instances of "FILE_PREFIX" in this text file to the chatterprefix defined in your .gamedatabundle file, which will allow you to copy and paste file names.
Common lines like, "selected" (clicking on the character), "confirm" (telling the character to move), and "scouting" (when your character starts sneaking) are scenarios that really easy to test and a good place to start.
Deadfire uses the .wem format for all audio files. As such the program Wwise is needed to convert your audio into this format. Wwise is free to use for non-commercial projects so can be used for most mods without the need for a licence.
I won't be going into detail on how to use Wwise for conversion, as the video below explains the process pretty well:
Frustratingly after converting your audio files, Wwise adds a string of numbers at the end of each file. This needs to be removed from the file name to work in Deadfire correctly.
Removing this can be a real hassle when handling a large number of files, so I would advise using this script mentioned in Step 12 of this post by Finchyy:
https://forums.obsidian.net/topic/100130-possible-to-change-sounds/?tab=comments#comment-2032932
You're audio files should have names like this once converted and ready to implement:
ch_example_f_confirm_0025.wem
ch_example_f_battlecry_0028.wem
Once you have some (or all of your) files converted go to:
PillarsOfEternityII_Data\StreamingAssets\Audio\Windows\Voices\English(US)\
and create a new folder, and name it the same as the chatterprefix line of your .gamedatabundle file. Place all audio files for your voice set in this folder.
You can test the voice at any time by creating an adventurer at an Inn, or by opening the customization menu on an existing custom character. When loading for the game it might take clicking a character a few time get audio to play at the correct volume as it takes a few seconds to load audio files.
The voice should still work with less than 121 files, but there will be gaps for actions where there is no corresponding audio file or in cases where there are more possible lines than audio files. E.g. if you have only implemented one audio clip for when you select the character, repeatedly clicking on the character will have some instances of gaps between repetitions of that single line.
Final thoughts:
- Currently your voice will appear in game with the name “Test”. Adding a piece of custom text to serve as a name requires adding a new entry to the gui.stringtable in your mod folder. There are a few posts on the Obsidian forums that go into this, but this post by BMac contains most of the basic information. Once you have a new gui.stringtable entry created, open up your .gamedatabundle and replace 465 with the numbers that point to your custom text. If you want to look at some examples mindParalysis' Custom Voice Pack and Pillars of Eternity I - Voice Sets are voice set mods with custom stringtable entries.
- You may want to create a mod manifest to provide some info in the options menu mod manager, there is a part in a tutorial by BMac that goes into how to do this.
- There is a bug in the character creation menu when there are more than 15 voices, which causes some of the options to break the bounds of the ui. This is only an issue in the character/adventurer creation screen.
If you have made it this far, thank you for checking this out!