A .txt file with a script that can be copied into the Construction set's script editor, during the process of creating a new container, that will transfer all ingredients from the player into the container upon activation.
Permissions and credits
Credits and distribution permission
Other user's assetsAll the assets in this file belong to the author, or are from free-to-use modder's resources
Upload permissionYou are not allowed to upload this file to other sites under any circumstances
Modification permissionYou are allowed to modify my files and release bug fixes or improve on the features without permission from or credit to me
Conversion permissionYou are not allowed to convert this file to work on other games under any circumstances
Asset use permissionYou must get permission from me before you are allowed to use any of the assets in this file
Asset use permission in mods/files that are being soldYou are not allowed to use assets from this file in any mods/files that are being sold, for money, on Steam Workshop or other platforms
Asset use permission in mods/files that earn donation pointsYou must get permission to earn Donation Points for your mods if they use my assets
Author notes
This author has not provided any additional notes regarding file permissions
File credits
iamnone
Donation Points system
Please log in to find out whether this mod is receiving Donation Points
Changelogs
Version 2.0
Added Root Pulp and Shivering Isles ingredients
This is an update of DD Alchemy Ingredient Transfer Script Resource by iamnone:
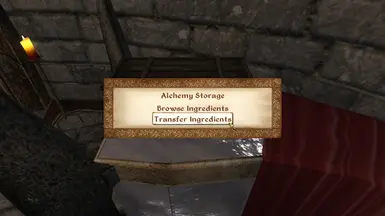
This resource is a script that you can attach to a container to allow the player to choose between "Browse Ingredients" and "Transfer Ingredients" when activating the container.
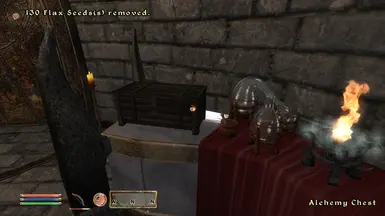
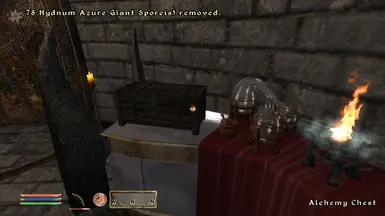
The transfer option will remove all ingredients found in the base game from the player and place equivalent numbers in the container with the following exceptions:
- Nirnroot; would cause incorrect count for quest - Human Heart and Human Skin; used in necromancy mods for special purposes - quest versions of ingredients
I added all Shivering Isles ingredients that are not quest items and a few vanilla ingredients that were missed the first time around.
For newbs: This was the first mod I ever looked up for Oblivion when I replayed in 2017 since dealing with inventory is pretty much the number one most tedious and time consuming thing about Oblivion. However there are no mods out there that I know of that will only add a single container with a script like this to Frostcrag Spire (why would you do your potion mixing and ingredient storing anywhere else?!). This undertaking required some knowledge of Oblivion's Construction Set and Scripting Editor, and therefore took me the longest to complete.
In the spirit of helping others, I will provide instructions on how to add a container with this script to the Frostcrag Spire Living Area:
1. Install Oblivion, and make sure it has all DLC included, and make sure to install it somewhere that will not be affected by WIndows UAC (the C:\ folder, or the User folder, or Desktop, etc will work but NOT any of the Program Files folders, etc). This is to ensure compatibility with all mods and utilities as the game was developed before UAC became ubiquitous, and you will have less of a headache enabling or disabling data files.
2. Install OBSE (do not use the Nexus Mod Manager to download and install if you choose to download it from NexusMods)
5. Install the Construction Set Extender (trust me, you do not want to muck around in the vanilla CS) by copying the contents of this download's archive to your Oblivion install folder
6. Install Oblivion Mod Manager (will allow you to easily install and uninstall other mods in the future--I have some recommendations to further optimize oblivion)
7. Download this script
8. Copy the Data folder from your Oblivion install and create a backup of it in case you wreck anything during your adventures with the Construction Set. Then, open the Construction Set Extended via the "Launch CSE.bat" file in your Oblivion folder. Done correctly, it should look fancy and modern, not clunky and old
9. Go to File, select Data..., check the Oblivion.esm and DLCFrostcrag.esp files, and with the DLCFrostcrag.esp selected, hit the Set As Active File button in the bottom left. Select OK. The CSE will load the files you need to work with, it may take a a short while
10. When the loading is complete, you need to locate the Cell View, Object Window, and Render Window and organize them in a way that best suits your tastes. If you cannot find them go to the View drop-down menu and select them there
11. In the Cell View window, ensure that Interiors is selected in the drop-down menu next to World Space. In the area below the Filter field, locate FrostcragSpire02 and double-click it. This will load the Living Area into the Render Window
12. In the left-hand side of the Object View window, you will see a branched list. Scroll down until you find the heading WorldObjects, expand it, and click on Container, then on Clutter. A list of all object in this category will load into the right hand field
13. Right-click any entry in the right-hand field and click New. A "Container" Base menu will open, and you will need to input information into its fields
14. Give your object an ID that will make it easy to locate in the Object Window (I called mine "PCChestClutterUpperAlchemyStorage"), and give it a Name that you like (I called mine "Alchemy Chest"), as this is the text that will pop up when your crosshairs alight on the object in-game
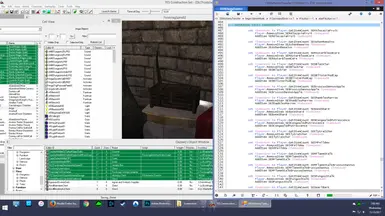
15. Next to the Script drop-down, there is a button marked "..." Click it. The CSE Script Editor will open. Select the New Script button from the menu at the top of the page, and a blank document will open
16. Locate the Ingredient Storage Transfer Script v2.txt file you downloaded from this page. Open it, select all text, copy it, then switch back to the Script Editor's page and paste the content there
17. Locate the Save drop-down (floppy disk icon) on the script editor's toolbar menu. Hit it and select Save Script and Active Plugin. If you copied the information correctly, the CSE should compile the script and save it as "DDAlchemyTransfer" within the DLCFrostcrag.esp pretty much instantly. You can exit the script editor, which will take you back to the "Container" base menu. Select the Script drop-down and locate the script you just made ("DDAchemyTransfer" -- double tap the "D" key on your keyboard to quickly jump down to this listing) and make sure it is selected properly before moving on
18. This next step is the real reason you need to be using the CSE and not the regular CS: select the Add NIF File button, A pop-up will appear, select the second option: Select Asset In Archive. In the BSA Browser that opens, hit Open Archive, and locate the file labelled Oblivion - Meshes. Open it. Within the BSA Browser's window, navigate through the following folders: meshes > clutter > upperclass, then double-click upperchest01.nif
19. Hit the Select TESSound button under "Open Sound" and type "DRS" on your keyboard when the pop-up appears to instantly jump down to the listings that begin with those letters. Scroll a bit further to locate DRSChestOpen, and double-click it. Follow a similar approach after hitting the second Select TESSound button under "Close Sound"but this time select DRSChestClose. Make sure you get those the right way around. Once you have completed all of the information in steps 18 & 19, you can hit the OK button at the bottom and a new listing will be generated in the Object Window (if it has disappeared, you can reopen it via the View drop-down menu on the CSE's menubar). You will be able to locate your new container by its Editor ID or by its Name, as these are the unique indentifiers you applied to it in Step 14. Drag and drop it into the Render Window, which should still be displaying FrostcragSpire02 from step 11. Your custom-scripted container should then manifest in the Render Window
14. To pan the camera within the Render Window, make sure the Render Window is selected, and that the mouse cursor is inside of it, then, hold down the Spacebar while moving the mouse. To rotate the camera around a point, do the same as above except press the Left Shift key while moving the mouse. To pan forward and back, hold the V key while moving the mouse. You can center the camera on any object you have selected from the Cell View window by tapping C. Be careful when click-dragging with the left mouse button (LMB) as you can accidentally move objects around. If this happens, make sure you use the Undo command located under Edit on the menubar, or when you use the Save command later, any unintended changes will become permanent, possibly forcing you to use your backups and having to redo everything again from scratch.
To move the chest on it's X- or Y-axis: hold-click with the LMB, and drag it around. To move it on its Z-axis: hold Z, hold-click the object with your LMB, and drag up or down. To change its size: hold S, hold-click with your LMB, and drag in or out fromt he object's centre. Use the F hotkey to cause a selected object to drop to any surface that is below it (to make objects appear to be resting on surfaces rather than levitating). Adjust your container however you like, and get the placement such that it will be accessible but not in the way when you are moving around in-game. I scaled the chest down and placed it on the left hand side of the Alchemy Table after deleting the alchemy equipment and Leek that were originally located there.
15. Once you have everything the way you like, double-check your container's Base attributes. Double-click its listing in the Cell View or Object View and then hit the Edit Base button to go back to the "Container" base menu. Make sure that everything is spelt correctly, that the open and close sounds are correct, and that the proper script is attached. If all is well, go to the File drop-down on the menubar and select Save...
16. Make sure the DLCFrostcrag.esp is selected in the OBMM or the Oblivion Launcher, whichever you want to use, and then fire up Oblivion. If you haven't purchased the Frostcrag Alchemy Table upgrade, and you placed the chest on top of it (or any other object you down currently own) in the Construction Set, you will have a chest floating in the air until you do purchase that upgrade. I have been planning on testing the Enable Parent function in the container's reference menu to link it to the alchemy table to see if that makes it only appear with the table or not, but I don't have much experience with this game engine yet, so I can't say for sure if that's what is does.