


0 of 0
File information
Created by
rockbiter68 and hitman47101Uploaded by
rockbiter68Virus scan
Safe to use
About this mod
Vanilla rigs provided by hitman. Upload, tweaks, and maintenance by me. Links to resources to get animators started along with a .txt file containing tips and streamlined advice. Read the description. Read the stickied post. Read the .txt file.
- Permissions and credits
- Donations
DESCRIPTION (WHAT TO EXPECT)
This page is a modder's resource for animators. Primarily, it hosts rigs for the vanilla idle animations in both first and third person. These rigs were created by hitman47101, tweaked by me, and uploaded by me. Permission was given by hitman to do this.
The purpose of this is to help lower the entry barrier for animating for this game, and to allow users to simply go through the provided tutorials and have access to functional vanilla rigs so they can get started without having to rely on reaching out to others to provide them with resources. All of the animators I have spoken to for this game (all of them at this point, pretty much), agree that it would be best to make things more accessible, especially with kNVSE, which allows users to animate for specific weapons without having to worry about making an entire set. With this in mind, these rigs can be easily tweaked to form new idles that can be a basis for your work, or to just fix an idle for a weapon that looks particularly bad with the vanilla idle.
The current caveat is that these rigs are currently provided as is. However, I have tried to mitigate some of the common roadblocks or issues with the rigs when I received them. I have also included a .txt file with some tips, tricks, and updated advice from shinyhax's tutorial, but it is by no means a replacer for it. I would consider it an invaluable supplement, though, and would highly recommend reading it if you've watched the tutorial but are still new. If you need a tutorial, I would recommend seeing the "OTHER RESOURCES" section. In the future, it is my goal to create a more robust tutorial to help streamline things; however, this is a ways off (seriously, don't hold your breath). As such, it is recommended that you have a basic understanding of blender and have watched existing tutorials (or plan to watch tutorials) before getting started with these.
I will be maintaining this page and answering questions if I can, but again, please do not view this page as a teaching course or a tutorial. Also, keep in mind I know very little about rigging, but I can try and answer questions about errors you may encounter.
THE RIGS (AND THE TWEAKS I MADE)
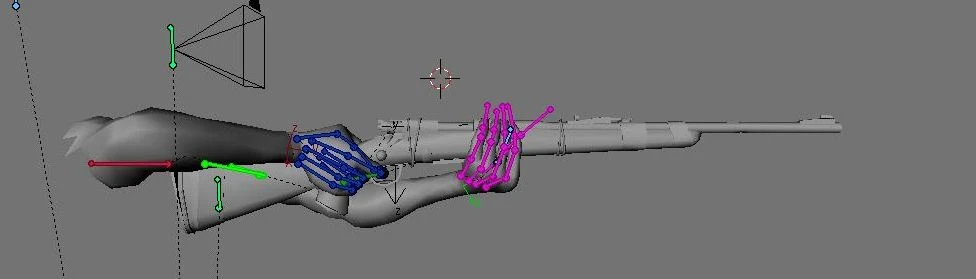
If you are coming here from shinyhax's tutorial, you may notice some differences. First and foremost, there is now a WeaponDummy Bone. This is an axis that intersects with the weapon. It is recommended to use this to animate the movement, as this bone will animate the hand that holds the weapon, the weapon itself, and the left hand if it is a two-handed weapon. This allows a variety of things: you can animate the right hand separate from the weapon now for pulling bolts, charging handles, etc.; you can place the left hand on a magazine and then use the WeaponDummy Bone to animate any necessary movement without having to worry about changing the left hand with it, etc. I have made the necessary changes (based off instructions from Januusz) so that you can safely move the right hand away from the weapon without causing issues.
I have set up the Text portion to be already be started with the first two beginning text keys.
I fixed an error with the first-person 2hl rig where one of the left finger bones would stick in place, causing the rest of the finger to become distorted. DISCLAIMER: the first-person 2hh rig and, in particular, the 2hl rig are very hard to work with. To quote hitman: "2hl and 2hh in particular are the bare minimum of sorta functional." I would not recommend starting with these unless you're brave and/or know what you're doing.
I removed the envelopes on the WeaponDummy bones, which didn't do anything for you but prevented the animation from exporting properly.
I have created DUMMY BOLTS or DUMMY CLIPS in the first-person rigs. They are on the top right-most layer. These are not necessary for anything, and can be safely deleted; however, they can also be safely manipulated if you need to see how moving them around would look with your hand motion. This is helpful for staging things up before moving on to nodes.
I have not touched the third-person rigs. I don't really know how to work with third-person. I will not be able to answer any questions regarding them at the moment. I am sorry about that.
I don't have any offhand knowledge on iron sight animations, although I know who to go to help me with it.
There are two different first-person 1hp rigs: one with a WeaponDummy bone that I created, and one without. The reason for this is because my WeaponDummy Bone causes a slight misalignment when putting the weapon in game. It's easily fixed by observing your animation in-game, and then moving the hands slightly to the left in blender. Otherwise, you don't super need the WeaponDummy bone for pistols - but it is helpful if you want to, say, I don't know, spin a revolver around.
OTHER RESOURCES (TUTORIALS, ETC.)
CREDITS (AND THANKS)
I am copying and pasting my thanks section because, without any of these people, I would not be in a position to even be uploading this modder's resource.
hitman47101: for supplying the vanilla rigs and answering questions.
Januusz: for the inspiration, answering questions, and troubleshooting.
DecerBW (Asurah): for answering questions and troubleshooting.
jmajero: for answering questions and troubleshooting.
Jacksonelhage: for answering questions and troubleshooting.
ShinyHax: for their tutorial.
blender: the primary tool I use to make these animations.
NifSkope: the secondary tool I use to make these animations.
This page is a modder's resource for animators. Primarily, it hosts rigs for the vanilla idle animations in both first and third person. These rigs were created by hitman47101, tweaked by me, and uploaded by me. Permission was given by hitman to do this.
The purpose of this is to help lower the entry barrier for animating for this game, and to allow users to simply go through the provided tutorials and have access to functional vanilla rigs so they can get started without having to rely on reaching out to others to provide them with resources. All of the animators I have spoken to for this game (all of them at this point, pretty much), agree that it would be best to make things more accessible, especially with kNVSE, which allows users to animate for specific weapons without having to worry about making an entire set. With this in mind, these rigs can be easily tweaked to form new idles that can be a basis for your work, or to just fix an idle for a weapon that looks particularly bad with the vanilla idle.
The current caveat is that these rigs are currently provided as is. However, I have tried to mitigate some of the common roadblocks or issues with the rigs when I received them. I have also included a .txt file with some tips, tricks, and updated advice from shinyhax's tutorial, but it is by no means a replacer for it. I would consider it an invaluable supplement, though, and would highly recommend reading it if you've watched the tutorial but are still new. If you need a tutorial, I would recommend seeing the "OTHER RESOURCES" section. In the future, it is my goal to create a more robust tutorial to help streamline things; however, this is a ways off (seriously, don't hold your breath). As such, it is recommended that you have a basic understanding of blender and have watched existing tutorials (or plan to watch tutorials) before getting started with these.
I will be maintaining this page and answering questions if I can, but again, please do not view this page as a teaching course or a tutorial. Also, keep in mind I know very little about rigging, but I can try and answer questions about errors you may encounter.
THE RIGS (AND THE TWEAKS I MADE)
If you are coming here from shinyhax's tutorial, you may notice some differences. First and foremost, there is now a WeaponDummy Bone. This is an axis that intersects with the weapon. It is recommended to use this to animate the movement, as this bone will animate the hand that holds the weapon, the weapon itself, and the left hand if it is a two-handed weapon. This allows a variety of things: you can animate the right hand separate from the weapon now for pulling bolts, charging handles, etc.; you can place the left hand on a magazine and then use the WeaponDummy Bone to animate any necessary movement without having to worry about changing the left hand with it, etc. I have made the necessary changes (based off instructions from Januusz) so that you can safely move the right hand away from the weapon without causing issues.
I have set up the Text portion to be already be started with the first two beginning text keys.
I fixed an error with the first-person 2hl rig where one of the left finger bones would stick in place, causing the rest of the finger to become distorted. DISCLAIMER: the first-person 2hh rig and, in particular, the 2hl rig are very hard to work with. To quote hitman: "2hl and 2hh in particular are the bare minimum of sorta functional." I would not recommend starting with these unless you're brave and/or know what you're doing.
I removed the envelopes on the WeaponDummy bones, which didn't do anything for you but prevented the animation from exporting properly.
I have created DUMMY BOLTS or DUMMY CLIPS in the first-person rigs. They are on the top right-most layer. These are not necessary for anything, and can be safely deleted; however, they can also be safely manipulated if you need to see how moving them around would look with your hand motion. This is helpful for staging things up before moving on to nodes.
I have not touched the third-person rigs. I don't really know how to work with third-person. I will not be able to answer any questions regarding them at the moment. I am sorry about that.
I don't have any offhand knowledge on iron sight animations, although I know who to go to help me with it.
There are two different first-person 1hp rigs: one with a WeaponDummy bone that I created, and one without. The reason for this is because my WeaponDummy Bone causes a slight misalignment when putting the weapon in game. It's easily fixed by observing your animation in-game, and then moving the hands slightly to the left in blender. Otherwise, you don't super need the WeaponDummy bone for pistols - but it is helpful if you want to, say, I don't know, spin a revolver around.
OTHER RESOURCES (TUTORIALS, ETC.)
- This is the standard tutorial for animating for this game, and the best (if not the only) one available: Fallout 3/New Vegas Animation Tutorial. It also contains links to the resources you will need to get blender set up for animating in this game.
- You need to know how to use blender. I learned years ago from this tutorial for Morrowind. It teaches you the basics. One thing to keep in mind: you do not need to - and nor would I recommend - keying in every bone in a frame before moving on to the next frame; I would simply key the bones that you did move and then move on. This makes it easier to go back and add/change things if you need to (you will). Also: 15 frames does not equal 1 second. These rigs are set to animate at 30 frames per second (which can be changed - see shinyhax's resources from his tutorial).
- You will need NifSkope for copying over nodes and to easily edit text data.
CREDITS (AND THANKS)
I am copying and pasting my thanks section because, without any of these people, I would not be in a position to even be uploading this modder's resource.
hitman47101: for supplying the vanilla rigs and answering questions.
Januusz: for the inspiration, answering questions, and troubleshooting.
DecerBW (Asurah): for answering questions and troubleshooting.
jmajero: for answering questions and troubleshooting.
Jacksonelhage: for answering questions and troubleshooting.
ShinyHax: for their tutorial.
blender: the primary tool I use to make these animations.
NifSkope: the secondary tool I use to make these animations.