About this mod
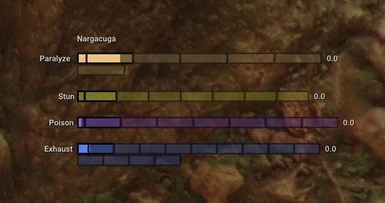
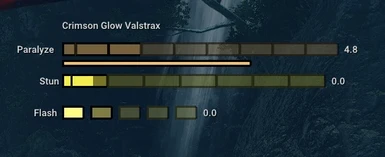
This mod adds a UI for viewing status effect build up on monsters as well as timer displays for how long a monster will be affected by a status
- Requirements
- Permissions and credits
To use this mod install REFramework and add this script to the autorun folder.
It is highly recommended you get the latest version of REFramework from their Github/AppVeyor. Doing so will persist the configuration changes you make through the UI instead of having to edit the script directly.
This mods adds a bunch of bars to the UI that will fill up as you attack monsters with status effect damage, each segment representing a threshold at which the status effect will trigger. In addition it will display a timer that will slowly drain while the monster is under the duration of the effect.
It comes with some default settings that I enjoy using myself, but it is highly customizable to fit whatever your desires are.
A description of the options:
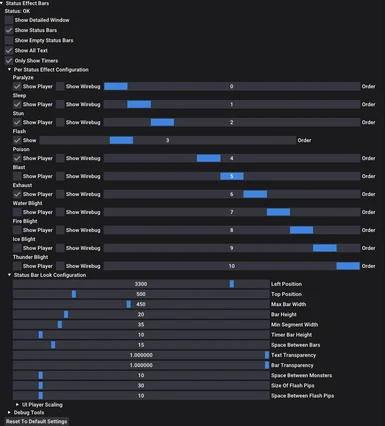
Show Detailed Window - Whether to display a printout of the actual numbers rather than the bars, useful for figuring out how much damage you are doing with your set for optimization

Show Status Bars - Whether to render the status bars at all

Show Empty Status Bars - By default only statuses that have actually been interacted with (either trigger or have some value filled) will display to save space in the UI. However, you can select this if you want to see every bar for every monster.

Show All Text - Controls whether or not to print out the status names and timer value

Only Show Timers - If true, only will display timers when status is active, not the buildup bars.

Per Status Effect Configuration - Options for individual status effect bars
 * Show Player - Whether to show the bar for player interacted damage (e.g. player damage, endemic life, items, etc)
 * Show Wirebug - Whether to show the bar for status damage via wirebug interactions (e.g. damage from mounted monsters), MHR tracks this separately and it builds separately
 * Order - What order the bar should be in

Status Bar Look Configuration - Options on how the bars should look (Size and position)
 * Left Position - How far left of the screen the bars should appear
 * Top position - How far from the top of the screen the bars should appear
 * Max Bar Width - The widest any of the bars should ever get, if a bar would be larger it will be wrapped to a newline
 * Bar Height - How high and individual bar should be
 * Min Segment Width - How wide, in pixels, the smallest segment in a bar should be. This is before scaling for players.
 * Timer Bar Height - How high the timer bars should be
 * Space Between Bars - How much vertical padding between status bars
 * Text Transparency - Alpha of the text
 * Bar Transparancy - Alpha of the bars
 * Space Between Monsters - How much vertical padding between monsters
 * Size of Flash Pips - How big the pips in the flash tracker should be
 * Space Between Flash Pips - Space between flash pips
 * UI Player Scaling - Scaling factor of width of the bars depending on quest type and player count.

Debug Tools - Useful tools that can be used while adjusting display settings
 * Village Bars/LRX/HRX - Load test data for quests with monsters of that rank/player size
 * Save Bars For Testing - Save the current quests bars for testing
 * Use Saved Bars - Use the saved bars (or loaded bars from buttons)

Reset To Default Settings - Resets the settings to default
The settings ive provided are my preferred default but changing this you can customize it as you will.
I turned off Blast and the Blights as well as all the Wirebug bars by default because they fuck with the bar sizes and generally aren't useful.

