


0 of 0


About this mod
A friendly, all-in-one desktop app that makes modding Metal Gear Solid Master Collection Vol. 1 on PC as easy as point-and-click.
Features:
One-click install & uninstall
Automatic Safety Backups
Live texture & 3-D model viewer
Camo / face-paint / box swapper
Guard-route editor
Audio Swapper
- Permissions and credits
MGS Mod Manager
A friendly, all-in-one desktop app that makes modding Metal Gear Solid Master Collection Vol. 1 on PC as easy as point-and-click.
✨ Features
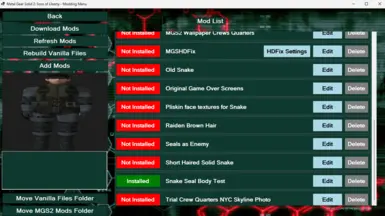
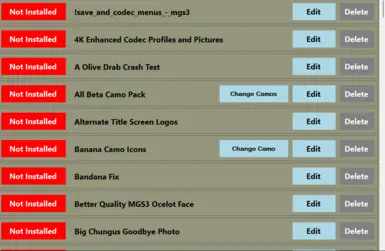
- One-click install & uninstall: Flip a switch to add or remove any mod—the manager copies files, updates logs, and cleans up after itself.
- Automatic Safety Backups: Your original game files are duplicated the very first time you run the app, so you can always roll back. Ensure your files are Vanilla when first downloading.
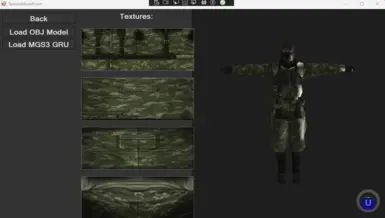
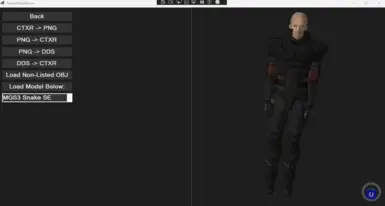
- Live texture & 3-D model viewer: Preview characters, camos, and textures in an Helix-powered 3-D window before installing. Like how a texture looks? Make it into a mod with a few clicks.
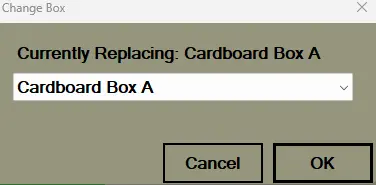
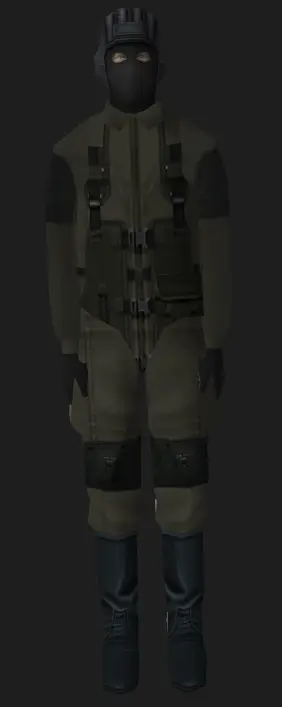
- Camo / face-paint / box swapper: Don’t like a modder’s replacement choice? Change Snake’s camo, face-paint, or cardboard boxes in seconds.
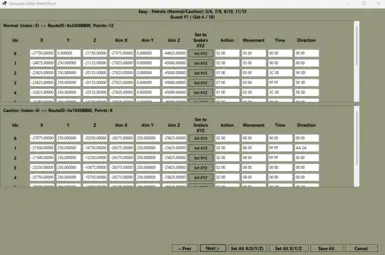
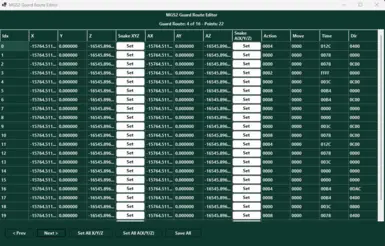
- Guard-route editors: Create new scenarios or aid MGS2/3 Randomizer development with visual editors for *.hzx and .geom guard paths.
- Auto-download of modding tools: CtxrTool, texconv, and other helpers are fetched automatically when needed.
🎮 Supported games
- Metal Gear & Metal Gear 2: Solid Snake (Master Collection)
- Metal Gear Solid (Master Collection)
- Metal Gear Solid 2: Sons of Liberty (Master Collection)
- Metal Gear Solid 3: Snake Eater (Master Collection)
(All refer to the Master Collection Vol. 1 Steam release. Non-Master Collection titles may be added later.)
🚀 Quick start
- Download: Run the ClickOnce installer to set up the Mod Manager and tools.
- Launch: Run ANTIBigBoss MGS Mod Manager (desktop shortcut provided).
- First-run setup: Choose the suggested Documents\MGS Mod Manager and Trainer folder or a custom path for backups/mods.
- Game paths: Manually browse to game installs if Steam paths aren’t auto-detected.
- Start modding: Select a game tab and install your first mod!
📦 Installing mods
- Drag & drop: Place mod folders into the MGS2 Mods or MGS3 Mods directory.
- “Add Mod” button: Browse to any folder or ZIP archive.
- Mod browser: Click the cloud-arrow icon to download and install mods directly.
Toggle mods on/off with the Installed / Not Installed switch.
🛠️ Extra tools
- Texture/Model Workshop: Convert CTXR ↔ PNG, preview models, and send textures to GIMP/Photoshop.
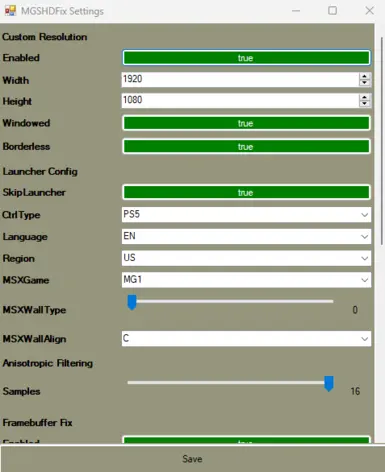
- MGSHDFix & MGSM2Fix INI editors: Tweak Master Collection fixes seamlessly.
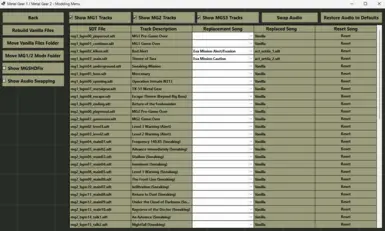
- Audio SDT Replacement: Swap songs between MG1/2 and MGS3 (e.g., use MG2’s alert theme in MGS3).
- Guard Position Changer: Reposition guards for custom scenarios or randomizer development.
💡 Tips & troubleshooting
- Stuck scanning for games? Go to Settings → Game Paths and browse manually.
- Undo everything: Use Restore Vanilla Files to revert to backups.
- 3D Model Viewer issues? Install GIMP and Python first.
Credits
- SageFantasma: Continued helped with the trainers, randomizers and all of our joint MGS2/3 MC Modding projects.
- Afevis/ShizCalev: Helped me with integrating MGSHDFix and parsing textures from the PS2 -> Master Collection.
- shalashaska/316austin316: A lot of his work helped me in understanding how to get the C# code to convert the CTXR Files into PNG Files.
- GIMP Developers: Helped me enable conversion of PNGs into DDS with mip map support.
- Python Developers: Allowed me to set up a script that enabled me to make GIMP work headlessly with GIMP's built in Python-Fu.
- CTXRTool Developer Jayveer: Enabled DDS-to-CTXR conversion.
- ANTIBigBoss (Me): Creator of the Mod Manager.
Donations (Optional)
- Support further development via Ko-Fi.