


0 of 0


About this mod
Modder's tool for converting and optionally scaling game textures up to 4K/8K
- Requirements
- Permissions and credits
- Changelogs
Texture conversion tool that lets you include 4K/8K replacement textures in your mod.

See the images for supported formats. Please report any remaining textures that the tool can't work with.
Text steps marked in gold are optional, but recommended for your first use of the tool.
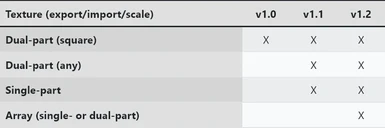
All textures in the game can optionally be an array, or stack, of multiple images. Arrays can be used to encode variations of flat textures, or multiple passes through the shader in the case of fabric patterns. STS handles this format by exporting each image to a separate file.
Do I have to scale up the texture?
Nope. It can be the original size, it just can't be any smaller.
What is a mipmap?
Unity has a nice explanation here: https://docs.unity3d.com/Manual/texture-mipmaps-introduction.html
Why can't I see the highest mipmaps in the game using the test texture?
The size is limited by the Texture Quality setting. Set to Very High to see 8K textures.
How does the tool work?
The game splits most of its texture data into 2 pieces. The "low res" part includes a header and all the smallest mipmaps, used at the start of the game and when the Texture Quality is set low. The "high res" part is stored headerless and contains the largest mipmaps. The engine retrieves and loads more mipmaps as needed, up to the limit set by the Texture Quality. This tool just adds more mipmaps to the high res asset, then updates the information about them in the low res header.
Nothing happens when I try to launch it.
Try installing the .NET runtime library linked in the Requirements.
Is source code available?
https://github.com/hypermorphicmods/SpideyTextureScaler
How do I work with DDS files?
This is the native format that textures are stored in this (and probably every Windows) game. It's best to work with DDS directly so that the correct color space (sRGB or Linear) is maintained throughout.
Can it do batch processing?
Not directly, but v1.2.3 can now be scripted from the command line. Run "SpideyTextureScaler --help" for info.
Does it work for any other games?
Yes. I was informed by Linkfla that it works for Ratchet & Clank: Rift Apart, so I added its texture resource IDs in v1.3.3. I do not own or provide any support for this game, but I am willing to add more IDs as other games are identified.
See the images for supported formats. Please report any remaining textures that the tool can't work with.
Tutorial
Text steps marked in gold are optional, but recommended for your first use of the tool.
- Using Spider-Man PC Modding Tool, extract the low-resolution texture asset (.texture file).
- Launch SpideyTextureScaler.exe, click the first button to load the extracted .texture file. The grid at the bottom should populate with the dimensions, DXGI format, and size of the high resolution piece (HDSize). If the value is 0, it's a single-part texture and you can skip the HD steps below.
- In the Modding tool, find the high resolution part (usually in g00s014 or above) and check that the file size (HDSize) is the same. Extract and save it with the exact same name but with a .hd.texture extension. If you have trouble finding it, use the Find function and put "texture" in the Filter box.
- Back in STS, click the second button to save the texture as a .DDS file. The filename and location is chosen automatically. If it complains that it can't find the HD part, cancel and check your filenames again.
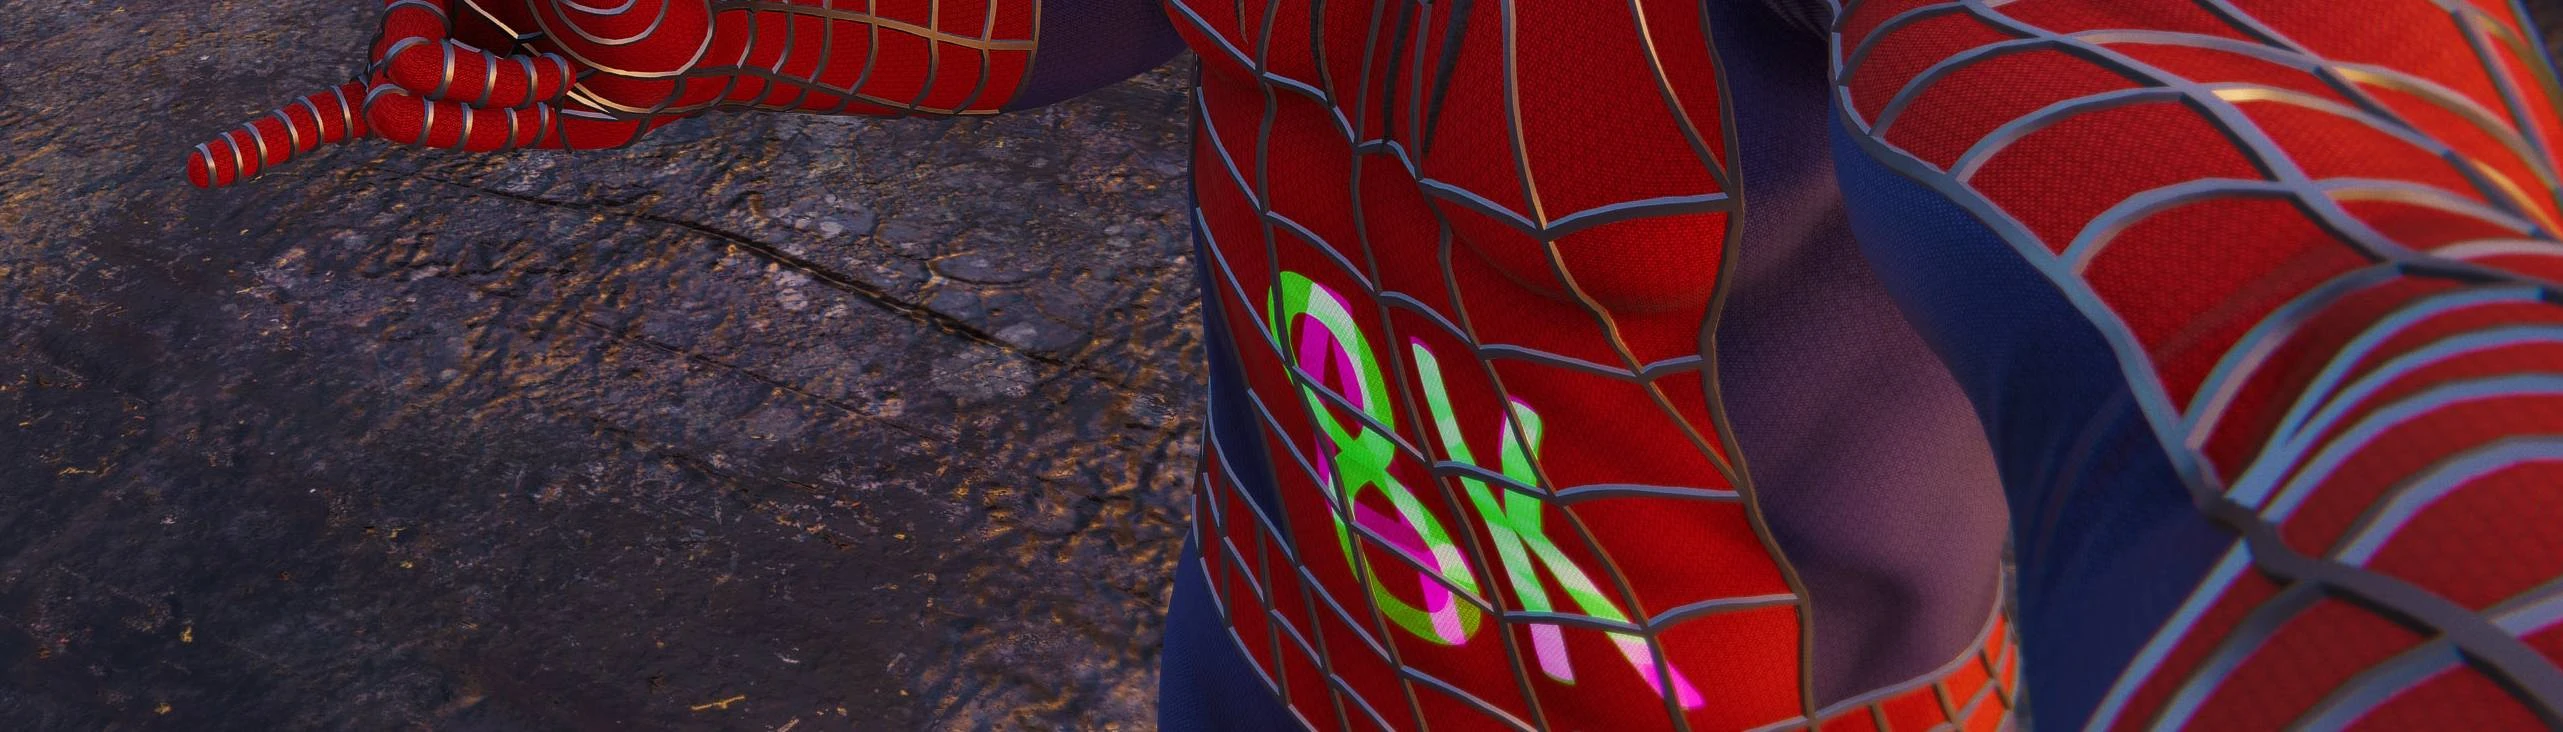
- Open the .DDS with your image editor and scale it up to 4K. Mark the texture in a way that you'll notice in game. Ideally a large mark you can see from far away, and a tiny detail that requires the higher resolution.
- Resave it as .DDS, being careful to match the compression format shown in STS.
- Click the third button to import your modified .DDS texture. Watch for errors to appear in the Log section, and compare the image attributes at the bottom of the window. Resave and reimport the file until the Format and BytesPerPixel match.
- Click the fourth button to choose an output .texture filename. Give it a friendly/shorter name that's easy to distinguish from the original. 2 files will actually be generated for HD textures: <name>.texture and <name>.hd.texture.
- Check the Test box ("don't replace SD mipmaps"). This will allow you to see the game transition between the low and high res textures.
- Click Generate and watch the Log section for a success message.
- In the Modding tool, replace both the low and high resolution textures with the new .texture and .hd.texture files. Click Test Mod to temporarily apply the changes to a "clean" copy of the game.
- In Photo mode, zoom in and out to see your marks appear and disappear. Turn off Test mode for the future.
- You can leave a copy of STS running for each texture you're working on, so the filenames are preselected. Then you only need to click Generate each time you make a change to your texture.
- I've also created a test texture mod for the Raimi suit with unique labels on the highest mipmaps. Use it to verify what resolution of texture your system displays and when.
Options
- Add SD Mipmaps/--extrasd (v1.3) - Moves mipmaps from the HD part to the SD part, effectively increasing the base resolution of the texture. There is no practical change in the game, since maximum textures sizes are still capped according to the texture quality setting (Low = 1K, Medium = 2K, etc). But it does work around the low-res texture problem that occurs in some custom models when the game fails to load the HD part. To fix an affected texture, export with this setting increased to the maximum, moving all data into the .texture file and leaving .hd.texture empty (size 0). You do not need to replace the HD texture in your mod.
- Ignore Format differences/--ignoreformat (v1.1/v1.2.3) - Silently ignores differences in DXGI format as long as the BytesPerPixel match. Use this if you're certain the format is correct, but your export software sets the option wrong in the file header.
- Test mode/--testmode - Retains the original SD mipmaps while including your modified HD mipmaps. Use this when you want to see the game transition between SD and HD mipmaps.
Texture Arrays (v1.2)
All textures in the game can optionally be an array, or stack, of multiple images. Arrays can be used to encode variations of flat textures, or multiple passes through the shader in the case of fabric patterns. STS handles this format by exporting each image to a separate file.
- When opening a .texture, v1.2 will display the number of images present at the bottom. If there is an array, the Save button will change to "Save multiple .dds"
- Exported images will be automatically named with their position in the array (eg. .A0.dds, .A1.dds). If you want to import them back into STS, you will need to keep the same naming convention: <any name>.Ax.dds
- The edits you make to the files need to be done in parallel. All images need to be the same size and format. An exception is the number of channels, which might vary due to the compression type. BC7 allows alpha channels to be added or removed dynamically.
- Import the A0 texture into STS, and it will look for similarly named files (up to 32).
- Export the combined .texture/.hd.texture as normal.
FAQ
Do I have to scale up the texture?
Nope. It can be the original size, it just can't be any smaller.
What is a mipmap?
Unity has a nice explanation here: https://docs.unity3d.com/Manual/texture-mipmaps-introduction.html
Why can't I see the highest mipmaps in the game using the test texture?
The size is limited by the Texture Quality setting. Set to Very High to see 8K textures.
How does the tool work?
The game splits most of its texture data into 2 pieces. The "low res" part includes a header and all the smallest mipmaps, used at the start of the game and when the Texture Quality is set low. The "high res" part is stored headerless and contains the largest mipmaps. The engine retrieves and loads more mipmaps as needed, up to the limit set by the Texture Quality. This tool just adds more mipmaps to the high res asset, then updates the information about them in the low res header.
Nothing happens when I try to launch it.
Try installing the .NET runtime library linked in the Requirements.
Is source code available?
https://github.com/hypermorphicmods/SpideyTextureScaler
How do I work with DDS files?
This is the native format that textures are stored in this (and probably every Windows) game. It's best to work with DDS directly so that the correct color space (sRGB or Linear) is maintained throughout.
- IntelTextureWorks plugin for Photoshop - old, but they still work with the latest CC. Slightly buggy in that the compression type changes when you switch channel count. Otherwise works great.
- NVidia Texture Tool Exporter and Photoshop plugin - Good, but requires invasive full name registration. The exports also lack a DX10 header, making it more difficult to determine the exact DXGI format. You will need to check the Ignore Format box to proceed.
- Texconv - Microsoft's command line utility for texture conversion (e.g. texconv -ft png gametexture.dds , texconv -f BC7_UNORM_SRGB -dx10 moddedtexture.png)
- GIMP - Still doesn't work with most DDS files, even with the latest plugin.
- Blender - scores a shameful 0 for not supporting an open format in an open source application. You must convert to PNG before using any texture. For any linear, non-diffuse maps, be sure the conversion changes the color space to SRGB, or select it manually in the shader editor.
Can it do batch processing?
Not directly, but v1.2.3 can now be scripted from the command line. Run "SpideyTextureScaler --help" for info.
Does it work for any other games?
Yes. I was informed by Linkfla that it works for Ratchet & Clank: Rift Apart, so I added its texture resource IDs in v1.3.3. I do not own or provide any support for this game, but I am willing to add more IDs as other games are identified.