


0 of 0


 that you can grab in The Caribbean are not acknowledged as ingredients whatsoever (neither are they in the Ultimania) because of their huge mobility and numbers.")
 is here because it's the very first place you can get it from.")


About this mod
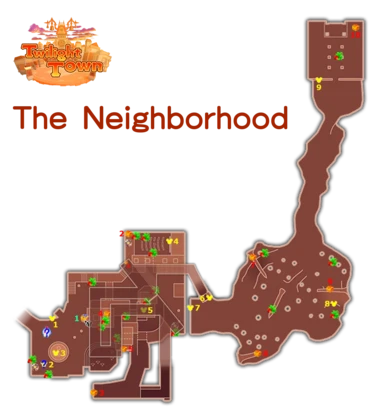
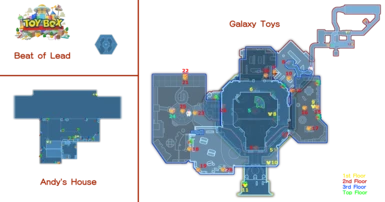
Every Mini Map in the game will now reveal all Treasure Chests and Lucky Emblems, and optionally Ingredients and even more collectibles. Choose between a texture version with static icons or a Modloader version with dynamic icons that fade on collection!
- Requirements
- Permissions and credits
[24/08/24] After a significant hiatus, UPDATE 3.0 of Map Overhaul is here! I bet none of you were expecting this! And to be honest, neither was I. You can effectively consider Aproydtix to be the creator of this update, which brings something I didn't think was possible: dynamic icons. Read on for details! (Yeah I have significantly trimmed down the description)
From 3.0 on, you will be able to choose between two main versions of the mod. Don't use both at once!
DYNAMIC & CLASSIC MAPS
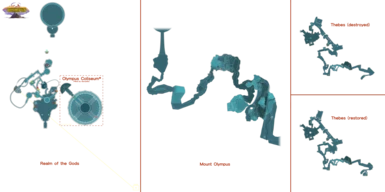
Classic Maps are fully compatible with the Olympus Coliseum Mod, though my pak needs to load after Coli.
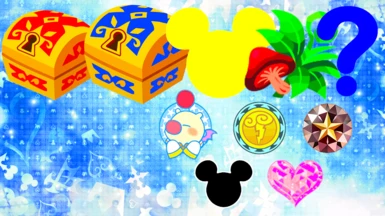
CLASSIC MAP ICONS
CLASSIC MAP ICONS

Red Chest Icon & Blue Chest Icon: Red Chest Icons are used for the smaller chests while Blue Chest Icons, for the large chests. The icons themselves have a slight difference in size, too!
Mickey Icon: It's placed exactly above every Lucky Emblem, or in the centre of the area covered by large Lucky Emblem formations (the icon size is always the same no matter how big or small the actual emblem is).
Herb Icon: It marks Ingredients.
Classic Mickey Icon: It’s for a one‑of‑a‑kind collectible, the Classic Kingdom Mini Games you can get in Twilight Town by scanning the "QR codes" in the bulletin board with the Gummiphone.
Olympus Icon: It marks the locations of all five Golden Herc statues.
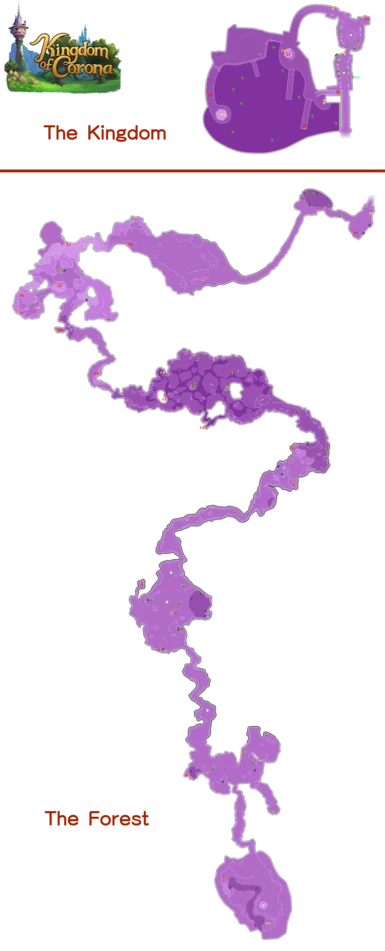
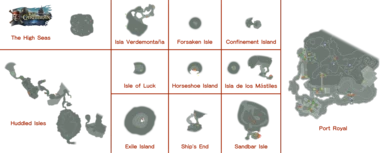
Jewel Icon: It marks the location of barrels and other objects (i.e. Kingdom of Corona flags) where Sora can perform a trick and make people drop Munny, and also all the loot from The Caribbean where you can spam Triangle/Y to get Munny.
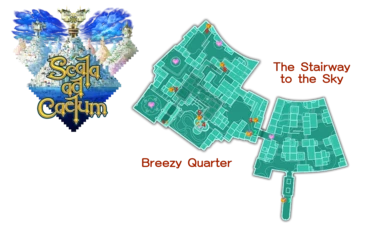
Heart Icon: It’s used for the Kairi’s heart pieces you collect in Scala ad Caelum.
Moogle Icon: You may find it useful as it indicates the location of every* Photomission target. By the way, you can also complete Photomissions before the Moogle makes them available!
Spoiler:
Show
- Photomissions #1 (Flamecore), #2 (Watercore) and #3 (Chief Puff): each of these missions uses a special coloured variant of the icon (red for #1, blue for #2 and green for #3), as they’re relatively abundant. There will only be icons in the locations that spawn the enemy you’re looking for at all times (e.g. if a one-time story counter has the enemy but not post-story and vice versa, there will be no icon).
- Photomissions #4 (Hercules Statue), #5 (Beasts and Bugs Wall Display), #6 (Rapunzel’s Tower), #7 (Festival), #8 (Fire in the Secluded Forge), #9 (Zeus), #11 (CDA Agent), #12 (Ice Palace), #13 (Olaf), #14 (Big Green Cactuar) and #18 (Waterfall): the icons are located where you think they are, mostly without oddities. Bear in mind there are as many icons as valid targets! So, for the sake of specificity: two icons for the Festival, two for the two CDA Agents, two for the two possible Olaf locations and two for the two waterfalls
(two no longer feels like a word at this point). - Photomissions #10 (Tram), #16 (Evening Star), #17 (Fish-shaped Wind Socks) and #19 (Demon Tower): these ones have a Question Mark on top of their respective icons because of certain problems (more on the Question Mark Icon section). For #10, because it’s actually a moving object; for #16 and #17, because the targets are only available during night and daytime respectively (#17 also has one icon per Wind Sock for a total of seven); for #19, because it can only be accessed during post-game.
- Photomissions #15 (Scarecrow) and #20 (Sora’s Teammates): there are unfortunately no icons for either of these. About the former, well… there is no map at all in The 100 Acre Wood! And about the latter, it would be an impossibly chaotic situation to capture in any map.
Question Mark Icon: This one never appears standalone, but on top of icons generally caught in tricky situations. So what's it do, you ask? Short answer: it indicates that the collectible carrying the Question Mark may or may not appear in that location. Long answer: I will proceed to list here all of its possible uses so far.
Spoiler:
Show
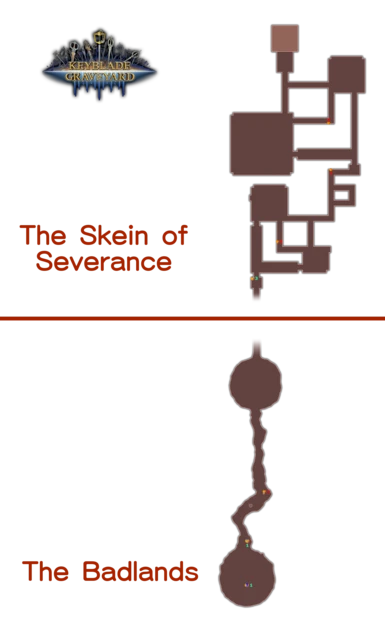
- Treasure Chests will feature a question mark if they are actually mobile, and not fixed within one location. This only happens with the treasure that's on your ship in the Caribbean. Update 2.1 also adds a Question Mark Treasure Chest in the first map of Keyblade Graveyard to mark the chest that's in The Final World.
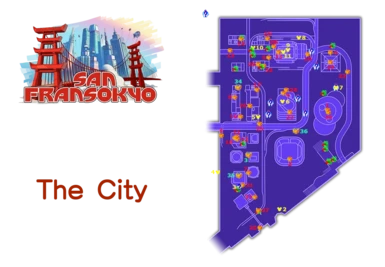
- Lucky Emblems will feature it if they are also mobile (see Twilight Town's tram Lucky Emblem) or if they are only available under certain conditions (see that one San Fransokyo's Lucky Emblem which only appears at night).
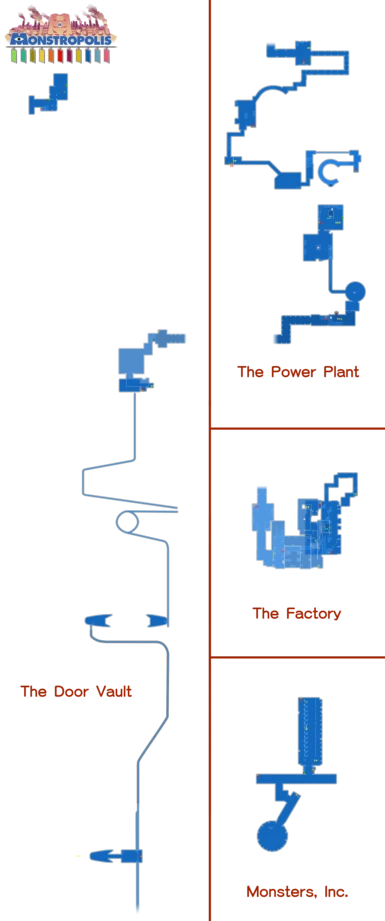
- Ingredients will feature it for randomised ingredients. Yes, they are a thing. And how do they work, exactly? Well, they’re a subgroup of ingredients that aren’t always available (their location is the same every time, but they simply may appear or not). Their chance of appearance can vary; it’s often 50 % and less frequently 25 %. The RNG reloads upon using Area Select or going to the World Map (but not by crossing area borders with loading screens). And the last piece of info you may want to know is that these randomised ingredients show up in Olympus, Toy Box, Kingdom of Corona, Arendelle and The Caribbean (Twilight Town, Monstropolis and San Fransokyo have no randomised ingredients, while Keyblade Graveyard and Scala ad Caelum have no ingredients whatsoever). Okay so, this special kind of ingredients will be differentiated with the use of Question Mark Icons (or else players like me back then are going to be pretty confused when they see an Herb Icon marking the location of nothing). However, fixed ingredients (those that appear in their location in 100 % of cases) stay without the Question Mark.
- Photomissions #10, #16, #17 and #19 feature it for the reasons stated above.
This is mostly all you need to know! Enjoy! And be sure to check out my other mods if you can!
ADDITIONAL INFORMATION
CreditsCredits go to:
- The KH3 Ultimania (it helped in establishing map locations, but rest assured my maps stand MORE accurate than it)
- Reddit and Twitter user Roboloidx (for his amazing webpage of KHUχ/DR assets)
- Twitter user EosFalsus (for the background used for my Icon Legend pic)
- Nexus and Discord user Aproydtix, who I've now included as co-developer of the mod for single-handedly developing the Dynamic Maps 3.0 update..
Final remarks
- You can go here if you'd like to have a blank, 4K version of The 100 Acre Wood map I commissioned to have restored!
- Disclaimer: The Classic Maps technically don't cover every single collectible in the game, since not every one of them is in an area with a Mini Map (i.e. The Final World, 100 Acre Wood, Frozen Slider, Hiro's Garage).
- About compatibility: This mod edits a lot of files, too many to name. However, there being hardly any mod on Nexus that edits maps, it is pretty much safe to say this mod won't suffer from conflicts at all! Plus, the new update should take care of compatibility with Olympus Coliseum (that is, as long as my mod loads after it!).
- About installation: Either do it with the mod manager or install it manually. For the latter method, go to Program files/Epic Games/KH_3/KINGDOM HEARTS III/Content/Paks. If there are no more folders inside Paks, create a folder named ~mods (just like I wrote it). After creating it or if it's already there, simply place your pak file within your ~mods folder. That's where most of your mods should be installed. If you need further instructions, hit me up with a comment or a DM, or look for more info (it's everywhere) in other mods.