


nathanj's sparkly sparkles and how to edit them
-
Endorsements
-
Unique DLs--
-
Total DLs--
-
Total views--
-
Version1.0
0 of 0


About this mod
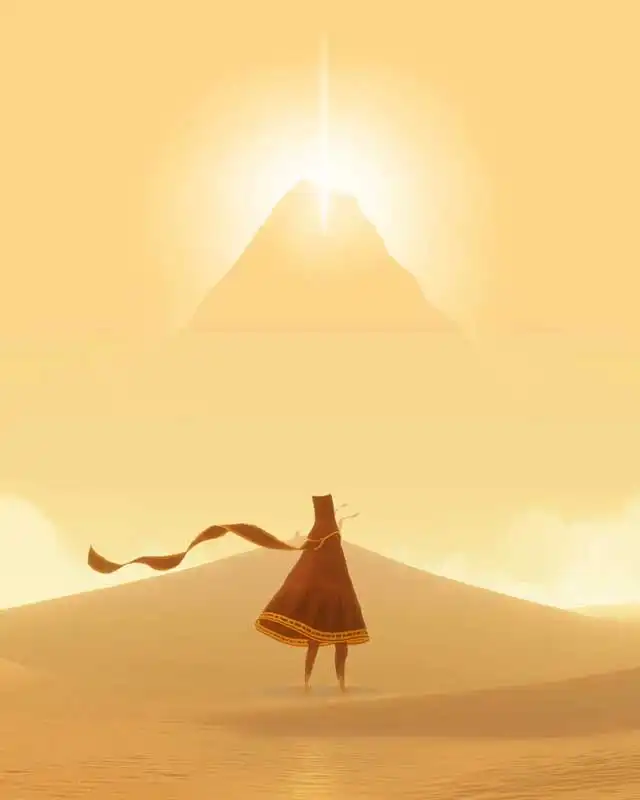
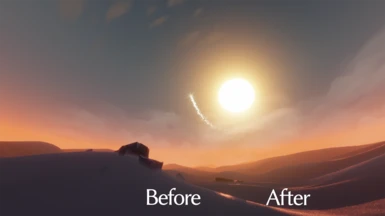
I let you copy the sparkle settings from my config file, so you too can enjoy it and lose your sight !
I also explain how to tweak sparkle settings yourself.
- Permissions and credits
How to install?
1) First find your config file located here:
\Users\AppData\Local\Annapurna Interactive\Journey\Steam\Journey.cfg
I'm not sure the config file is located elsewhere if you only got the epic games version.
I believe steam and epic will use the same cfg file if you got both versions, like I do.
2) Open the cfg file with any text editor like notepad++,...
Then copy and paste the following lines at the corresponding location in the file:
3) Save the file and you're done !
Note these sparkle settings were meant to be used with High Dune settings, High Sand texture quality, and MSAA=4.
But you can try other settings and see how you like it.
Can I recover my default config file?
Just delete the config file, and upon launching the game again Steam/Epic Games will create a new one with default settings (you may have to select again the buttons you use and graphic settings).
Otherwise you can just copy and paste + save the default config file sparkle settings:
Ok it's pretty cool but my eyes quite literally burn !??
Don't you worry, I'll explain how to adapt the shininess to your liking if you wish to adjust it (based on my own observations):
You can see many level names to adjust the sparkles for. They are put in order of appearance in-game: see this wiki article for reference.
Level Credits = Snow+Tower+UG. Level Matt = SC + PD (at dusk). Level Chris = BB + CS (Night scene).
Know similar settings for 2 different levels can give a different outcome, so you will have to consider each level individually to achieve the desired sparkle settings.
I might still adjust my config file a little more in the future, but the overall sparkle design got achieved as far as I'm concerned.
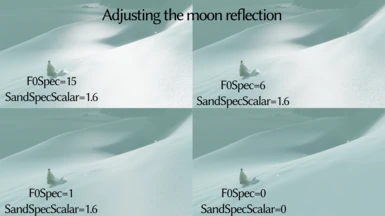
Sun/Moon reflection:
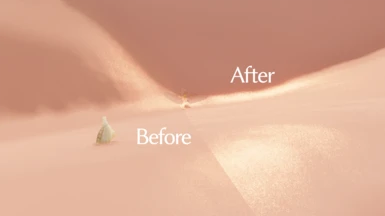
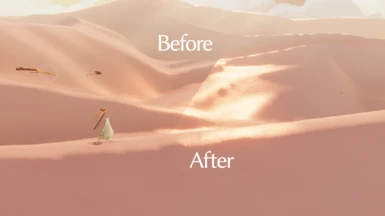
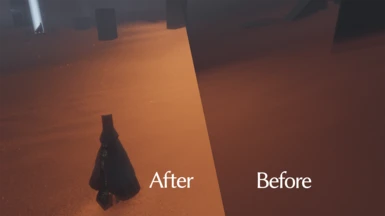
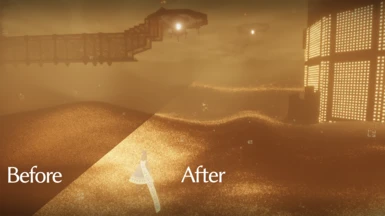
F0spec and SandSpecScalar are responsible for the sun/moon's direct reflection on the sand/snow. The higher these values are, the stronger the reflection gets.
I couldn't find a difference between the two, and it's possible to achieve very similar results with completely different ratios for both (one set very high and the other very low for example).
Even in Underground or Tower level, the sun position located outside in the North is reflected on the ground inside. Though this doesn't make any sense, it can still be used for a nice effect. (Underground and tower are considered outside when it comes to sparkles)
Negative values will create negatively colored sun reflections (which looks cool but definitely not natural !)
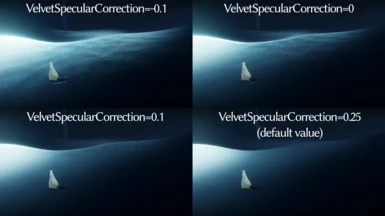
VelvetSpecularCorrection:
VelvetSpecularCorrection makes the sand shine at a distance everywhere light hits directly (not in shadows), the lower this value is. It will work for Underground and tower levels too. The effect is especially visible when the camera is angled flat, close to the ground, and you look at the dunes ahead of you: it tends to shine brighter at the top of sand dunes or when angling the camera so it faces an elongated dune from the side.
If the camera aims fully down you can only see the direct sun reflection determined by F0spec and SandSpecScalar instead.
This setting can be lowered down to -1 (lower than this gives no sparkles), but it will start behaving weird below -0.1 in my opinion.
When working on my sparkles, most of the time (for outdoor environments), I would try to first define how bright I want the direct sun reflection to be, based on the time of the day each level represents and their environment, and then try to match the distant sparkles accordingly by adjusting the VelvetSpecularCorrection value.
Noise faders:
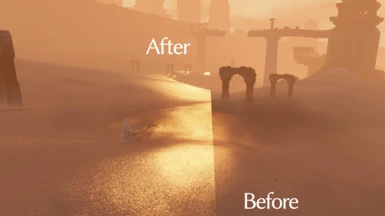
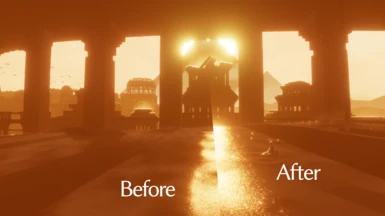
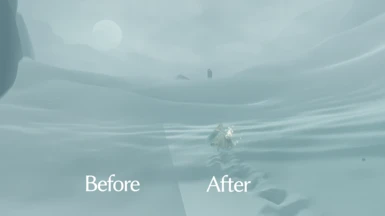
NoiseFadeBias and NoiseFadeScalar are two interdependant parameters which define the rendering distance of sparkles and how soft they look (affecting both direct sun reflection and also VelvetSpecularCorrection sparkles).
The idea is to find a good ratio between the two for the desired effect.
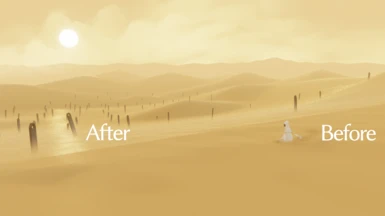
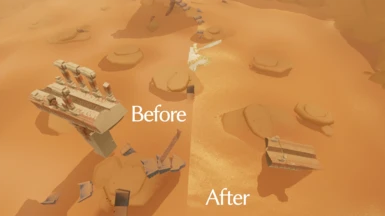
See the screenshots comparing them to understand more easily what they do.
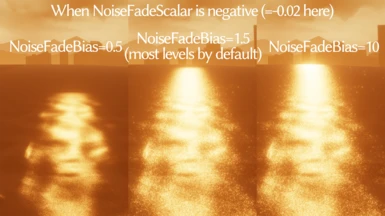
By default NoiseFadeScalar is a negative value, and this makes NoiseFadeBias define how far will sparkles still be visible (assuming NoiseFadeBias remains positive, or no sparkles will be displayed).
It will also give the sparkles a softer look near the transition point to "no sparkles".
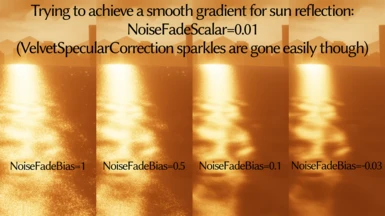
The closer to 0 NoiseFadeScalar gets, the smoother the transition point will look, but the more you will have to adjust NoiseFadeBias down to keep the ratio intact, and have the same distance to the camera for the point of transition.
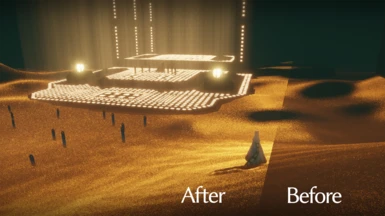
When NoiseFadeScalar="-0.02" (default value for most levels), if you set NoiseFadeBias high you can see sparkles very far away: in most levels when NoiseFadeBias="20" or "30", you will see sparkles across the entire level !
I don't know how performance heavy my sparkle settings are, so if you experience FPS issues it can be an idea to set NoiseFadeScalar to a negative value while estimating how smooth you want the transition to be, and then set NoiseFadeBias to an intermediate value, so sparkles aren't shown across the entire level at the same time.
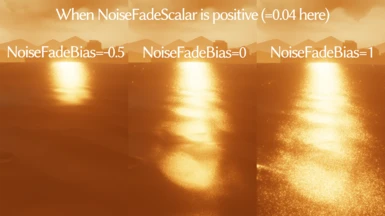
If NoiseFadeScalar is a positive value, then NoiseFadeBias will instead define from which distance to the camera will the sparkles start to become visible !
It will again make the sparkles softer at the transition point depending on how close to 0 NoiseFadeScalar is, for a smooth transition.
NoiseFadeBias can be positive, negative or equal to 0 in this situation.
When NoiseFadeBias is negative you won't see any sparkles close to the camera, which in my opinion looks very unnatural.
When NoiseFadeBias="0" or is a positive value, the sun reflection will reach the camera (or start "behind it"), and allow for a smooth gradient of sparkles more present toward the horizon ; which can look interresting. However the sparkles defined by VelvetSpecularCorrection will only be visible far away.
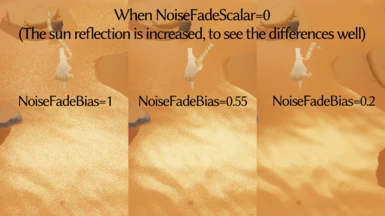
When you put NoiseFadeScalar="0", NoiseFadeBias will instead start to act like a softening parameter only, for all kinds of sparkles (no rendering distance is considered anymore, so all sparkles are visible).
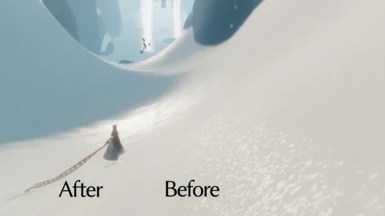
You can then adjust NoiseFadeBias between 0 and 1 (1 would be the default value, aka "normal" sparkles), and the more you lower it, the softer the sparkles will look.
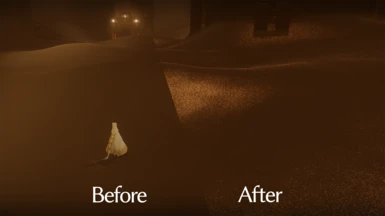
I personally used this configuration for every levels so far, and lowered NoiseFadeBias in Broken Bridge for an original look of the sand, since I used to find the sun reflections too agressive there, given the cloudy sky and still rather early time of the day in-game (I think it can look really cool too in Snow level).
The more you lower NoiseFadeBias, the more you will also have to lower VelvetSpecularCorrection and push F0spec or SandSpecScalar up, to keep a similar amount of sparkles and brightness everywhere, but with the softer look. Direct sun reflections will spread less the lower NoiseFadeBias is though, no matter how well you adjust F0spec or SandSpecScalar accordingly.
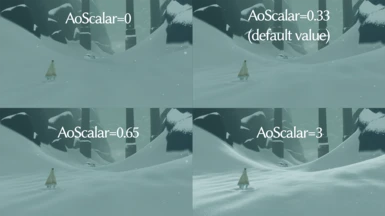
AoScalar:
The higher AoScalar is, the easier tiny sand ripples are to see depending on the camera angle, since it will make them brighter the more the camera looks as them from as much to the side as possible (a bit like VelvetSpecularCorrection behaves regarding sparkles, except it also works for sand/snow in the shadows !).
Overall you could consider it brightens the sand/snow the higher this value is. And just like VelvetSpecularCorrection, AoScalar has a tendency to make the outline of sand dunes very bright, due to the camera angle looking at the sand from the side.
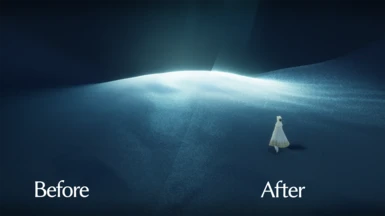
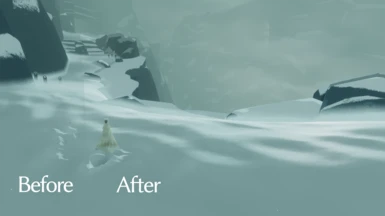
I Like to push this value up a bit for snowy environments since it gives better contrast everywhere there is no sun reflection, and it brings a more comfy vibe.
It might be a good idea to define this value early on, since otherwise VelvetSpecularCorrection will appear to make sparkles even brighter, as they will overlap onto brighter dunes !
AoScalar can be set negative to obtain negative colors.
MipTapBias seems to only reduce the effect of VelvetSpecularCorrection, the higher it gets (0.2 for example makes a considerable difference). I'm not sure it's a really useful setting in achieving a cool look in-game, considering you could simply adjust VelvetSpecularCorrection directly.
Good luck with tweaking these values ! Have fun
1) First find your config file located here:
\Users\AppData\Local\Annapurna Interactive\Journey\Steam\Journey.cfg
I'm not sure the config file is located elsewhere if you only got the epic games version.
I believe steam and epic will use the same cfg file if you got both versions, like I do.
2) Open the cfg file with any text editor like notepad++,...
Then copy and paste the following lines at the corresponding location in the file:
        <Sparkle>
          <Level_Graveyard AoScalar="0.5" F0spec="2" MipTapBias="0.000" NoiseFadeBias="1" NoiseFadeScalar="0" SandSpecScalar="1.8" VelvetSpecularCorrection="0.19"/>
          <Level_Barrens AoScalar="0.33" F0spec="0.2" MipTapBias="0.000" NoiseFadeBias="0.55" NoiseFadeScalar="0" SandSpecScalar="1.8" VelvetSpecularCorrection="0.15"/>
          <Level_Desert AoScalar="0.4" F0spec="0.2" MipTapBias="0.000" NoiseFadeBias="1" NoiseFadeScalar="0" SandSpecScalar="1.8" VelvetSpecularCorrection="0.18"/>
          <Level_Canyon AoScalar="0.2" F0spec="0.15" MipTapBias="0.000" NoiseFadeBias="1" NoiseFadeScalar="0" SandSpecScalar="1.8" VelvetSpecularCorrection="0.19"/>
          <Level_Cave AoScalar="0.33" F0spec="0.05" MipTapBias="0.000" NoiseFadeBias="1" NoiseFadeScalar="0" SandSpecScalar="1.6" VelvetSpecularCorrection="0.085"/>
          <Level_Ruins AoScalar="0.5" F0spec="0.2" MipTapBias="0.000" NoiseFadeBias="1" NoiseFadeScalar="0" SandSpecScalar="2" VelvetSpecularCorrection="-0.03"/>
          <Level_Mountain AoScalar="0.65" F0spec="0.8" MipTapBias="0.000" NoiseFadeBias="1" NoiseFadeScalar="0" SandSpecScalar="1.6" VelvetSpecularCorrection="0.2"/>
          <Level_Summit AoScalar="0.5" F0spec="0.08" MipTapBias="0.000" NoiseFadeBias="1" NoiseFadeScalar="0" SandSpecScalar="1.6" VelvetSpecularCorrection="0.08"/>
          <Level_Credits AoScalar="0.4" F0spec="0.8" MipTapBias="0.000" NoiseFadeBias="1" NoiseFadeScalar="0" SandSpecScalar="2.2" VelvetSpecularCorrection="0.085"/>
          <Level_Matt AoScalar="0.33" F0spec="0.1" MipTapBias="0.000" NoiseFadeBias="0.8" NoiseFadeScalar="0" SandSpecScalar="1" VelvetSpecularCorrection="0.08"/>
          <Level_Chris AoScalar="0.45" F0spec="0.6" MipTapBias="0.000" NoiseFadeBias="1" NoiseFadeScalar="0" SandSpecScalar="2" VelvetSpecularCorrection="0.11"/>
        </Sparkle>
3) Save the file and you're done !
Note these sparkle settings were meant to be used with High Dune settings, High Sand texture quality, and MSAA=4.
But you can try other settings and see how you like it.
- Lower Dune settings make the sand particules bigger and as a result make the sand more shiny. Ultra Dune settings make the sand look too thin to me.
- Lower sand texture reduces the amount of sand ripples, and "ultra" is too many ripples for my taste.
- MSAA is supposed to smoothen sharp edges around objects the higher it is, but it can also create shiny outlines, like around the wayfarer itself or war machines in some levels... As a side effect it also tends to give more big and very bright sand sparkles the higher this value gets (the kind of sparkles found a lot OOB in Sunken City level on PS3)
Can I recover my default config file?
Just delete the config file, and upon launching the game again Steam/Epic Games will create a new one with default settings (you may have to select again the buttons you use and graphic settings).
Otherwise you can just copy and paste + save the default config file sparkle settings:
        <Sparkle>
          <Level_Graveyard AoScalar="0.33" F0spec="0.01" MipTapBias="0.000" NoiseFadeBias="1.5" NoiseFadeScalar="-0.02" SandSpecScalar="1.6" VelvetSpecularCorrection="0.25"/>
          <Level_Barrens AoScalar="0.33" F0spec="0.01" MipTapBias="0.000" NoiseFadeBias="1.5" NoiseFadeScalar="-0.02" SandSpecScalar="1.6" VelvetSpecularCorrection="0.25"/>
          <Level_Desert AoScalar="0.33" F0spec="0.01" MipTapBias="0.000" NoiseFadeBias="1.5" NoiseFadeScalar="-0.02" SandSpecScalar="1.6" VelvetSpecularCorrection="0.25"/>
          <Level_Canyon AoScalar="0.33" F0spec="0.01" MipTapBias="0.000" NoiseFadeBias="1.0" NoiseFadeScalar="-0.06" SandSpecScalar="1.0" VelvetSpecularCorrection="0.25"/>
          <Level_Cave AoScalar="0.33" F0spec="0.01" MipTapBias="0.000" NoiseFadeBias="1.5" NoiseFadeScalar="-0.02" SandSpecScalar="1.6" VelvetSpecularCorrection="0.25"/>
          <Level_Ruins AoScalar="0.33" F0spec="0.01" MipTapBias="0.000" NoiseFadeBias="1.5" NoiseFadeScalar="-0.02" SandSpecScalar="1.6" VelvetSpecularCorrection="0.25"/>
          <Level_Mountain AoScalar="0.33" F0spec="0.01" MipTapBias="0.000" NoiseFadeBias="1.5" NoiseFadeScalar="-0.02" SandSpecScalar="1.6" VelvetSpecularCorrection="0.25"/>
          <Level_Summit AoScalar="0.33" F0spec="0.01" MipTapBias="0.000" NoiseFadeBias="1.5" NoiseFadeScalar="-0.02" SandSpecScalar="1.6" VelvetSpecularCorrection="0.25"/>
          <Level_Credits AoScalar="0.33" F0spec="0.01" MipTapBias="0.000" NoiseFadeBias="1.5" NoiseFadeScalar="-0.02" SandSpecScalar="1.6" VelvetSpecularCorrection="0.25"/>
          <Level_Matt AoScalar="0.33" F0spec="0.01" MipTapBias="0.000" NoiseFadeBias="1.5" NoiseFadeScalar="-0.02" SandSpecScalar="1.6" VelvetSpecularCorrection="0.25"/>
          <Level_Chris AoScalar="0.33" F0spec="0.01" MipTapBias="0.000" NoiseFadeBias="1.5" NoiseFadeScalar="-0.02" SandSpecScalar="1.6" VelvetSpecularCorrection="0.25"/>
        </Sparkle>
Ok it's pretty cool but my eyes quite literally burn !??
Don't you worry, I'll explain how to adapt the shininess to your liking if you wish to adjust it (based on my own observations):
You can see many level names to adjust the sparkles for. They are put in order of appearance in-game: see this wiki article for reference.
Level Credits = Snow+Tower+UG. Level Matt = SC + PD (at dusk). Level Chris = BB + CS (Night scene).
Know similar settings for 2 different levels can give a different outcome, so you will have to consider each level individually to achieve the desired sparkle settings.
I might still adjust my config file a little more in the future, but the overall sparkle design got achieved as far as I'm concerned.
Sun/Moon reflection:
F0spec and SandSpecScalar are responsible for the sun/moon's direct reflection on the sand/snow. The higher these values are, the stronger the reflection gets.
I couldn't find a difference between the two, and it's possible to achieve very similar results with completely different ratios for both (one set very high and the other very low for example).
Even in Underground or Tower level, the sun position located outside in the North is reflected on the ground inside. Though this doesn't make any sense, it can still be used for a nice effect. (Underground and tower are considered outside when it comes to sparkles)
Negative values will create negatively colored sun reflections (which looks cool but definitely not natural !)
VelvetSpecularCorrection:
VelvetSpecularCorrection makes the sand shine at a distance everywhere light hits directly (not in shadows), the lower this value is. It will work for Underground and tower levels too. The effect is especially visible when the camera is angled flat, close to the ground, and you look at the dunes ahead of you: it tends to shine brighter at the top of sand dunes or when angling the camera so it faces an elongated dune from the side.
If the camera aims fully down you can only see the direct sun reflection determined by F0spec and SandSpecScalar instead.
This setting can be lowered down to -1 (lower than this gives no sparkles), but it will start behaving weird below -0.1 in my opinion.
When working on my sparkles, most of the time (for outdoor environments), I would try to first define how bright I want the direct sun reflection to be, based on the time of the day each level represents and their environment, and then try to match the distant sparkles accordingly by adjusting the VelvetSpecularCorrection value.
Noise faders:
NoiseFadeBias and NoiseFadeScalar are two interdependant parameters which define the rendering distance of sparkles and how soft they look (affecting both direct sun reflection and also VelvetSpecularCorrection sparkles).
The idea is to find a good ratio between the two for the desired effect.
See the screenshots comparing them to understand more easily what they do.
By default NoiseFadeScalar is a negative value, and this makes NoiseFadeBias define how far will sparkles still be visible (assuming NoiseFadeBias remains positive, or no sparkles will be displayed).
It will also give the sparkles a softer look near the transition point to "no sparkles".
The closer to 0 NoiseFadeScalar gets, the smoother the transition point will look, but the more you will have to adjust NoiseFadeBias down to keep the ratio intact, and have the same distance to the camera for the point of transition.
When NoiseFadeScalar="-0.02" (default value for most levels), if you set NoiseFadeBias high you can see sparkles very far away: in most levels when NoiseFadeBias="20" or "30", you will see sparkles across the entire level !
I don't know how performance heavy my sparkle settings are, so if you experience FPS issues it can be an idea to set NoiseFadeScalar to a negative value while estimating how smooth you want the transition to be, and then set NoiseFadeBias to an intermediate value, so sparkles aren't shown across the entire level at the same time.
If NoiseFadeScalar is a positive value, then NoiseFadeBias will instead define from which distance to the camera will the sparkles start to become visible !
It will again make the sparkles softer at the transition point depending on how close to 0 NoiseFadeScalar is, for a smooth transition.
NoiseFadeBias can be positive, negative or equal to 0 in this situation.
When NoiseFadeBias is negative you won't see any sparkles close to the camera, which in my opinion looks very unnatural.
When NoiseFadeBias="0" or is a positive value, the sun reflection will reach the camera (or start "behind it"), and allow for a smooth gradient of sparkles more present toward the horizon ; which can look interresting. However the sparkles defined by VelvetSpecularCorrection will only be visible far away.
When you put NoiseFadeScalar="0", NoiseFadeBias will instead start to act like a softening parameter only, for all kinds of sparkles (no rendering distance is considered anymore, so all sparkles are visible).
You can then adjust NoiseFadeBias between 0 and 1 (1 would be the default value, aka "normal" sparkles), and the more you lower it, the softer the sparkles will look.
I personally used this configuration for every levels so far, and lowered NoiseFadeBias in Broken Bridge for an original look of the sand, since I used to find the sun reflections too agressive there, given the cloudy sky and still rather early time of the day in-game (I think it can look really cool too in Snow level).
The more you lower NoiseFadeBias, the more you will also have to lower VelvetSpecularCorrection and push F0spec or SandSpecScalar up, to keep a similar amount of sparkles and brightness everywhere, but with the softer look. Direct sun reflections will spread less the lower NoiseFadeBias is though, no matter how well you adjust F0spec or SandSpecScalar accordingly.
AoScalar:
The higher AoScalar is, the easier tiny sand ripples are to see depending on the camera angle, since it will make them brighter the more the camera looks as them from as much to the side as possible (a bit like VelvetSpecularCorrection behaves regarding sparkles, except it also works for sand/snow in the shadows !).
Overall you could consider it brightens the sand/snow the higher this value is. And just like VelvetSpecularCorrection, AoScalar has a tendency to make the outline of sand dunes very bright, due to the camera angle looking at the sand from the side.
I Like to push this value up a bit for snowy environments since it gives better contrast everywhere there is no sun reflection, and it brings a more comfy vibe.
It might be a good idea to define this value early on, since otherwise VelvetSpecularCorrection will appear to make sparkles even brighter, as they will overlap onto brighter dunes !
AoScalar can be set negative to obtain negative colors.
MipTapBias seems to only reduce the effect of VelvetSpecularCorrection, the higher it gets (0.2 for example makes a considerable difference). I'm not sure it's a really useful setting in achieving a cool look in-game, considering you could simply adjust VelvetSpecularCorrection directly.
Good luck with tweaking these values ! Have fun