


0 of 0


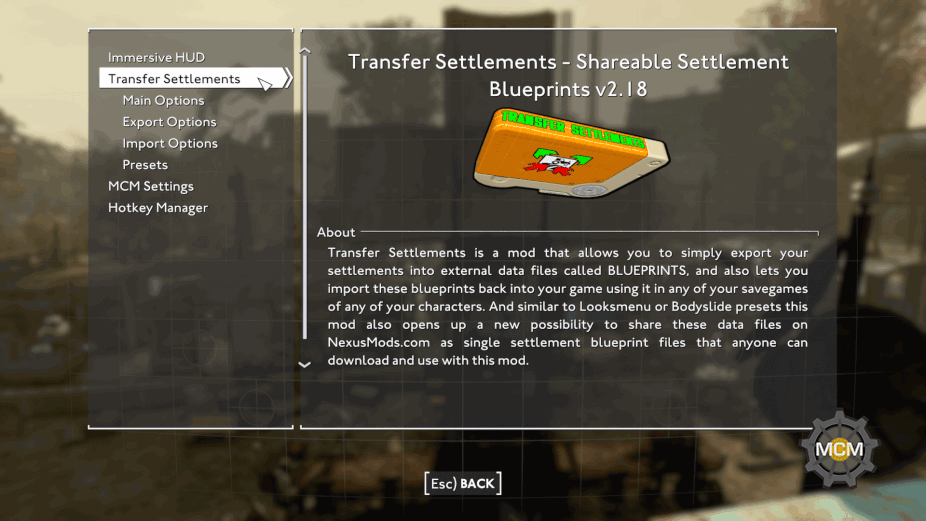
About this mod
Similarly to its Fallout 4 version, Transfer Settlements - London allows you to export your London settlements into external blueprint files, share them with others or import them back to any of your savegames for any of your characters.
- Requirements
- Permissions and credits
- Changelogs
- Donations
______________________________________________________________________________________________________________
THIS MOD WOULD NOT HAVE BEEN POSSIBLE WITHOUT HUGE AMOUNTS OF HELP BY
Expired6978, registrator2000 & GroteGrottrol
Expired6978, registrator2000 & GroteGrottrol
WATCH MY VIDEO FEATURING THE CHANGES IN THE NEW VERSION!
Music: Fallout London Anthem by Fallout Tribute Music
Music: Fallout London Anthem by Fallout Tribute Music

If you are here, chances are you already know Transfer Settlements for Fallout 4 quite well. So no surprises, Transfer Settlements - London does the same thing, but in Fallout: London. It's a mod that allows you to simply export your London settlements into external data files called BLUEPRINTS, and also lets you import these blueprints back into your game using it in any of your savegames of any of your characters. And similar to Looksmenu or Bodyslide presets this mod also opens up a new possibility to share these data files on NexusMods.com as single settlement blueprint files that anyone can download and use with this mod.
CHECK OUT GOPHER'S ANNOUNCEMENT VIDEO:
THE ORIGINAL TRANSFER SETTLEMENTS TUTORIALS/REVIEWS FROM OXHORN AND GOPHER:
THE ORIGINAL TRANSFER SETTLEMENTS TUTORIALS/REVIEWS FROM OXHORN AND GOPHER:

1) Install HUDFramework (originally created for Fallout 4)!
2) Install the HUDFramework FOLON Compatibility Patch that you can find on my mod page!
Without this, HUDFramework would override the Fallout: London minimap icons with the vanilla Fallout 4 ones.
3) Install Transfer Settlements - London
Use a mod manager like Vortex or MO2.
OR
Extract the contents of the rar file to your Fallout: London Data folder.
Enable TransferSettlements.esp using a mod manager or manually.
Ensure these lines appear in your ../Documents/My Games/Fallout4/Fallout4Custom.ini:
[Archive]
bInvalidateOlderFiles=1
sResourceDataDirsFinal=
GOG-USERS
If you are running the GOG version of Fallout 4 and MO2, you will need to add this argument to your f4se_loader.exe in MO2 otherwise f4se-mods won't run:
-forcesteamloader
If you have trouble installing mods, check these tutorials by Gopher:
- FALLOUT 4: Enabling Modding for PC (UPDATED)
- FALLOUT 4: Installing Mods on PC (MANUALLY)
If you have problem installing Fallout: London, check out these tutorials:
- How-To FALLOUT: LONDON

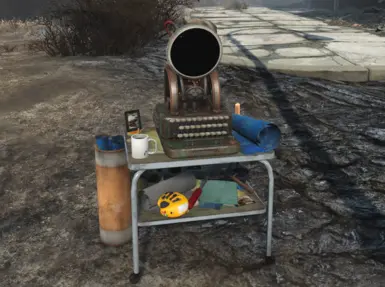
The Transfer Settlements Terminal can be built in workshop mode under Power / Miscellaneous. All features this mod offers are available through this terminal.

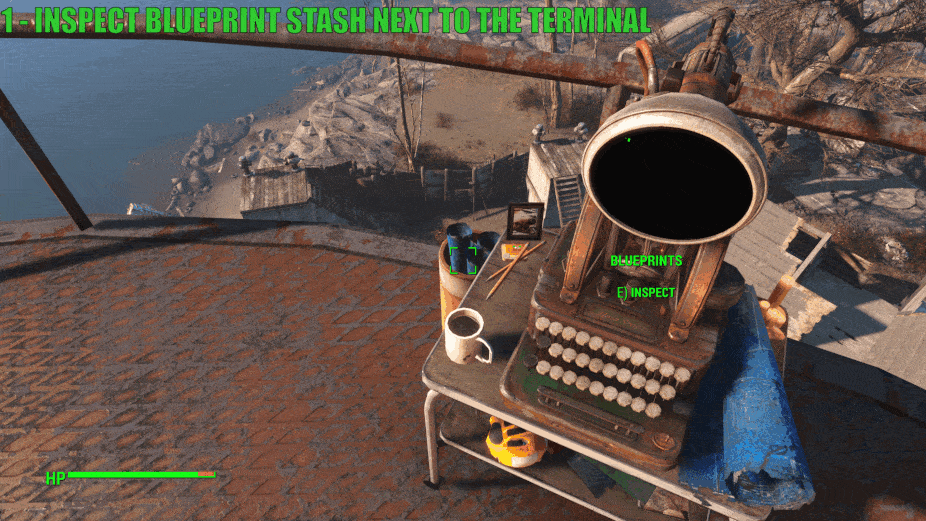
There’s a Blueprint Stash spawned automatically next to each Transfer Settlements Terminal that can be activated separately, and can be used to inspect each of the available blueprints in their physical form - choosing the TAKE option of the blueprint will take that blueprint to the nearest Transfer Settlements Terminal to directly open its import options.
After installing the mod you will also receive a holotape to your inventory called [Settings] Transfer Settlements which you will often find under the submenu "Setting Holotapes" without the holotape itself having the [Settings] prefix if you’re using item sorting mods. It is also craftable at Chemistry Stations under the Utility section. All features are available through this holotape as well.
Optionally you can use the Mod Configuration Menu (MCM) to reach Transfer Settlements General Settings under Mod Config from the pause menu. The same settings are available from the terminal and the holotape as well.
TL;DR
Use the holotape or the terminal and follow the instructions in the game.
EXPORTING SETTLEMENTS
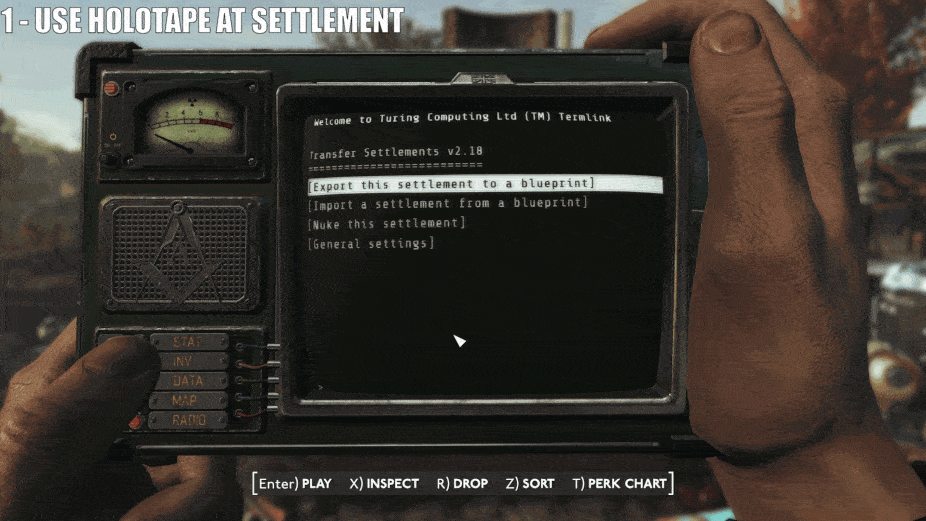
Build and use the terminal or load up the holotape at the location of the settlement you wish to export and choose Export this settlement to a blueprint.
On the next screen choose a blueprint slot from the list. These blueprint slots represent the numbered folders in your blueprints folder that is located in your Fallout London installation folder under Data\F4SE\Plugins\TransferSettlements\blueprints. So for example the data file for a blueprint in the first slot will look something like this Data\F4SE\Plugins\TransferSettlements\blueprints\1\bp_dante_london_bridge_2409191950.json. So choosing a blueprint slot here will determine the blueprint folder you wish to use for this settlement export. Note that any previously existed blueprints in that chosen folder will be overwritten automatically so make sure you backup your blueprint files somewhere else if you want to export more settlements than the number of available blueprint slots.
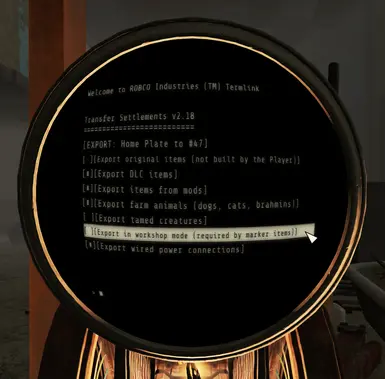
After selecting one of them you can fine-tune the options of the export.
- Export original items (not built by the Player)
By enabling the export of original items you will export items that are linked to the settlement workshop but wasn’t built by the Player. Think of Shawn’s Crib at Sanctuary Hills in vanilla Fallout 4 as an example.
This is useful if you previously removed these items and want them back in your game. But in most cases you probably want to export only the items built by yourself.
- Export DLC items / Export items added by mods
Turning off the export of DLC items or items added by mods means you don’t want these types of items exported into the blueprint. By default these options are turned on since the import process handles missing DLCs or mods perfectly.
- Export farm animals (dogs, cats, brahmins)
The option to export farm animals lets you export dogs, cats, brahmins to your blueprint. Note that this will never export unique animals.
- Export tamed creatures
The option to export tamed creatures lets you export various tamed creatures added to your settlement by cages from the Wasteland Workshop DLC or from mods that work similarly.
- Export marker-based items
Marker-based objects are settlement objects that are represented by markers in Workshop Mode. In order to successfully export such objects, Transfer Settlements - London can optionally work while Workshop Mode is open, granting the ability to fully imitate manual settlement building. This was tested with ccmads’s Settlement Objects Expansion Pack v1.6.4 and Build Your Own Pool v4.0 by Akarnan but should be compatible with any mods that work similarly.
- Export wired power connections
Checking this option will store the data for all wired power connections in your settlement.
- Export Sim Settlements items
This option requires Sim Settlements to be installed. By checking this Sim Settlements plots can be exported, building plans and upgrade stages are being exported as well so you will be able to import the same plot with the same building with all its currently exported upgrades.
VIP Stories can be exported - available from Sim Settlements (2.1.7).
Industrial Revolution Advanced Industrial Plots can be exported - available from Sim Settlements (2.1.7).
Industrial Revolution Martial Plots and Recreational Plots can be exported.
Note that all of these options are available before importing a blueprint as well, so even if a file contains all exportable items, animals and creatures from various DLCs and mods it is always possible to choose to discard the same categories of objects and NPCs before importing a blueprint, just like you can discard them here. In other words you are never forced to import these optional assets from a blueprint if you don’t want to, but choosing not to export unnecessary items in the first place may result in a faster operation both during export and import.
START THE EXPORT!
Closes the Pip-Boy or the terminal and starts the export process.
PHASE 1) SCANNING
First the settlement will be scanned for assets that are actually valid regarding your export settings.
- Blue highlight = assets being scanned
- Yellow highlight = assets discarded by you
- Red highlight = assets that cannot be exported such as settlers or unique animals
PHASE 2) EXPORTING
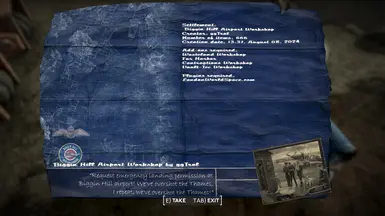
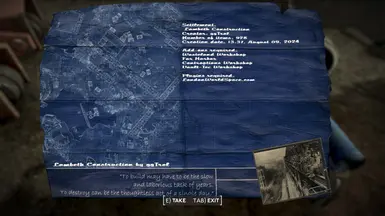
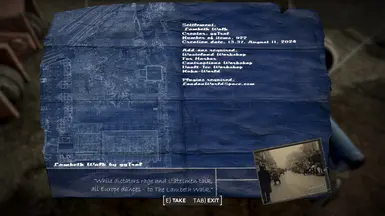
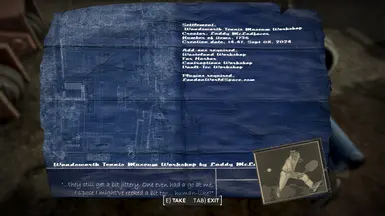
After the scanning process has been finished the program starts exporting the remaining assets that are still highlighted in blue. An object turning into green means it will end up in the external blueprint file. Once the exporting process has been finished as well, you can read a report about the blueprint details. It is highly recommended that you make a screenshot of the report if you want to publish your settlement as it shows you the required plugins for your settlement. Alternatively you can always check for this data by opening the blueprint file itself using a text editor.
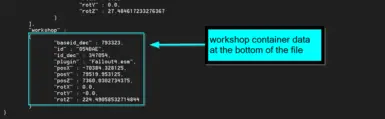
BLUEPRINT FILES
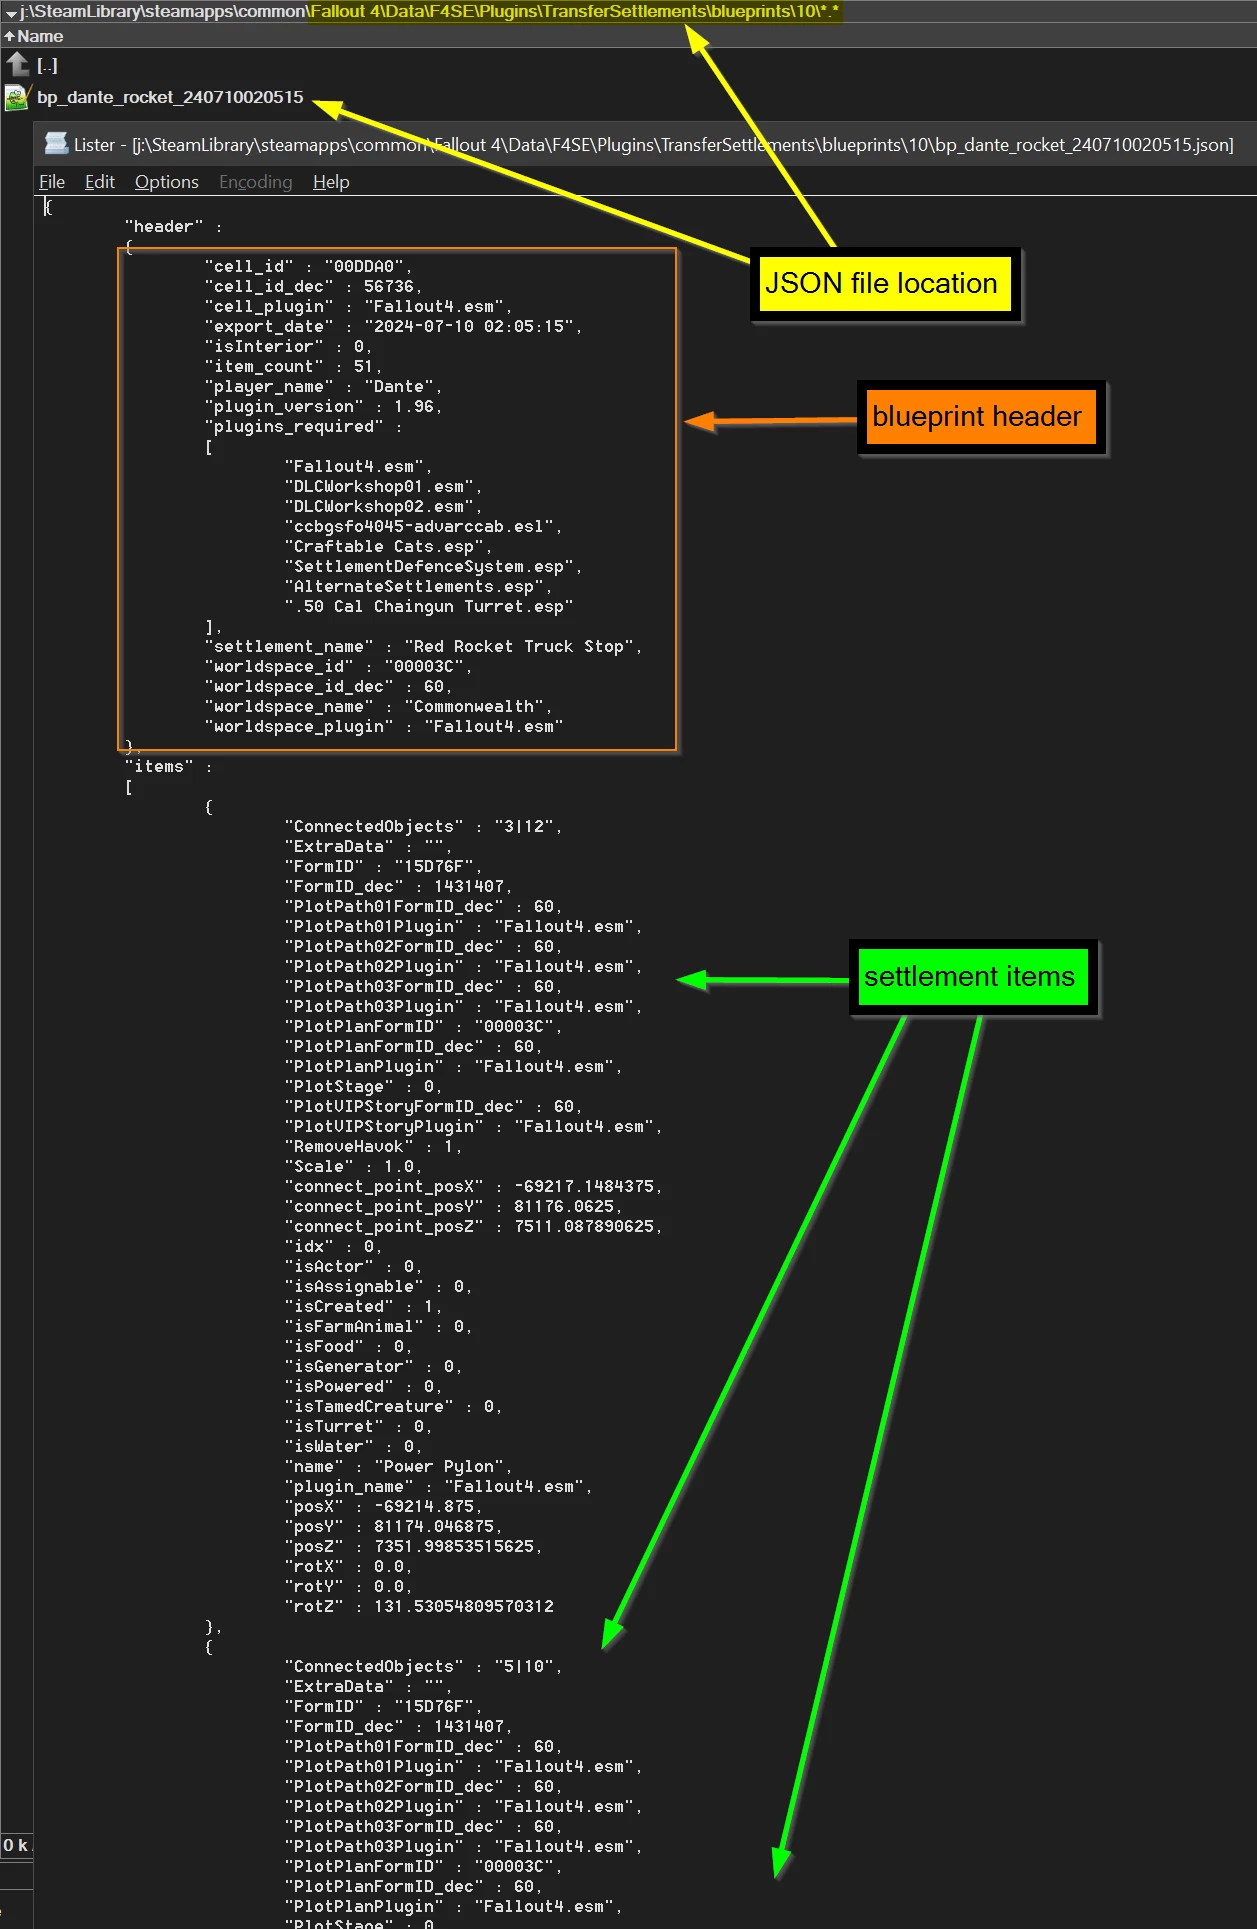

Blueprints are in JSON format which is an open-standard format that uses human-readable text to store/transmit data. These blueprint files are located in your Fallout: London installation folder under Data\F4SE\Plugins\TransferSettlements\blueprints\ where each non-empty Blueprint Slot has a numbered folder with a JSON file in it. So for example if you export a settlement to slot 1, you will find the blueprint file under Data\F4SE\Plugins\TransferSettlements\blueprints\1\.
UPLOADING A BLUEPRINT TO NEXUSMODS
Publishing your settlement as a blueprint mod can be done in a few easy steps.
- Export your settlement as detailed above.
- Find the file.
- Make sure you pack the file with folders included. Your archive should contain the full path like for example F4SE\Plugins\TransferSettlements\blueprints\1\my_cool_settlement.json instead of just the JSON file. But do NOT include other files from the F4SE or Plugins folder! You should only include your Blueprint (JSON) file(s).
- Name your mod somethig like "... Settlement Blueprint" - this is important if you want users to easily recognize it to be a Transfer Settlements blueprint by the mod's name.
- After uploading the file to NexusMods and setting up your mod page, make sure you add Transfer Settlements as a requirement. You may also add F4SE and HUDFramework but this mod already covers those requirements.
- Make sure you add all other mods as well that are requirements for your Blueprint.
PRO TIP: CHECK OUT THESE AWESOME TOOLS TO HANDLE BLUEPRINT FILES
- Fallout 4 - TSB Item Havok Disabler by FiftyTifty
- NMM Transfer Settlements Blueprint Installer by Caladon
IMPORTING BLUEPRINTS
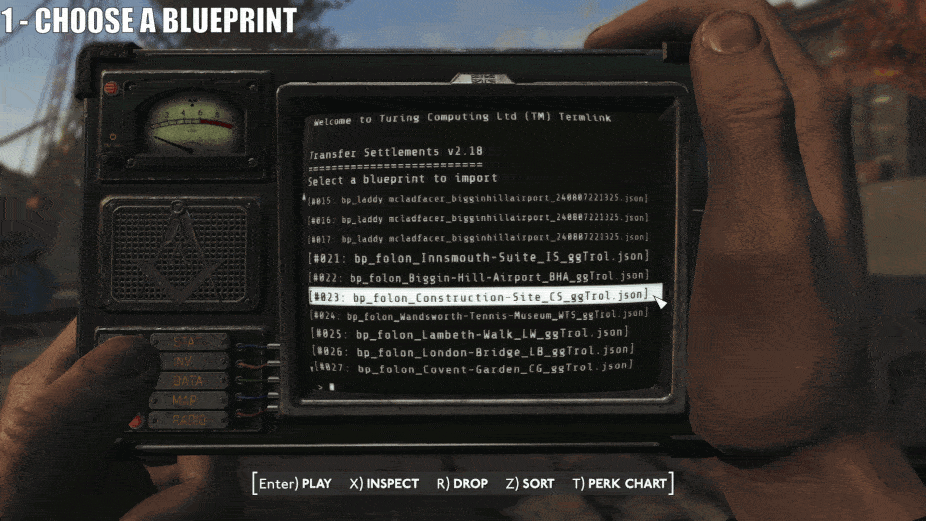
Build and use the terminal or load up the holotape, but this time your location doesn't matter. Choose Import a settlement from a blueprint.
On the next screen choose the blueprint you want to import depending on its filename and the number of the folder you copied or exported it to earlier.
After selecting one of them you will see a brief info popup message about the file, then on the next screen you can fine-tune the options of the import.
- Show blueprint info
You can check the blueprint info any number of times.
- Import original items (not built by the Player)
By enabling the import of original items you will import any items that were originally linked to the settlement workshop but wasn’t built by the creator of the Blueprint. An example would be Tato Plants and Melons at Abernathy Farm in vanilla Fallout 4. Of course if the Blueprint doesn't contain such items this option is irrelevant.
- Import DLC items / Import items added by mods
If you don't want items imported that originate from a mod or a DLC, you can turn these off. Note that if you don't have those DLCs or mods installed the script will skip the items regardless of these options.
- Import farm animals (dogs, cats, brahmins)
You can keep this turned off if you don't want pets imported from blueprints.
- Import tamed creatures
You can keep this turned off if you don't want creatures imported from blueprints that are tamed by cages from the Wasteland Workshop DLC. Note that if the Blueprint contains this type of creatures they will be hostile until you power up a Beta wave emitter.
- Import or nuke marker-based items
Marker-based objects are settlement objects that are represented by markers in Workshop Mode. In order to successfully import or destroy such objects, Transfer Settlements - London can optionally work while Workshop Mode is open, granting the ability to fully imitate manual settlement building. This was tested with ccmads’s Settlement Objects Expansion Pack v1.6.4 and Build Your Own Pool v4.0 by Akarnan but should be compatible with any mods that work similarly. In order to destroy such items in an existing settlement you also need to choose the 'Nuke settlement before import' option.
- Import wired power connections
Checking this option will recreate exported wired connections in your settlement.
- Restore snapped power connections
These are the snapped power connections added by the Contraptions Workshop and the Vault-Tec Workshop DLCs such as conduits and vault sections. Importing/restoring these non-wired connections will be automatic, the script will auto-detect connected objects and restore snap connections.
- Import Sim Settlements Plots
This option requires Sim Settlements to be installed. By checking this Sim Settlements plots can be imported. With this option only the type of the plot will be restored without the actual building plans or building upgrades. So if it was a residential plot on concrete foundations then it will be imported as a new residential plot on concrete foundations that can still turn into any type of buildings.
- Import Sim Settlements Buildings
This option requires Sim Settlements to be installed. By checking this Sim Settlements plots can be imported along with their original building plans. With this option only the type of the plot and the type of the building will be restored without the actual building upgrades. So if it was a Raised Shack then it will be imported as a new, level 0 Raised Shack that still needs to be built by a settler.
- Import Sim Settlements Buildings + Upgrades
This option requires Sim Settlements to be installed. By checking this Sim Settlements plots can be imported along with their original building plans and all of its upgrades. With this option the type of the plot, the type of the building and all the achieved upgrades will be restored instantly. So if it was a level 3 Sailor's Cabin then it will be imported as a level 3 Sailor's Cabin just like it was when you exported the settlement.
VIP Stories can be imported - make sure you assign a Settler to the Plot after you've imported the Plot with the building+upgrades option - available from Sim Settlements (2.1.7).
Industrial Revolution Advanced Industrial Plots can be imported - available from Sim Settlements (2.1.7).
Industrial Revolution Martial Plots and Recreational Plots can be imported.
- Nuke settlement before import
Undoubtedly one of the most fun features of Transfer Settlements - London is to erase your previous home in this spectacular fashion! Don't worry, the explosions are harmless. Kinda. :)
There are two options: choose all items if you'd like to destroy everything linked to the workshop, or choose only the items you've built.
START THE IMPORT!
Closes the Pip-Boy or the terminal and starts the import process. It will automatically teleport you to the settlement if your character is too far away.
PHASE 1) PREPARING
Handling necessary preparation subroutines for each item before deletion.
PHASE 2) NUKING
The Import process will start by blowing up everything on your settlement if you've chosen this option before. Extra points for flying Brahmins!
PHASE 3) IMPORTING
Importing the blueprint is also quite fun as the script animates the objects in a way that each item rises up from below with some particle effect. The player will also express their happiness about structures popping up rapidly.
PHASE 4) STABALIZING
Handling necessary subroutines for each item after creation.
PHASE 5) POWERING UP
Creating wired connections and restoring snapped power connections.
IN ORDER TO FIX ALL NAVMESHES AND FURNITURE MARKERS PLACED BY THE SCRIPT, PLEASE SAVE AND RELOAD YOUR GAME AFTER IMPORTING A BLUEPRINT!
GENERAL SETTINGS

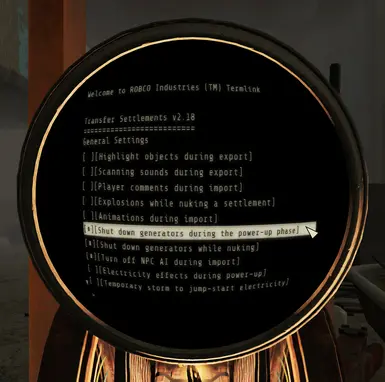
- Highlight objects during export
You can turn off blue, yellow, red and green effect shaders on items during the export process.
- Scanning sounds during export
You can turn off scanning, skipping, error and success sound effects on items during the export process.
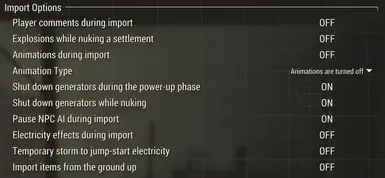
- Player comment during import
You can turn off Player excitement during the import process.
- Explosions while nuking a settlement
By turning off explosions, destroying a settlement will simply make items disappear instead of blown up.
- Animations during import
With animations turned on, items will slide to their places during the import process. Turning this off will make all items simply fade in.
>>> Items appearing from below the ground
With this animation items are raised from below the ground.
>>> Items descending from the sky
With this animation items are descending from the sky.
- Shut down generators during the power-up phase
Generators will be temporarily shut down while the import process restores electricity. Grately improves performance!
- Shut down generators while nuking
Generators will be shut down before removing a settlement. Improves performance!
- Turn off NPC AI during import
All NPC AI will be temporarily turned off during the whole import process. Improves performance!
- Electricity effects during import
Electrical sound effects, spark and occasional random direct lightning hits occur to jump start and power up electrical items in rainy/stormy weather. Turning this off will make power return to the settlement silently.
- Temporary storm to jump-start electricity
Regardless of this option, with electricity effects turned on random direct lightning hits occur to jump start and power up electrical items in rainy/stormy weather. With this option you can choose to summon a temporary storm to trigger this effect every time during settlement import unless you're in an interior cell of course. Nuka-World, Far Harbor, True Storms and Vivid Weathers are automatically detected and new storm types are automatically added to this feature.
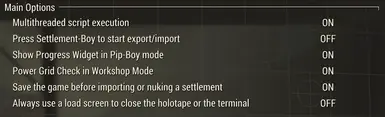
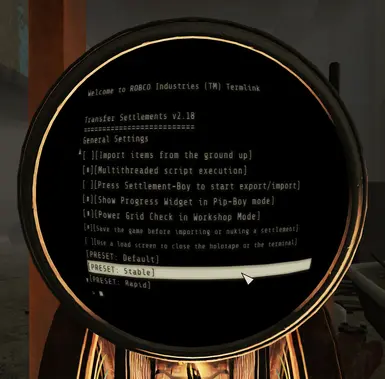
- Multithreaded script execution
Transfer Settlements normally works with multithreading. This generally means that the script doesn't wait for a certain operation to finish before going to the next item to initiate the same operation. Turning off multithreading may solve performance problems or crashes if you experience trouble using the mod, however it slows down both import and export processes significantly. Note that you shouldn't ever turn this feature off while still using the mod with animations turned on!
- Press Settlement-Boy to start export/import
Pip-Boy is now simply closes itself and there's a new custom animation as well - you can watch the player pressing the Settlement-Boy instead of the black loading screens when you start an export or an import. By turning this option off the Player will simply close the Pip-Boy without an additional animation.
- Show Progress Widget in Pip-Boy mode
HUD widget can optionally be visible in Pip-Boy mode (which is quite useful since the export is usually much faster while your Pip-Boy is open).
- Power Grid Check in Workshop Mode
Turn this option off if you don't want the mod to verify your Power Grid each time you enter Workshop Mode.
- Save the game before importing or nuking a settlement
Turn this option off if you don't want the mod to automatically create a normal save (not autosave) each time before importing or nuking a settlement.
- Always use a load screen to close the holotape or the terminal
Turn this option on if you're experiencing any issues with auto-exiting the Pip-Boy when initiating operations from the holotape or the terminal.
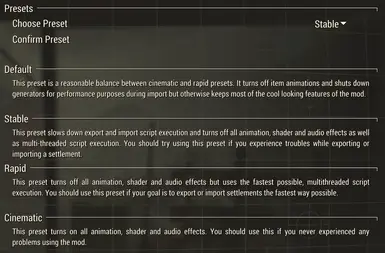
- PRESET: Default
This preset is a reasonable balance between cinematic and rapid presets. It turns off item animations and shuts down generators for performance purposes during import but otherwise keeps most of the cool looking features of the mod.
- PRESET: Stable
This preset slows down export and import script execution and turns off all animation, shader and audio effects as well as multi-threaded script execution. You should try using this preset if you experience troubles while exporting or importing a settlement.
- PRESET: Rapid
This preset turns off all animation, shader and audio effects but uses the fastest possible, multithreaded script execution. You should use this preset if your goal is to export or import settlements the fastest way possible.
- PRESET: Cinematic
This preset turns on all animation, shader and audio effects. This is the default preset for the mod and you should use this if you never experienced any problems using the mod.

The mod is specifically designed to support any items added by DLCs and other mods to your workshop!
On top of that it also supports any custom settlements added by mods as long as those settlements are using the vanilla Workshop object placed in the gameworld through the editor. Of course in this case you will need the original settlement mod to be installed in your game to import the blueprint of that custom settlement.
The mod is compatible with Place Everywhere, and it is also capable of exporting and importing Scaling data! You can also force items to be imported as static objects by manually editing the blueprint file and changing the value 'RemoveHavok' from 0 to 1 on certain items.
The mod is fully compatible with Sim Settlements, Sim Settlements Expansions and any Sim Settlements Addons!
The mod is fully compatible with Chesko's Conquest mod!
The mod is compatible with most mods that add objects to the workshop that act as markers in Workshop Mode.
The mod is capable of optionally exporting and importing creatures tamed with cages from the Wasteland Workshop DLC or from mods working similarly.
Probably needless to say but Transfer Settlements - London does not support model or texture replacer mods. It will export the FormID of the original item regardless of the mesh or skin replacements.

Expired6978 - huge amount of F4SE help
registrator2000 - huge amount of Papyrus tips, F4SE, C++ and HUDFramework help
ousnius - additional C++ help
GroteGrottrol - mod testing and solving user problems on my mod page and on my discord server

Some notable reviews of the original Transfer Settlements mod for Fallout 4.

__________________________________________________________________________________________________________________________

- F4SE
- HUDFramework
- IDA Pro
- B.A.E. - Bethesda Archive Extractor
- FO4Edit
- Visual Studio Express 2012
- Automation Tools for TES5Edit
- Notepad++
- Caprica Papyrus Compiler
- Adobe Flash
- Adobe Photoshop
- NVIDIA Texture Tools for Adobe Photoshop
- NifSkope
- Material Editor


