Documentation
Readme
View as plain text
FOMOD Creation Tool
Quick guide
Preparation.
First of first you should prepare folder where will be your mod files and 'fomod' folder. it's up to you how you organize structure of your mod, but keep in mind that some people may want to do manual installation so making this structure reasonable is good idea.
1. Program menu.
1.1. FOMOD menu.
1.1.1. New. Delete all steps if such exist, cleans all mod info fields, clean root catalog.
1.1.2. Open folder. Opens existing fomod .xml files. You should specify root folder that contains 'fomod' folder. FOMOD Creation Tool mainly support unicode text in UTF-16 (UCS-2) Little Endian encoding, and since 1.6 version limitedly support UTF-8. Non-english symbols in UTF-8 may be interpreted incorrectly.
1.1.3. Open file. Opens existing fomod .xml files. You may choose info.xml or ModuleConfig.xml file, FOMOD CT will catch up pair for it if such exist. FOMOD Creation Tool mainly support unicode text in UTF-16 (UCS-2) Little Endian encoding, and since 1.6 version limitedly support UTF-8. Non-english symbols in UTF-8 may be interpreted incorrectly.
1.1.4. Save. Saves fomod .xml files. FOMOD Creation Tool since 1.2 version support unicode text only in UTF-16 (UCS-2) Little Endian encoding and will save files in this encoding.
1.1.5. Merge FOMOD. Allow you to merge two FOMODs. Fomod recipient should be loaded from file or created, fomod donor you specify in dialog window. Choose only ModuleConfig.xml files. Steps, required files and conditional installations would be added to the end of recipient fomod.
1.1.6. Recent. List of recently opened/saved fomods.
1.1.7. Exit. Exits from program.
1.2. Options menu.
1.2.1. Settings. Opens a settings window. Opens a settings window. There you can choose language file, hide/show menu items 'Open folder' and 'Open file'. Set interface text size (interface may look clumsy with big letters).Manage recent files.
1.2.2. Run before save. Opens window where you can write down some Windows console based script. This script will be compiled in Windows .bat file and executed before your fomod will be saved. You can use FOMOD Creation Tool macro to insert specific data in script. More about supported macro you can read in script window.
Example:
del "$MODROOT$\*.rar" /q
This deletes existing .rar archives from root catalog.
1.2.3. Run after save. Opens window where you can write down some Windows console based script. This script will be compiled in Windows .bat file and executed after your fomod saved. You can use FOMOD Creation Tool macro to insert specific data in script. More about supported macro you can read in script window.
Example:
d:
cd "$MODROOT$"
"C:\Program Files\WinRAR\rar.exe" a -r -ep1 "$MODNAME$_$MODVERSION$.rar" *
This will change active drive to D:\. Then set active path to mod root directory. Then using WinRar pack all files in root directory in archive named with mod name and mod version.
2. Program main interface.
2.1. Mod info.
At start of program you'll see 'Mod info' tab where you put information about your mod.
2.1.1. Mod information.
• Mod name - name of your mod.
• Mod author - it's you, comrade.
• Mod version - i think it's understandable.
• Mod page on Nexus - URL to your mod's page on www.nexusmods.com. To get it create file in your account on Nexus, but not upload anything and not publish it, you'll be able to copy URL of your future mod now.
• Mod header image - image that will be shown on top of installation window to the right from mod name.
• Mod description - text that will be shown in right part of NMM when your mod selected. This field can be multiline, but that doesn't mean that in NMM (or any other mod installer) this description will be multiline. Use some special codes or BB codes in order to get correct page layout.
• Mod category - category on Nexus your mod belongs.
• Technically this fields not necessary but you want your mod look gleam and neat, aren't you?
2.1.2. Workspace.
There you set root folder, which you prepare and where will be your mod files and 'fomod' folder, if there no 'fomod' folder program will offer you to create one. After workspace is set correctly 'Proceed' button is enabled. Once 'Proceed' button is click you'll see 'Steps' tab and not be able to change root directory.
2.2. Steps.
Basic tab where you create your FOMOD installation.
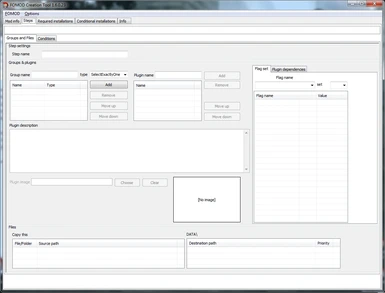
2.2.1. Groups and Files
2.2.1.1. Step name. Sets name of step in installation, will not be displayed anywhere, it's for your convenience but it can't be empty.
2.2.1.2. Groups. Add at least one group to each step. Group name will be displayed at left part of installation window. Choose type for your groups. You may change group name from context menu or by selecting group in list end then press left mouse button again on it, just like you rename files in Windows. Group can be changed via context menu. There are four types of groups:
• SelectExatlyOne - you can select only one option in group, can't select none or several.
• SelectAny - you can select none, several or all options in group;
• SelectAtMostOne - you can select none or only one option in groups.
• SelectAtLeastOne - you can select one, several or all options in group, can't select none.
• SelectAll - you must select all options in group.
2.2.1.3. Plugins. Plugins is a options under groups which you choose upon installation. At least one plugin must be in each group. Group must be selected in group list in order to add plugin in it. You may change plugin name from context menu or by selecting plugin in list end then press left mouse button again on it, just like you rename files in Windows.
2.2.1.4. Plugin description. Text that will be shown in right top part of installation window when plugin is selected by user. This field can be multiline, but that doesn't mean that in NMM (or any other mod installer) this description will be multiline. Use some special codes or BB codes in order to get correct page layout. Plugin must be selected in order to add description.
2.2.1.5. Plugin image. Image that will be shown at right bottom part of installation window when plugin is selected by user. Use English letters in image name. It will be wise to put you images in 'fomod' folder, but nit necessary. Plugin must be selected in order to add description. Image must belong to root directory.
2.2.1.6. Variable set. If you are making FOMOD installation with conditions you should operate with some variables. Every plugin may set several variables to any text value, 'On' and 'Off' for example. If you don't need conditions leave it blank. Plugin must be selected in order to add variable.
2.2.1.7. Plugin dependencies. For more experienced modders. Here you can set conditions for showing information messages to user and, in theory, auto-checking plugins. Note: text in messages is pre-defined by fomod installer, not this program. Fields:
• Default type name - specifies default type of plugin. Can be set to: Optional, Required, Recommended, CouldBeUsable, Not Usable. If you don't add dependency patterns this field will be translated to xml as typeDescriptor/type, otherwise typeDescriptor/dependency Type/defaultType.
• Operator - specifies logic of conditions, should they all be meet or enough only one to be true. Can be set to 'And' or 'Or'.
• Type name - same as default type name but valid only for one dependency pattern.
• Dependency type - specifies would be condition based on file dependency or flag. Available if at least one dependency pattern created.
• File/Flag name - self-explanatory. Available if at least one dependency pattern created.
• State(Value) - value to be meet for condition to be true. Available if at least one dependency pattern created.
2.2.1.8. Files. Each plugin may install some files. You may add files one by one to plugin or add entire folder. Plugin must be selected in order to add files and/or folders. Each file/folder have three main property: source path, destination path, priority. Path for files and folders is relative, but source path relates from root directory, place where 'fomod' folder is, and destination path relates from 'DATA' folder in game directory. FOMOD Creation Tool will attempt to automatically determine correct destination path. Program recognize files: .esp, .esm; also recognize folders: STRINGS, TEXTURES, MUSIC, SOUND, INTERFACE, MESHES, PROGRAMS, MATERIALS, LODSETTINGS, VIS, MISC, SCRIPTS, SHADERSFX. Priority determine order in which files/folders will be installed. Files with lower priority number will be installed first, with highest - last. Priority may be used in case your installation will overwrite its own files. For example, by default your mod install files from folders A, B and C, but if user choose some option then fomod installer should take files from catalog Ð and overwrite files installed from catalog B. So, to not let things go wrong, like files from B overwrites D, Ð files should have priority number higher then B. Priority also may be used to specify order in which files will be placed in mods load order. Files with lower priority number will be higher in load order. You may change destination path and priority from context menu or by selecting file in list end then press left mouse button again on it, just like you rename files in Windows.
2.2.2. Conditions.
If you are making FOMOD installation with multiple steps and conditions you must set the conditions.
2.2.2.1. Condition set. When you setted variables for your plugins (group options) these variables will be available in dropdown list. Choose one or several and choose corresponding comparison value. If variable is equal to comparison value this step will be shown in installation. If not then step will be skipped and hidden from user. If several condition setted then all of them should be fulfilled at the same time.
2.3. Required installations.
Files specified here will be installed under any circumstances.
2.4. Conditional installations.
Files specified here will be installed depending on conditions which may be flags and/or other files. Conditional installation split into patterns. Each pattern consists of a set of dependencies, logic operator between it, and set of files that will be installed if result condition is true.
2.5. Finalization.
Choose FOMOD->Save menu when you set everything you wanted. 'info.xml' and 'ModuleConfig.xml' files will be created in 'fomod' directory. Now you can pack you mod in archive and test it before uploading anywhere.
3. Language files.
FOMOD CT from version 1.5 support multi language interface and use language files for this. Language file is a simple text file in unicode UTF-16 Little Endian encoding. It consist of list of pairs key = "value". Users are free to make their own language, for this follow this instruction:
1. Copy any existing language file in 'Language' catalog.
2. Set name of this copy to correspond language you are about to translate.
3. Open it any text editor you prefer, select all and cut.
4. Open any translator that support whole text translation. For example google translator. Past text to it. Don't forget to specify languages from and to which you are translating.
5. Check the result. Keys should not be translated, file should save it structure key = "value" where only value should be translated. Manually edit translation if needed.
6. Copy your translation and past in copied file, save it. Now you can choose this language file from settings window in FOMOD CT.
Redacted by Valyn81. Nexus: https://rd.nexusmods.com/fallout4/users/2283611


