


0 of 0


About this mod
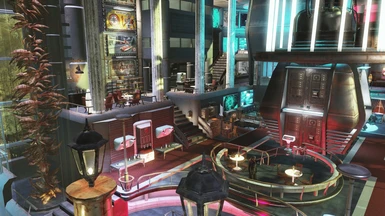
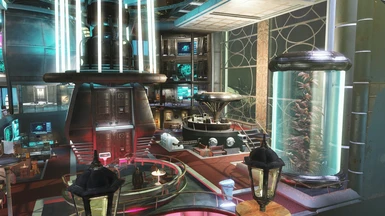
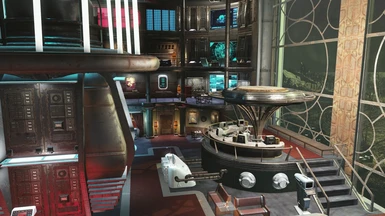
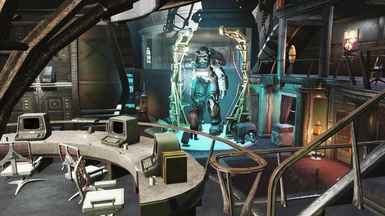
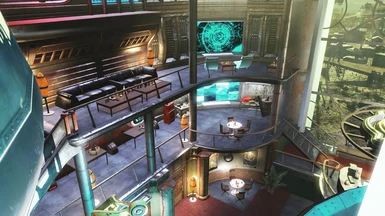
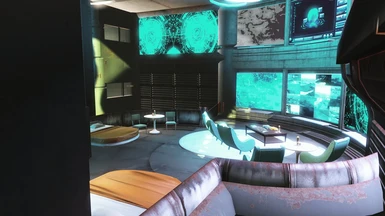
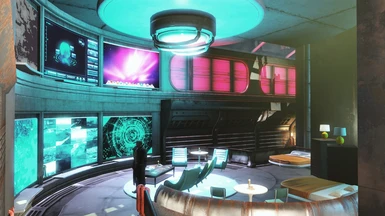
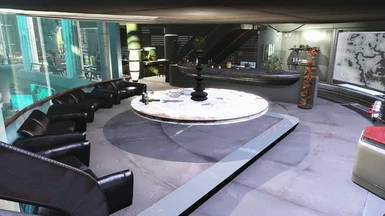
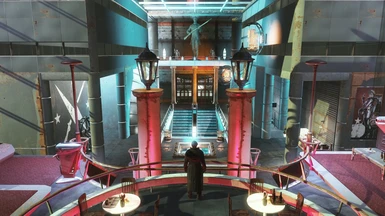
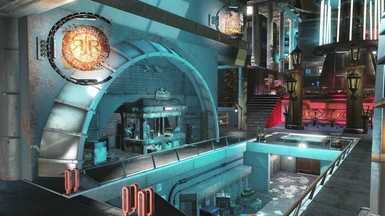
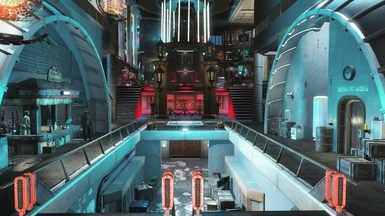
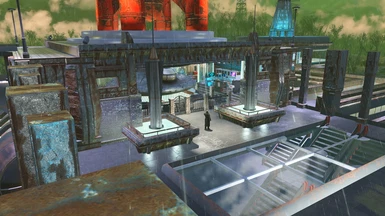
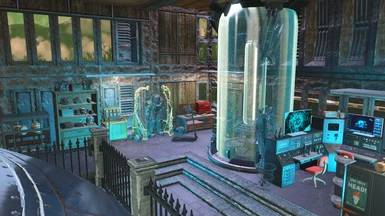
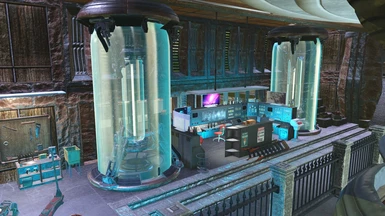
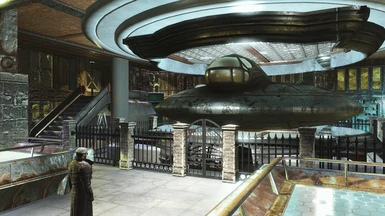
Player Build in Sanctuary. (Blueprint and Clipboard pattern included)
- Requirements
- Permissions and credits
Prologue:
Well, maybe not Endgame, but 100 years after the bombs fell. Some believed these to be the end times, but time moves on.
The planet is trying to recover from unimaginable devastation and is still somewhat unstable, while the weather has become a new force to be dealt with. Not to worry though, I'm sure in another hundred years we should be down to the occasional radstorm.
Mankind has survived. A new era has begun.
Introduction:
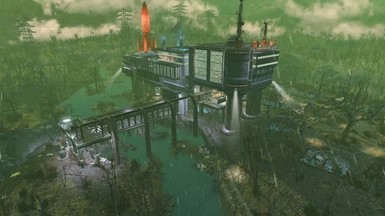
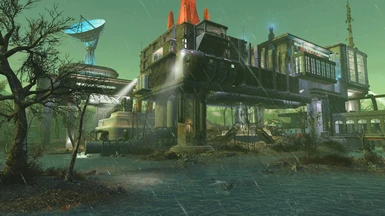
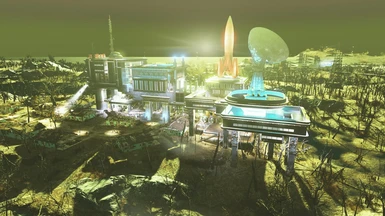
I hadn't planned on posting this to Nexus, but I really liked how this turned out and just wanted to share. Also, if you want the same effect as the first three pictures, just use the console command fw 1256fb. Fw 2b52a is for clear weather if you'd like to revert back. It'll change anyway, this is just a quick way to do it.
As for me, I'm not really a settlement builder but do enjoy building in Fallout 4. I create these builds for my own enjoyment, and there are no plans to update them. Also, this comes as is and works fine on my pc, although other user experiences may vary. I just hope that others can enjoy using this as much as I enjoyed building it.
I also build with the idea of using as few mods as is necessary. So, most of the mods I use have been chosen because they are comprehensive and include many different pieces.
Because I hadn't planned on posting this, I added a few mods to this build that normally I wouldn't have. Pipe Galore and G2M Workshop are still great mods and are obviously in my load order, but I've been trying to stick to the same mods in all that I've posted so far mostly for convenience. Also, with Pipe Galore it will need The Master Plan for it to work. Of course, if you have The Master Plan, you might want to take a look at all of Ethreon's building mods. Really some great mods.
*Also included is a Clipboard Resurrection pattern file (pattern.ini) that is much quicker than Transfer Settlements and doesn't include its requirements.
Recommended Mods:(highly recommended)
Workshop Plus (allows flying while in workshop mode among other options and makes moving around in a build much easier and really can add to your creativity) (just don't forget to shut off the workshop 5 second timer (F5) (from Place Everywhere))
Build High - Expanded Settlements 5.0 (doesn't work with Workshop Anywhere but offers 200+ floors and expanded boundaries in vanilla settlements) (great for any arial builds like skyscrapers/aircraft/spacecraft etc...)
Place Everywhere (of course) (If I could only choose one building mod for Fallout 4, this would be it.)
Installation:
* Make sure that you have F4SE, HUD Framework and Transfer Settlements installed.
* Extract the file "Data" and copy, then paste to your Fallout 4 game folder (C:\Program Files (x86)\Steam\steamapps\common\Fallout 4).
* This blueprint uses Slot 11. If you would rather it be a different folder, create another folder and number it (1-100) in C:\Program Files (x86)\Steam\steamapps\common\Fallout 4\Data\F4SE\Plugins\TransferSettlements\blueprints. Then add the .json file to the folder.
* The easiest way I've found to add a blueprint is to create a shortcut to the blueprint folder and place it on my desktop. Then when I download a new blueprint I can extract it, copy it, go right to the blueprint folder and either paste the new folder or create a new folder and place the .json file in it. Done!
Importing:
No need to scrap anything to prepare, just fast travel to Sanctuary and import.
Import the settlement via the Transfer Settlements holotape, detailed instructions on this process can be found on the Transfer Settlements mod page.
Before importing and to ensure the settlement imports correctly always import and export on the STABLE (preset), not normal. Then always use Marker Based, where it will open the workshop while it's importing or exporting so it simulates you actually building manually.
To import, enable the following options from within the holotape:
*[Enable Import DLC items
*[Enable Import mod-added items
*[Enable Import or nuke marker-based items
*[Enable Import wired power connections
*[Enable Restore snapped power connections
Using the Clipboard Resurrection pattern file:
After extracting the files from your download, copy/paste the Clipboard pattern (pattern.ini) to a folder located at C:\Program Files (x86)\Steam\steamapps\common\Fallout 4\Data\F4SE\Plugins\Clipboard.
Then while in game (and in the workshop):
* Build the clipboard tool.
* Choose "Move To Pattern Source Location" in the action menu first.
* Then choose "Paste From Clipboard".
Special Note: After importing the pattern file, Clipboard doesn't seem to include the animations that come with the SOE generators. It's an easy fix though. Just replace each piece one at a time from the workshop menu. Using Place Everywhere, highlight/copy the coordinates of the 1st piece with '=', scrap it, then paste the new piece in using '0' (two keys to the left). Repeat the process for the others.
Special Note: Wait till everything is highlighted, then you can destroy the Clipboard Tool. After importing, don't immediately save the game. The papyrus function needs time to catch up with all the changes that were made, and your game will freeze until it finishes. This process may take up to 5 minutes then it will save your game. It's best to let it finish. When it finishes, create a full save.
Special Note: If you enjoy building in Fallout 4 and are on Facebook, the best building groups I've found are the Fallout 4 Settlement Building and Fallout 4: Commonwealth Creators groups. They include some of the best builders in the Fallout community. They also include builders of all skill levels and can answer any questions you might have about mods, materials, or techniques used for building in Fallout 4.
Well, maybe not Endgame, but 100 years after the bombs fell. Some believed these to be the end times, but time moves on.
The planet is trying to recover from unimaginable devastation and is still somewhat unstable, while the weather has become a new force to be dealt with. Not to worry though, I'm sure in another hundred years we should be down to the occasional radstorm.
Mankind has survived. A new era has begun.
Introduction:
I hadn't planned on posting this to Nexus, but I really liked how this turned out and just wanted to share. Also, if you want the same effect as the first three pictures, just use the console command fw 1256fb. Fw 2b52a is for clear weather if you'd like to revert back. It'll change anyway, this is just a quick way to do it.
As for me, I'm not really a settlement builder but do enjoy building in Fallout 4. I create these builds for my own enjoyment, and there are no plans to update them. Also, this comes as is and works fine on my pc, although other user experiences may vary. I just hope that others can enjoy using this as much as I enjoyed building it.
I also build with the idea of using as few mods as is necessary. So, most of the mods I use have been chosen because they are comprehensive and include many different pieces.
Because I hadn't planned on posting this, I added a few mods to this build that normally I wouldn't have. Pipe Galore and G2M Workshop are still great mods and are obviously in my load order, but I've been trying to stick to the same mods in all that I've posted so far mostly for convenience. Also, with Pipe Galore it will need The Master Plan for it to work. Of course, if you have The Master Plan, you might want to take a look at all of Ethreon's building mods. Really some great mods.
*Also included is a Clipboard Resurrection pattern file (pattern.ini) that is much quicker than Transfer Settlements and doesn't include its requirements.
Recommended Mods:(highly recommended)
Workshop Plus (allows flying while in workshop mode among other options and makes moving around in a build much easier and really can add to your creativity) (just don't forget to shut off the workshop 5 second timer (F5) (from Place Everywhere))
Build High - Expanded Settlements 5.0 (doesn't work with Workshop Anywhere but offers 200+ floors and expanded boundaries in vanilla settlements) (great for any arial builds like skyscrapers/aircraft/spacecraft etc...)
Place Everywhere (of course) (If I could only choose one building mod for Fallout 4, this would be it.)
Installation:
* Make sure that you have F4SE, HUD Framework and Transfer Settlements installed.
* Extract the file "Data" and copy, then paste to your Fallout 4 game folder (C:\Program Files (x86)\Steam\steamapps\common\Fallout 4).
* This blueprint uses Slot 11. If you would rather it be a different folder, create another folder and number it (1-100) in C:\Program Files (x86)\Steam\steamapps\common\Fallout 4\Data\F4SE\Plugins\TransferSettlements\blueprints. Then add the .json file to the folder.
* The easiest way I've found to add a blueprint is to create a shortcut to the blueprint folder and place it on my desktop. Then when I download a new blueprint I can extract it, copy it, go right to the blueprint folder and either paste the new folder or create a new folder and place the .json file in it. Done!
Importing:
No need to scrap anything to prepare, just fast travel to Sanctuary and import.
Import the settlement via the Transfer Settlements holotape, detailed instructions on this process can be found on the Transfer Settlements mod page.
Before importing and to ensure the settlement imports correctly always import and export on the STABLE (preset), not normal. Then always use Marker Based, where it will open the workshop while it's importing or exporting so it simulates you actually building manually.
To import, enable the following options from within the holotape:
*[Enable Import DLC items
*[Enable Import mod-added items
*[Enable Import or nuke marker-based items
*[Enable Import wired power connections
*[Enable Restore snapped power connections
Using the Clipboard Resurrection pattern file:
After extracting the files from your download, copy/paste the Clipboard pattern (pattern.ini) to a folder located at C:\Program Files (x86)\Steam\steamapps\common\Fallout 4\Data\F4SE\Plugins\Clipboard.
Then while in game (and in the workshop):
* Build the clipboard tool.
* Choose "Move To Pattern Source Location" in the action menu first.
* Then choose "Paste From Clipboard".
Special Note: After importing the pattern file, Clipboard doesn't seem to include the animations that come with the SOE generators. It's an easy fix though. Just replace each piece one at a time from the workshop menu. Using Place Everywhere, highlight/copy the coordinates of the 1st piece with '=', scrap it, then paste the new piece in using '0' (two keys to the left). Repeat the process for the others.
Special Note: Wait till everything is highlighted, then you can destroy the Clipboard Tool. After importing, don't immediately save the game. The papyrus function needs time to catch up with all the changes that were made, and your game will freeze until it finishes. This process may take up to 5 minutes then it will save your game. It's best to let it finish. When it finishes, create a full save.
Special Note: If you enjoy building in Fallout 4 and are on Facebook, the best building groups I've found are the Fallout 4 Settlement Building and Fallout 4: Commonwealth Creators groups. They include some of the best builders in the Fallout community. They also include builders of all skill levels and can answer any questions you might have about mods, materials, or techniques used for building in Fallout 4.