


0 of 0


The dedicated tool for creating FO4 meshes is 3DS Max. But... it's just a bit too expensive for a hobby-only thing, so I attempted to create a FO4 outfit using only free tools. Here's a short summary of the workflow. I can't call this a full-sized tutorial, though. Also, the skeleton file may not be absolutely correct - so any comments welcome.
Requirements:
Blender 2.77 or higher
BodySlide and Outfit Studio
CBBE (although the workflow does not actually depend on any particular body addon)
So, what do you need to make an armor or outfit?
Let's start with the reference body model. Load the reference body in Outfit Studio and export it as FBX. Make sure all sliders are set to zero before exporting.
Next, open skeleton fo4.blend and import the .fbx body model in Blender. Use the following settings when importing:
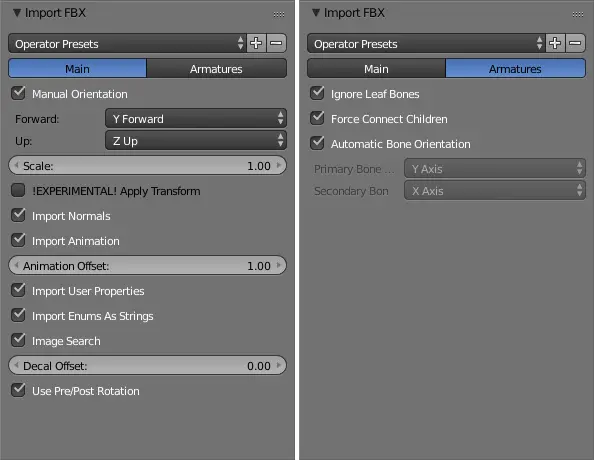
The imported model will look totally crumpled - but no panic! That happens because the game .nifs don't contain the full bone information. Unparent the model from the malformed armature (and delete the malformed armature) - and the body will look absolutely fine. Reset the body rotation and position it at X0 Y0 Z120.
Apply the Armature modifier to it, using the supplied skeleton. Now, rotating the skeleton bones in Pose mode will make the body respond accordingly.
Use the same steps to import an existing outfit into Blender if needed.
The next step is the most time consuming... model the armor/outfit, unwrap UVs and paint the weights. Using the Data Transfer modifier to copy the vertex weights from the reference body would make a good start.
Apply the Armature modifier to your mesh and check the skinning by rotating the skeleton bones in Pose mode.
Now it's time to export the model. Make sure you've applied any rotation/scale before exporting. Also, the mesh's origin must be the same as the reference body's: X0 Y0 Z120.
Select the model and the armature and export FBX with the following settings:
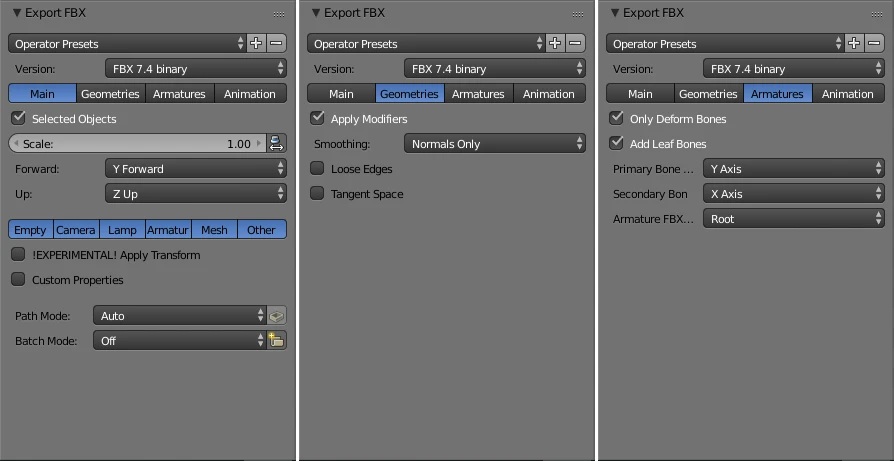
Import the FBX in Outfit Studio and assign a material to it. Invert the Y UV coordinate.
Ah, one more catch: when you use FBX to transfer a model from Blender to Outfit Studio, UV coordinates may be exported incorrectly unless you split the edges that match UV seams. This does not happen with OBJ files, but OBJs don't preserve vertex weights. If you really need to keep these edges joined, you may want to use OBJ to transfer the geometry, and FBX to transfer vertex weights (copy the weights from FBX to OBJ in Outfit Studio).
Finally, export the outfit as .nif (it's up to you whether to include the reference body or not, depending on the slots your armor uses). Also, making the model BodySlide-compatible is beyond the scope of this text.
Sometimes, Outfit Studio complains that the bone information is incomplete - but I haven't noticed any problems in game.
Well, that's it. Any comments appreciated.
Credits:
Thanks to ousnius and Caliente for creating BodySlide and Outfit Studio and CBBE
Requirements:
Blender 2.77 or higher
BodySlide and Outfit Studio
CBBE (although the workflow does not actually depend on any particular body addon)
So, what do you need to make an armor or outfit?
Let's start with the reference body model. Load the reference body in Outfit Studio and export it as FBX. Make sure all sliders are set to zero before exporting.
Next, open skeleton fo4.blend and import the .fbx body model in Blender. Use the following settings when importing:
The imported model will look totally crumpled - but no panic! That happens because the game .nifs don't contain the full bone information. Unparent the model from the malformed armature (and delete the malformed armature) - and the body will look absolutely fine. Reset the body rotation and position it at X0 Y0 Z120.
Apply the Armature modifier to it, using the supplied skeleton. Now, rotating the skeleton bones in Pose mode will make the body respond accordingly.
Use the same steps to import an existing outfit into Blender if needed.
The next step is the most time consuming... model the armor/outfit, unwrap UVs and paint the weights. Using the Data Transfer modifier to copy the vertex weights from the reference body would make a good start.
Apply the Armature modifier to your mesh and check the skinning by rotating the skeleton bones in Pose mode.
Now it's time to export the model. Make sure you've applied any rotation/scale before exporting. Also, the mesh's origin must be the same as the reference body's: X0 Y0 Z120.
Select the model and the armature and export FBX with the following settings:
Import the FBX in Outfit Studio and assign a material to it. Invert the Y UV coordinate.
Ah, one more catch: when you use FBX to transfer a model from Blender to Outfit Studio, UV coordinates may be exported incorrectly unless you split the edges that match UV seams. This does not happen with OBJ files, but OBJs don't preserve vertex weights. If you really need to keep these edges joined, you may want to use OBJ to transfer the geometry, and FBX to transfer vertex weights (copy the weights from FBX to OBJ in Outfit Studio).
Finally, export the outfit as .nif (it's up to you whether to include the reference body or not, depending on the slots your armor uses). Also, making the model BodySlide-compatible is beyond the scope of this text.
Sometimes, Outfit Studio complains that the bone information is incomplete - but I haven't noticed any problems in game.
Well, that's it. Any comments appreciated.
Credits:
Thanks to ousnius and Caliente for creating BodySlide and Outfit Studio and CBBE