


0 of 0


About this mod
::::NO LONGER BEING SUPPORTED:::
A few files that go with a video tutorial to give you a starting point for making your own power armor textures and paint jobs.
- Permissions and credits
- Donations
Hello friends! I'm no longer supporting this mod but anyone should feel free to do anything they like with it, credit not needed. - ogd
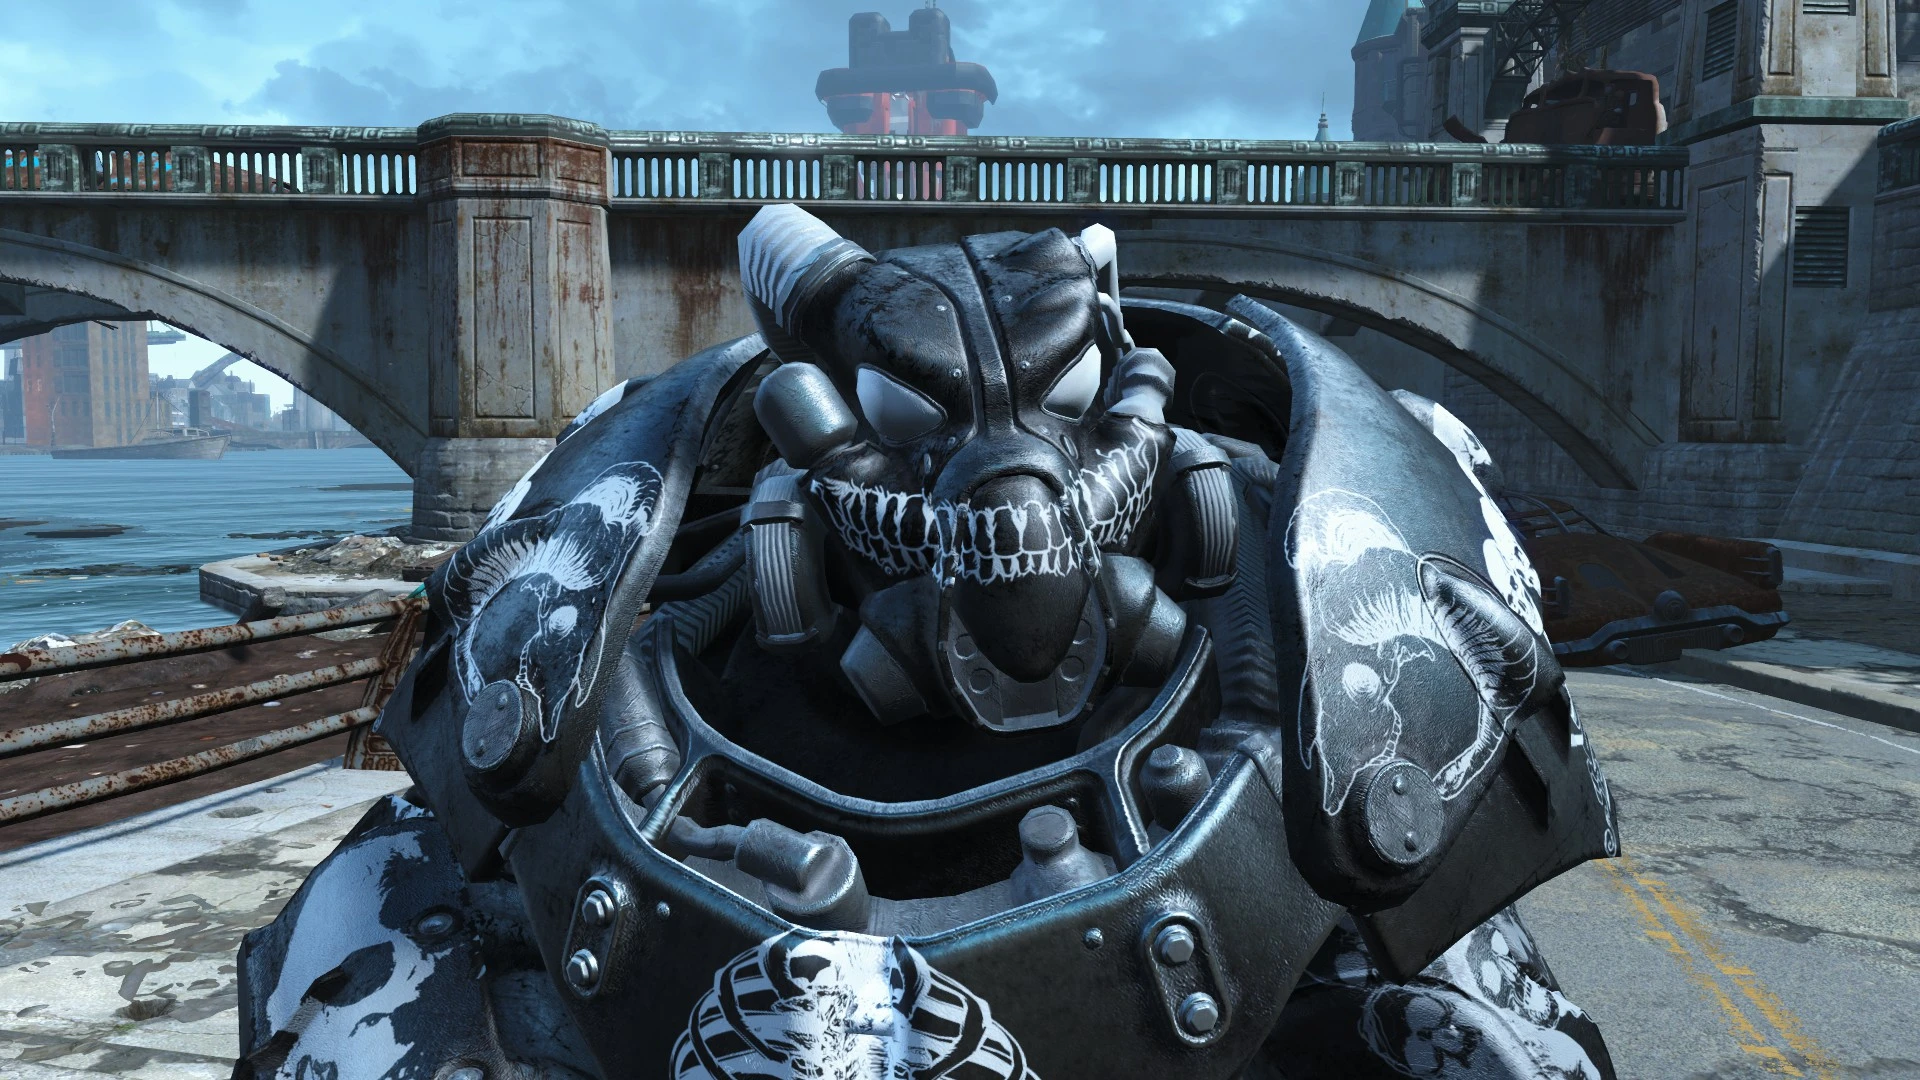
Power Armor Texture Tutorial (PATT) - By DreadBeard - v 1.0 (Currently only for X01, but I will expand)
The PA frame used in this video was made by Kooj, all credit goes to them. I had it on for so long I forgot to remove it before taking the video.
:::Contents:::
The .7z you'll get from here contains original .BLANK texture files (just white, no labels) and .xcf projects for GIMP which have all labelled areas as layers.
:::Steps::: These are all shown in the video tutorial as well.
1. Preparation. Get the programs ready.
We're using GIMP in this tutorial, but anything that opens .dds is fine.
you'll need Material Editor for sure, and you might as well get BAE too. Hats off to the original authors for these very useful programs.
You will also need the Creation Kit.
2. Create your files.
3. Edit your texture files.
4. Testing your files in game.
5. Adjust and repeat 3 & 4 to your liking.
6. Bonus material
7. Problems!!
For my Overkill PJ, I just grabbed a texture file from the game's default textures4.bsa for x01 and since it was white, I inverted it to make it black. If you hunt around in those .bsa files you can get any of the game's default textures, but those originals are what is included in this mod. Change white tones to whatever color you like with GIMP.
It's also possible to grab the textures used by any mod, just look for where it was added in /textures/.
**Disclaimer: I don't suggest uploading any mods you make using other people's work, without permission granted first. I'm sure you can use a modified texture file for yourself though.**
:::Video::: This outlines what you'll see in the video.
Note that if you want to just edit the PATT files, you are free to do so. This part can be done later if you want to jump right to texture edits, skip to step 3 (4:54)
Step 1 - Set up your folders.
Step 2 - Setting up part 2.
Step 3 - Texture editing
Power Armor Texture Tutorial (PATT) - By DreadBeard - v 1.0 (Currently only for X01, but I will expand)
The PA frame used in this video was made by Kooj, all credit goes to them. I had it on for so long I forgot to remove it before taking the video.
:::Contents:::
The .7z you'll get from here contains original .BLANK texture files (just white, no labels) and .xcf projects for GIMP which have all labelled areas as layers.
:::Steps::: These are all shown in the video tutorial as well.
1. Preparation. Get the programs ready.
We're using GIMP in this tutorial, but anything that opens .dds is fine.
you'll need Material Editor for sure, and you might as well get BAE too. Hats off to the original authors for these very useful programs.
You will also need the Creation Kit.
2. Create your files.
- move/copy/rename the tutorials files if you like, put them in the correct spots and sort them out in the CK, create a .esp to work with that's associated with your mods.
- copy the .dds files from the textures folder and put them in your folder, or rename them accordingly. -copy the files in the materials folder, open in BAE and edit them to point to your newly moved texture files.
- in the CK get Fallout4.esm and PATT.esm loaded. Search all for '_PATT' and copy each of these, renaming as shown in the video, and editing the MSWP file to point to your BGSM files. Now you're ready to edit those textures.
3. Edit your texture files.
- in this tutorial we'll be using GIMP for that, with DDS support added on.
- open each .dds, delete the mip map layers (we'll be generating more later) and add new layers to draw in, or paste in images and anchor them to new layers. Save as .xcf and now if you use that you won't need to do this again.
- before testing, merge all visible layers. Be sure to set cropping to bottom layer. Now export as .dds and replace the previous file. I close my texture .xcf at this time to retain my layer structure. Be sure to generate mip maps as well.
- now open Fallout 4 or load a game and re apply armor paint to test. **You can save a game with your armor textures applied and load it but this doesn't show 100% of changes 100% of the time. Not sure why but I have occasionally seen changes missing, so I opt to start the game again or re apply after loading a saved game.**
4. Testing your files in game.
- See how they look, where they are, colors, etc. - this is made a lot easier by having a companion wear your armor.
- load in and use console to type 'tfc' (toggle free cam) and you can zip around them and they won't move.
- 'tcl' will prevent them from walking away, and grant a similar flying ability (but you're the sole survivor now, and not just an invisible camera).
- Another useful command is 'tm' (toggle menu) this removes all of the HUD.
- To undo, type ` (~) and tm again. You won't see it happen unless it worked though.
- A final useful console command is 'qqq' for insta quit to desktop.
5. Adjust and repeat 3 & 4 to your liking.
- Having that main file with layers established will make it much easier to adjust the placement of a single image/drawing. Lock your layers and move on until each is where you like it. For some areas like the helmet of X01 you'll have to summon great patience as you work on it. The 'mouth' area of the helmet displays a few different texture areas. What I did was drop the image I wanted to use several times, a layer for each area, and then I erased the the parts of each one that I didn't need after they all lined up. In GIMP, with a layer selected you can erase it while it's not visible/shown.
6. Bonus material
- BGSM Files. I only just started to play with these, but I noticed if you set the specular color to black your armor doesn't shine like the sun. Interesting.
- Useful links - GIMP - https://www.gimp.org/downloads/
- GIMP DDS support - http://libregraphicsworld.org/blog/entry/normalmap-and-dds-plug-ins-updated-for-gimp-2.8
- Inkscape - https://inkscape.org/en/download/
- BAE - http://www.nexusmods.com/fallout4/mods/78/?
- Material editor - http://www.nexusmods.com/fallout4/mods/3635/?
- Vectors - are scalable images that can be opened in programs like Adobe Illustrator or Inkscape, adjusted for size and color, and dropped in to GIMP (which can't scale vectors, it's Raster, but opens them) Some places to get vectors. I aimed mostly to include free ones. - https://arsenal.gomedia.us/freebies/ - http://www.shutterstock.com/ - http://www.vectorgenius.com/ -
7. Problems!!
- my armor piece is pink! You have an incorrect file path. Check your BGSM files and the file names they point to, something is slightly off.
- the art/images I'm placing are slightly out of place! Make sure you're cropping to bottom layer when merging, and generating mipmaps when exporting. If you're not, it's stretching the texture's outer size and moving the placement of the whole texture.
- this is too hard!! Yes, it can be frustrating. I'd recommend starting simple and also just working on one area of armor at a time. PM me or post if you need help, I will attempt to assist.
- these words are backwards! The arm and leg textures will be reflected until I figure out how to make a totally separate one an option.
For my Overkill PJ, I just grabbed a texture file from the game's default textures4.bsa for x01 and since it was white, I inverted it to make it black. If you hunt around in those .bsa files you can get any of the game's default textures, but those originals are what is included in this mod. Change white tones to whatever color you like with GIMP.
It's also possible to grab the textures used by any mod, just look for where it was added in /textures/.
**Disclaimer: I don't suggest uploading any mods you make using other people's work, without permission granted first. I'm sure you can use a modified texture file for yourself though.**
:::Video::: This outlines what you'll see in the video.
Note that if you want to just edit the PATT files, you are free to do so. This part can be done later if you want to jump right to texture edits, skip to step 3 (4:54)
Step 1 - Set up your folders.
- Anywhere in the textures folder, or a sub folder akin to your (mod) name, paste the PATT texture files. They'll be in "...\Fallout 4\Data\textures\Actors\PowerArmor\DreadBeard\PATT
- Anywhere in the materials folder, or a sub folder akin to your (mod) name, paste the PATT materials files. They'll be in "...\Fallout 4\Data\materials\Actors\PowerArmor\DreadBeard\PATT
- Rename the PATT part of any of these, or use a sub folder if you want to start your own ESM file. Just remember the folder paths and filenames.
- Open the material files (.BGSM) and edit each one to point to the moved/renamed files.
Step 2 - Setting up part 2.
- Open Fallout4.esm and PATT.esm in the Creation Kit. DO NOT set an active file, and continue. Search for the _PATT files in *All, copy them.
- Rename the PATT part of all 3 to your liking. Open each one and make sure it points to the other newly created file (You'll see this again in the video when I create the PATT.esm from my Overkill esm)
- With each editor item named properly, each editor item opened and associated with your other files, and all your BGSM files pointed to, click File>Save, and choose a name for your ESM file.
Step 3 - Texture editing
- Just a few tips and general guidelines for this. Playing around is the best way to learn. Here's a great example of what's possible in time.
That's all. Enjoy, and please endorse if this helped and share your work under user photos!