


0 of 0

About this mod
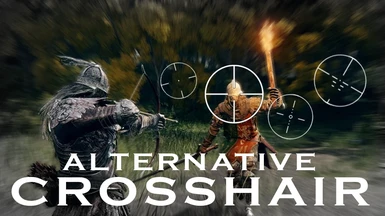
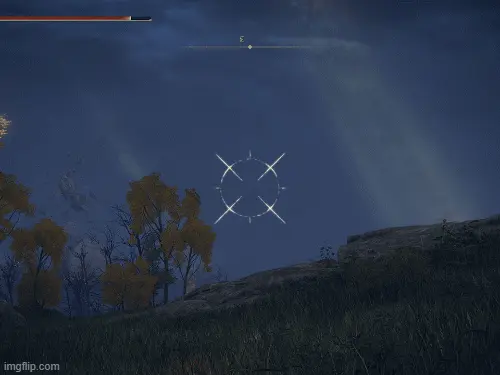
Basic but effective modification that replaces the crosshair with a more precise one.
- Permissions and credits
- Changelogs
- Donations
Never miss again a long distance headshot with manual aiming!
Well, slightly less than before at least...
Well, slightly less than before at least...
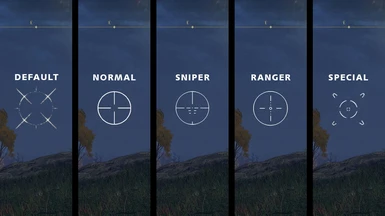
If you also include the use of the bow or crossbow in your build and also think that the basic sight does not provide great accuracy in certain contexts, especially when using arrows or darts at a great distance, I've got you covered.
Not so lore friendly and not reminiscent some kind of medieval style, but very precise and inevitable for those who use a mod which adds firearms like GUNNER CLASS (M16 and Shotgun) , Elden Ring Gun Mod Pack or more simply for those like me who do not like the basic crosshair.

With these you can take advantage of the zoom mechanics of ranged weapons even better.

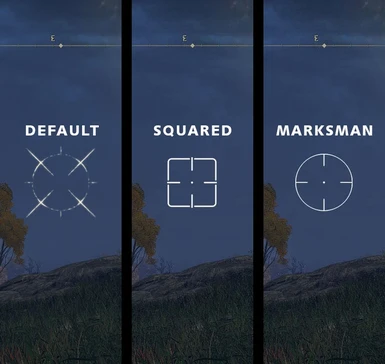
The user TedKuruk has kindly proposed, created and provided an alternative version of the crosshair sniper,
you can watch a small preview below and download it in the files tab, the installation remains the same as the other crosshair of course.

Thank you TedKuruk!
Installation
UXM Selective Unpacker
To install and use mods with the UXM Selective Unpacker, you need to first extract my mod files to your desired location. Then, place the contents from the "menu" folder of this mod inside the folder of the same name created by UXM. Lastly, ensure that you Patch the game using UXM.
Mod Engine 2 [RECOMMENDED]
Make sure you have a "menu" folder within the "mod" folder of Mod Engine 2 - if not, just create one yourself. Extract this mod to your desired location and place the contents of "menu" within the folder of the same name located in the "mod" folder, then launch Elden Ring with the batch file “launchmod_eldenring.bat”
Installation - Gideon version
For players who use mods to alter their UI/HUD like Elden Ring Reforged, PS5 PS4 Controller UI, etc.
For players who use mods to alter their UI/HUD like Elden Ring Reforged, PS5 PS4 Controller UI, etc.
- With Gideon, you can avail of the UI texture deployer program, which will take care of merging modded files for you.
- Before you proceed with Gideon, please make sure your computer has .NET 6 Desktop Runtime installed. If not, kindly take a few minutes to install it.
- Before merging this mod with yours, ensure that the mod you want to merge with mine has been installed beforehand. To do so, check its respective mod page for instructions.
- Download the Gideon version of this mod, and don't forget to extract its contents once it finishes downloading.
- From the chosen folder of the Gideon version you will need to move its content and "Setup UI Images ..." into the "mod" folder (Mod Engine 2) or directly into the game directory (UXM).
- Use the "Setup UI Images ..." shortcut provided to launch Gideon. Gideon will take care of the rest and you should have no problems with merging your mods. Please read all the instructions carefully displayed by Gideon to make sure everything goes as expected. If there are any issues, then follow the advice given within those instructions. Ultimately, you should now be able to experience the game with your merged mods!
- NOTE: Installing various UI/HUD editing mods does not require prior merging, but it may work better if you choose to merge them first. It is suggested to merge first before installing the mods if multiple UI/HUD editing mods are being used. Installing and combining Gideon mods with any other mod is easy; all you need to do is make sure that the folder with the modded content and Gideon's shortcut are present in the same mod's directory. This will not overwrite the other mods.
Credits & Tools Used:
Photoshop
Yabber+
UXM Selective Unpacker
Gideon