


0 of 0


")

")
About this mod
Distributes face tints like how melanin can be in real life. 3 different options available, plus makeup compatibility files and a kit for assigning the options individually.
- Requirements
- Permissions and credits
- Changelogs
(Please make sure to read the installation and compatibility instructions below!)
This mod will apply to all heads (both PC and NPC), making the skin tints apply to the face and scalp in a way that looks more like how pigment can be distributed in the skin. There are three options, and there are also files available to apply the different tint maps individually to different characters if you wish. The tint map and makeup maps are unavoidably contained in the same file, so smooth makeup is included (more below on the available compatibility files and replacing the makeup if you wish).
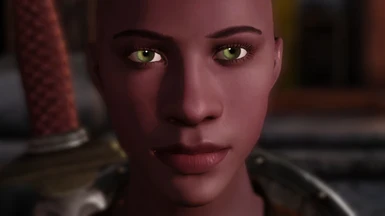
Note: The headmorphs in the screenshots are not part of this mod; they're just there to help showcase it!
As always, if you enjoy this mod and want to upload screenshots for it, that would be great! I would also be delighted if you want to improve on it; there is a PSD available in the Miscellaneous Files section if you wish to do so.
What do skin tints have to do with the makeup file?
The alpha channel of the makeup file (uh_hed_maka_0t), previously acknowledged as the source of the "patchy skin" issue (where the darker skin tones appear blotchy), has nothing specifically to do with the makeup in the red/green/blue channels and is actually the face tint map.
Why vanilla and vanilla-based fixes don't work
The short version
The base face textures are pale and are darkened by the skin tints. Tint maps work by applying more tint in light areas on the map, and less in dark areas. The vanilla tint map is also based on a face texture, which means it includes shading: this means that less tint is applied in the shadows and more in the highlights, producing an inverted lighting effect that counteracts the actual lighting and makes the face look flat. I also don't think it lines up with how pigment tends to be distributed in faces in real life.
This means that replacing the vanilla map with one that still has the same kind of shading -- even if higher quality -- will still result in the same problems.
The long version
My approach
I've tried to emulate how pigment distribution can actually vary on faces. Obviously in real life this is unique for every person, but the tint map is normally universal for all heads, so it unfortunately has to be generalised. I've put more tint over the forehead, scalp and neck, and less tint over the eyes, nose and ears. I felt that lips in particular varied quite a bit in their pigment distribution, however, so I've made three versions: dark lips, medium lips, and light lips.
I've tried to place the different lip distributions in positions that will work on all heads, but they will unavoidably look slightly different depending on the head because Bioware placed the lip vertices differently on each (an unending source of frustration for me as I slowly work on a complexion mod). For example on the female elf and human male heads, any features that are on the inner bottom lip stretch further out than on the others.
There is also a scalp tint map included that will blend perfectly with all of the face maps. It's one flat colour and of course has no makeup, so I took the opportunity to make those files quite small.
Reckon you can do a better job?
Entirely likely! I bear significant resemblance to a sentient jar of mayonnaise, so my references for this mod have mostly been sites like 3d.sk (since they have images where the lighting is as even as possible to avoid highlight/shading bias) and reviewing things with a much less mayonnaisey friend. I've included a PSD file in the Miscellaneous Files section, so have your own go if you want! Please also feel free to use my makeup map if you like it (in whole or in part).
About that makeup...
Yeah, I really wish the skin tint map and the makeup maps weren't in the same file -- it would be nice for people to be able to swap them around separately. Separating them might be possible, but I haven't found a way.
So! I've tried to make a generally acceptable makeup map. I used the shapes of vanilla as my starting point, but there are some differences:
(There is the usual issue of any transparency producing dark edges, which is most visible with light makeup colours on light skin -- the same issue can be experienced on any tattoos, makeup, etc. I assume this is something to do with alpha multiplying, but I've no idea if there's any way of fixing it without sticking your nose in the engine itself.)
I'm more than happy to make compatibility files that combine my skin tint map (alpha channel) with another modder's makeup (RGB channels), as long as they've given permission. There are some already available, and you can also use the PSD in the Miscellaneous Files to make your own.
Main file
First choose which lip style you'd like. Remember that this will apply to every character (PC or NPC) that doesn't have their tint map manually set (see the Character Variance Kit section on how to do this if you wish). Download the corresponding main file, and extract in the usual override folder (\Documents\Bioware\Dragon Age\packages\core\override). Watch out for duplicate files from other mods, as they may override this one (see below for a list of known incompatible mods; alternatively you can run a search in your override folder for uh_hed_maka_0t and pn_har_blda_0t). Either:
a) Delete the duplicate files from the other mod (likely to be the whole mod)
or
b) Make this mod have a later load priority than the other mod (whichever duplicate file is loaded last is the one that is seen in-game) by naming your folders appropriately.
Compatibility files
If you want to use the makeup from another mod (see below under Compatibility for a list), make sure you have one of the main files first, as it contains the scalp tint map files, then download the compatibility file you want from the Optional Files section (these are named "Main compatibility files"; not to be confused with the "CVK compatibility files"). There will be three folders inside corresponding to the different lip styles; extract only the one with the lip style you want, and either replace the corresponding files from the main file, or use load priority as above.
Uninstallation
Delete the files.
Not compatible
Any mod designed to fix the patchy skin issue and any makeup mod, since they edit the same file(s). This mod of course fixes the patchy skin issue, and I've tried to do a decent job of the makeup distribution, but I have provided some compatibility files under Optional Files that combine my skin tint map with existing makeup mods that have given permission.
Compatible (but there will be no effect where you might expect one)
Compatible
These are the same textures renamed so that they specifically do not overwrite the vanilla texture. They are intended for use with Toolset Unlocked v2.0's ability to apply them manually (see Option 1 section 9). First install a main file as above; this will be used by all heads that you don't specify a different texture for. Then simply extract the standalone file to the override folder, and use Toolset Unlocked to specify one of the other two textures for whichever headmorphs you like.
The old technique for this was the Character Variance Kit, which involved assigning a new base head to an exported morph and could not be previewed in the toolset unlike the above. The CVK is obsolete now; if you need to change the tint map on a MOP or MOR where you don't have the MRH available, please follow the "Using extra texture slots" instructions in Toolset Unlocked's Manual Workarounds article.
As I mentioned, I've included a PSD file in the miscellaneous files section; you're welcome to make your own if you wish! Bear in mind that the layers for the skin tint map are in the RGB channels along with the makeup (so that I could keep them as separate layers); you will have to research how to copy RGB data to the alpha channel in your chosen image editor, because the skin tint map needs to be there, with only the makeup in the RGB channels.
When exporting to dds, however you choose to do it (I swear I will make a tutorial on dds formats), you should use u8888 (that's four 8s, not to be confused with u888, which lacks an alpha channel) like vanilla. This is uncompressed and high quality, so there will be no artefacts or stepping.
u8888 files do not have to be extremely high resolution if they don't contain fine detail: my main face tint map is 1024x1024, only double the size of vanilla. LOD files for the face can also accommodate an extra step down in size, as the head is quite tiny at LOD distances (though the main file should be big enough to look good in cutscenes): my LOD2 face tint map is 256x256, and LOD3 is 128x128, both the same as vanilla.
Mods prominently shown in screenshots:
This mod will apply to all heads (both PC and NPC), making the skin tints apply to the face and scalp in a way that looks more like how pigment can be distributed in the skin. There are three options, and there are also files available to apply the different tint maps individually to different characters if you wish. The tint map and makeup maps are unavoidably contained in the same file, so smooth makeup is included (more below on the available compatibility files and replacing the makeup if you wish).
Note: The headmorphs in the screenshots are not part of this mod; they're just there to help showcase it!
As always, if you enjoy this mod and want to upload screenshots for it, that would be great! I would also be delighted if you want to improve on it; there is a PSD available in the Miscellaneous Files section if you wish to do so.
About
What do skin tints have to do with the makeup file?
The alpha channel of the makeup file (uh_hed_maka_0t), previously acknowledged as the source of the "patchy skin" issue (where the darker skin tones appear blotchy), has nothing specifically to do with the makeup in the red/green/blue channels and is actually the face tint map.
Why vanilla and vanilla-based fixes don't work
The short version
The base face textures are pale and are darkened by the skin tints. Tint maps work by applying more tint in light areas on the map, and less in dark areas. The vanilla tint map is also based on a face texture, which means it includes shading: this means that less tint is applied in the shadows and more in the highlights, producing an inverted lighting effect that counteracts the actual lighting and makes the face look flat. I also don't think it lines up with how pigment tends to be distributed in faces in real life.
This means that replacing the vanilla map with one that still has the same kind of shading -- even if higher quality -- will still result in the same problems.
The long version
Spoiler:
Show
(To reiterate: tint maps work by applying more tint in light areas on the map, and less in dark areas.)
So, for starters, the vanilla alpha channel has speckles that produce a "patchy" appearance; I think everyone can agree that that was a poor choice, and this is what SJC's groundbreaking Patchy Skin Fix concentrates on by using a much smoother image.
But it's not just the speckles. The vanilla alpha channel contains a lighter, flatter version of one of the face complexions (plus those speckles), meaning that the light and dark areas roughly correspond to the light and dark areas on the complexions, whether due to colours or shading -- for example darker under the cheeks and chin (shading and cheek blush), on and under the lips (shading and lip redness), either side of the nose, in the nostrils, and in the ear (shading).
Having shading in tint maps is ubiquitous in clothing and armour in DAO, but the base colour for these is usually a dark grey/brown colour; having this show through the brighter tint colour in darker map areas creates a sort of supplemental lighting effect that, I suspect, helps keep the tinted sections from looking too flat in DAO's old lighting engine.
However, the base colour of the face is pale, and all vanilla skin tints darken it (and most modded tints, too).
This means that wherever the tint map has a darker colour, a lighter colour shows through. A tint map with illumination-based shading produces a kind of inverted shading (less tint in the shaded areas of the face (making them look lighter) and more tint in the brighter areas (making them look darker)) that actually counteracts the lighting and makes the face appear very flat. Dark speckles in the tint map produce light speckles. This is also why the "patchy skin" issue only really shows up on darker skintones: the light base colour that shows through the tints is a fixed value, so the darker the tint, the more obvious the contrast.
There is at least one vanilla example of a pale base plus a dark tint being handled logically: the mabari. Because the base dog texture is white, the tint map that handles turning it brown is an inverted version of the shading detail, making the light base colour show through in the highlights rather than the shadows. This is the opposite of the clothing/armour approach, but it's the same principle: using the base texture showing through to essentially provide supplemental lighting. If the vanilla face tint map had been inverted, it would have looked much less odd.
However, on a face, the tint is standing in specifically for skin pigment. Despeckling the vanilla mask certainly improves it. Inverting it (then re-brightening) also looks less weird. But I don't think it lines up with how pigment is distributed in faces.
The nude bodies' vanilla tint maps handle the issue in another way that's very basic but doesn't work too badly: the skin areas are a solid shade of very light grey with no shading. (Why light grey and not white? My guess from testing is that white produces a skintone that's a bit flat, but they did go for white for the exposed skin in clothing/armour.) The simplest approach for the face would be to make the tint map the same uniform light grey colour, and I think if this had been done in vanilla it would have been much less annoying.
My approach
I've tried to emulate how pigment distribution can actually vary on faces. Obviously in real life this is unique for every person, but the tint map is normally universal for all heads, so it unfortunately has to be generalised. I've put more tint over the forehead, scalp and neck, and less tint over the eyes, nose and ears. I felt that lips in particular varied quite a bit in their pigment distribution, however, so I've made three versions: dark lips, medium lips, and light lips.
- Dark lips: The outer edge of the top lip has more tint; the rest of the lips have the same amount as the surrounding skin (they will appear darker due to the underlying complexion most likely having darker lips).
- Medium lips: The outer edge of the top lip has more tint, and the inner edges of both lips have less -- the bottom lip in particular.
- Pale lips: The whole lip area has less tint; a small amount of the innermost edges have even less.
I've tried to place the different lip distributions in positions that will work on all heads, but they will unavoidably look slightly different depending on the head because Bioware placed the lip vertices differently on each (an unending source of frustration for me as I slowly work on a complexion mod). For example on the female elf and human male heads, any features that are on the inner bottom lip stretch further out than on the others.
There is also a scalp tint map included that will blend perfectly with all of the face maps. It's one flat colour and of course has no makeup, so I took the opportunity to make those files quite small.
Reckon you can do a better job?
Entirely likely! I bear significant resemblance to a sentient jar of mayonnaise, so my references for this mod have mostly been sites like 3d.sk (since they have images where the lighting is as even as possible to avoid highlight/shading bias) and reviewing things with a much less mayonnaisey friend. I've included a PSD file in the Miscellaneous Files section, so have your own go if you want! Please also feel free to use my makeup map if you like it (in whole or in part).
About that makeup...
Yeah, I really wish the skin tint map and the makeup maps weren't in the same file -- it would be nice for people to be able to swap them around separately. Separating them might be possible, but I haven't found a way.
So! I've tried to make a generally acceptable makeup map. I used the shapes of vanilla as my starting point, but there are some differences:
- The eyeshadow is pretty significantly different. It stops at the corner of the eye and doesn't extend middlewards onto the sides of the nose. It's also tighter along the lower lids and avoids the tearduct (but is still on the waterlines otherwise).
- The blush is higher and slightly more to the middle of the face, so that it's placed on the apple of the cheeks and fading out up along the cheekbones.
- The lipstick is flat with slightly soft edges; the shape is very close to vanilla, but avoids a couple of areas that distort on female humans.
(There is the usual issue of any transparency producing dark edges, which is most visible with light makeup colours on light skin -- the same issue can be experienced on any tattoos, makeup, etc. I assume this is something to do with alpha multiplying, but I've no idea if there's any way of fixing it without sticking your nose in the engine itself.)
I'm more than happy to make compatibility files that combine my skin tint map (alpha channel) with another modder's makeup (RGB channels), as long as they've given permission. There are some already available, and you can also use the PSD in the Miscellaneous Files to make your own.
Installation
Main file
First choose which lip style you'd like. Remember that this will apply to every character (PC or NPC) that doesn't have their tint map manually set (see the Character Variance Kit section on how to do this if you wish). Download the corresponding main file, and extract in the usual override folder (\Documents\Bioware\Dragon Age\packages\core\override). Watch out for duplicate files from other mods, as they may override this one (see below for a list of known incompatible mods; alternatively you can run a search in your override folder for uh_hed_maka_0t and pn_har_blda_0t). Either:
a) Delete the duplicate files from the other mod (likely to be the whole mod)
or
b) Make this mod have a later load priority than the other mod (whichever duplicate file is loaded last is the one that is seen in-game) by naming your folders appropriately.
Compatibility files
If you want to use the makeup from another mod (see below under Compatibility for a list), make sure you have one of the main files first, as it contains the scalp tint map files, then download the compatibility file you want from the Optional Files section (these are named "Main compatibility files"; not to be confused with the "CVK compatibility files"). There will be three folders inside corresponding to the different lip styles; extract only the one with the lip style you want, and either replace the corresponding files from the main file, or use load priority as above.
Uninstallation
Delete the files.
Compatibility
Not compatible
Any mod designed to fix the patchy skin issue and any makeup mod, since they edit the same file(s). This mod of course fixes the patchy skin issue, and I've tried to do a decent job of the makeup distribution, but I have provided some compatibility files under Optional Files that combine my skin tint map with existing makeup mods that have given permission.
- SJC's Patchy Skin Fix (This uses vanilla makeup, a compatibility file for which is provided; otherwise it is entirely replaced by this mod. I know there's an edited scalp normals map in SJC's mod but it only edits an area of severe texture distortion and mesh weirdness above the ears that, after testing my own complexions, I believe actually looks marginally better with the vanilla normals. Why did Bioware make the mesh like that? Poor bald people.)
- Soft makeup (Compatibility file provided.)
- Better makeup
Compatible (but there will be no effect where you might expect one)
- Unique Face Textures for Companions -- most companions in this mod have their tint maps manually set (in the same way I've used for the Character Variation Kit), so they won't be changed. If you do want to change their tint maps (they do use a vanilla-like approach), the easiest way to do it is to make a copy of whichever of my maps you want to use, rename it so that it's the same as the map that you want to replace (each of them is named with the character it corresponds to) and overwrite it.
- Qunari update and related mods, eg Cookies for Sten and Sten of the Beresaad -- have completely separate tint maps that are flat like the vanilla body maps.
Compatible
- Should be compatible with Realistic Teeth -- all that mod needs from a tint map is to have the teeth area blacked out (so that the teeth aren't tinted), and this doesn't get in the way of blacking out the vanilla teeth, so it's compatible with both vanilla teeth and realistic teeth. (The actual colour of the teeth is determined by the complexion texture.)
- Headmorphs (Unique Face Textures for Companions is slightly different as mentioned above)
- Complexions; in fact they should look even better with this mod!
Optional: Standalone textures
These are the same textures renamed so that they specifically do not overwrite the vanilla texture. They are intended for use with Toolset Unlocked v2.0's ability to apply them manually (see Option 1 section 9). First install a main file as above; this will be used by all heads that you don't specify a different texture for. Then simply extract the standalone file to the override folder, and use Toolset Unlocked to specify one of the other two textures for whichever headmorphs you like.
The old technique for this was the Character Variance Kit, which involved assigning a new base head to an exported morph and could not be previewed in the toolset unlike the above. The CVK is obsolete now; if you need to change the tint map on a MOP or MOR where you don't have the MRH available, please follow the "Using extra texture slots" instructions in Toolset Unlocked's Manual Workarounds article.
Optional: Modder Resource Files
As I mentioned, I've included a PSD file in the miscellaneous files section; you're welcome to make your own if you wish! Bear in mind that the layers for the skin tint map are in the RGB channels along with the makeup (so that I could keep them as separate layers); you will have to research how to copy RGB data to the alpha channel in your chosen image editor, because the skin tint map needs to be there, with only the makeup in the RGB channels.
When exporting to dds, however you choose to do it (I swear I will make a tutorial on dds formats), you should use u8888 (that's four 8s, not to be confused with u888, which lacks an alpha channel) like vanilla. This is uncompressed and high quality, so there will be no artefacts or stepping.
u8888 files do not have to be extremely high resolution if they don't contain fine detail: my main face tint map is 1024x1024, only double the size of vanilla. LOD files for the face can also accommodate an extra step down in size, as the head is quite tiny at LOD distances (though the main file should be big enough to look good in cutscenes): my LOD2 face tint map is 256x256, and LOD3 is 128x128, both the same as vanilla.
Mods prominently shown in screenshots:
- Skin tints from Pineappletree's Vibrant Colors
- Risibisi's hair (Wynne's is Afro Wavy; Morrigan's is Nightcrawler Nala; Leliana's is Nightcrawler Amunet)
- Kani Hime's vanilla face texture replacers
- Practical Morrigan Robe
- Retcon Light Armor Texture Rehaul
- Neutral Female Armor
- Alternative arms and armor tints
- Natural lighting for the character creator
- My own eyebrows, and WIP complexion and eye mods