


0 of 0

About this mod
Guides on adding costumes and converting texmod/tfc mods to addons
- Permissions and credits
((=======================Costume addon guides=======================))
Please read entire Description thank you
=!notes!=
first off these guides are "Mostly" text and image based meaning no video guides,sorry im not on youtube or any other social media.
second ill reference images throughout these guides for better understanding,these images are in the gallery
third the tools need are
=for adding costumes=
upk explorer -for editing upk files-involves editing materials,meshes,effects etc
photoshop -for texture editing
notepad -for ini file editing-mostly involves file path locations,ui names etc
=for converting texmod=
upk explorer -for editing upk files-involves editing materials,meshes,effects etc
photoshop -for texture editing
notepad -for ini file editing-mostly involves file path locations,ui names etc
TPFextractGUI -for extracting tpf files
=for converting tfc=
upk explorer -for editing upk files-involves editing materials,meshes,effects etc
photoshop -for texture editing
notepad -for ini file editing-mostly involves file path locations,ui names etc
tfc installer -for installing tfc mods
ok thats all,the guides are below.but! before doing anything be sure to download the archive in the files tab,this contains a sort of base/blueprint
for a costume which is what youll be using as a base for your mod to make things easier.
((=======================guides=======================))
=adding costumes guide=
step1=first extract the files from the downloaded archive and you should see 2 folders "Dante Base" and "Vergil Base".open the folder for the character
you want to add a costume for and you should see another folder called "devilgame" you will be working inside of this folder first and once your done you will be moving it into your dmc devil may cry game directory.
step2=once your inside the "devilgame" folder keep opening folders until you see one named "DLCCostumePack(!!!NAME HERE!!!)" replace the (!!!NAME HERE!!!) part with something related to the mod your doing like "DLCCostumePack69" or "DLCCostumePackDanteAnime" or "DLCCostumePackVergilClassic" you get the idea.also dont use any spaces.
"DLCCostumePackVergil Classic" !NOT LIKE THIS
"DLCCostumePackVergilClassic" LIKE THIS
once youve decided on the name open the folder.
step3=open the file named "devilgame.ini" with notepad and follow the instructions inside that file.
step4=RETURNING from "devilgame.ini" for either vergil or dante after copying the costume file.
ill be using dantes son of sparda costume file for this part of the guide but you can use anyone and still follow along.first you will be renaming the copied file
the name should look like this below.replace the (!!!NAME HERE!!!) part with your costumes name with NO! spaces,only one word
for dante => CH_dante_(!!!NAME HERE!!!)_SF.upk
for vergil => CH_vergil_(!!!NAME HERE!!!)_SF.upk
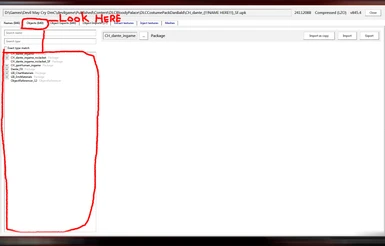
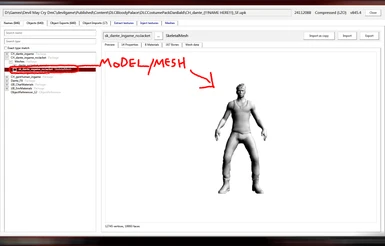
step5=after renaming the file,open it with upk explorer.once its open find the costumes model DONT search it,locate it manually in the objects tab through the drop down menus
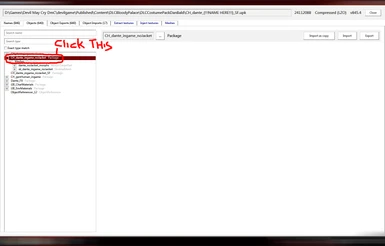
"see reference screenshot 1" once youve located the model "see reference screenshot 2" look at the initial package its in and click on it "see reference screenshot 3"
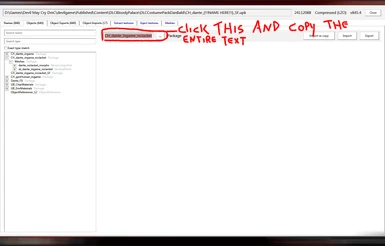
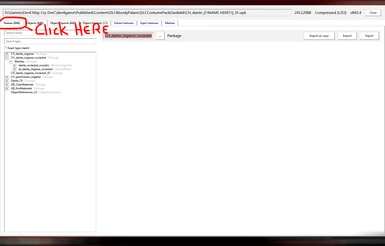
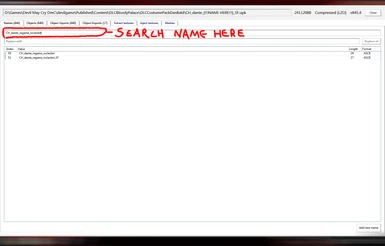
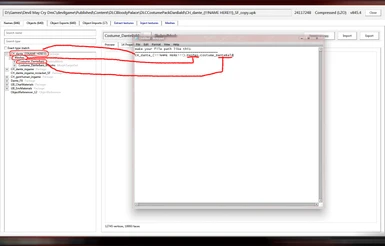
then click on the package name "see reference screenshot 4" and select and copy the entire packages name with ctrl+c.then click on the names tab "see reference screenshot 5"
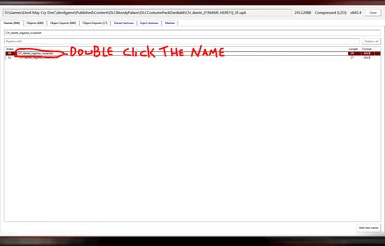
once your on the names tab search the package name you copied "see reference screenshot 6"once you see the package name double click on it "see reference screenshot 7"
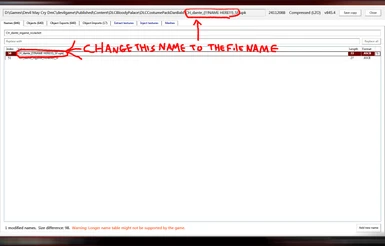
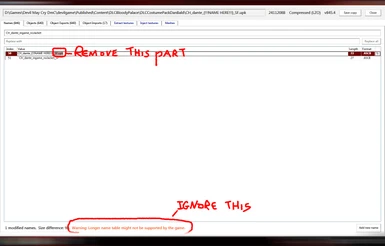
and change this name to the name of the file "see reference screenshot 8" but remove the part that says "_SF.upk" "see reference screenshot 9" also you can ignore the warning at
the bottom.go back to the objects tab and back to the costume model,now rename the costume the same way you did the package just now except rename it to your costumes "DLCID"
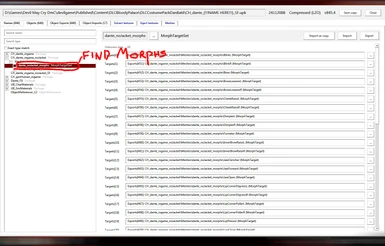
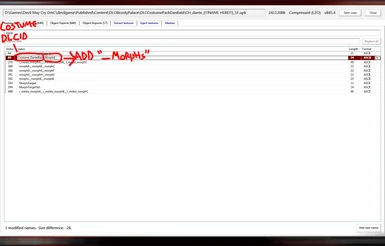
now look for the costumes "morphs" again DONT search it,locate it manually in the objects tab "see reference screenshot 10",in my case with the son of sparda costume the morphs
and model/mesh are in the same package however in some cases the morphs might be in a different package seperate from the mesh.now rename the morphs the same way you did the others
and rename it to your costumes "DLCID" but add "_Morphs" at the end "see reference screenshot 11" once your done renaming the morphs click save copy in the top right corner.
this will save the current file you just modded as a copy of the original in the same folder its in.
step6=now delete the original file and rename the copy to the originals name simply by deleting "_copy" from it.
now open devilgame.ini and continue with guide inside that file
step7=after closing and save devilgame.ini you should have successfully made a addon costume with what you just did all thats left is to move the files into the game directory
go back to the initial folder of the mod with the "dante base" and "vergil base" folder if you were doing a addon for dante open his folder if you were doing one for vergil open his
copy or move the devilgame folder into your game directory and launch the game and see if everythings working correctly with the new addon costume
at this point if you followed everything but the costume still doesnt show ingame the most likely reason would be you made a mistake in devilgame.ini so double check in that file
if you made any typos or forgot something
==================================================Adding part finished above
==================================================editing/converting part below
step8=if everythings working properly you just successfully added a costume NICE! DUDE!.at this point you can begin with editing the costume however you like with new materials,textures,
model/mesh,effects etc.but befor that theres some things you should know
ATTENTION! (texmod/tfc convert) if you are converting a texmod/tfc mod you will have to follow the guide above on adding a costume and when you get to the point where you must choose a costume
file for editing choose the one that your texmod/tfc mod was for.for instance if you had a texmod/tfc for dark dante copy the dark dante costume file for editing and continue the guide
until your here again.
NOTE! im not gonna go into detail on editing/swapping meshes,materials,textures etc im assuming you know how those work already :p
step9=in order to properly texture edit any costume,3 files will need to be temporarilly copied into the same folder of the costume file,those files are.
CharTextures.tfc =>devilgame\CookedPCConsole
CharTextures_DanteOriginal.tfc =>devilgame\Published\Content\DLCDanteOriginal
CharTextures_VergilsDownfall.tfc=>devilgame\Published\Content\DLCVergilsDownfall
the reason for this is that most costume files reference textures that are not in the file itself so in order to properly edit these textures those 3 files have to be in the same
folder with your costume.once those 3 files are copied to the same folder as the costume file you can begin texture editing like you usually would by exporting textures,editing in photoshop
moving from the exports folder to the imports folder,than importing them in upk explorer.after your done editing and importing the new textures this way.the new textures will be saved in
the costume file itself and you can remove the 3 files you copied."Honestly i have no idea how this works...But it does,pretty neat"
==================================================editing part finished above
==================================================converting part below
Texmod conversion
step9=yes also step 9 thats not a typo these two steps are connected.okay so to convert a texmod is pretty simple first extract all your edited textures from your .tpf file with TPFextractGUI
once you have all your extracted textures open the costume file you added above with upk explorer and export the same textures your gonna replace with the ones from your texmod mod.for example
if your texmod mod gave dante pink hair you will be exporting dantes hair textures to replace with the ones from the texmod.edit/replace the texutres in photoshop once your done with all of them
move them to the imports folder and import with them with upk explorer DONE!
tfc conversion
step10=okay this will be a little more in depth first there are 2 ways to do this that i know of
1=involves exporting all changes you made then importing into the new costume,information changes that cant be exported like materials will have to be redone in the new costume
i know this might seem tiresome to do all those changes again in the new costume but this way is the best imo since the file will be more clean,if that makes sense.
=install your mod with tfc installer then you will have to open the upk file your tfc mod edited for example if your tfc mod was for dark dante install it than open the dark dante
costume file with upk explorer.once the files open in upk explorer export any changes you made that can be exported then import them in the new costume and any changes that
cant be import/exported will have to be done manually.thats all!
2=involves copying the edited file from your tfc mod and makeing slight ajustments in upk explorer and possibly devilgame.ini.
=first copy the file your tfc mod edited to the folder with your new costume file open both in upk explorer and all the renaming changes you made in the new costume file redo/mirror them in your
file from the tfc mod,the naming/structure should be identical as the new costume once your done save it and replace the new costume file with the edited tfc mod file you just made the
name changes in.thats all if done correctly your tfc mod should be loaded as a addon now.
==================================================costume select ui images guide Below
This guide will explain how to add costume portraits that show up in the costume select screen
Step1=first copy this file "DLC_Images_Pack1_SF.upk" which is located in "devilgame/published/content/DLCDanteOriginal" into the folder where your costume mod is located,the folder where your devilgame.INI and costume upk file is.
Step2=now rename the file to this "DLC_Images_(!!!name here!!!)_SF.upk" But replace the (!!!name here!!!) Part with your costume DLCID.AND! Also Remove the part that says "Costume_" Example.
=DLC_Images_Costume_DanteBald_SF.upk= FROM THIS
=DLC_Images_DanteBald_SF.upk= TO THIS
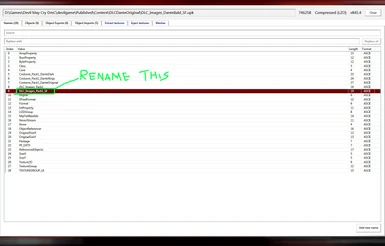
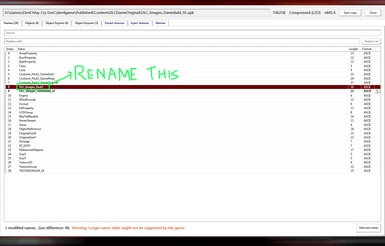
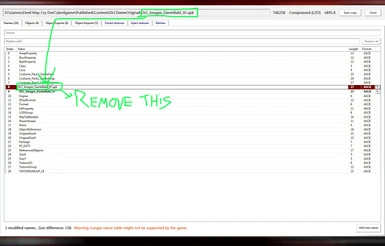
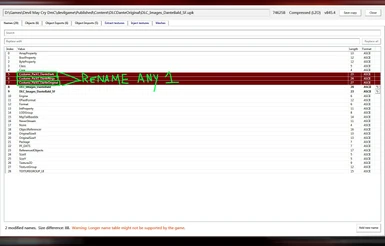
Step3=after renaming the file open it in upk explorer.and click on the names tab.then rename this "see reference screenshot 13" to the files name but remove the ".upk" part "see reference screenshot 14".now rename this " see reference screenshot 15" also to the files name but remove the "_SF.upk" part "see reference screenshot 16" now rename any 1 of the 3 above names "see reference screenshot 17"to your costume DLCID.then save the file.
Step4=after saving the file.replace the original with the copy and open the file again in upk explorer.now click on the extract textures tab,you should see 3 textures and one of them should have your costumes DLCID for a name,edit this texture to your costume portrait and save the file once your done.
Step5=after saving the file simply replace the original with the copy and your done your costume should be loading the new portrait you just edited.
((=======================FAQ=======================))
Q:no question just some heads ups you should keep in mind/know
A:make sure wordwrap is turned OFF in note pad this will make things ALOT easier
A2:if you make any typos/mistakes in devilgame.ini the game wont crash however the costume wont load and the game will automatically load dantes normal coat with dark hair costume
if you are working off dantes normal coat costume this might make things kinda tricky since it will be hard to tell if you made any mistakes since that same costume will load
if you made mistakes in this case i recommend you make a small texture edit to see if everythings working properly so you can tell the difference
A3=whenever you make changes to a any file in a upk texture/mesh/material etc make sure the name of the package its in is not the original name,the name of the package of any file
you edit will have to be changed.if the name is left unchanged the game will load the original assets instead of your new modded data.renaming it anyway will work you could just
add a 1 at the end of the name,however i recommend something more unique.
A4=When editing texutures in photoshop dont forget to have generate mip maps on
Q:no question
A:if anyone has questions on other stuff like attaching static meshes to your costume or adding ui icons or effects to your costume you can ask
Q:are those wallpapers
A:yes those are wallpapers,"why are they there you ask?" well because if you followed this entire guide and went through everything but still had no luck i didnt want all that to be for
nothing so i added some cool dmc wallpapers i edited forever ago as a cool bonus,that you can use for wallpapers/slideshows etc.just...please DONT repost them anywhere.thankyou.
Please read entire Description thank you
=!notes!=
first off these guides are "Mostly" text and image based meaning no video guides,sorry im not on youtube or any other social media.
second ill reference images throughout these guides for better understanding,these images are in the gallery
third the tools need are
=for adding costumes=
upk explorer -for editing upk files-involves editing materials,meshes,effects etc
photoshop -for texture editing
notepad -for ini file editing-mostly involves file path locations,ui names etc
=for converting texmod=
upk explorer -for editing upk files-involves editing materials,meshes,effects etc
photoshop -for texture editing
notepad -for ini file editing-mostly involves file path locations,ui names etc
TPFextractGUI -for extracting tpf files
=for converting tfc=
upk explorer -for editing upk files-involves editing materials,meshes,effects etc
photoshop -for texture editing
notepad -for ini file editing-mostly involves file path locations,ui names etc
tfc installer -for installing tfc mods
ok thats all,the guides are below.but! before doing anything be sure to download the archive in the files tab,this contains a sort of base/blueprint
for a costume which is what youll be using as a base for your mod to make things easier.
((=======================guides=======================))
=adding costumes guide=
step1=first extract the files from the downloaded archive and you should see 2 folders "Dante Base" and "Vergil Base".open the folder for the character
you want to add a costume for and you should see another folder called "devilgame" you will be working inside of this folder first and once your done you will be moving it into your dmc devil may cry game directory.
step2=once your inside the "devilgame" folder keep opening folders until you see one named "DLCCostumePack(!!!NAME HERE!!!)" replace the (!!!NAME HERE!!!) part with something related to the mod your doing like "DLCCostumePack69" or "DLCCostumePackDanteAnime" or "DLCCostumePackVergilClassic" you get the idea.also dont use any spaces.
"DLCCostumePackVergil Classic" !NOT LIKE THIS
"DLCCostumePackVergilClassic" LIKE THIS
once youve decided on the name open the folder.
step3=open the file named "devilgame.ini" with notepad and follow the instructions inside that file.
step4=RETURNING from "devilgame.ini" for either vergil or dante after copying the costume file.
ill be using dantes son of sparda costume file for this part of the guide but you can use anyone and still follow along.first you will be renaming the copied file
the name should look like this below.replace the (!!!NAME HERE!!!) part with your costumes name with NO! spaces,only one word
for dante => CH_dante_(!!!NAME HERE!!!)_SF.upk
for vergil => CH_vergil_(!!!NAME HERE!!!)_SF.upk
step5=after renaming the file,open it with upk explorer.once its open find the costumes model DONT search it,locate it manually in the objects tab through the drop down menus
"see reference screenshot 1" once youve located the model "see reference screenshot 2" look at the initial package its in and click on it "see reference screenshot 3"
then click on the package name "see reference screenshot 4" and select and copy the entire packages name with ctrl+c.then click on the names tab "see reference screenshot 5"
once your on the names tab search the package name you copied "see reference screenshot 6"once you see the package name double click on it "see reference screenshot 7"
and change this name to the name of the file "see reference screenshot 8" but remove the part that says "_SF.upk" "see reference screenshot 9" also you can ignore the warning at
the bottom.go back to the objects tab and back to the costume model,now rename the costume the same way you did the package just now except rename it to your costumes "DLCID"
now look for the costumes "morphs" again DONT search it,locate it manually in the objects tab "see reference screenshot 10",in my case with the son of sparda costume the morphs
and model/mesh are in the same package however in some cases the morphs might be in a different package seperate from the mesh.now rename the morphs the same way you did the others
and rename it to your costumes "DLCID" but add "_Morphs" at the end "see reference screenshot 11" once your done renaming the morphs click save copy in the top right corner.
this will save the current file you just modded as a copy of the original in the same folder its in.
step6=now delete the original file and rename the copy to the originals name simply by deleting "_copy" from it.
now open devilgame.ini and continue with guide inside that file
step7=after closing and save devilgame.ini you should have successfully made a addon costume with what you just did all thats left is to move the files into the game directory
go back to the initial folder of the mod with the "dante base" and "vergil base" folder if you were doing a addon for dante open his folder if you were doing one for vergil open his
copy or move the devilgame folder into your game directory and launch the game and see if everythings working correctly with the new addon costume
at this point if you followed everything but the costume still doesnt show ingame the most likely reason would be you made a mistake in devilgame.ini so double check in that file
if you made any typos or forgot something
==================================================Adding part finished above
==================================================editing/converting part below
step8=if everythings working properly you just successfully added a costume NICE! DUDE!.at this point you can begin with editing the costume however you like with new materials,textures,
model/mesh,effects etc.but befor that theres some things you should know
ATTENTION! (texmod/tfc convert) if you are converting a texmod/tfc mod you will have to follow the guide above on adding a costume and when you get to the point where you must choose a costume
file for editing choose the one that your texmod/tfc mod was for.for instance if you had a texmod/tfc for dark dante copy the dark dante costume file for editing and continue the guide
until your here again.
NOTE! im not gonna go into detail on editing/swapping meshes,materials,textures etc im assuming you know how those work already :p
step9=in order to properly texture edit any costume,3 files will need to be temporarilly copied into the same folder of the costume file,those files are.
CharTextures.tfc =>devilgame\CookedPCConsole
CharTextures_DanteOriginal.tfc =>devilgame\Published\Content\DLCDanteOriginal
CharTextures_VergilsDownfall.tfc=>devilgame\Published\Content\DLCVergilsDownfall
the reason for this is that most costume files reference textures that are not in the file itself so in order to properly edit these textures those 3 files have to be in the same
folder with your costume.once those 3 files are copied to the same folder as the costume file you can begin texture editing like you usually would by exporting textures,editing in photoshop
moving from the exports folder to the imports folder,than importing them in upk explorer.after your done editing and importing the new textures this way.the new textures will be saved in
the costume file itself and you can remove the 3 files you copied."Honestly i have no idea how this works...But it does,pretty neat"
==================================================editing part finished above
==================================================converting part below
Texmod conversion
step9=yes also step 9 thats not a typo these two steps are connected.okay so to convert a texmod is pretty simple first extract all your edited textures from your .tpf file with TPFextractGUI
once you have all your extracted textures open the costume file you added above with upk explorer and export the same textures your gonna replace with the ones from your texmod mod.for example
if your texmod mod gave dante pink hair you will be exporting dantes hair textures to replace with the ones from the texmod.edit/replace the texutres in photoshop once your done with all of them
move them to the imports folder and import with them with upk explorer DONE!
tfc conversion
step10=okay this will be a little more in depth first there are 2 ways to do this that i know of
1=involves exporting all changes you made then importing into the new costume,information changes that cant be exported like materials will have to be redone in the new costume
i know this might seem tiresome to do all those changes again in the new costume but this way is the best imo since the file will be more clean,if that makes sense.
=install your mod with tfc installer then you will have to open the upk file your tfc mod edited for example if your tfc mod was for dark dante install it than open the dark dante
costume file with upk explorer.once the files open in upk explorer export any changes you made that can be exported then import them in the new costume and any changes that
cant be import/exported will have to be done manually.thats all!
2=involves copying the edited file from your tfc mod and makeing slight ajustments in upk explorer and possibly devilgame.ini.
=first copy the file your tfc mod edited to the folder with your new costume file open both in upk explorer and all the renaming changes you made in the new costume file redo/mirror them in your
file from the tfc mod,the naming/structure should be identical as the new costume once your done save it and replace the new costume file with the edited tfc mod file you just made the
name changes in.thats all if done correctly your tfc mod should be loaded as a addon now.
==================================================costume select ui images guide Below
This guide will explain how to add costume portraits that show up in the costume select screen
Step1=first copy this file "DLC_Images_Pack1_SF.upk" which is located in "devilgame/published/content/DLCDanteOriginal" into the folder where your costume mod is located,the folder where your devilgame.INI and costume upk file is.
Step2=now rename the file to this "DLC_Images_(!!!name here!!!)_SF.upk" But replace the (!!!name here!!!) Part with your costume DLCID.AND! Also Remove the part that says "Costume_" Example.
=DLC_Images_Costume_DanteBald_SF.upk= FROM THIS
=DLC_Images_DanteBald_SF.upk= TO THIS
Step3=after renaming the file open it in upk explorer.and click on the names tab.then rename this "see reference screenshot 13" to the files name but remove the ".upk" part "see reference screenshot 14".now rename this " see reference screenshot 15" also to the files name but remove the "_SF.upk" part "see reference screenshot 16" now rename any 1 of the 3 above names "see reference screenshot 17"to your costume DLCID.then save the file.
Step4=after saving the file.replace the original with the copy and open the file again in upk explorer.now click on the extract textures tab,you should see 3 textures and one of them should have your costumes DLCID for a name,edit this texture to your costume portrait and save the file once your done.
Step5=after saving the file simply replace the original with the copy and your done your costume should be loading the new portrait you just edited.
((=======================FAQ=======================))
Q:no question just some heads ups you should keep in mind/know
A:make sure wordwrap is turned OFF in note pad this will make things ALOT easier
A2:if you make any typos/mistakes in devilgame.ini the game wont crash however the costume wont load and the game will automatically load dantes normal coat with dark hair costume
if you are working off dantes normal coat costume this might make things kinda tricky since it will be hard to tell if you made any mistakes since that same costume will load
if you made mistakes in this case i recommend you make a small texture edit to see if everythings working properly so you can tell the difference
A3=whenever you make changes to a any file in a upk texture/mesh/material etc make sure the name of the package its in is not the original name,the name of the package of any file
you edit will have to be changed.if the name is left unchanged the game will load the original assets instead of your new modded data.renaming it anyway will work you could just
add a 1 at the end of the name,however i recommend something more unique.
A4=When editing texutures in photoshop dont forget to have generate mip maps on
Q:no question
A:if anyone has questions on other stuff like attaching static meshes to your costume or adding ui icons or effects to your costume you can ask
Q:are those wallpapers
A:yes those are wallpapers,"why are they there you ask?" well because if you followed this entire guide and went through everything but still had no luck i didnt want all that to be for
nothing so i added some cool dmc wallpapers i edited forever ago as a cool bonus,that you can use for wallpapers/slideshows etc.just...please DONT repost them anywhere.thankyou.