


0 of 0


")
")


")
")


About this mod
Random Luts. latest have number in title of what to set size to.
Or hover mouse over png's to see.
They're not all perfect and might have color artifacts/clipping issues.
- Requirements
- Permissions and credits
[ You have full permission to use my mods or Luts as your own anywhere ].
Got bored tried to edit some Luts for 2024.
One before and after slide :
1 https://imgsli.com/MjUzNTQx
2 https://imgsli.com/MjUzNTg4
Probably last update I'll make for a while.
Another before and After :
Kirk Sawyer small time Heywood Fixer
https://www.nexusmods.com/cyberpunk2077/images/87486
ARTIST Luts:
"ArtisticLUT-04.png"
"ArtisticLUT-05.png"
This is the Final update to Nexusmod. Have a good one.
Really am not returning this time.
Stay healthy and active. Take care.
https://www.youtube.com/@TheShepherdsChapel
=========================================
I've been editing reshade Luts for a bit.
"no green" luts too.
Sort and choose what you want.
( on windows hover mouse over the png to see the size.
the smaller number that appears is what you use in reshade Lut.fx two times.
ApplyLut(luttools only once )etc. The smaller number only ).
For those that don't know, Luts [ color lookup table ]
is a screen shot, of how colors look on your screen, saved to a lut, to be applied that way.
And easily shared. Just with a .png. This is better for performance. Than using too many shaders.
Typically how a Lut is made using Reshade or putting a default lut into a photo editor for adjusting there :
I just do it in game with other shaders. And do cropping in PainttoolSai2.
I Use another shader that displays a Lut across the screen is used, like Lightroom.fx (set to the top of the shader list).
When you toggle it's checkbox on, a Lut appears. Set to 32x32, [ other .fx shaders can make other Lut formats ].
Then other .fx shaders below it are used to change colors in real time in game.
Which will change the color of the lut squares too.
When satisfied do a screenshot, then import that to your fav image editor,
then crop canvas perfectly to the lut color squares. Then save as a .png.
( Note if creating a lut, dont screenshot a LUT with sharpens, AA, bloom, dof, etc, As it will mess the lut.)
And now you have a Lut you can use or share.
And you only need one .fx shader , to apply in game.
Way better performance, than what is sometimes offered on Nexus for ReShade :
where people expect you to run a profile, that uses more than two shaders, just for one color palette change
and a few fancy effects that are not practical from a gameplay performance standpoint.
So a Lut will be the better option:
Because all people really want is the color change.
And one shader to apply it.
Since I don't know yet how to make a archive lut mod,
ReShade version will have to do.
(( There is one Bug that happens with LUT.fx. After applying custom png lut name,
If after that, you remove that png, and turn on LUT.FX it will bug. as it wont find the previous png it had.
It won't run again and show a black screen. Just toggle it off. Because a previous info is stored but the png name is not matching the name you entered for it. To fix, delete the .txt files for reshade in the game folder you see. ReshadePreset.ini
(You will lose any reshade settings having to adjust it again for every shader) That should fix LUT.fx.
Or can go into the preset file with txt editor, and find the [LUT.fx] and the last incorrect name you put there and enter a current png name you have in texture folder.))
How to use my LUTs in 2077 ? :
Install ReShade > https://reshade.me/
( ↑Only need to install the ""standard effects""during the install process - needed for Lut.fx to work.
Nothing else ( unless you intend to edit your own).
Off check the other boxes. Lut.fx is already included with the standard effects, I just noticed.)
After following all the instructions, you should be left with this window >
Settings tab to disable non active shaders. ( if you turn off LUT.fx with disable non active effects, it will disappear from list. Turn back on non active shader list, to find it again ).
Active shaders have a check next to their name. 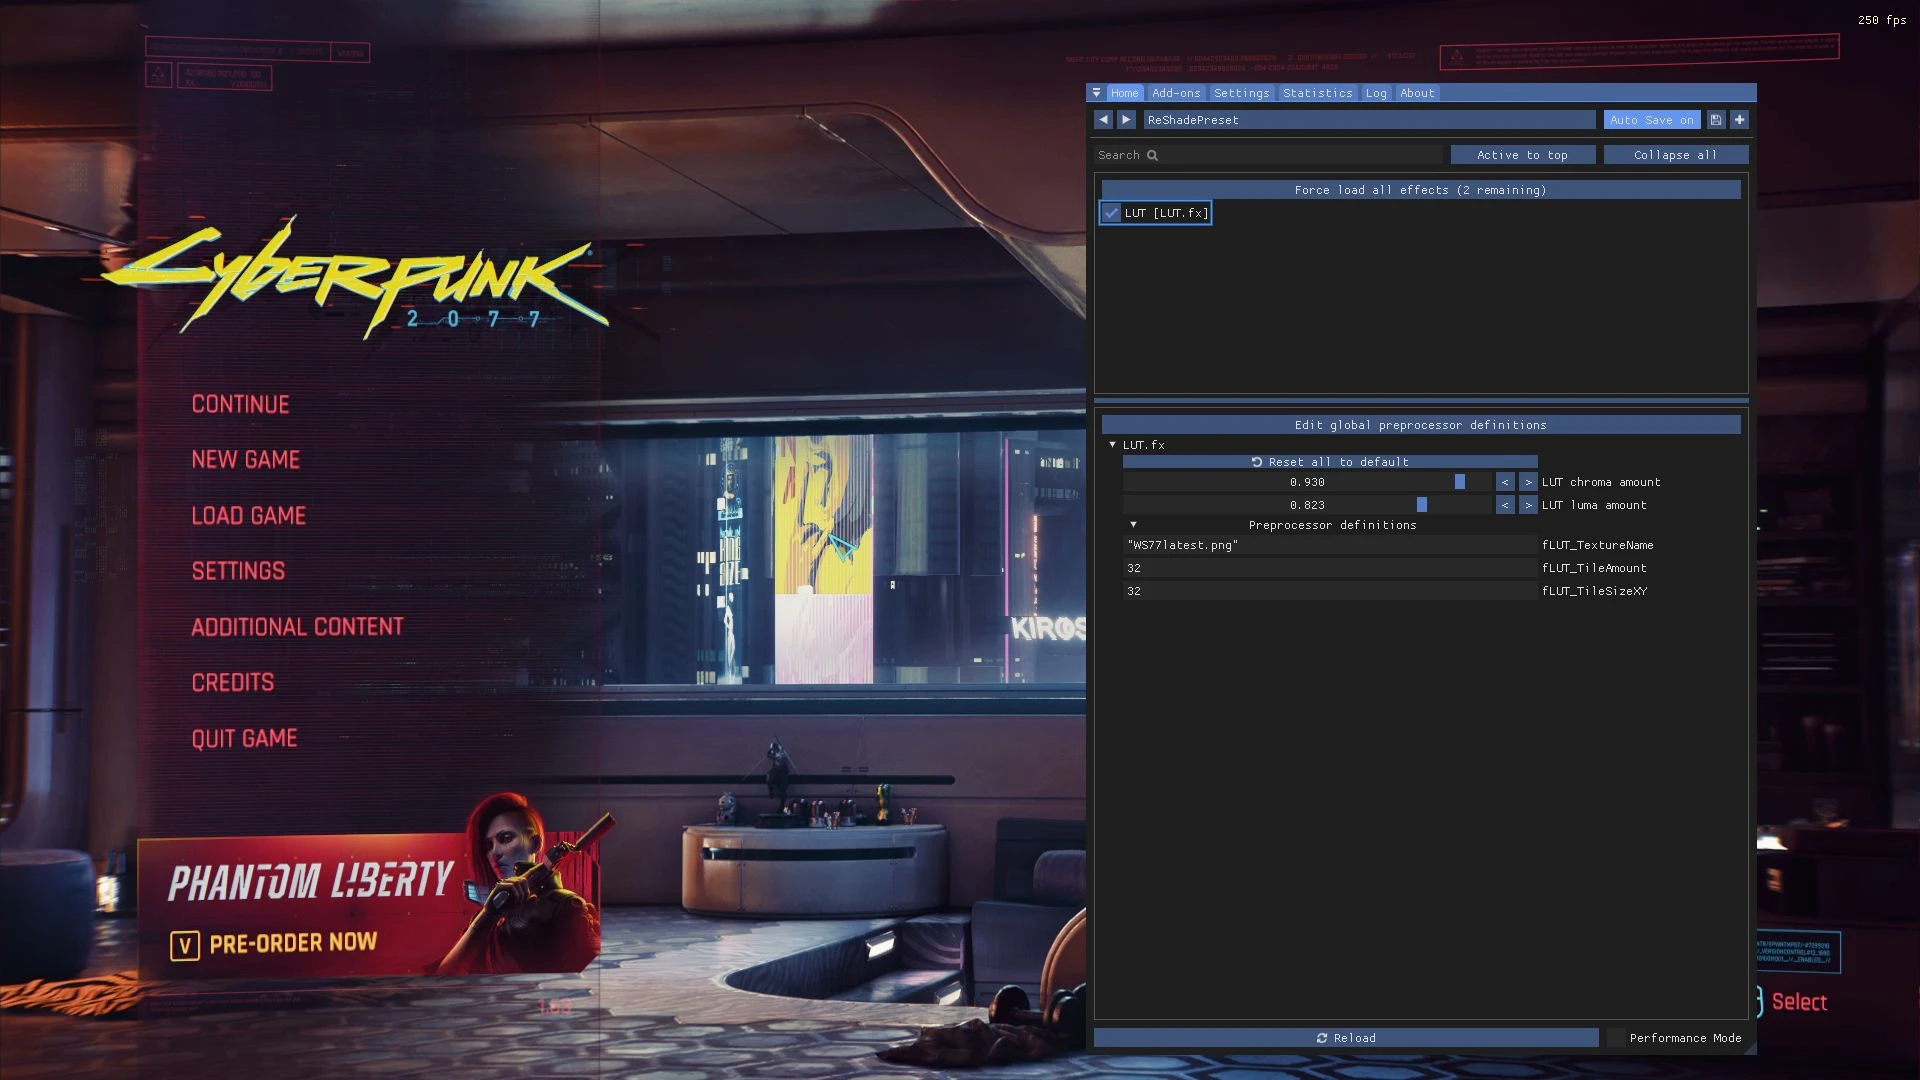
Place "WS77latest.png" [ put all the luts you intend to use, into texture folder ]
Into Reshade's Texture folder.
( Can rename a .png if you want.
png name , has to match the name you put into the .fx shader fields for that one to be active. As pictured).
If you don't have LUT.fx or ApplyLut.fx.
Put into Reshade's Shader folder. If not already.
When you download at least one set of shaders from the installer ""standard effects"",
it will create shader-texture folders.
Typically along the x64 folder path (shouldn't matter).
But you can always create these folders:
Direct Reshade's path to a Texture & Shader folder if needed;
if not shader list won't populate.
( Can manually set from ReShades UI/settings tab while in game ( Home key ).
Start 2077 then press Home key (can set to any key in reshade, example Ins (Insert key);
to open ReShade User Interface,
then look for LUT.fx or ApplyLut.fx in the list.
Turn it on ( LUT.fx or ApplyLut.fx ) so its active, and press its Preprocessor tab
(small drop menu arrow) you'll see "lut.png".
Paste over that name with "WS77latest.png"
( Must include .png in the name with "quotation" marks! )
( 32 x 32 has to be set for LUT.fx. But ApplyLut[ luttooks] only one number like 32
And depending on the texture , these numbers can be different.
To know, hover mouse over the .png to see the image size. The smaller number is what you use. )
Press Enter key while in each box field you paste into, for it to stay.
Finished.
You can even keybind in reshade, a key to toggle the effects on and off.
------------------------------------
Example: values
If using Lut.fx :
0.500 LUT chroma amount ( Adjust to personal tastes)
0.822 LUT luma amount ( Adjust to personal tastes)
"WS77latest.png" fLUT_TextureName
32 fLUT_TileAmount
32 fLUT_TileSizeXY
------------------------------------
If using Apply LUT [LUTTools.fx] :
Display LUT settings:
32
Apply LUT settings
0.400 / 0.752 LUT chroma/luma ( Adjust to personal tastes)
Preprocesser definitions \/
32
"WS77latest.png"
false
"
-----------------------------------------------------------------------------
-----------------------------------------------------------------------------
Miscellaneous talk :
[ If you have any questions about this process just Ask. And I'll try and reply ].
I've tried to target excessive green tint, without touching the reds
nor amplifying blue's [ hard to do ]. Contrast and brightness remains relatively samey.
Color bloom should be reduced for better clarity maybe.
I gave attention to avoid clipping artifacts.
Overall this ideally should complement your own color adjust from monitor or done by gpu even.
Warm tones suffer in most in my no green tint luts. I tend to neglect warm hues, to favor blue hues.
But you can adjust the Chroma slider so the effect is not too strong.
-----------------------------------------------
There are other shaders that display more complex luts and .fx displays for them,
to make a drop down menus to access many luts , but I do not understand how those work.
I use the most basic and simple reshade LUT and shader to apply it.
Maybe you can teach Chat gpt, to create a .fx shader for you that is more feature rich.
Like a drop down of more luts. etc. Coding a .fx shader is a skill of its own. How I would do this, is maybe located a Lut.fx type, that has a drop down of many luts. And use that as a template to teach GPT. Then have it somehow, replace the code, with the names of your custom luts. And then maybe that will work. Or not. Unsure because I don't know how to code a .fx. Nor how to edit the type of lut needed for them.
---
If you want to make your own Reshade lut, then whenever you install the shaders from reshade, then lightroom.fx is in one of the downloads. Maybe qUINT.
Or get it directly from github. Just copy paste the raw page stuff into a .txt file. save.
be sure extensions types are visible on pc. Then change .txt to .fx save. Title file qUINT_lightroom.fx
whatever the bolded name title is at github.
Then put into the shader folder.
https://github.com/martymcmodding/qUINT/blob/master/Shaders/qUINT_lightroom.fx
[ that needs its set of files to work under shaders folder path at github ]
Then its just a matter of using other shaders, to adjust the colors before saving the lut as I described from the start.
Lightroom has to always be top of list if you use it.
Got bored tried to edit some Luts for 2024.
One before and after slide :
1 https://imgsli.com/MjUzNTQx
2 https://imgsli.com/MjUzNTg4
Probably last update I'll make for a while.
Another before and After :
Kirk Sawyer small time Heywood Fixer
https://www.nexusmods.com/cyberpunk2077/images/87486
ARTIST Luts:
"ArtisticLUT-04.png"
"ArtisticLUT-05.png"
This is the Final update to Nexusmod. Have a good one.
Really am not returning this time.
Stay healthy and active. Take care.
https://www.youtube.com/@TheShepherdsChapel
=========================================
I've been editing reshade Luts for a bit.
"no green" luts too.
Sort and choose what you want.
( on windows hover mouse over the png to see the size.
the smaller number that appears is what you use in reshade Lut.fx two times.
ApplyLut(luttools only once )etc. The smaller number only ).
For those that don't know, Luts [ color lookup table ]
is a screen shot, of how colors look on your screen, saved to a lut, to be applied that way.
And easily shared. Just with a .png. This is better for performance. Than using too many shaders.
Typically how a Lut is made using Reshade or putting a default lut into a photo editor for adjusting there :
I just do it in game with other shaders. And do cropping in PainttoolSai2.
I Use another shader that displays a Lut across the screen is used, like Lightroom.fx (set to the top of the shader list).
When you toggle it's checkbox on, a Lut appears. Set to 32x32, [ other .fx shaders can make other Lut formats ].
Then other .fx shaders below it are used to change colors in real time in game.
Which will change the color of the lut squares too.
When satisfied do a screenshot, then import that to your fav image editor,
then crop canvas perfectly to the lut color squares. Then save as a .png.
( Note if creating a lut, dont screenshot a LUT with sharpens, AA, bloom, dof, etc, As it will mess the lut.)
And now you have a Lut you can use or share.
And you only need one .fx shader , to apply in game.
Way better performance, than what is sometimes offered on Nexus for ReShade :
where people expect you to run a profile, that uses more than two shaders, just for one color palette change
and a few fancy effects that are not practical from a gameplay performance standpoint.
So a Lut will be the better option:
Because all people really want is the color change.
And one shader to apply it.
Since I don't know yet how to make a archive lut mod,
ReShade version will have to do.
(( There is one Bug that happens with LUT.fx. After applying custom png lut name,
If after that, you remove that png, and turn on LUT.FX it will bug. as it wont find the previous png it had.
It won't run again and show a black screen. Just toggle it off. Because a previous info is stored but the png name is not matching the name you entered for it. To fix, delete the .txt files for reshade in the game folder you see. ReshadePreset.ini
(You will lose any reshade settings having to adjust it again for every shader) That should fix LUT.fx.
Or can go into the preset file with txt editor, and find the [LUT.fx] and the last incorrect name you put there and enter a current png name you have in texture folder.))
How to use my LUTs in 2077 ? :
Install ReShade > https://reshade.me/
( ↑Only need to install the ""standard effects""during the install process - needed for Lut.fx to work.
Nothing else ( unless you intend to edit your own).
Off check the other boxes. Lut.fx is already included with the standard effects, I just noticed.)
After following all the instructions, you should be left with this window >
Settings tab to disable non active shaders. ( if you turn off LUT.fx with disable non active effects, it will disappear from list. Turn back on non active shader list, to find it again ).
Active shaders have a check next to their name.
Place "WS77latest.png" [ put all the luts you intend to use, into texture folder ]
Into Reshade's Texture folder.
( Can rename a .png if you want.
png name , has to match the name you put into the .fx shader fields for that one to be active. As pictured).
If you don't have LUT.fx or ApplyLut.fx.
Put into Reshade's Shader folder. If not already.
When you download at least one set of shaders from the installer ""standard effects"",
it will create shader-texture folders.
Typically along the x64 folder path (shouldn't matter).
But you can always create these folders:
Direct Reshade's path to a Texture & Shader folder if needed;
if not shader list won't populate.
( Can manually set from ReShades UI/settings tab while in game ( Home key ).
Start 2077 then press Home key (can set to any key in reshade, example Ins (Insert key);
to open ReShade User Interface,
then look for LUT.fx or ApplyLut.fx in the list.
Turn it on ( LUT.fx or ApplyLut.fx ) so its active, and press its Preprocessor tab
(small drop menu arrow) you'll see "lut.png".
Paste over that name with "WS77latest.png"
( Must include .png in the name with "quotation" marks! )
( 32 x 32 has to be set for LUT.fx. But ApplyLut[ luttooks] only one number like 32
And depending on the texture , these numbers can be different.
To know, hover mouse over the .png to see the image size. The smaller number is what you use. )
Press Enter key while in each box field you paste into, for it to stay.
Finished.
You can even keybind in reshade, a key to toggle the effects on and off.
------------------------------------
Example: values
If using Lut.fx :
0.500 LUT chroma amount ( Adjust to personal tastes)
0.822 LUT luma amount ( Adjust to personal tastes)
"WS77latest.png" fLUT_TextureName
32 fLUT_TileAmount
32 fLUT_TileSizeXY
------------------------------------
If using Apply LUT [LUTTools.fx] :
Display LUT settings:
32
Apply LUT settings
0.400 / 0.752 LUT chroma/luma ( Adjust to personal tastes)
Preprocesser definitions \/
32
"WS77latest.png"
false
"
-----------------------------------------------------------------------------
-----------------------------------------------------------------------------
Miscellaneous talk :
[ If you have any questions about this process just Ask. And I'll try and reply ].
I've tried to target excessive green tint, without touching the reds
nor amplifying blue's [ hard to do ]. Contrast and brightness remains relatively samey.
Color bloom should be reduced for better clarity maybe.
I gave attention to avoid clipping artifacts.
Overall this ideally should complement your own color adjust from monitor or done by gpu even.
Warm tones suffer in most in my no green tint luts. I tend to neglect warm hues, to favor blue hues.
But you can adjust the Chroma slider so the effect is not too strong.
-----------------------------------------------
There are other shaders that display more complex luts and .fx displays for them,
to make a drop down menus to access many luts , but I do not understand how those work.
I use the most basic and simple reshade LUT and shader to apply it.
Maybe you can teach Chat gpt, to create a .fx shader for you that is more feature rich.
Like a drop down of more luts. etc. Coding a .fx shader is a skill of its own. How I would do this, is maybe located a Lut.fx type, that has a drop down of many luts. And use that as a template to teach GPT. Then have it somehow, replace the code, with the names of your custom luts. And then maybe that will work. Or not. Unsure because I don't know how to code a .fx. Nor how to edit the type of lut needed for them.
---
If you want to make your own Reshade lut, then whenever you install the shaders from reshade, then lightroom.fx is in one of the downloads. Maybe qUINT.
Or get it directly from github. Just copy paste the raw page stuff into a .txt file. save.
be sure extensions types are visible on pc. Then change .txt to .fx save. Title file qUINT_lightroom.fx
whatever the bolded name title is at github.
Then put into the shader folder.
https://github.com/martymcmodding/qUINT/blob/master/Shaders/qUINT_lightroom.fx
[ that needs its set of files to work under shaders folder path at github ]
Then its just a matter of using other shaders, to adjust the colors before saving the lut as I described from the start.
Lightroom has to always be top of list if you use it.