


0 of 0


About this mod
The CpOIC is an easy-to-use tool to create mod installers, (mainly) for clothing mods.
In the past the user had to manually choose and copy an 'archive' file in to the 'patch' directory of Cyberpunk, but these times are over now!
- Requirements
- Permissions and credits
- Mirrors
- Changelogs
Quick start:
- Simply create such a folder structure
My fancy mod/   //Should have the name of your mod
├── basegame_Short_Skirt_Red.archive
├── basegame_Short_Skirt_Blue.archive
├── common.png  //An image showing all the variants
├── description.txt    //some description
└── Items.Q005_Johnny_Pants   //A file named by the code of the item you will replace.
- Make sure you have installed Java 13 or higher, download it here!
- Download the CpOIC
- Execute it and select the created top folder e.g.: My fancy mod
- Fill out the mod information
- Then the CpOIC will create the zip file for you
License
Simply use it!
But I would be glad if you mention me/my mod in the description of your mod.
Maybe also with my logo:
(https://staticdelivery.nexusmods.com/mods/3333/images/2149/2149-1618313855-1175489278.jpeg)
The problem with the current state
Isn't it a hassle...
You see a nice clothing mod for Cyberpunk at nexusmods.com, it offers replacements for
Johnnies pants and shoes in different Variants and colors. But which one should you take? The Red short skirt? The blue
pants? Which shoe model and color? Maybe you chose one, copied the .archive files to the Cyberpunk directory. But then
you might think, that another one would be better. And again, manual copy and paste...
This tool allows the modder to easily create a mod installer. Then the user can download the mod and Vortex will open the
installer at the mod installation. There the user can choose which version he fancy installing. Also, the CpOIC takes care
about the overwritten game item, so the user is warned, when he installs a mod which will replace the same game item.
The Vortex mod manager allows the modder to create mod installers
(also referred to as FOMOD installer)
which made the mod users live much easier. It essentially adds a menu to the mod installation where one can choose which
variant of a mod should be installed.
At this moment in time the Cyberpunk mod community has no way to simply add a new item to the game. Therefore, they have
to replace an existing item and this introduces a lot of problems.
- Firstly one should not install multiple mods which overwrite the same item at one time.
- Without a mod installer you have to manually copy the mods into your game directory. This is very often the case in Cyberpunk and at some point in time you will lose track about which mod is installed at the moment.
- Normally it is tedious to create such an installer, because it is very repetitive. But the CpOIC allows to generate such an installer with in only a few minutes
Zipping Disclaimer:
The CpOIC provides two zipping variants. Firstly a fully integrated java based zipping. This variant is always
usable, but the archived compression is not that good (sometimes very bad).
Therefore 7-Zip will be used if it is locally installed. If 7-Zip is not installed in the standard
directory (C:\Program Files\7-Zip\7z.exe)
the install directory has to be set manually (See chapter about configuration.)
How this tool avoids mod conflicts.
This mechanism is not good, but it is the best possibility I am aware of. If you have a better idea, please write
me!
Requirements:
- The conflicting mods must both use the CpOIC
Then the user will be warned at deployment

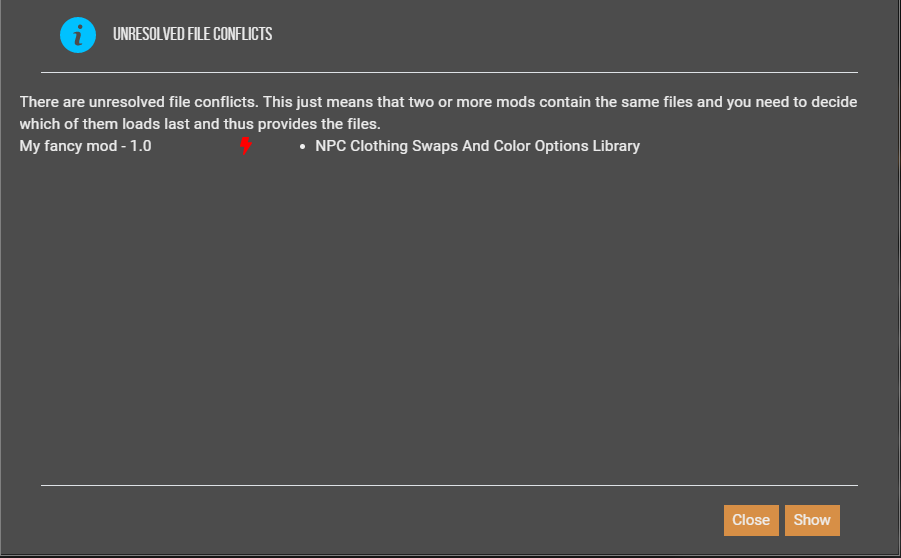
But simply choosing a solution provided by Vortex does not help.
The user has to be aware that, if he sees this warning
he has to uninstall one of the shown mods.
A more complex example
My fancy mod/ // <1> Should have the name of your mod
├── Replace Johnnies pants/ // <2> One directory per replaced game item
│├── Short skirt/ // <3> One directory per variant
││├── basegame_Short_Skirt_Red.archive    // <4> The archive containing the mod files
││├── basegame_Short_Skirt_Red.png     // <5> One image per .archive
││├── basegame_Short_Skirt_Blue.archive
││├── basegame_Short_Skirt_Blue.png
││├── description.txt // <6> Maybe an description. E.g.:
│││     //     "please select one color for the short skirt"
││└── Items.Q005_Johnny_Pants   // <7> A file with the code of the item
││                                            //     an archive will replace.
││
│├── Long skirt/
││├── basegame_Long_Skirt_Red.archive
││├── basegame_Long_Skirt_Blue.archive
││├── common.png   // <5> An common image for all archives in one folder
││├── description.txt
││└── Items.Q005_Johnny_Pants
│├── common.png// <5> An common image for all choices in the folder
│└── description.txt  // <6> E.g.: "Would you reather like to replace Johnnies
│                                             //            pants by a short or long skirt?"
│
├── Replace Johnnies boots/
│├── basegame_Sneaker_Green.archive
│├── basegame_Sneaker_Blue.archive
│├── common.png
│├── Items.Q005_Johnny_Shoes
│└── description.txt
│
├── SelectAny  // <8> Enables the user to replace multiple items
├── description.txt   // <6> E.g. "This is my fancy mod! Pleas select whether you
 │                                                    //           like to replace Johnnies pants and / or boots"
├── common.png // <5> The main image of the mod
└── module.jpeg// <9> The main image of the mod. Yes use it here again.
- <1> The so called *workspace* which should have the name of the mod.
- <2> For every game item the mod can replace one should create one Folder in the workspace. If only one item can be replaced (e.g. the mod only offers certain variants for Johnnies Pants) this layer can be left out.
- <3> Directories for certain variants. This layer can be skipped if only one variant is offered ( see: `Replace Johnnies boots/`).
- <4> The archive which contains the modification. They will be copied in to the game folder ( under `/archive/pc/patch/`).
- <5> For the images there are two possibilities:
- One can define one image per ".archive". Then the image should have the same name as the archive, except the ending.
- One can define one common image for all ".archive" files. This should be named `common.<Image ending>`
- <6> In every folder a description can be added. This should be named `description.txt`
- <7> Every directory containing archives should contain a file named exactly the same as the game item which is replaced by an archive. The content of the file does not mather.
- Attention: The file should not have an ending like txt or something else. It should have exactly the same name as the game item.
- <8> By default, the user can only choose one or none option, if the behavior should be other than that, create a file without file ending and name it SelectAtLeastOne, SelectAtMostOne, SelectExactlyOne, SelectAll or SelectAny. This is useful to allow the user, like in the example, to replace Johnnies pants and/or boots.
- <9> The main image of your mod.
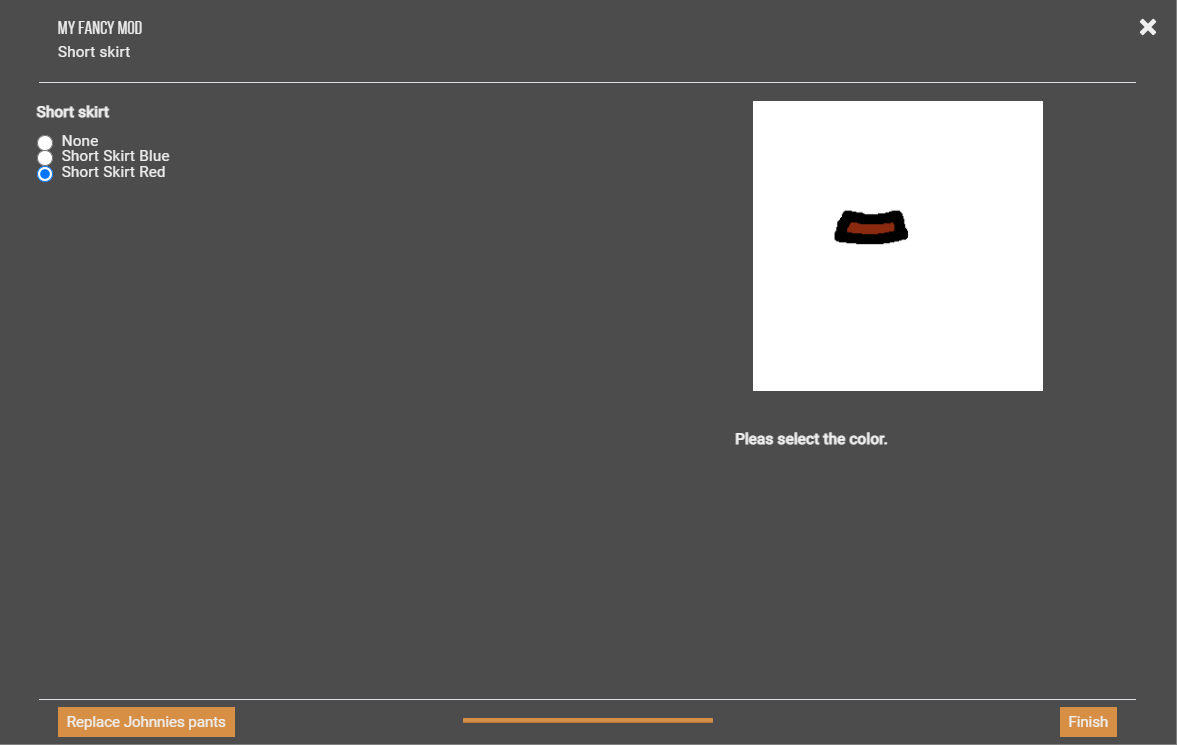
And this is the result:
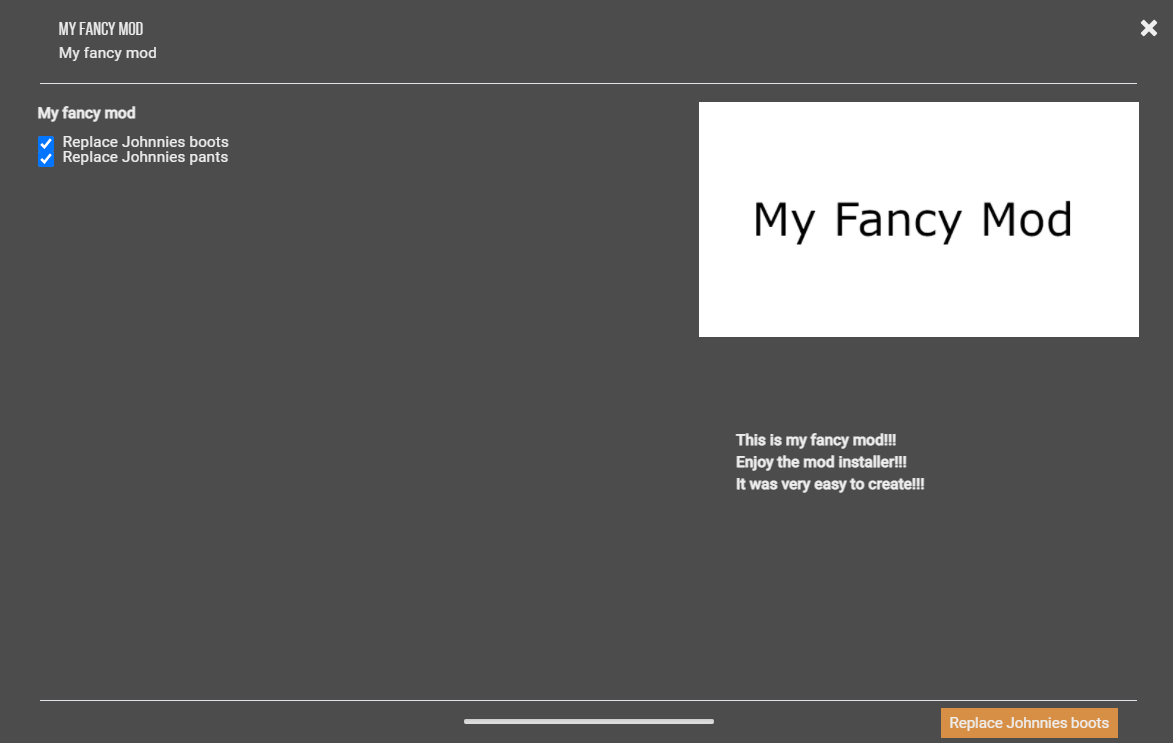
Firstly you can decide whether you would like to install a replacer for Johnnies boots and/or pants.
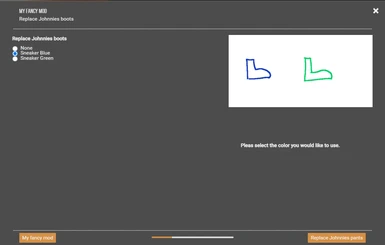
Then you can decide on the color of the boots.

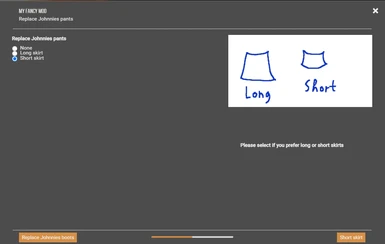
Now you can decide which type of skirt you prefer.

And again, the color can be selected.
!!! Help me with your ideas !!!
Please help me to develop the CpOIC further!
Send in your ideas and requirements. I will do my best to integrate them.
Reporting
You found a bug? Please report it!
1. Create a report.
- Normally the CpOIC should ask you if a report should be created, if an error occurred.
- If this is not the case, execute the CpOIC with the command line argument `-r`. In
detail:
java -jar "\path\to\CpOIC.jar" -r
- Then run the CpOIC exactly like the last time.2. Then send the report together with a description, and your contact details, to me.
3. I will try my best to solve the bug or help you with your problem.
Use it for other games / Configuration
If you have a similar problem with another game, you can reconfigure

Simply download the config.properties file and place it next to the
What the properties are for is documented inside the properties file. Click here for a preview of the properties file!
Also, it gives you the possibility to configure your 7-zip install directory.