Had to drop the files from "Classic W I D E B O I REDmods" straight into the Material and Texture Override folder for the game not to crash on launch!?
All Redmod related requirements updated to the latest version and offcourse Material and Texture Override, but by dropping it into Cyberpunk 2077\mods the game crashes.
So for anyone having issues crashing with the Redmod version try this:
No need to copy the info.json file, only copy basegame_nineelevenwideboitarmac.archive to:
Cyberpunk 2077\mods\Material and Texture Override\archives\basegame_nineelevenwideboitarmac.archive
For Marrek's Ride - Porsche 911 Nomad Legend Edition (https://www.nexusmods.com/cyberpunk2077/mods/5433?tab=description)
Cyberpunk 2077\mods\Material and Texture Override\PorscheNomad.json Cyberpunk 2077\mods\Material and Texture Override\archives\basegame__adecals.archive Cyberpunk 2077\mods\Material and Texture Override\archives\basegame_bporschemvptest.archive Cyberpunk 2077\mods\Material and Texture Override\archives\basegame_cblack.archive
I don't understand why you make people 'send message' to you for get some mods files. This is mod community, why don't you just upload file here? That is much simple and much convinient for everyone.
Because that file was a Discord Exclusive, so I directed people there. That file is now available here on Nexus as it is no longer a Discord Exclusive. I understand it was inconvenient but I owed it to the people who taught me how to mod in the first place!
I see, btw nice mod but there is one prob. Like comment below mine, my porsche' colors are still normal. Not black. I installed 911 custom paintjob mod but still not changed. Any solution?
Try renaming the color mod so that it comes before mine in your mod order, that should work but let me know and I can try and send you a file with the black baked in.
Also make sure you have the current Texture Override, without it the car will physically change but not the colors.
I already did. I saw your sticky post. But its still normal. So I changed color mod, and the color came out properly, but textures are...little bit blurry. Can you send the file you mentioned for me?
definitely love this mod. Perhaps maybe in the future an RWB version or even a call to the Belgrade Phantom? the White 911 S Targa? just some ideas for you to chew on. lmao!
The simple black version stays with the default colors and not black. If I put another black paint mod and rename it to load before this one, the car loses steering functionality.
Hmm, try downloading a porsche color pack, there are a few available from other authors- you'll then want to name that archive file with an "a" infront so it loads first, and then your car should be whatever that color file dictates. I know it's not convenient but the people who put the time and effort into making the color mods should get the downloads, yaknow?
wanna download this but hate the green or blue on the metal bars under the car when this mod is installed, why cant they just be black, chrome, or just a regular metal color.
But you simply would not believe how painstaking changing a single color is in this game.. Here's the "simple" step-by-step, (without the complicated diagrams) so you can have a laugh (or hell, take a go at it, it's all below):
Made by Wathon How to change colours/materials in Cyberpunk Table of Contents How to change colours/materials in Cyberpunk............................................................................................. 1 1. Getting started...................................................................................................................................... 2 1.1. About CP77Tools........................................................................................................................... 2 1.2. About 010 Editor and “The Holy Template” ................................................................................ 3 1.3. About Cyber Engine Tweaks......................................................................................................... 4 2. Brief Introduction.................................................................................................................................. 5 2.1. Multilayer Templates (.mltemplate)............................................................................................ 5 2.2. Multilayer Setups (.mlsetup)........................................................................................................ 5 3. Finding the multilayer setup for your mesh ........................................................................................ 6 4. Finding the correct material by using Multilayer Setup...................................................................... 8 4.1. Things you should know before editing colours........................................................................ 10 4.2. Changing the colour in the Multilayer Setup............................................................................. 10 .............................. 12 6. Packing your files................................................................................................................................ 12 7. Colour change results ......................................................................................................................... 13 8. Credits ................................................................................................................................................. 14 (Material swapping still needs testing.) 1. Getting started The basic tools that you need to be able to modify Cyberpunk 2077 are the following: • CP77Tools: https://github.com/WolvenKit/CP77Tools/releases o Search release.zip from the Assets. • 010 Editor: https://www.sweetscape.com/010editor/ o Just download the trial version. There is a script that renews the trial after 30 days in #scripts in the Discord server. • alphaZomega’s CP77_CR2W-template for 010 Editor o (also known as “The Holy Template” -SilverEzredes aka _S1lv3rh4nd.exe) o (Can be found in #scripts in the Discord server). • Cyber Engine Tweaks: https://www.nexusmods.com/cyberpunk2077/mods/107 o You need this. Just go and get it. 1.1. About CP77Tools You can use CP77Tools to extract archives located in your Cyberpunk installation. The path should be something like …\Cyberpunk 2077\archive\pc\content. You will find many archives there and you can extract whatever you like, but the one we’re focusing here is basegame_4_gamedata.archive. Simply run CP77Tools.exe from the file you downloaded and it should open up a console window. There are two ways to extract the archive, which both result in different outcomes. You should, however, do it both ways since you might need files from the other one. Expect the filesize to be around 120GBs once finished. First you can use unbundle -p [Path to the archive]. (Example. unbundle -p “C:\Games\Cyberpunk 2077\archive\pc\content\basegame_4_gamedata.archive”) (Optional: You can use -o to define output folder otherwise it will just extract it to the same folder.) (Example. unbundle -p (Same as above) -o “C:\Games\Cyberpunk 2077\ExtractedGameData”) To put it simply, this method extracts the archive as it is. You’ll receive important files such as .mlsetup, .mltemplate, etc. The extraction for this one won’t take long and it can be expected to be around 8GBs. Second, there’s uncook -p [Path to the archive]. Works similarly as the previous example and also has -o. This command separates the archive’s packed files making them usable. Meaning it will generate new textures from .xbm texture files, such as .dds and .tga, that can be easily modified. It will also generate .buffer files, which are important for this tutorial. This extraction will take long so find yourself something to do while waiting. TIP: This is the straightforward way to do this, but CP77Tools offers more options to extract specific files if you know what you’re looking for. Check their Discord server for more info: https://discord.gg/cp77modding 1.2. About 010 Editor and “The Holy Template” 010 Editor is basically a text editor that can open any kind of file and make it readable for humans with a correct template. Once you’ve downloaded alphaZomega’s template, open the template in 010 Editor: It will open a separate window, but you can just close it for this tutorial. It just displays the template’s coding. Next up, you can open up any file from the archive you just extracted. Once you’ve opened it, go to the same menu as in the picture above and press Run Template (F5). You want to select the one that’s under Open Templates and press Run. It will then give you another windows attached to either down or right side of the editor. You will see a lot of stacked lists, which hold all the information the file has. We mainly want to focus our attention to what’s in the ‘struct DATA’, ‘FILES’ and ‘CNAMES’. The result should look something like this: If you want to change the position of the template’s results, simply right click and select the position. All the changes that we want to make to the file will be made through the template. 1.3. About Cyber Engine Tweaks This is essential and the most important mod for Cyberpunk 2077. Without it you won’t even be able to use mods made by other people. I’m not going to talk too much about it since they have their own wiki explaining everything. Just get the damn thing already! The wiki can be found here: https://wiki.cybermods.net/cyber-engine-tweaks/ 2. Brief Introduction First off, I want to thank Turk645 for discovering the way we can enable our multilayer edits in game. We’ll get to that later, but first we’ll dive into how Cyberpunk 2077 uses their multilayer setups and templates to define colours for their mesh appearances. Then I will teach you how to change a colour of an appearance of t2_097_pma_jacket__holmes_coat.mesh. Please note that I’m not a modeler or an architect, just a simple coder. The following information is just my conclusions of the things that I’ve discovered. You might find more accurate information anywhere else. 2.1. Multilayer Templates (.mltemplate) Some of these files can be found at base\surfaces\materials in your extracted gamedata archive. They exist to compile textures together, keep list of colour CNames and their RGB values, and all other effects. If possible, I recommend not changing information in these files, unless you know what you’re doing. These are basically the source files for all textures in game. Meaning that multiple meshes might use the same .mltemplate in their .mlsetup files and thus by changing .mltemplate, you might end up changing a whole lot more meshes than you originally wanted. 2.2. Multilayer Setups (.mlsetup) These are the files we’re interested in when changing colour/materials. Here’s where a mesh gets their materials and colour CNames as reference from the .mltemplate file path. These files can be found all over the gamedata, sometimes the most random places. They basically compile the .mltemplates into multilayer_layers and define the intensity, contrast, colour and whole bunch of what-nots themselves so changing these values should be enough. These files should be okay to edit because they usually define just one specific mesh’s appearance. 3. Finding the multilayer setup for your mesh For the sake of this tutorial, I will use a mesh, which appearance’s colour I first managed to successfully change. The mesh I’m talking about is located in base\characters\garment\player_equipment\torso\t2_097_jacket__holmes_coat and it will be the male version t2_097_pma_jacket__holmes_coat.mesh that I will be demonstrating. NOTE: You need the uncooked version of this folder and mesh. • Open the mesh with your 010 Editor and use “The Holy Template” on it. Expand the CMesh list and then expand struct Data list and you should see the following: Yes, this is a list of all the appearances that the coat can have. The tricky part is to know how they look. Their name usually gives away something, but once I had a case where appearance was called “red” and appeared as green in game. Anyways, here you can do the basic appearance swapping if you want, but there’s another tutorial for that in the Discord server. That’s not what we’re doing here though. • The appearance’s colour I want to change is called “blue”. It looks like this in game: I don’t like the pink colour that it has on the insides and on the belt. • Next step is to simply count. The first meshMeshAppearance[3] holds masksset, so it’s not considered an appearance. Sometimes there might be an empty meshMeshAppearance before the actual appearances and they usually hold the same masksset data. So, we start counting after it. The “blue” appearance is the 8th item on the list. Keep that in mind. Then comes the tedious part for most meshes, finding the .mlsetup file. The .buffer files in the uncooked folder hold “raw data” and they also hold the file path to the .mlsetup files. For this coat’s case, we’re lucky to have only 5 buffer files, but other meshes can easily have up to 20 buffers. • Find the .buffer file that contains CMaterialInstance lists. Simply open them with 010 Editor and use the template. If you see nothing, or not CMaterialInstances, then move on to next one. For this coat, the buffer file containing this data is t2_097_pma_jacket__holmes_coat.mesh.4.buffer. Once you open it, it should look like this: I’ve already taken the liberty and opened CMaterialInstance[8], because that’s where the “blue” appearance’s .mlsetup’s file path is located. Below FILES you will see imports: First is the .mlsetup file we were looking for, second is .mlmask and third is .xbm. Now simply copy the path and try to locate it in the extracted gamedata files. The path should be something like base\characters\garment\citizen_vagrant\torso\t2_040_hood__homeless\textures\ml_t2_040_blue.mlset up. Changes made to this .mlsetup will affect everyone using the mesh’s appearance, including NPCs. (I believe material swapping is possible through these .buffer files, but I haven’t tested it yet.) • Now that we finally found the .mlsetup, we can start editing it. IMPORTANT: You can only find these .mlsetup files in your unbundled gamedata folder. Not uncooked. 4. Finding the correct material by using Multilayer Setup Open up the .mlsetup file you want and use “The Holy Template” on it. If there’s errors, just press ignore and if it opens up another window (most likely “The Holy Template” code window), just close it. I will open the one I mentioned before, ml_t2_040_blue.mlsetup. You screen should look something like this: I’ve already expanded the struct DATA and the array within it. There you can find the list of all .mltemplates this .mlsetup file uses. Within each of these Multilayer_Layers is a pile of variables and references to CNames that define how the material acts and looks in game. Looks like this: The most important thing here is to locate the materials you want to edit. Now, I don’t know if there’s any better way to do this, but the way I found my correct material by comparing the colorScale values (3eaf77_null = colour CName) to the ones within in .mltemplate. Knowing that my material had pink colour, it wasn’t too difficult to spot in the huge colour Cname list within .mltemplate. Another way to find the right material maybe is to just follow the file path that the Multilayer_Layer has on it’s right side that leads to the .mltemplate file. You will find the texture files there too, but only at your uncooked version of gamedata archive. Then you can just compare them to what you see in game or in model editor or something. I had to open each .mltemplate and check what colour each colourScale CName referred to in .mltemplate. I found out that the pink colour on that coat was on Multilayer_Layer[7], which had a path to base\surfaces\materials\fabric\canvas\canvas_clean_01_30.mltemplate and colorScale CName was 6d0ef7_null, which when looking through the .mltemplate’s list of colorScale CNames can be seen as pink colour. So the .mltemplate looks like this: Again, I’ve expanded the struct DATA and some of its list members. There you can see a list item named array:Multilayer_LayerTemplateOverridesColor[0] | colorScale. Once you expand that, you’ll get a huge list of colour CNames that .mltemplate can have. Thanks to “The Holy Template” you can also see the colour on left hex rows. You can also see how the colour looks when you scroll “The Holy Template” sideways to the right and you’ll see a column “Color” with Bg representing the colour. NOTE: The colour CNames are different for each colour in each .mltemplate. Some might be the same. Here you can compare the colorScale CNames with the ones in the same materials in .mlsetup to see what colours they hold in. Once you’ve found your material that you want to edit, we can proceed to see how they can be edited and for that we’re going to replace the CName in .mlsetup with the colour’s CName in .mltemplate. 4.1. Things you should know before editing colours Most of the data files of Cyberpunk 2077 have fixed size. This means that you can’t add more text within these data files than what they already have. For example, if you’d like to rename a CName within the data, it can’t have more letters than it originally has. The same rule applies to colour changing, unfortunately. This means that, for example, colour with a colourScale CName value of 6d0ef7_null can’t be replaced with a longer colour CName like 57f95c_d42857. It either breaks the game or won’t work at all, and can only be replaced with another one that ends with _null. Making longer texts shorter shouldn’t prove to be a problem. 4.2. Changing the colour in the Multilayer Setup Alright, so what you want to do is pick a colour’s CName from the .mltemplate to replace the colour for a specific material in .mlsetup. I decided to grab 79a684_null, which looks like dark blue, to replace pink colour on my coat mesh’s appearance. Now you should head to the .mlsetup for which you want to apply the colour. Take note of the original colour’s CName in the colorScale. In struct ‘STRINGINDEX Index’ the number 43 is a list number that tells where exactly this value is stored in the CNAMES list. Next, go to the CNAMES list and expand it. You should see a huge list of all CNames used in the .mlsetup. Just scroll down until you find the CName listnumber 43 and you will find your colour’s CName there. It looks something like this: Now can simply double left-click the CName value field and replace it with a new value. I will replace the original 6d0ef7_null colour CName with the new one I picked from .mltemplate, 79a684_null. And you’re done! Now your mesh’s appearance’s material should have new colour in game, but we are not done yet… Now for the most crucial part of this whole tutorial! For this discovery I will once again credit Turk645. Turk645 had discovered a file just under base folder called resource.cooked_mlsetup (so that means in …\base\resource.cooked_mlsetup). You can only find this file in your unbundled version of gamedata archive! If you’ve been wondering why your colour/material edits haven’t been working you can blame this file! As this file’s name suggests, you will probably find every single .mlsetup file’s data inside it. I believe this file was made by CDPR to speed up graphic loading, but I’m not sure. What I found out is that you can just simply delete all the data within this file and pack it with your colour/material edit mod and the changes you’ve made will become visible in game. You can just simply open it with 010 Editor, CTRL + A, delete all text/data, save and pack it with your mod. It should have the size of 0. This method will just overwrite the existing file in game and force the game to load its .mlsetup files from their original paths. 6. Packing your files Once you’ve made your edits, you’ll have to mimic the folder structure that the gamedata archives uses. Since I edited ml_t2_040_blue.ml_setup file, I need to place it inside textures folder that has the following path: …\MyMod\base\characters\garment\citizen_vagrant\torso\t2_040_hood__homeless\textures. Once you’ve created that, you can simply use CP77Tool’s command pack -p [Path to file] (In this example, it’s just pack -p “C:\Games\CyberpunkMods\MyMod”) and it will create a new archive file called basegame_MyMod. Don’t delete the basegame_ from the beginning as the game won’t load it otherwise. Then you simply place it inside your Cyberpunk 2077 installation folder in a path of …\Cyberpunk 2077\archive\pc\patch. Don’t forget to include an empty resource.cooked_mlsetup file with your mod or colour/material swapping won’t work. 7. Colour change results After following my tutorial, you can add the coat with the “blue” appearance that we edited to your inventory with a console command Game.AddToInventory(“Items. Coat_02_basic_01”,1). This is the coat before editing: And this is the coat after editing: Obviously that belt needs to be changed too, but I just wanted to demonstrate this with one colour change! 8. Credits I’ve already mentioned him, but I’ll do it again, Turk645 for discovering the resource.cooked_mlsetup file. Special thanks go to WillyJL, alphaZomega, l2hman, Dobrov and BroerJelle! I also want to thank Discord group “Cyberpunk 2077 Modding” for teaching me how Cyberpunk runs and uses its files, but also for the support and help when I needed it! You guys are awesome


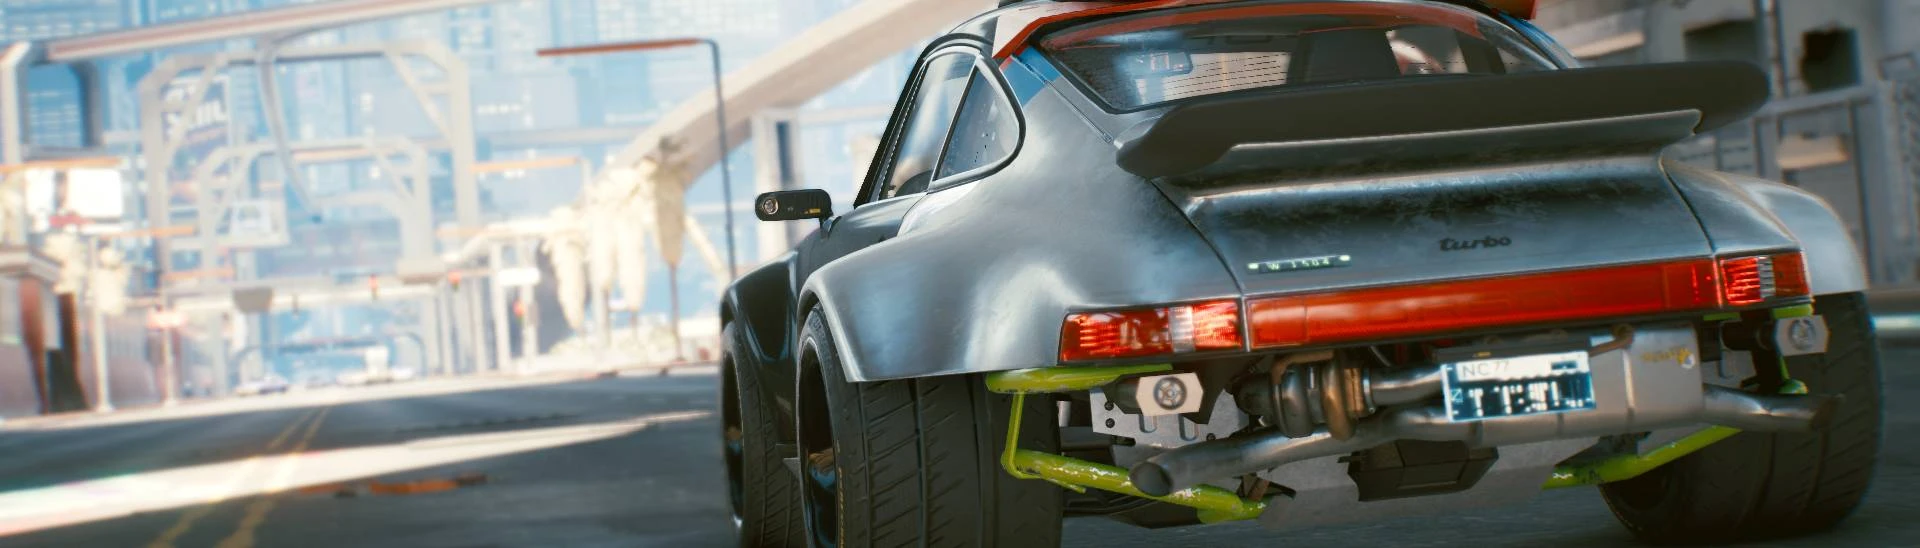
 Badlands W I D E B O I -MK_1")
 Badlands W I D E B O I -MK_1")
")
 Badlands W I D E B O I -MK_1")
 Badlands W I D E B O I -MK_1")
 Badlands W I D E B O I -MK_1")
 Badlands W I D E B O I -MK_1")
 Badlands W I D E B O I -MK_1")
 Badlands W I D E B O I -MK_1")
 Badlands W I D E B O I -MK_1")
 Badlands W I D E B O I -MK_1")
 Badlands W I D E B O I -MK_1")
 Badlands W I D E B O I -MK_1")
 Badlands W I D E B O I -MK_1")
 Badlands W I D E B O I -MK_1")
 Badlands W I D E B O I -MK_1")
 Badlands W I D E B O I -MK_1")
 Badlands W I D E B O I -MK_1")
 Badlands W I D E B O I -MK_1")
 Badlands W I D E B O I -MK_1")
 Badlands W I D E B O I -MK_1")
 Badlands W I D E B O I -MK_1")
")
")
")
")
")
")
")
")
")
56 comments
ALSO MAKE SURE YOU HAVE THE NEW TEXTURE OVERRIDE, THE NO LONGER SUPPORTED ONE IS NO LONGER SUPPORTED (duh?)
(930) Badlands W I D E B O I -MK_1 looks great but needs an upgrade and converting it to convertible would be the icing on the cake.
It's the only thing missing from this great Porsche.
Best Regards and have a great day.
All Redmod related requirements updated to the latest version and offcourse Material and Texture Override, but by dropping it into Cyberpunk 2077\mods the game crashes.
So for anyone having issues crashing with the Redmod version try this:
No need to copy the info.json file, only copy basegame_nineelevenwideboitarmac.archive to:
Cyberpunk 2077\mods\Material and Texture Override\archives\basegame_nineelevenwideboitarmac.archive
For Marrek's Ride - Porsche 911 Nomad Legend Edition (https://www.nexusmods.com/cyberpunk2077/mods/5433?tab=description)
Cyberpunk 2077\mods\Material and Texture Override\PorscheNomad.json
Cyberpunk 2077\mods\Material and Texture Override\archives\basegame__adecals.archive
Cyberpunk 2077\mods\Material and Texture Override\archives\basegame_bporschemvptest.archive
Cyberpunk 2077\mods\Material and Texture Override\archives\basegame_cblack.archive
This is mod community, why don't you just upload file here? That is much simple and much convinient for everyone.
Like comment below mine, my porsche' colors are still normal. Not black.
I installed 911 custom paintjob mod but still not changed. Any solution?
Also make sure you have the current Texture
Override, without it the car will physically change but not the colors.
But you simply would not believe how painstaking changing a single color is in this game.. Here's the "simple" step-by-step, (without the complicated diagrams) so you can have a laugh (or hell, take a go at it, it's all below):
Made by Wathon How to change colours/materials in Cyberpunk
Table of Contents
How to change colours/materials in Cyberpunk............................................................................................. 1
1. Getting started...................................................................................................................................... 2
1.1. About CP77Tools........................................................................................................................... 2
1.2. About 010 Editor and “The Holy Template” ................................................................................ 3
1.3. About Cyber Engine Tweaks......................................................................................................... 4
2. Brief Introduction.................................................................................................................................. 5
2.1. Multilayer Templates (.mltemplate)............................................................................................ 5
2.2. Multilayer Setups (.mlsetup)........................................................................................................ 5
3. Finding the multilayer setup for your mesh ........................................................................................ 6
4. Finding the correct material by using Multilayer Setup...................................................................... 8
4.1. Things you should know before editing colours........................................................................ 10
4.2. Changing the colour in the Multilayer Setup............................................................................. 10
.............................. 12
6. Packing your files................................................................................................................................ 12
7. Colour change results ......................................................................................................................... 13
8. Credits ................................................................................................................................................. 14
(Material swapping still needs testing.)
1. Getting started
The basic tools that you need to be able to modify Cyberpunk 2077 are the following:
• CP77Tools: https://github.com/WolvenKit/CP77Tools/releases
o Search release.zip from the Assets.
• 010 Editor: https://www.sweetscape.com/010editor/
o Just download the trial version. There is a script that renews the trial after 30 days in
#scripts in the Discord server.
• alphaZomega’s CP77_CR2W-template for 010 Editor
o (also known as “The Holy Template” -SilverEzredes aka _S1lv3rh4nd.exe)
o (Can be found in #scripts in the Discord server).
• Cyber Engine Tweaks: https://www.nexusmods.com/cyberpunk2077/mods/107
o You need this. Just go and get it.
1.1. About CP77Tools
You can use CP77Tools to extract archives located in your Cyberpunk installation. The path should be
something like …\Cyberpunk 2077\archive\pc\content. You will find many archives there and you can
extract whatever you like, but the one we’re focusing here is basegame_4_gamedata.archive. Simply run
CP77Tools.exe from the file you downloaded and it should open up a console window.
There are two ways to extract the archive, which both result in different outcomes. You should, however,
do it both ways since you might need files from the other one. Expect the filesize to be around 120GBs
once finished.
First you can use unbundle -p [Path to the archive].
(Example. unbundle -p “C:\Games\Cyberpunk 2077\archive\pc\content\basegame_4_gamedata.archive”)
(Optional: You can use -o to define output folder otherwise it will just extract it to the same folder.)
(Example. unbundle -p (Same as above) -o “C:\Games\Cyberpunk 2077\ExtractedGameData”)
To put it simply, this method extracts the archive as it is. You’ll receive important files such as .mlsetup,
.mltemplate, etc. The extraction for this one won’t take long and it can be expected to be around 8GBs.
Second, there’s uncook -p [Path to the archive]. Works similarly as the previous example and also has -o.
This command separates the archive’s packed files making them usable. Meaning it will generate new
textures from .xbm texture files, such as .dds and .tga, that can be easily modified. It will also generate
.buffer files, which are important for this tutorial. This extraction will take long so find yourself something
to do while waiting.
TIP: This is the straightforward way to do this, but CP77Tools offers more options to extract specific files if
you know what you’re looking for.
Check their Discord server for more info: https://discord.gg/cp77modding
1.2. About 010 Editor and “The Holy Template”
010 Editor is basically a text editor that can open any kind of file and make it readable for humans with a
correct template. Once you’ve downloaded alphaZomega’s template, open the template in 010 Editor:
It will open a separate window, but you can just close it for this tutorial. It just displays the template’s
coding. Next up, you can open up any file from the archive you just extracted.
Once you’ve opened it, go to the same menu as in the picture above and press Run Template (F5).
You want to select the one that’s under Open Templates and press Run. It will then give you another
windows attached to either down or right side of the editor.
You will see a lot of stacked lists, which hold all the information the file has. We mainly want to focus our
attention to what’s in the ‘struct DATA’, ‘FILES’ and ‘CNAMES’. The result should look something like this:
If you want to change the position of the template’s results, simply right click and select the position.
All the changes that we want to make to the file will be made through the template.
1.3. About Cyber Engine Tweaks
This is essential and the most important mod for Cyberpunk 2077. Without it you won’t even be able to use
mods made by other people. I’m not going to talk too much about it since they have their own wiki
explaining everything. Just get the damn thing already!
The wiki can be found here: https://wiki.cybermods.net/cyber-engine-tweaks/
2. Brief Introduction
First off, I want to thank Turk645 for discovering the way we can enable our multilayer edits in game. We’ll
get to that later, but first we’ll dive into how Cyberpunk 2077 uses their multilayer setups and templates to
define colours for their mesh appearances.
Then I will teach you how to change a colour of an appearance of t2_097_pma_jacket__holmes_coat.mesh.
Please note that I’m not a modeler or an architect, just a simple coder. The following information is just my
conclusions of the things that I’ve discovered. You might find more accurate information anywhere else.
2.1. Multilayer Templates (.mltemplate)
Some of these files can be found at base\surfaces\materials in your extracted gamedata archive. They exist
to compile textures together, keep list of colour CNames and their RGB values, and all other effects.
If possible, I recommend not changing information in these files, unless you know what you’re doing.
These are basically the source files for all textures in game. Meaning that multiple meshes might use the
same .mltemplate in their .mlsetup files and thus by changing .mltemplate, you might end up changing a
whole lot more meshes than you originally wanted.
2.2. Multilayer Setups (.mlsetup)
These are the files we’re interested in when changing colour/materials. Here’s where a mesh gets their
materials and colour CNames as reference from the .mltemplate file path. These files can be found all over
the gamedata, sometimes the most random places. They basically compile the .mltemplates into
multilayer_layers and define the intensity, contrast, colour and whole bunch of what-nots themselves so
changing these values should be enough.
These files should be okay to edit because they usually define just one specific mesh’s appearance.
3. Finding the multilayer setup for your mesh
For the sake of this tutorial, I will use a mesh, which appearance’s colour I first managed to successfully
change. The mesh I’m talking about is located in
base\characters\garment\player_equipment\torso\t2_097_jacket__holmes_coat and it will be the male
version t2_097_pma_jacket__holmes_coat.mesh that I will be demonstrating.
NOTE: You need the uncooked version of this folder and mesh.
• Open the mesh with your 010 Editor and use “The Holy Template” on it. Expand the CMesh list and
then expand struct Data list and you should see the following:
Yes, this is a list of all the appearances that the coat can have. The tricky part is to know how they look.
Their name usually gives away something, but once I had a case where appearance was called “red” and appeared as green in game.
Anyways, here you can do the basic appearance swapping if you want, but there’s another tutorial for that
in the Discord server. That’s not what we’re doing here though.
• The appearance’s colour I want to change is called “blue”. It looks like this in game:
I don’t like the pink colour that it has on the insides and on the belt.
• Next step is to simply count. The first meshMeshAppearance[3] holds masksset, so it’s not
considered an appearance. Sometimes there might be an empty meshMeshAppearance before the
actual appearances and they usually hold the same masksset data. So, we start counting after it.
The “blue” appearance is the 8th item on the list. Keep that in mind.
Then comes the tedious part for most meshes, finding the .mlsetup file. The .buffer files in the
uncooked folder hold “raw data” and they also hold the file path to the .mlsetup files. For this coat’s
case, we’re lucky to have only 5 buffer files, but other meshes can easily have up to 20 buffers.
• Find the .buffer file that contains CMaterialInstance lists. Simply open them with 010 Editor and use
the template. If you see nothing, or not CMaterialInstances, then move on to next one. For this
coat, the buffer file containing this data is t2_097_pma_jacket__holmes_coat.mesh.4.buffer. Once
you open it, it should look like this:
I’ve already taken the liberty and opened CMaterialInstance[8], because that’s where the “blue”
appearance’s .mlsetup’s file path is located. Below FILES you will see imports: First is the .mlsetup file we
were looking for, second is .mlmask and third is .xbm. Now simply copy the path and try to locate it in the
extracted gamedata files. The path should be something like
base\characters\garment\citizen_vagrant\torso\t2_040_hood__homeless\textures\ml_t2_040_blue.mlset
up. Changes made to this .mlsetup will affect everyone using the mesh’s appearance, including NPCs.
(I believe material swapping is possible through these .buffer files, but I haven’t tested it yet.)
• Now that we finally found the .mlsetup, we can start editing it.
IMPORTANT: You can only find these .mlsetup files in your unbundled gamedata folder. Not uncooked.
4. Finding the correct material by using Multilayer Setup
Open up the .mlsetup file you want and use “The Holy Template” on it. If there’s errors, just press ignore
and if it opens up another window (most likely “The Holy Template” code window), just close it. I will open
the one I mentioned before, ml_t2_040_blue.mlsetup.
You screen should look something like this:
I’ve already expanded the struct DATA and the array within it. There you can find the list of all .mltemplates
this .mlsetup file uses. Within each of these Multilayer_Layers is a pile of variables and references to
CNames that define how the material acts and looks in game. Looks like this:
The most important thing here is to locate the materials you want to edit. Now, I don’t know if there’s any
better way to do this, but the way I found my correct material by comparing the colorScale values
(3eaf77_null = colour CName) to the ones within in .mltemplate. Knowing that my material had pink colour,
it wasn’t too difficult to spot in the huge colour Cname list within .mltemplate.
Another way to find the right material maybe is to just follow the file path that the Multilayer_Layer has on
it’s right side that leads to the .mltemplate file. You will find the texture files there too, but only at your
uncooked version of gamedata archive. Then you can just compare them to what you see in game or in
model editor or something.
I had to open each .mltemplate and check what colour each colourScale CName referred to in .mltemplate.
I found out that the pink colour on that coat was on Multilayer_Layer[7], which had a path to
base\surfaces\materials\fabric\canvas\canvas_clean_01_30.mltemplate and colorScale CName was
6d0ef7_null, which when looking through the .mltemplate’s list of colorScale CNames can be seen as pink
colour.
So the .mltemplate looks like this:
Again, I’ve expanded the struct DATA and some of its list members. There you can see a list item named
array:Multilayer_LayerTemplateOverridesColor[0] | colorScale. Once you expand that, you’ll get a huge
list of colour CNames that .mltemplate can have. Thanks to “The Holy Template” you can also see the
colour on left hex rows. You can also see how the colour looks when you scroll “The Holy Template”
sideways to the right and you’ll see a column “Color” with Bg representing the colour.
NOTE: The colour CNames are different for each colour in each .mltemplate. Some might be the same.
Here you can compare the colorScale CNames with the ones in the same materials in .mlsetup to see what
colours they hold in.
Once you’ve found your material that you want to edit, we can proceed to see how they can be edited and
for that we’re going to replace the CName in .mlsetup with the colour’s CName in .mltemplate.
4.1. Things you should know before editing colours
Most of the data files of Cyberpunk 2077 have fixed size. This means that you can’t add more text within
these data files than what they already have. For example, if you’d like to rename a CName within the
data, it can’t have more letters than it originally has. The same rule applies to colour changing,
unfortunately.
This means that, for example, colour with a colourScale CName value of 6d0ef7_null can’t be replaced with
a longer colour CName like 57f95c_d42857. It either breaks the game or won’t work at all, and can only be
replaced with another one that ends with _null.
Making longer texts shorter shouldn’t prove to be a problem.
4.2. Changing the colour in the Multilayer Setup
Alright, so what you want to do is pick a colour’s CName from the .mltemplate to replace the colour for a
specific material in .mlsetup. I decided to grab 79a684_null, which looks like dark blue, to replace pink
colour on my coat mesh’s appearance.
Now you should head to the .mlsetup for which you want to apply the colour. Take note of the original
colour’s CName in the colorScale.
In struct ‘STRINGINDEX Index’ the number 43 is a list number that tells where exactly this value is stored in
the CNAMES list.
Next, go to the CNAMES list and expand it. You should see a huge list of all CNames used in the .mlsetup.
Just scroll down until you find the CName listnumber 43 and you will find your colour’s CName there.
It looks something like this:
Now can simply double left-click the CName value field and replace it with a new value. I will replace the
original 6d0ef7_null colour CName with the new one I picked from .mltemplate, 79a684_null.
And you’re done!
Now your mesh’s appearance’s material should have new colour in game, but we are not done yet…
Now for the most crucial part of this whole tutorial!
For this discovery I will once again credit Turk645.
Turk645 had discovered a file just under base folder called resource.cooked_mlsetup (so that means in
…\base\resource.cooked_mlsetup). You can only find this file in your unbundled version of gamedata
archive!
If you’ve been wondering why your colour/material edits haven’t been working you can blame this file!
As this file’s name suggests, you will probably find every single .mlsetup file’s data inside it. I believe this file
was made by CDPR to speed up graphic loading, but I’m not sure.
What I found out is that you can just simply delete all the data within this file and pack it with your
colour/material edit mod and the changes you’ve made will become visible in game. You can just simply
open it with 010 Editor, CTRL + A, delete all text/data, save and pack it with your mod. It should have the
size of 0. This method will just overwrite the existing file in game and force the game to load its .mlsetup
files from their original paths.
6. Packing your files
Once you’ve made your edits, you’ll have to mimic the folder structure that the gamedata archives uses.
Since I edited ml_t2_040_blue.ml_setup file, I need to place it inside textures folder that has the following
path: …\MyMod\base\characters\garment\citizen_vagrant\torso\t2_040_hood__homeless\textures.
Once you’ve created that, you can simply use CP77Tool’s command pack -p [Path to file] (In this example,
it’s just pack -p “C:\Games\CyberpunkMods\MyMod”) and it will create a new archive file called
basegame_MyMod. Don’t delete the basegame_ from the beginning as the game won’t load it otherwise.
Then you simply place it inside your Cyberpunk 2077 installation folder in a path of …\Cyberpunk
2077\archive\pc\patch.
Don’t forget to include an empty resource.cooked_mlsetup file with your mod or colour/material swapping
won’t work.
7. Colour change results
After following my tutorial, you can add the coat with the “blue” appearance that we edited to your
inventory with a console command Game.AddToInventory(“Items. Coat_02_basic_01”,1).
This is the coat before editing: And this is the coat after editing:
Obviously that belt needs to be changed too, but I just wanted to demonstrate this with one colour change!
8. Credits
I’ve already mentioned him, but I’ll do it again, Turk645 for discovering the resource.cooked_mlsetup file.
Special thanks go to WillyJL, alphaZomega, l2hman, Dobrov and BroerJelle!
I also want to thank Discord group “Cyberpunk 2077 Modding” for teaching me how Cyberpunk runs and
uses its files, but also for the support and help when I needed it! You guys are awesome