


0 of 0
<-- What is this mod? -->
There will be addons, startup files setups and models I made for the BG3 modding.
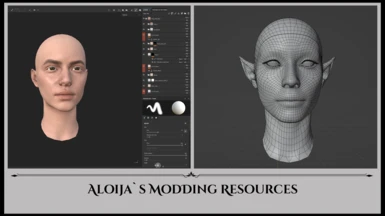
Quadrangulated Face mesh
Manually quadrangulated head, I made for convenient high-poly sculpting with subdivisions. You can shape-key any head of all the races (except the dragonborns) and bodytypes to this mesh to get the quad geometry.
How to use:
Manually quadrangulated head, I made for convenient high-poly sculpting with subdivisions. You can shape-key any head of all the races (except the dragonborns) and bodytypes to this mesh to get the quad geometry.
How to use:
Spoiler:
2. Choose the source head first and then the target head (Quad head).
3. Go to Data tab -> Shape keys, click the little down arrow at the right and click "Join as Shape". You'll get two new lines - the "Basis" and another one with the name of the source head.
4. Choose the second line and set Value to 1.
5. Click the arrow and choose "Apply All Shape Keys"
1. Choose the source head first and then the target head. Go to Weight Paint mode.
2. Click Weights on top -> Transfer Weights. In the panel below set "Source Layers" to "By Name".
Repeat these steps for the tearline, eyeshadow, scalp and ears. Ears don't need weight transfer. Eyes, Mouth and Eyelashes can be from the source model.
Show
Shape Keys:
1. Apply all the transforms on the head you want to use as a base (it will be a source head). 2. Choose the source head first and then the target head (Quad head).
3. Go to Data tab -> Shape keys, click the little down arrow at the right and click "Join as Shape". You'll get two new lines - the "Basis" and another one with the name of the source head.
4. Choose the second line and set Value to 1.
5. Click the arrow and choose "Apply All Shape Keys"
Transferring Weights (not necessary, but recommended):
1. Choose the source head first and then the target head. Go to Weight Paint mode.
2. Click Weights on top -> Transfer Weights. In the panel below set "Source Layers" to "By Name".
Repeat these steps for the tearline, eyeshadow, scalp and ears. Ears don't need weight transfer. Eyes, Mouth and Eyelashes can be from the source model.
Substance Painter skin texturing preset
The preset I made for texturing faces and bodies
!!! Works only with Substance Painter 2023 + !!!
How to use:
!!! Works only with Substance Painter 2023 + !!!
How to use:
Spoiler:
1. Join and merge the head and the ears with the same UV name. (Skip for bodies)
2. Assign to them material named "Head" (for bodies too)
3. Assign to the eyes material named "Eyes" (Skip for bodies)
4. Export the head and the eyes together as .fbx
1. Go to Edit -> Project configuration -> Select
2. Select your .fbx, press OK
3. Choose "Head" in Texture set list.
The colors and shading are not accurate to the game!
Show
In Blender:
1. Join and merge the head and the ears with the same UV name. (Skip for bodies)
2. Assign to them material named "Head" (for bodies too)
3. Assign to the eyes material named "Eyes" (Skip for bodies)
4. Export the head and the eyes together as .fbx
In Substance Painter:
1. Go to Edit -> Project configuration -> Select
2. Select your .fbx, press OK
3. Choose "Head" in Texture set list.
The colors and shading are not accurate to the game!
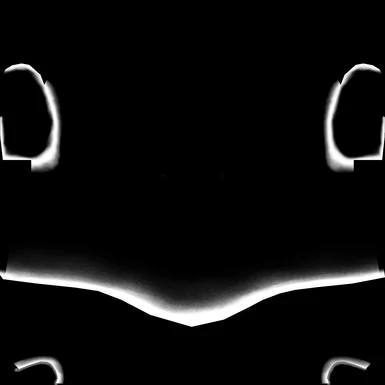
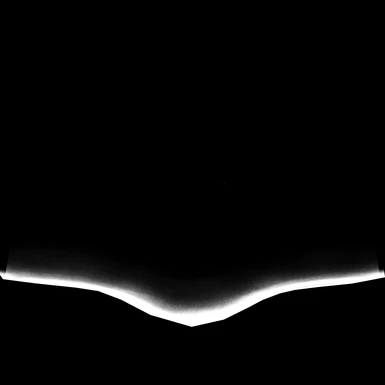
Neck & Seam Mask
I made this to speed up the seam-fixing process.
How to use:
I made this to speed up the seam-fixing process.
How to use:
Spoiler:
1. Layer vanilla texture on top of custom one
2. Throw the mask into the mask layer of the vanilla texture.
You need to do the same for the alpha layer of the texture separately.
Show
1. Layer vanilla texture on top of custom one
2. Throw the mask into the mask layer of the vanilla texture.
You need to do the same for the alpha layer of the texture separately.