


0 of 0


About this mod
This mod edits the mesh of the longsword to have a more reasonably sized handle, this affects the regular longsword, and both the +1 and +2 versions of it.
- Permissions and credits
Notice: As bg3 has now fully released I felt the need to say this mod was made in early access and may have problems, I wont remove the mod just in case someone wants to use it anyway or potentially wants the edited meshes (although they'd probably have an easier time working from scratch as the changes I made were extremely basic and scuffed).
Description:
I've shortened the length of the handle by about a third, made it more oval and added a slight taper to it as well. I used blender as the modelling software and Norbyte's Export Tool to get the meshes from the game.
I'm new to modding, and still learning how to use 3D modelling software so if you have any feedback on issues I caused or ways I could improve I would appreciate it. Also if anyone has any suggestions on other weapons they'd like to see tweaked and in what ways I'd love to hear about that too. :)
How I export and import Baldurs Gate 3 meshes using Norbyte's Export Tool
Some people were curious so I decided to make a short tutorial on the steps I took.
Step 0- Download the Export Tool from here https://github.com/Norbyte/lslib/releases
Step 1- Make a backup and extracted folder, the backup is for the .pak file you want to extract. The extracted folder is for holding the extracted .pak files. You can place these anywhere but I have added them to the BG3 Data folder.
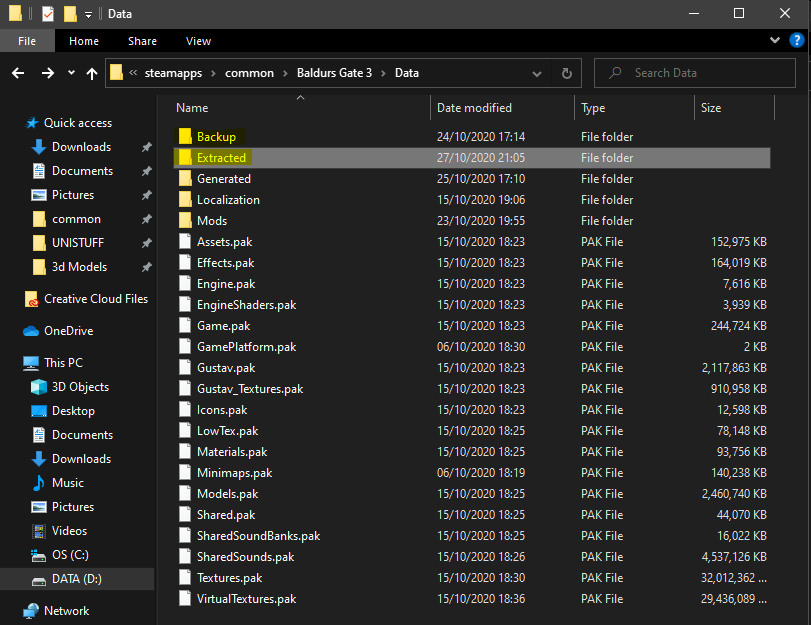
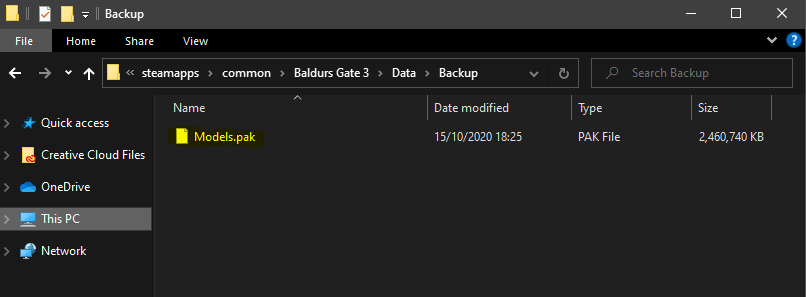
Step 2- Copy the .pak file you want to extract, in this case its Models.pak, and paste it into the Backup folder. Then create a folder in Extracted named after the .pak file you want to extract.

Step 3- Extract the downloaded Export Tool and run ConverterApp.exe.

Step 4- Make sure everything highlighted in the image below is the same for you, if it isn't then change it.

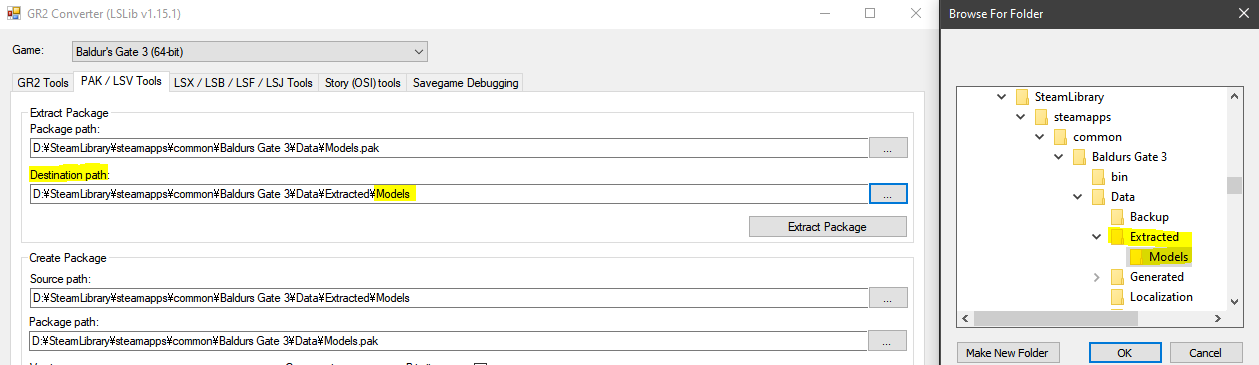
Step 5- Set the package path to the .pak file you want to extract.
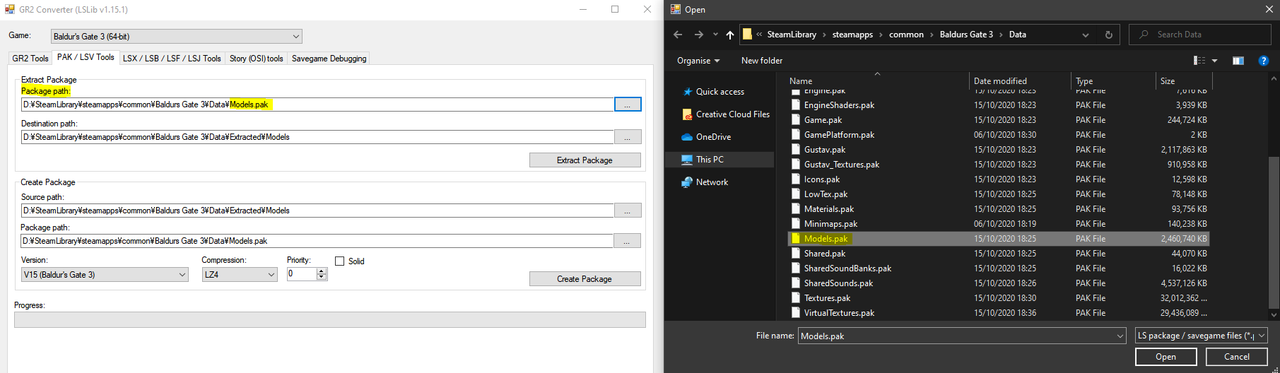
And set the destination path to the folder you created in your extracted folder.
Step 6- Extract the package, and once its done check the models folder in extracted, it should have two folders in it like below.

Step 7- Find the mesh you want to edit and copy it to a separate folder, I make a different folder per mod and another inside that for each mesh.

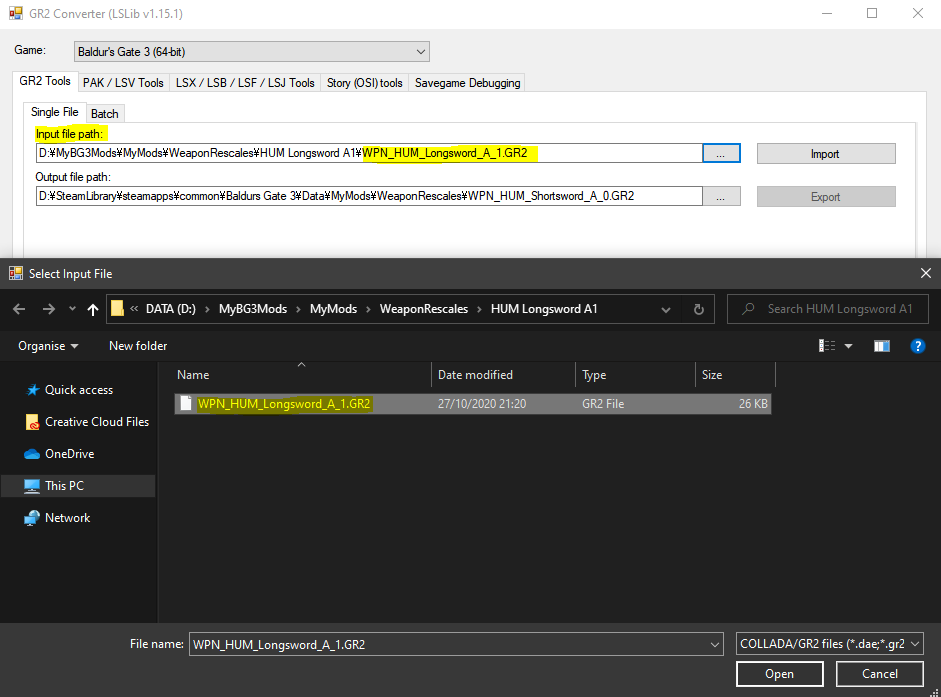
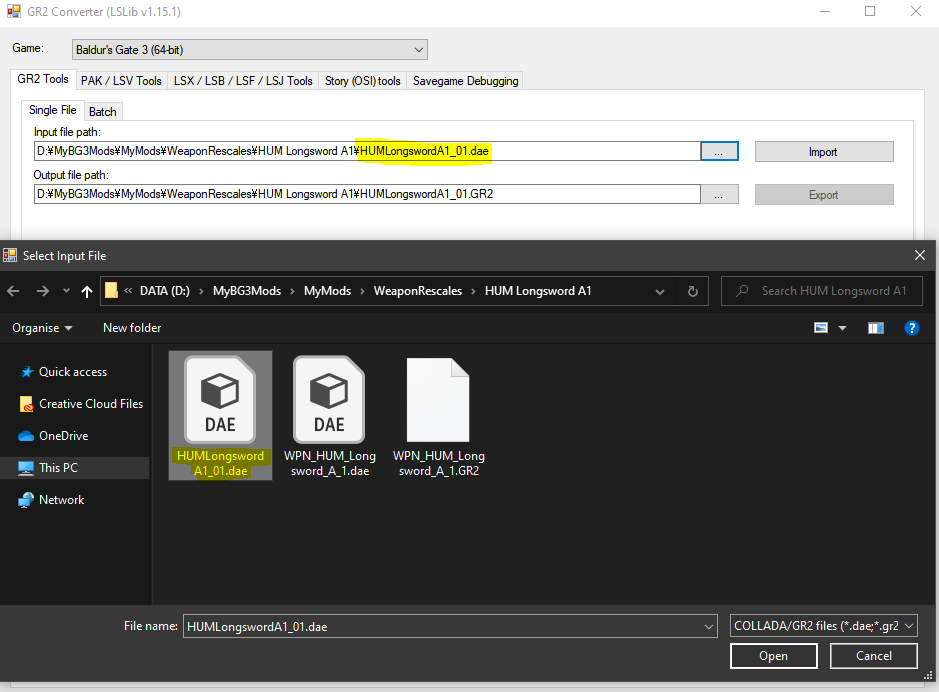
Step 8- Back in your ConverterApp go to the GR2 Tools section and enter a input path. This should lead to the .GR2 file you just pasted.
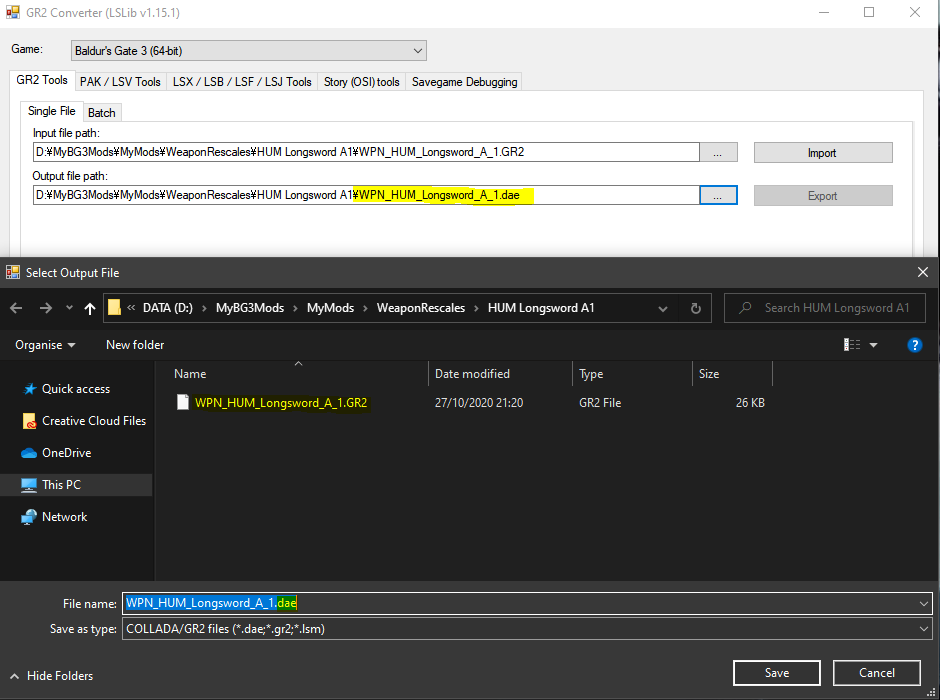
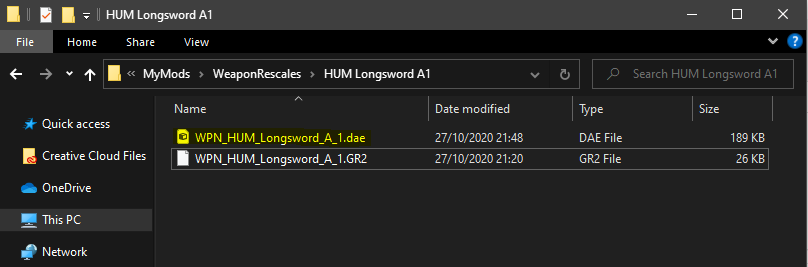
For the output path select the same file but in the file name area delete the '.GR2' at the end and replace it with '.dae' As seen below.
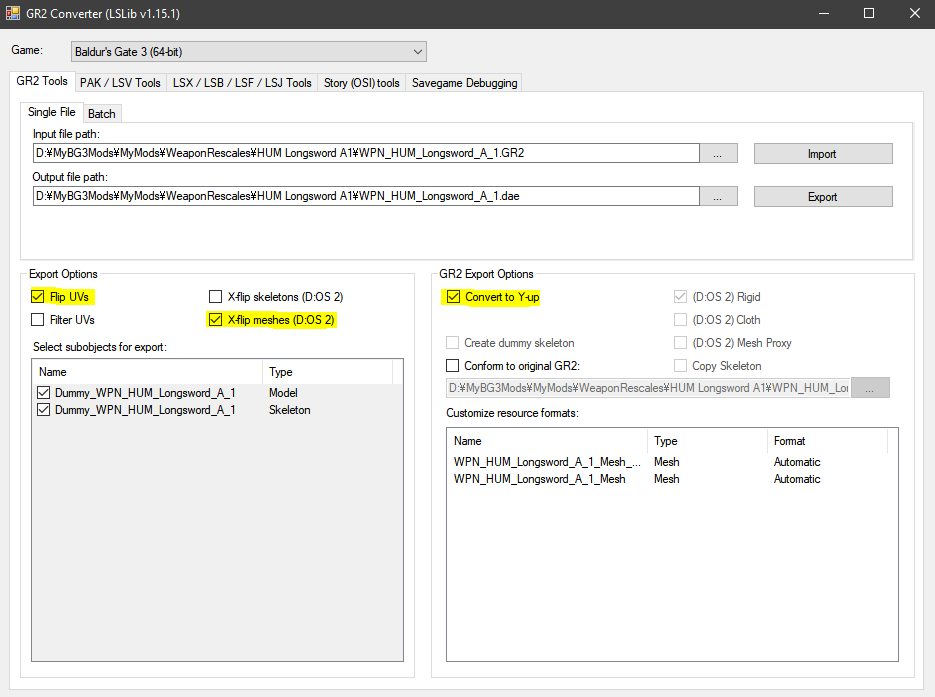
Step 9- Press the Import button, then after its finished make sure the settings highlighted below are the same.
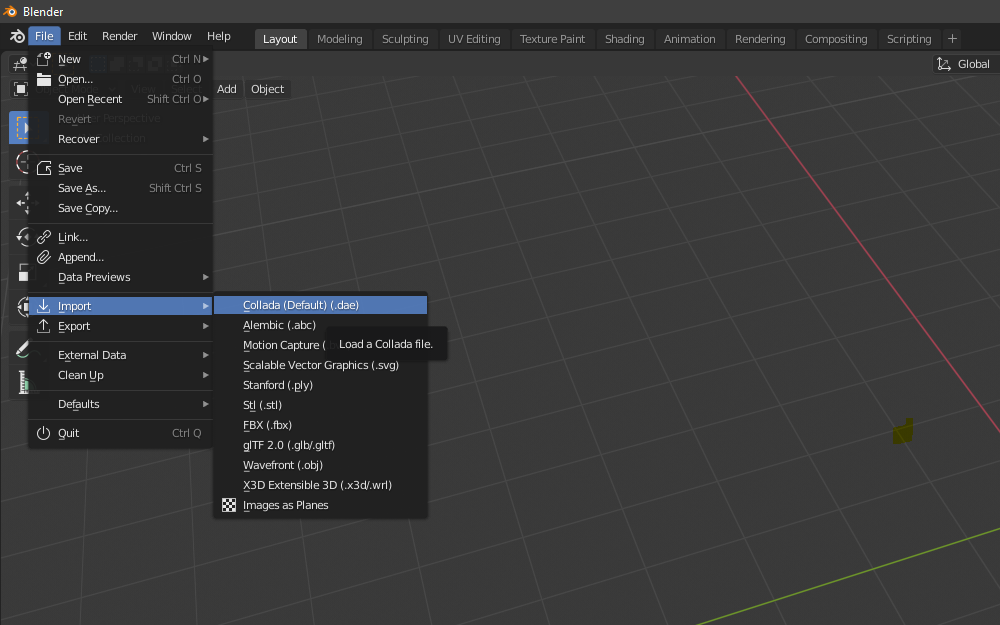
Step 10- Press Export, once its finished you should have a .dae version of the mesh, that can be imported into blender.
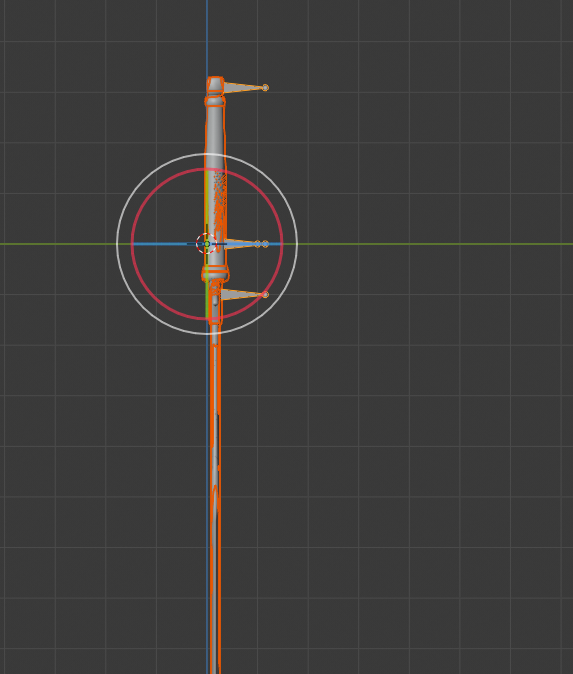
Step 11- Because of blender and GR2 meshes having differences in which of the XYZ axis represent up, exporting the mesh as it is now will cause the issue shown below.
To fix this you just have to rotate the mesh so that the blade of the sword is facing down in blender like so.
Step 12- After making whatever edits you want save and export as a .dae.

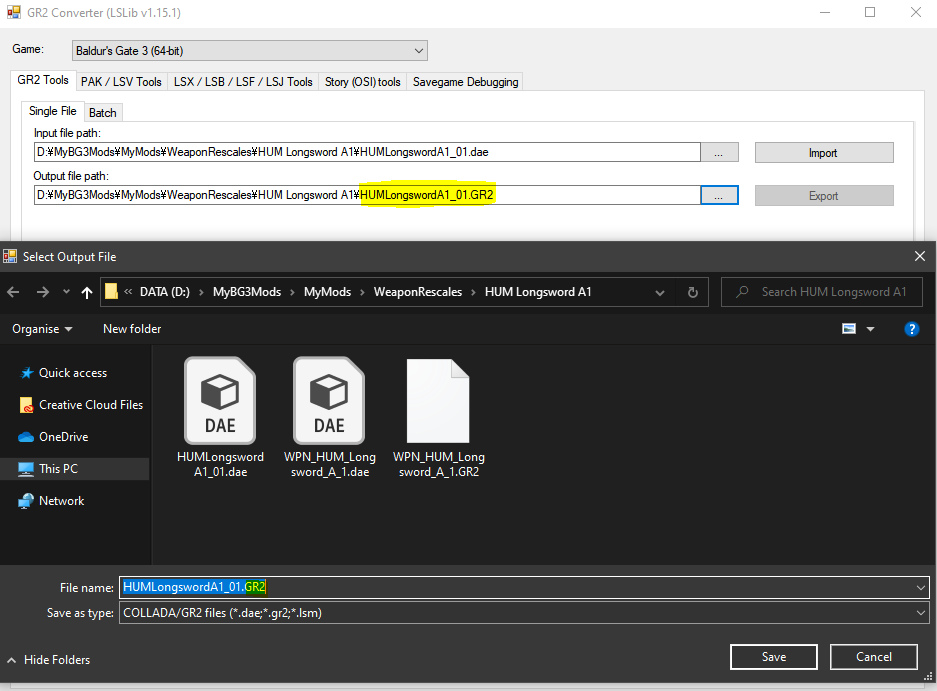
Step 13- Now go back to the ConverterApp and in the input file path select the .dae that you exported from blender.
Then for the Output file path select the same folder, but change the .dae at the bottom to a .GR2 the opposite of what you did before.
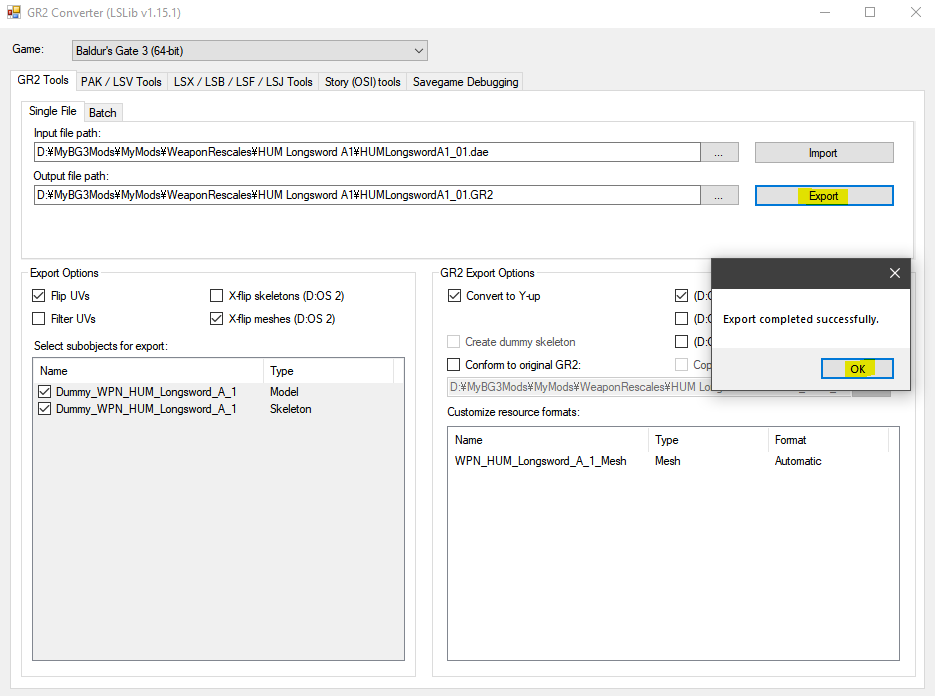
Step 14- Check that the settings are the same as they were when you first converted the GR2 to a dae and then click the export button.
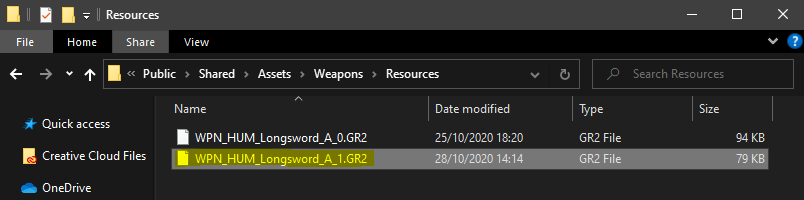
Step 15- create a folder in the Baldurs Gate 3 Data folder called Generated and create the same file path from the generated folder that you took to get to the mesh you've edited. In my instance it was Generated > Public > Shared > Assets > Weapons > Resources.
Copy and paste the new .GR2 file you created into the last folder and then change its name to be exactly like the mesh your replacing. Now the mesh should be visible in game and you can check what it looks like for any issues.
Step 16- Add the Generated folder to an archive and upload it to nexus once you're done and want to share your mod.
Description:
I've shortened the length of the handle by about a third, made it more oval and added a slight taper to it as well. I used blender as the modelling software and Norbyte's Export Tool to get the meshes from the game.
I'm new to modding, and still learning how to use 3D modelling software so if you have any feedback on issues I caused or ways I could improve I would appreciate it. Also if anyone has any suggestions on other weapons they'd like to see tweaked and in what ways I'd love to hear about that too. :)
How I export and import Baldurs Gate 3 meshes using Norbyte's Export Tool
Some people were curious so I decided to make a short tutorial on the steps I took.
Step 0- Download the Export Tool from here https://github.com/Norbyte/lslib/releases
Step 1- Make a backup and extracted folder, the backup is for the .pak file you want to extract. The extracted folder is for holding the extracted .pak files. You can place these anywhere but I have added them to the BG3 Data folder.
Step 2- Copy the .pak file you want to extract, in this case its Models.pak, and paste it into the Backup folder. Then create a folder in Extracted named after the .pak file you want to extract.
Step 3- Extract the downloaded Export Tool and run ConverterApp.exe.
Step 4- Make sure everything highlighted in the image below is the same for you, if it isn't then change it.
Step 5- Set the package path to the .pak file you want to extract.
And set the destination path to the folder you created in your extracted folder.
Step 6- Extract the package, and once its done check the models folder in extracted, it should have two folders in it like below.
Step 7- Find the mesh you want to edit and copy it to a separate folder, I make a different folder per mod and another inside that for each mesh.
Step 8- Back in your ConverterApp go to the GR2 Tools section and enter a input path. This should lead to the .GR2 file you just pasted.
For the output path select the same file but in the file name area delete the '.GR2' at the end and replace it with '.dae' As seen below.
Step 9- Press the Import button, then after its finished make sure the settings highlighted below are the same.
Step 10- Press Export, once its finished you should have a .dae version of the mesh, that can be imported into blender.
Step 11- Because of blender and GR2 meshes having differences in which of the XYZ axis represent up, exporting the mesh as it is now will cause the issue shown below.
To fix this you just have to rotate the mesh so that the blade of the sword is facing down in blender like so.
Step 12- After making whatever edits you want save and export as a .dae.
Step 13- Now go back to the ConverterApp and in the input file path select the .dae that you exported from blender.
Then for the Output file path select the same folder, but change the .dae at the bottom to a .GR2 the opposite of what you did before.
Step 14- Check that the settings are the same as they were when you first converted the GR2 to a dae and then click the export button.
Step 15- create a folder in the Baldurs Gate 3 Data folder called Generated and create the same file path from the generated folder that you took to get to the mesh you've edited. In my instance it was Generated > Public > Shared > Assets > Weapons > Resources.
Copy and paste the new .GR2 file you created into the last folder and then change its name to be exactly like the mesh your replacing. Now the mesh should be visible in game and you can check what it looks like for any issues.
Step 16- Add the Generated folder to an archive and upload it to nexus once you're done and want to share your mod.